My Previous posts on reto-computing were dealing with emulating old 8-bit and 16-bit computers and consoles. That’s is what indeed triggered a bit of retro-gaming and retro-computing addiction. And, of course, like any addiction, I wanted more !
So it was time to go one step further, with the real stuff: sourcing old computers and giving them a new life, just for the fun of it !
![]()
tHE RETRO-COMPUTING COMMUNITY
I have been using messing with computers, software and networks for over 40 years now. I have been contributing (unfortunately less and less actively) to various open-source projects for 30 years. For more than 20 years, I have been happily working in the IT sector. I held various positions as Consultant, CTO, IT expert, Senior Security & Architect Lead, and now VP Technology & Research. I had the chance to explore a wide variety of IT subjects, from software design up to quantum computing and data marketplaces.
From my days as a particle physicist, I have a some basic electronics knowledge and did quite a bit of soldering while building and experimenting with high energy muon spectrometers in the late 90’s.
But … I am no hardware expert !
So before going any further, I took a look at the retro-computing community materials. I grew quite fond of this community, learning from their videos and skills. I started preparing myself, read a few books, bought the necessary tools and started building a proper bench.
Here are the people I follow the most:
- RMC – The Cave: https://www.youtube.com/c/RMCRetro (and its related site & channels: RMC Extra Caverns & This Week in Retro)
- Mark Fixes Stuff: https://www.youtube.com/c/markfixesstuff
- Jan Beta: https://www.youtube.com/c/JanBeta, https://janbeta.net/videos/
- Adrian’s Digital Basement: https://www.youtube.com/c/adriansdigitalbasement (as well as his second channel)
- Noel’s Retro Lab: https://www.youtube.com/c/NoelsRetroLab, https://noelsretrolab.com
- Mr Lurch’s Things: https://www.youtube.com/c/MrLurchsThings, https://mrlurch.com
- ctr-alt-rees: https://www.youtube.com/c/ctrlaltrees, https://ctrl-alt-rees.com
For french speaking nerds:
- Rodrik Studio: https://www.youtube.com/c/RodrikStudio
sOURCING A SINCLAIR ZX81
Where to start ? I thought I should begin with the very first micro-computer I actually touched and used (at a friend’s, I did not own one myself): a Sinclair ZX81.
I started hunting for one. One not too expensive. One … not too much broken. I am not very familiar with eBay and auctions, so I settled for something easier and maybe more “local”: leboncoin.
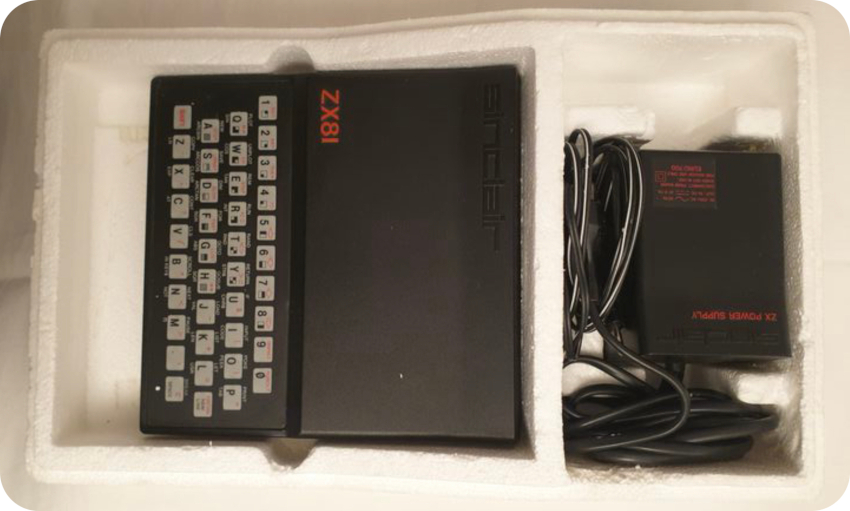
After a couple of weeks, I found a nice one: a ZX81 in good conditions, in its original polystyrene box. It was sold with cables, PSU, a manual, ads, a few cassettes, a third party keyboard, a 16K RAM expansion, an A.G.R. dual joysticks port expansion, and a ZX Printer (in its original polystyrene box, along with its PSU and 3 rolls of aluminum-coated paper).
A vintage treasure, for less than 150 € including shipment ! Deal was done in a matter of hours. Nice.
uNBOXING
I received the package about a week later, and unboxed it almost right away, starting with the polystyrene box that protected its majesty, the ZX81:
Please, note that in this post, I will concentrate on the ZX81 itself, as I haven’t yet worked on the printer, the PSUs nor the expansions.
oPENING UP THE ZX81
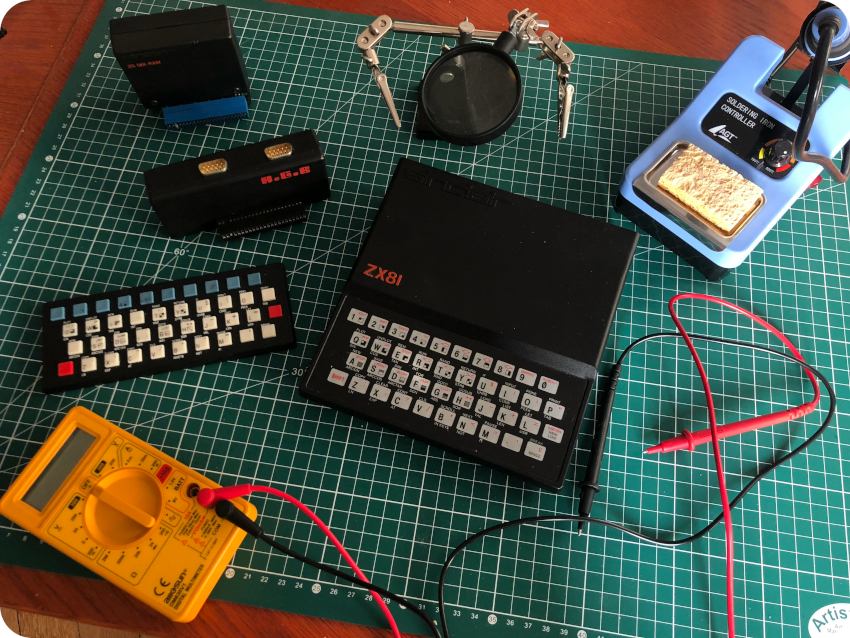
I set up my bench, a bit nervous at the idea of opening the chest of this little vintage fellow:
Everything looked very good from the outside. Just a bit of dirt, and the distinctive smell of objects stored for a long time, maybe in a garage. No signs of corrosion though.
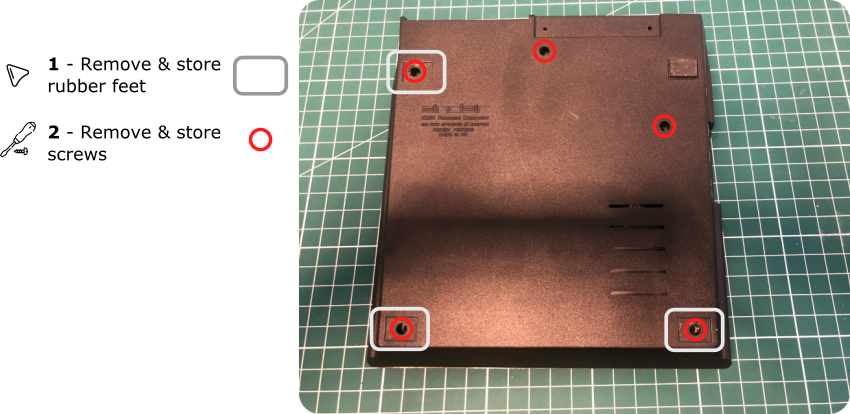
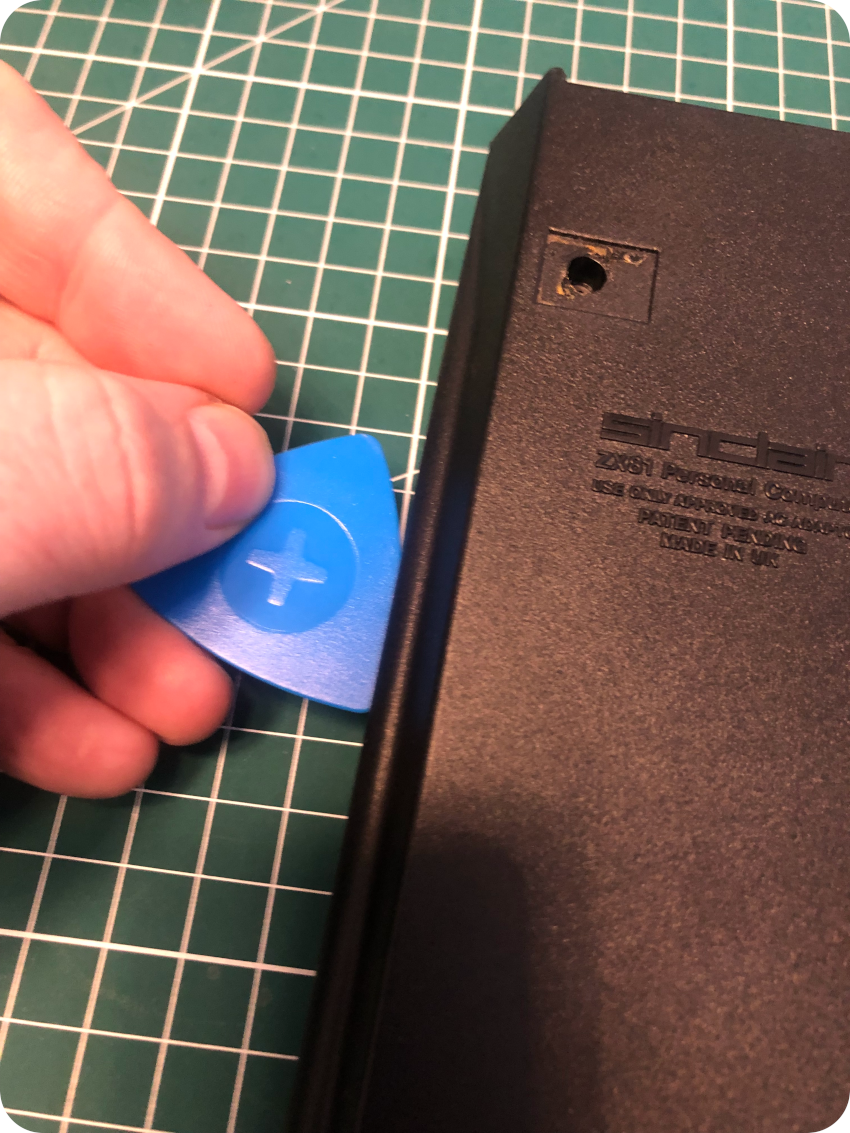
Let’s dig in ! First, let’s flip the ZX81. Then carefully remove and store the 3 rubber feet as well as the 5 screws:
Next, let’s separate the top and the bottom parts of the case with a plastic opening tool (I like the ones from ifixit):
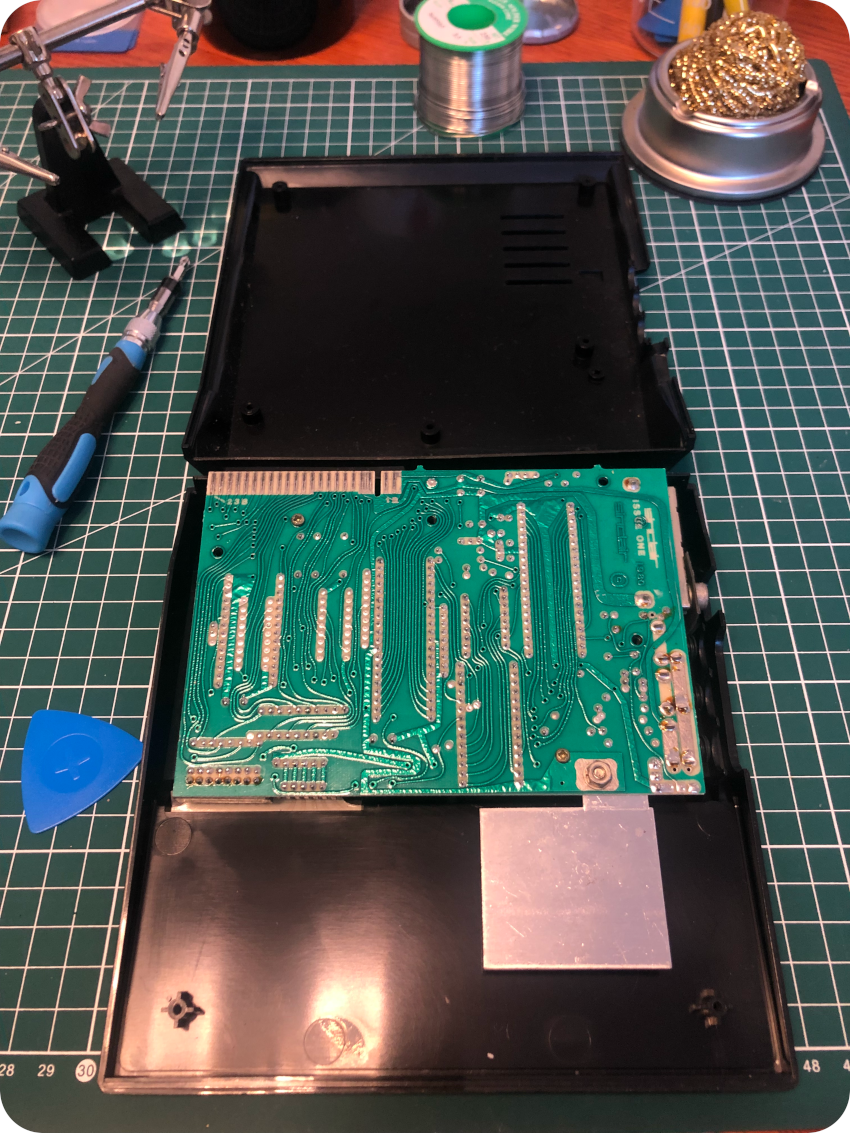
Almost no dust inside, and no signs of corrosion. I must say I was very pleased !
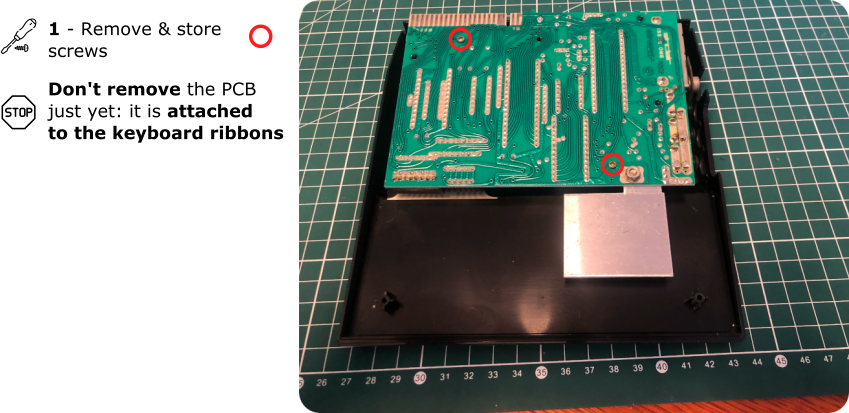
Now it is time to remove the 2 screws from the PCB. But don’t remove yet the PCB from the case ! The PCB is still attached, underneath, to the keyboard ribbons. As time passes, these ribbons become very very fragile !
Gently lift the PCB. You will see a pair of very thin ribbon cables, connecting the keyboard membrane to the PCB. You can grip them close to the connectors, and, very slowly, pull them free. Be careful during this step, the ribbons can break apart very easily.

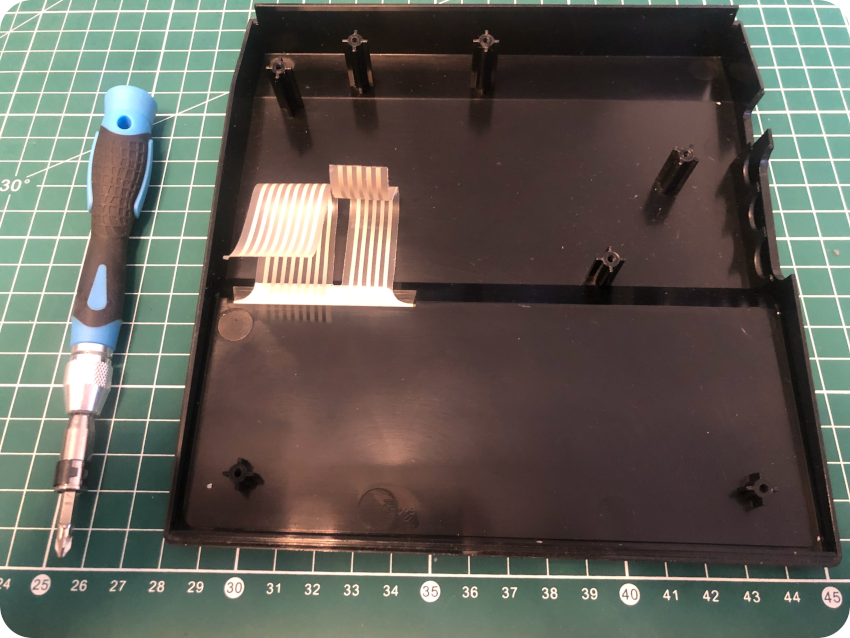
Mine were in very good conditions, and with the help of some sort of miracle (I can be quite clumsy…), I didn’t break them.
In any case, it is easy to find brand new replacement keyboard membranes, for example:
- from ZX Renew (UK): https://zxrenew.co.uk/Sinclair-ZX81-Membrane-p102352920
- from Sintech (DE): https://www.sintech-shop.de/en/zx81-keyboard-membrane/a-7626
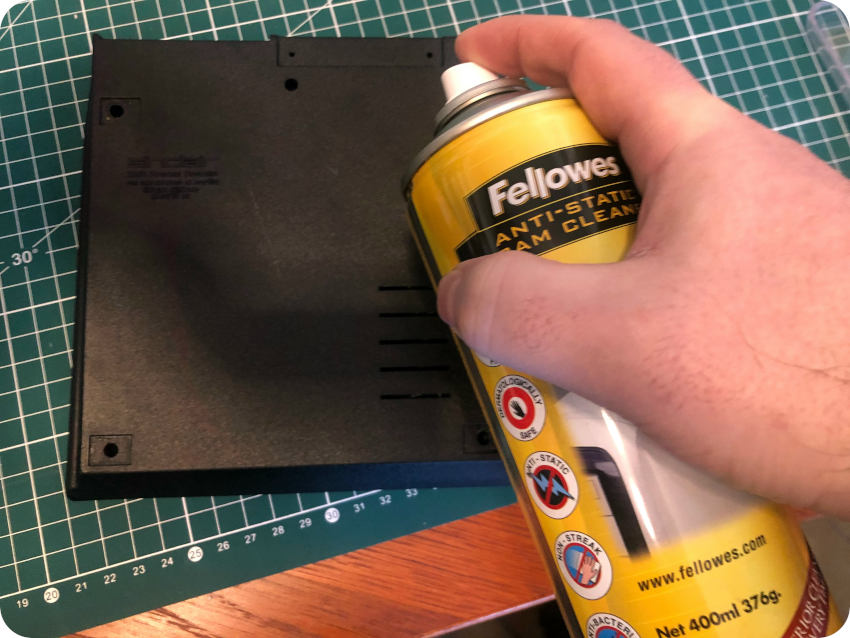
I took the bottom part of the case and gave it a nice soapy bath. Then I used an anti-static cleaner. I cleaned the top part gently with soapy water and a toothbrush, then with the anti-static cleaner and a micro-fiber cloth.
tHE ZX81 PCB
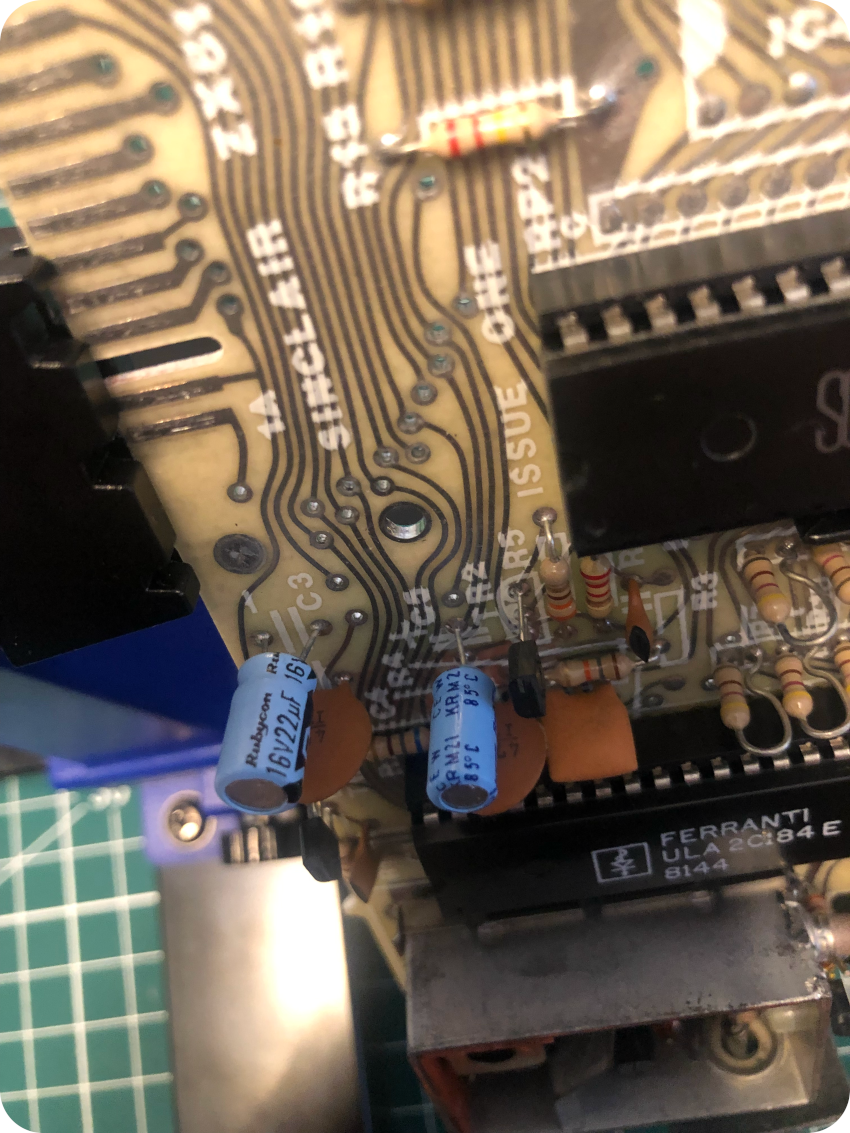
There have been 3 revisions of the Sinclair ZX81 PCB. Mine is revision one. You can tell by looking at the traces on the board: issue 1 traces are curvy, whereas 2 and 3 are straight lines. You can also … just read the “ISSUE ONE” markings next to the microprocessor (not sure it is explicitly written on the other revisions).
Let’s have a more detailed look at the PCB:
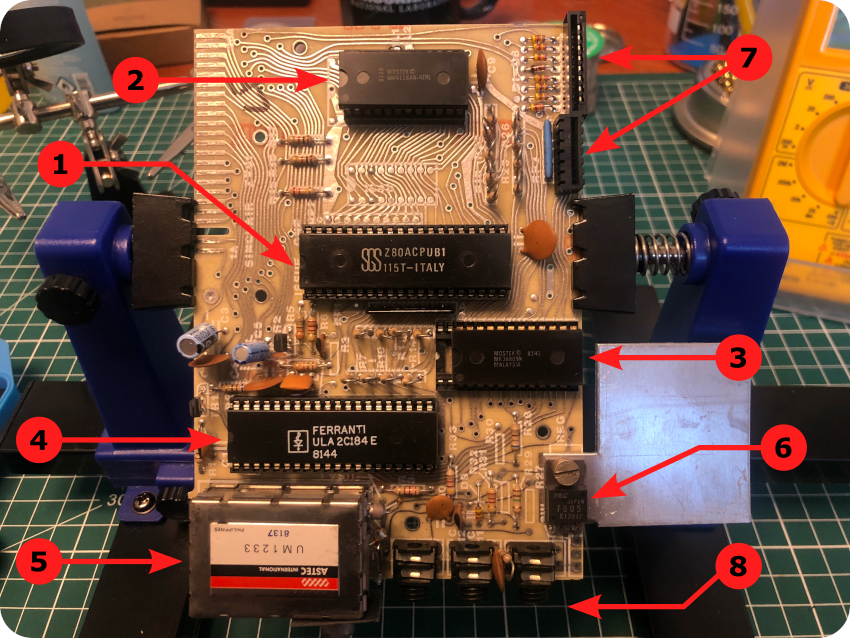
What immediately stroked me is how remarkably simple the board is, with very few IC’s. It is built around:
- Microprocessor: the Sinclair ZX81 uses a 3.25Mhz Zilog Z80 8-bit microprocessor. The one used here is socketed. It was manufactured by SGS (Società Generale Semiconduttori), a former Italian company now merged into the French-Italian semiconductors manufacturer STMicroelectronics
- RAM: the ZX81 had 1Kb of integrated RAM. This memory is provided by either one 4418 chip or two 2218 chips. Here a socketed Mostek (now part of STMicroelectronics) MK4418 chip is used (thus the empty location labelled IC4b, right under the MK4418)
- ROM: the board uses a Mostek MK36809N 8Kb ROM chip, storing the BASIC interpreter
- ULA (Uncommitted Logic Array): it uses a Ferranti ULA 2C184E on which was squeezed a lot of functions, like keyboard activity, display management and processing audio signals used for saving and retrieving data from cassettes. It can get uncomfortably warm during usage
- TV Output Modulator: the board uses an ASTEC International UM 1233 RF Modulator to generate signals for UHF Televisions
- Voltage regulator: the board uses a 7805 voltage regulator manufactured by NEC. It is coupled to a metal square heat sink, as the regulator would get often rather hot
- Keyboard connectors: the ZX81 is equipped with a (quite horrible to use) membrane keyboard, connected to the PCB via two connectors
- Connectors: on the side of the case are located (from left to right) the RF modulator TV Output antenna connector, EAR and MIC connectors (to be connected to a tape recorder), and a 9V DC power jack. Finally, at the back of the case (top/left on the picture) lies a connector slot for expansions (RAM expansion, printer, …)
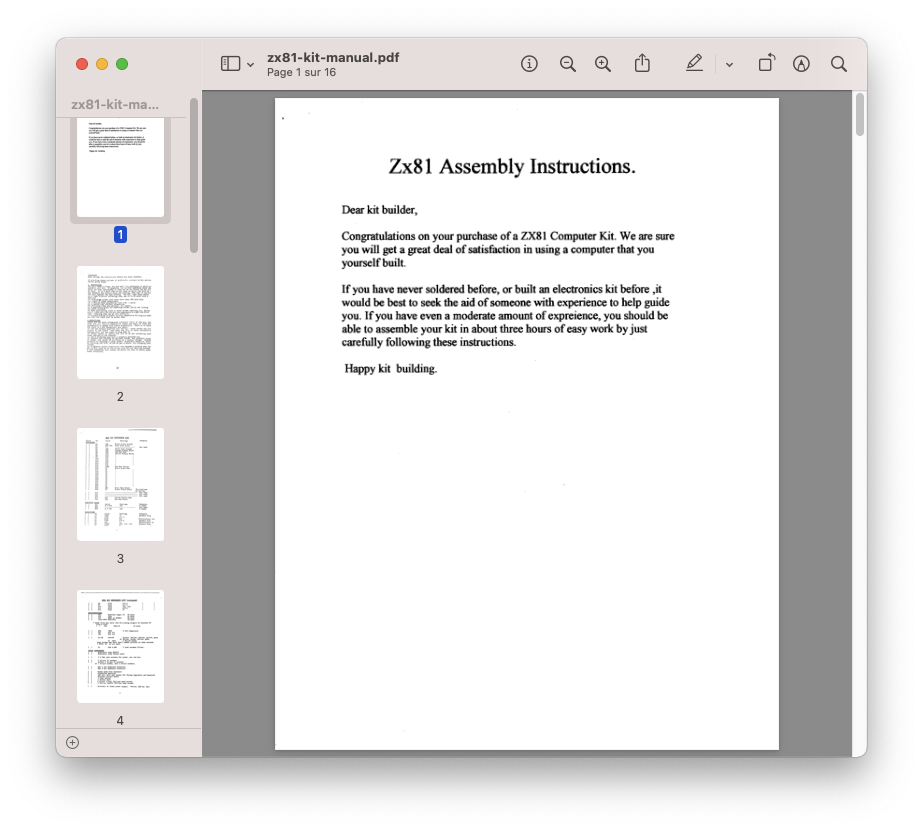
The Sinclair ZX81 was available pre-assembled, but it was also sold as a cheaper kit version, to be assembled. Here is the a copy of the original ZX81 Assembly Instructions [PDF], with a list of components and a few schematics:
iNSPECTING AND CLEANING THE BOARD
The back of the PCB was pretty clean. I inspected it for corrosion, cracks and dry solder joints, then cleaned it with IPA:

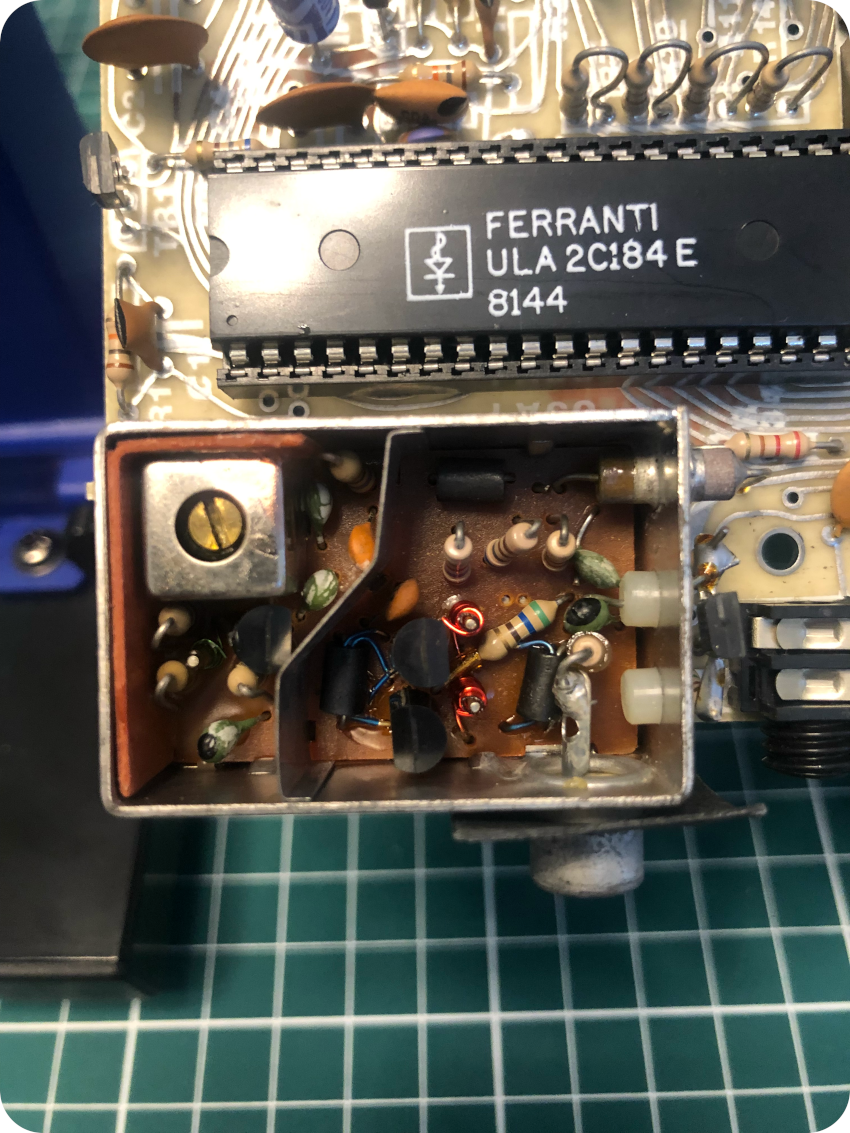
I opened up the RF modulator box, and inspected it for mods. ZX81’s are often modified to add composite video, which helps connecting them to a modern TV with no RF input. None were found:
Then I had a look at the radial electrolytic capacitors, since they tend to fail and leak as time passes, damaging the board. They all looked nice, though I would be reassured to replace them, and thus expanding the lifetime of my new little buddy:
I cleaned the front side of the PCB with IPA and used a contact cleaner, especially insisting on the ribbon connectors:
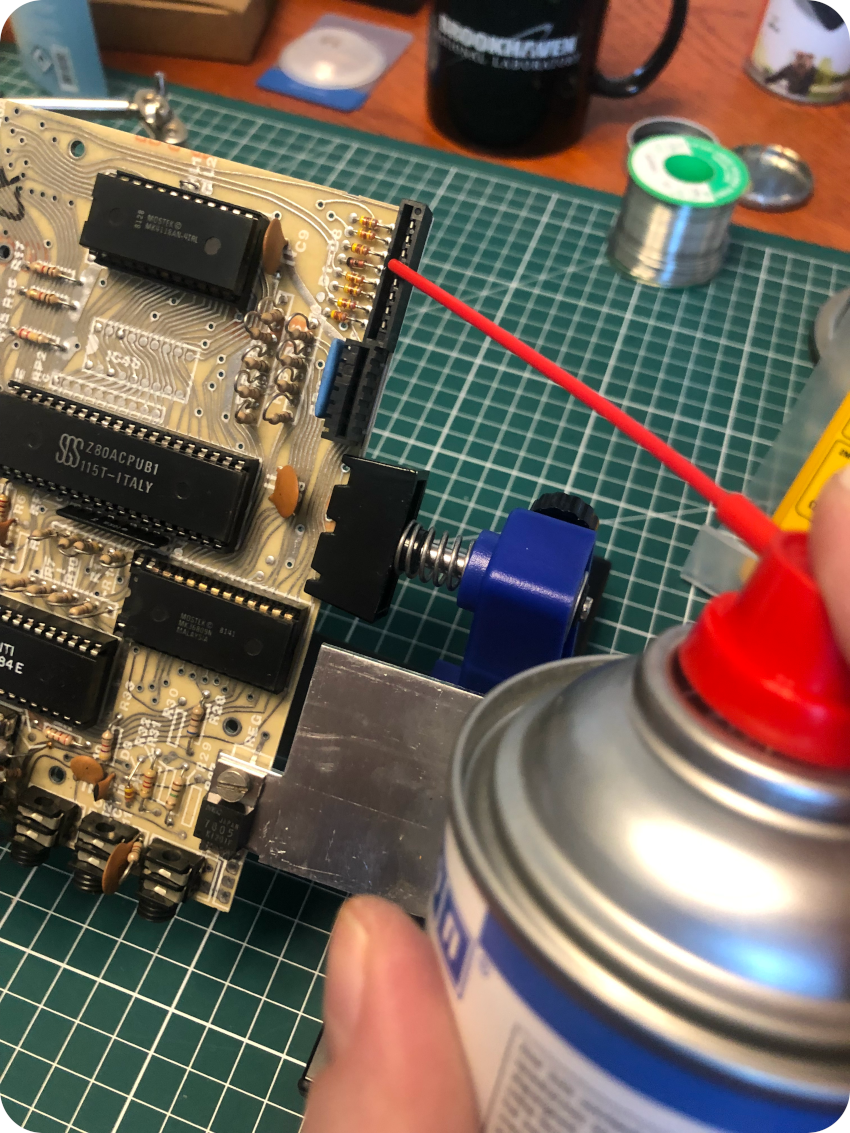
I finished the job by cleaning the expansion slot connector with a toothbrush.
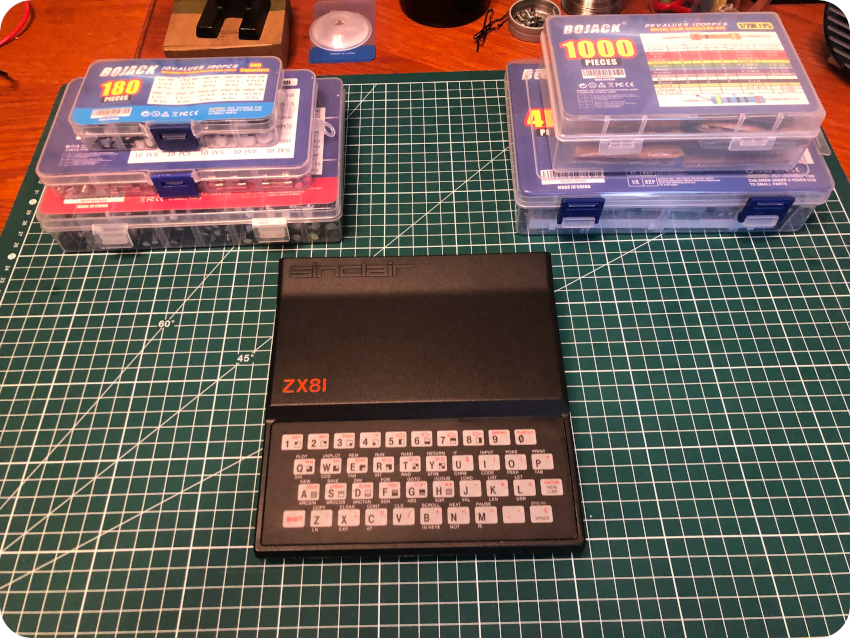
wRAPPING UP THINGS AND NEXT STEPS
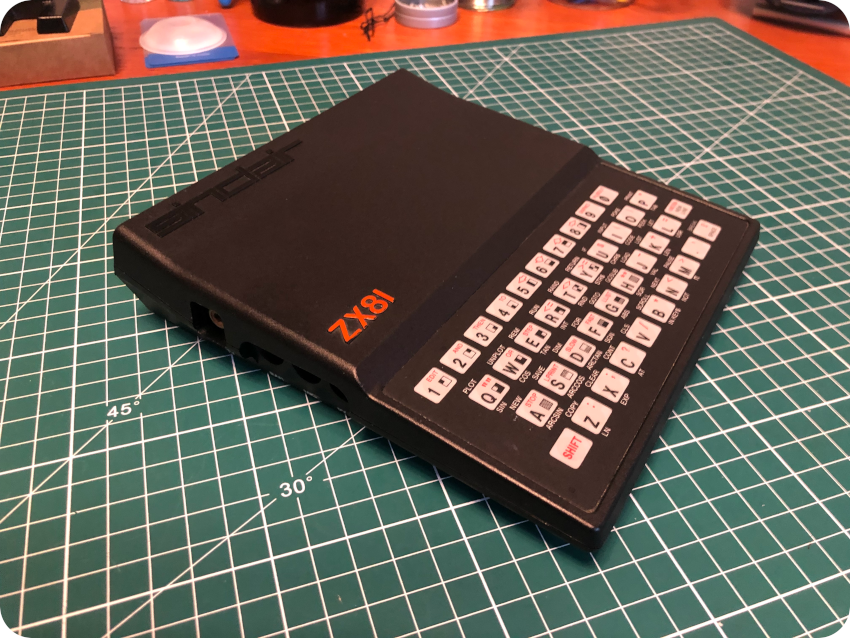
It was time to wrap things up, at least for these first baby steps. I carefully reassembled the ZX81, now all inspected, cleaned up, shiny and smelling good:
Next steps ?
- Cleaning and inspecting the 16K RAM expansion, the joysticks expansion, printer and PSUs (I will probably won’t use them, and use a modern ones instead)
- Recapping the board with new electrolytic capacitors
- (maybe) Adding composite video
- Testing !
I ordered and received a bunch of components for the next steps.
But, in the meantime, I sourced and bought a Sinclair ZX Spectrum, which will be the subject of the next post …