In a previous post, I presented the restoration of an Apple IIc that I acquired a couple of months ago. Since it was my first steps with an Apple II computer, I tried to explore many aspects of it, including null modem communication for bootstrapping, disk image transfer and terminal access to a GNU/Linux gateway.
This made me wonder: how about null modem communication with other vintage computers ?
In this blog post, I will attempt:
- to explore (in general terms) what null modem communication is
- to summarize what I already did with the Apple IIc (null modem cable creation, terminal access to a gateway via VT emulation, and data transfer), extend this work to use virtual drives and explore TCP/IP stacks
- to explore null modem communication for the Atari 1040 STF and the Macintosh Plus (Terminal access, Data Transfer, TCP/IP stack, Web browsing)
![]()
Null Modem communication
Null modem is a communication method to directly connect two devices using an RS-232 serial cable. The term refers to using a crossed-over RS-232 cable to connect the devices directly to one another without a modem. By extension, a null modem cable is a RS-232 serial cable where the transmit and receive lines are cross-linked. In some cables there are also handshake lines cross-linked.
As an example, here is a common wiring diagram for a null modem cable to interconnect two terminals providing full handshake (for DB-9 and DB-25 connectors):
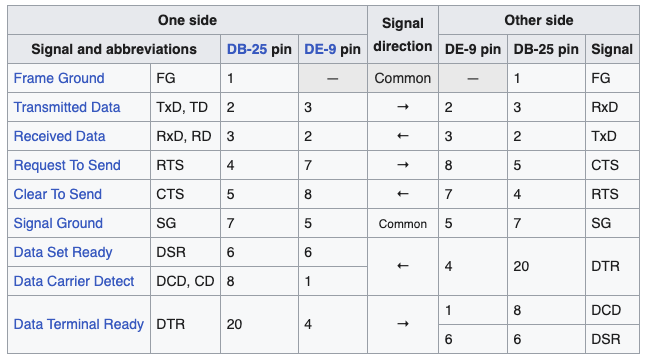
[Table copied from Wikipedia’s page on Null Modem]
Of course, there are many other possible wiring diagrams, depending on the type of connectors (DB-9, DB-25, mini-DIN 8, DIN-5, etc.) and the types of devices on both sides, as well as the type of handshake (no hardware handshake, loop back handshake, partial handshake and full handshake).
The original application of a null modem was to connect two devices directly without using a modem. As the RS-232 standard was adopted by other types of equipment, the scope of applications expanded. Null modems were commonly use for file transfer or remote operations:
- connecting a character-oriented terminal (VT52, VT100, …) to a mainframe computer or a terminal server
- on MS-DOS or MS Windows, using software like Laplink or InterLnk to map a disk of one PC as a network drive on another one, or transfer files between PCs
- on Amiga computer, using a null modem connection as a way of playing multiplayer games between two machines
- etc.
Of course, the availability of faster means of wired communication like Token Ring or Ethernet and – much later on – wireless communication (Wi-Fi, Bluetooth, …) made the use of null modem cable less and less common.
Vintage computers as terminals
In this blog post, I will use three vintage computers as terminals:
- An Apple IIc
- An Atari 1040 STF
- An Apple Macintosh Plus
We will have to use three different null modem cables, because:
- The Apple IIc uses a DIN-5 female connector (thus, a DIN-5 male connector will be needed for this side of the Apple IIc null modem cable)
- The Atari ST uses a DB-25 female connector (thus, a DB-25 male connector will be needed for this side of the Atari ST null modem cable)
- The Macintosh Plus uses a mini DIN-8 female connector (thus, a mini DIN-8 male connector will be needed for this side of the Macintosh Plus modem cable)
To keep thing (more of less) simple, the other end of the null modem cables will be a standard serial female DIN-9 connector.
We will also explore what kind of software will be needed (terminal emulators, specific software to transfer files, communication stacks, …) and explore a few network applications
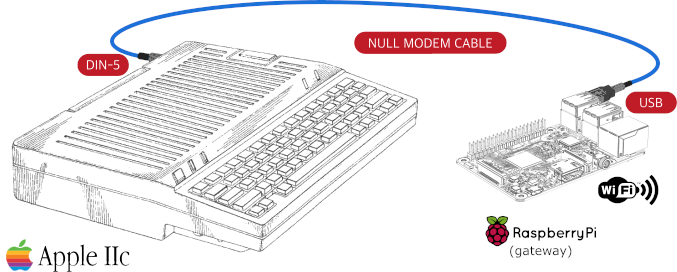
Gateway
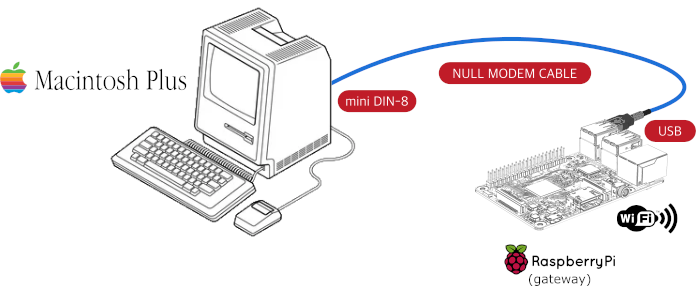
The terminals are only one of the sides of the equations. For our experiments, we will need another computer to which these terminals will be connected to. This device will be referred in this post as the gateway. For its convenience and versatility I will use a GNU/Linux system running on a Raspberry Pi.
The advantage of a GNU/Linux system on a Raspberry Pi, is that it will easy to build and will be portable. Moreover, it will be easy to add and configure the necessary software stacks for our tests.
The disadvantage of this solution … is that today’s computers don’t use old-style serial DIN-9 connectors. In the case of the Raspberry Pi, they use USB ports. So, a male RS232 (DIN-9 male) to USB connector – to which the 3 null modem cables will be hooked – will be required. I used this PL2303RA-based adapter, that was cheap and easy to find online :

Note:
- Raspberry OS recognized this RS232 to USB connector right away (as /dev/ttyUSB0 in my case), no configuration was needed.
- Technical details about the gateway are presented later on, in a dedicated paragraph.
VT terminals and VT emulation
A computer terminal is a device which can be used for entering data into and displaying data from a host computer like a terminal server or a mainframe. A terminal that depends on the host computer for its processing power is often called a “thin client” (or a “dumb terminal“), contrary to “fat clients” (or “smart terminals”) which have significant local capabilities and are able to process data.
In the 40-50’s, early terminals were electromechanical teleprinters/telewriters (often called TTY‘s for TeleTYpewriters). In the late 50’s early 60’s came Video Display Units (VDU), that could displays information on a screen rather than printing text to paper.
Then, in the 70’s came a next generation of VDU’s. They went beyond teletype emulation with an addressable cursor that gave them the ability to render and interact in 2 dimensions rather than line by line.
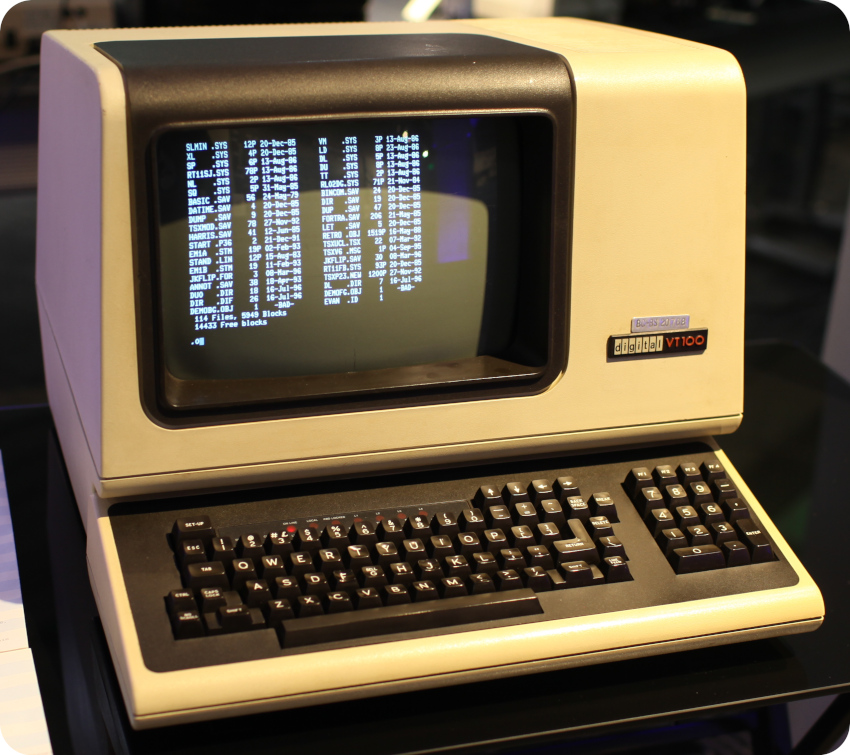
[DEC VT100 terminal, from Wikipedia]
In the late 70’s up to the 80’s emerged standards around character sets (ASCII/ANSI), RS-232 ports and 72 (or 80) columns x 24 (or 25) lines displays with VT52, VT100, VT220 terminals, and termcap / terminfo for Unix-like systems.
I remember, in the early 90’s, as a particle physics student, using VT100 terminals to access VM/CMS virtual machines on CERN‘s or CC-IN2P3‘s IBM mainframes for Fortran / CERNLIB programming and running PAW and GEANT simulations. Later on, I used them to get access to RS/6000 farms. By the end of my PhD, in the late 90’s, these old-school terminals were all replaced by X Terminals, or full Solaris, HP-UX, AIX or GNU/Linux workstations.
For the sake of exploring 80’s computers network capabilities, we will therefore need:
- TTY capabilities on the computer sides, through VT emulation
- “Get TTY” capabilities on the gateway side, via getty
Data transfer
Data transfer over serial cable has been one of the first null modem communication applications. The null modem cable is actually just the physical channel on which data transits. To achieve data transfer, one has to select a protocol: a convention that describe how to transfer data between endpoints, breaking up the original data into series of packets to be sent to the receiver along with additional information to indicated whether packets are correctly received, and, if not, how to manage transmission errors, and so on.
Over the years, many different protocols have been created: XMODEM (1977), Kermit (1981), YMODEM (1985), ZMODEM (1986), etc. Some of these protocols can be proprietary and / or specific to a specific hardware or specific to an operating system.
We will explore a few of these data transfer protocols in this blog post.
TCP/IP over null modem
The Internet Protocol Suite (often referred as TCP/IP) is a framework of communication protocols commonly used nowadays in local networks and in the Internet. Born in the early 70’s, what is now taken for granted is actually quite old (I believe I have to the month the exact same age as the FTP protocol).
A minimal IPv4 suite include the following protocols (IPv6 is a tad more complex): Internet Protocol (IP), Address Resolution Protocol (ARP), Internet Control Message Protocol (ICMP), Transmission Control Protocol (TCP), User Datagram Protocol (UDP), and Internet Group Management Protocol (IGMP).
The Internet protocol suite does not presume any specific hardware or operating system. It only requires that hardware and a software layer exists that is capable of sending and receiving packets on a computer network. Networking capabilities are so important that, nowadays, the suite is implemented on all new system/hardware. This, of course, wasn’t always the case for our beloved vintage computers from the 70’s and 80’s. In this little experiment, I will
- start by exploring whether TCP/IP stacks exists for our 3 systems
- then I will explore whether it can be used over null modem
- if so, I will explorer how far we can use (today’s) common applications like a Web browser
GNU/Linux gateway (Raspberry Pi)
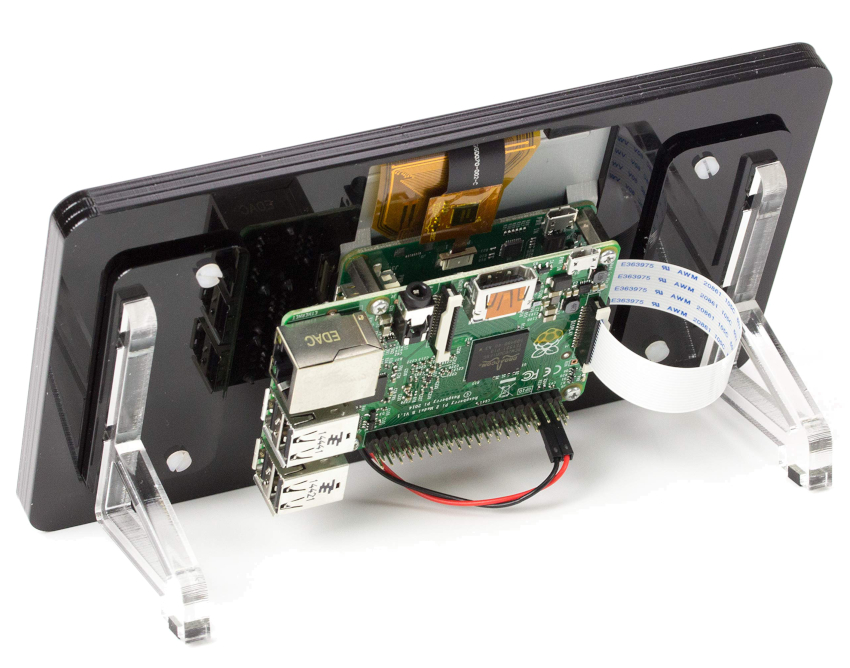
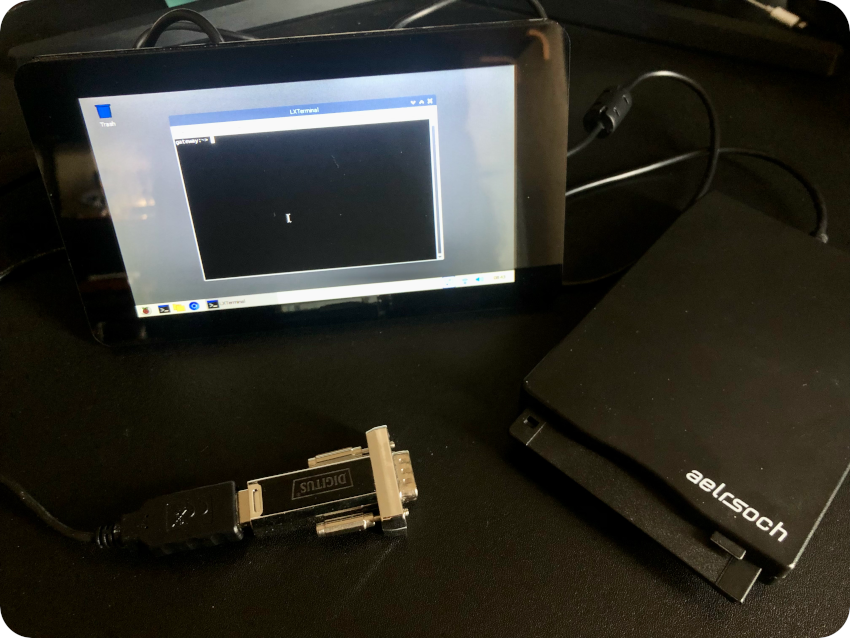
Raspberry Pi’s are unfortunately hard to find and expensive since the global shortage of semiconductor components. It seems thing are getting back to normal (yeah !), but I had the chance to have bought over the years many Raspberry Pi’s. So, to build the GNU/Linux gateway, I resurrected an old Raspberry Pi 2 along with its touchscreen and stand (bought in 2015 on element14 and Pimoroni):
I took a brand new SD card, installed Raspberry OS 11.7 and configured the following hardware setup:
- a cheap Belkin USB WiFi dongle I had handy (configured to get access to my home network and the Internet)
- a USB 3″ floppy disk drive (the one I used to create Atari ST diskettes), on /dev/sda
- a Digitus USB to RS232 adapter (no driver needed, using /dev/ttyUSB0)
On the network service front, to drive remotely the gateway, I configured the Raspberry Pi to launch the following remote access services
- SSHd
- VNCserver
I created a simple account named fred, to be used to log remotely into the gateway and sudo commands. This account has the following configuration:
- defaults using the tcsh shell (I found out it worked better than the default bash shell for most VT emulators)
- a very simple (to avoid mangled characters at the prompt) .tcshc file: set prompt="%M:%~>"
On the software front, I added via apt-get install:
- openJDK Runtime Environment 17.0.7 (for ADTPro, more on this later)
- dosbox 0.74 (for Ghostlink, more on this later)
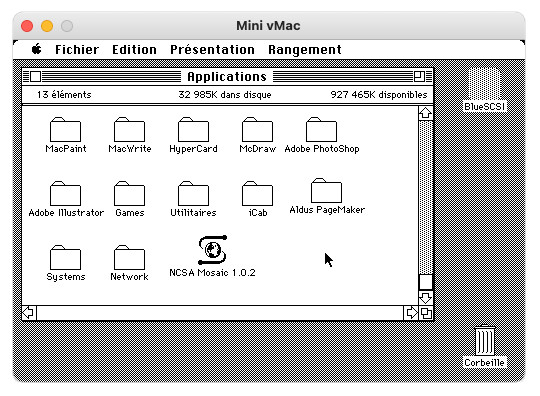
On top of this, I added (for convenience) the Hatari and Mini vMac emulators. These are not required, but they can be handy for testing purposes before experimenting on real hardware.
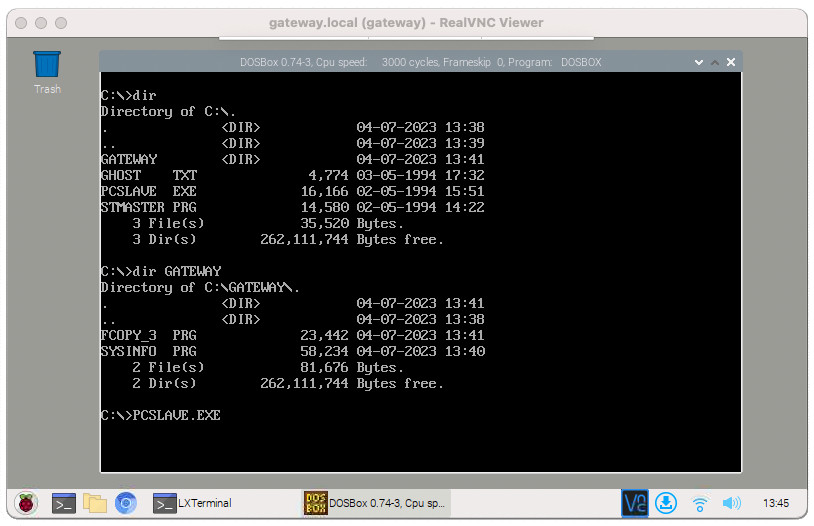
Apple IIc
This part is mainly a summary of the work done in a previous post on an Apple IIc restoration, which contains detailed information. Here is the general setup for the first set of experiments:
- Connect the Apple IIc to the Raspberry Pi via a null modem cable (from the DIN-5 serial port of the Apple IIc to the RS232 adapter, plugged into a USB port on the Raspberry Pi)
- Use the Raspberry Pi as a gateway for internet access
The null modem cable plugs into the 2nd serial port of the Apple IIc (IN#2):
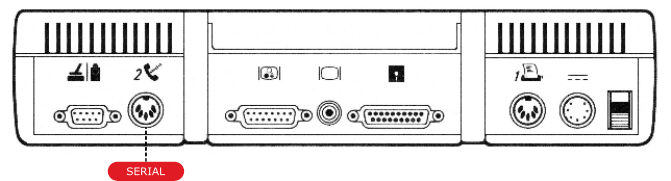
The first thing is therefore to get a proper null modem cable for Apple IIc
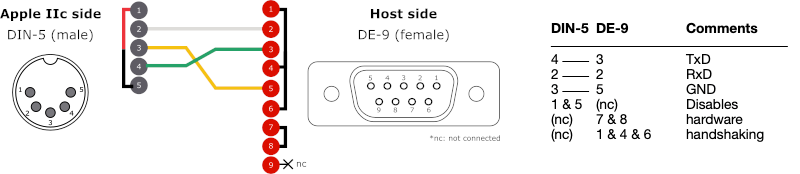
Apple IIc null modem cable
It is easy to buy a DIN-5 (male) to RS232 DE-9 (female) null modem cable online. But I decided to build it myself, which was much cheaper and faster. Here is the wiring (see here for details):
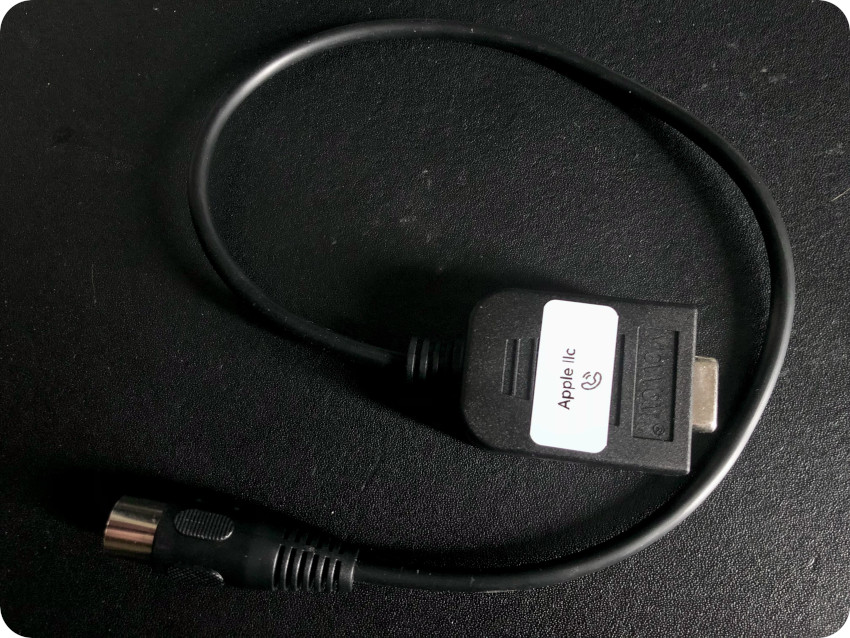
Here is the resulting null modem cable for the Apple IIc:
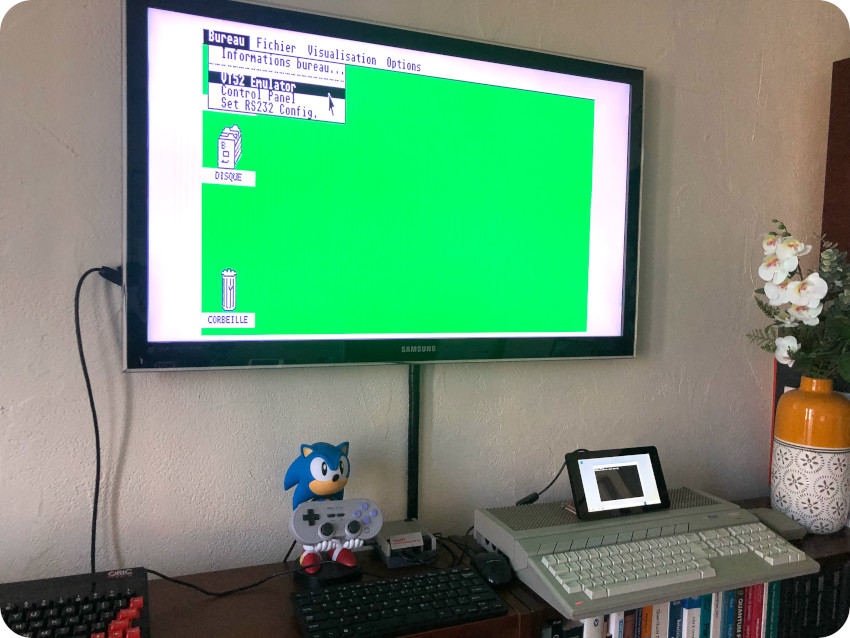
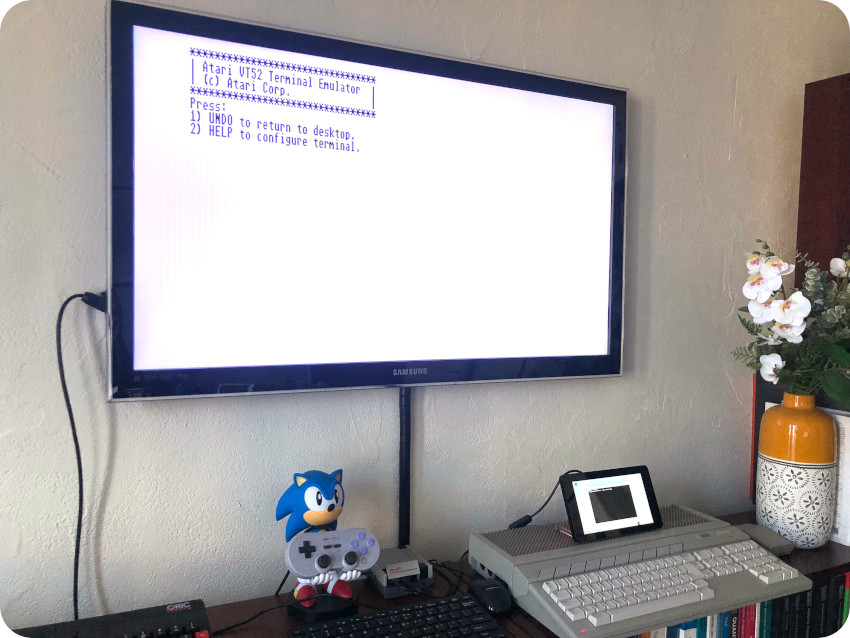
VT terminal: MODEM MGR (Apple IIc) and getty (GNU/Linux gateway)
In our very first experiment, I wanted to use the Apple IIc as a “dumb” terminal. The setup is the following;
- Run MODEM MGR (PRODOS version) on the Apple IIc side
- Run getty on the gateway side
MODEM MGR is a communications program for the Apple II+, IIe and IIc personal computers. It supports receiving and transmitting text / data between the computer and other systems over phone line or with over null modem. It supports VT emulation on the PRODOS version, available here.
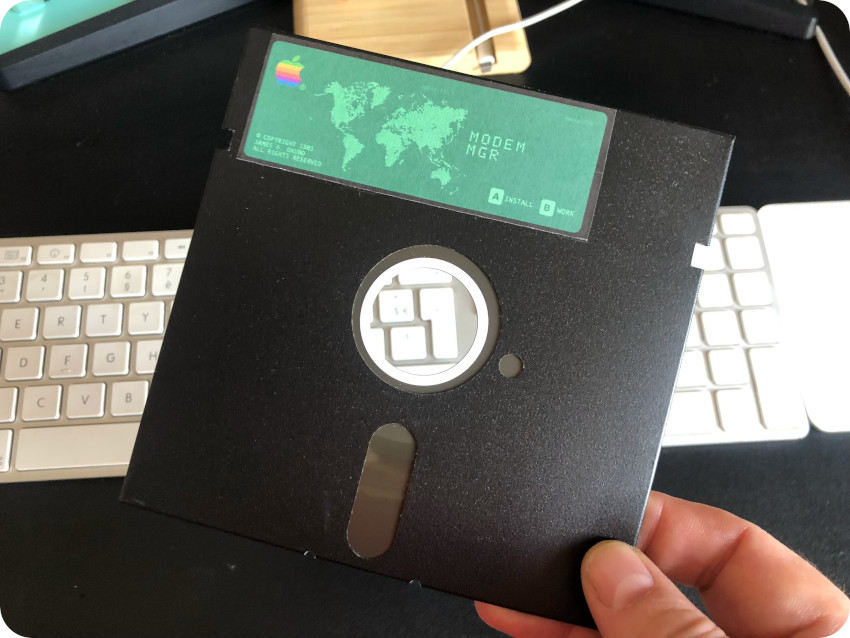
Note: details on how to create and setup MODEM MGR are available here.
On the GNU/Linux side, I created the following “server_vt100.sh” script:
#!/bin/bash

while true
do
/sbin/getty -L 9600 ttyUSB0 vt100
done
Here is an explanation of this script:
- getty (short for “get TTY”) is a Unix program that manages physical or virtual terminals
- When it detects a connection, it prompts for a username an runs the login program to authenticate the user
- It is set to use device /dev/ttyUSB0 (used by the RS232-to-USB adapter)
- The “-L” options controls the line flag
- The Baud rate (speed) is set to 9600
- It is configured as a VT100 terminal
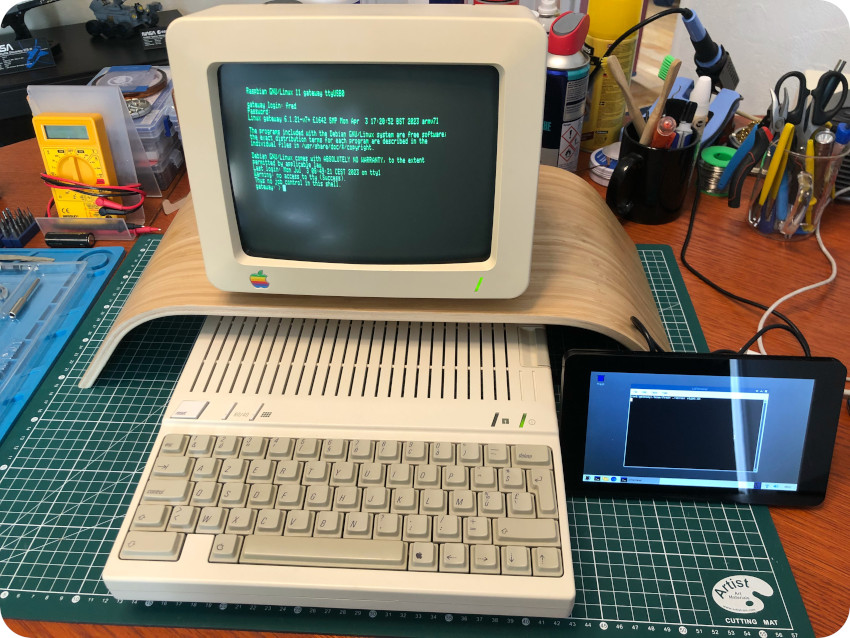
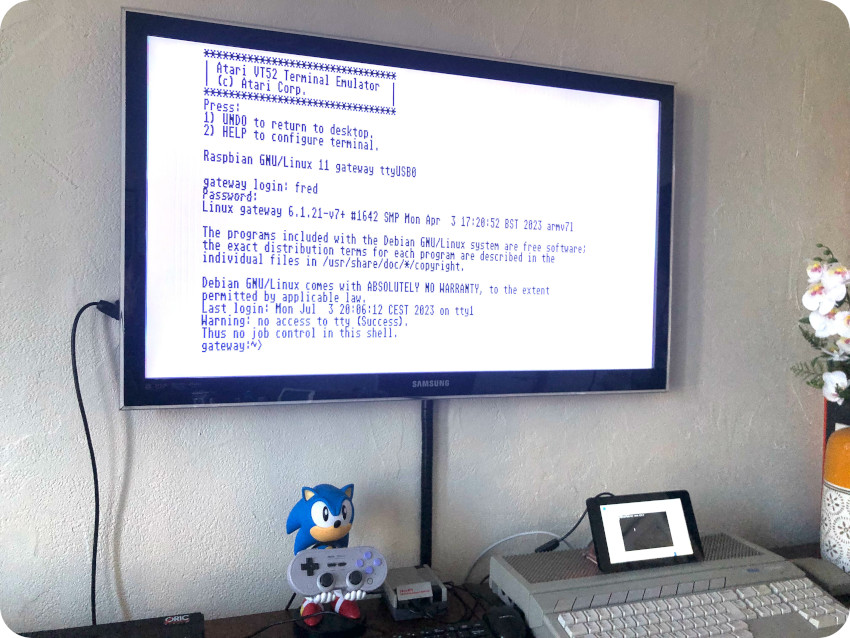
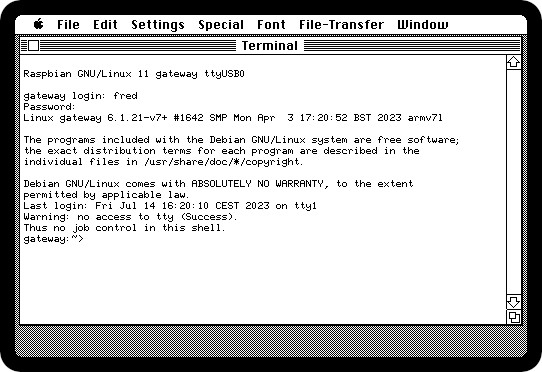
To log into the GNU/Linux gateway:
- Boot the Apple IIc with the Modem MGR floppy disk (“Work” side)
- On the Apple IIc side, when the Modem MGT menu appears, type ESC-M, then N to set the speed to 9600 bauds
- Once done, type ESC-:, then V to choose the VT terminal emulation
- On the GNU/Linux side, start the server script (as root): sudo ./server.sh
The login process initiates right away:
Here is a screenshot of the Apple IIc accessing Wikipedia‘s page on the Apple IIc:
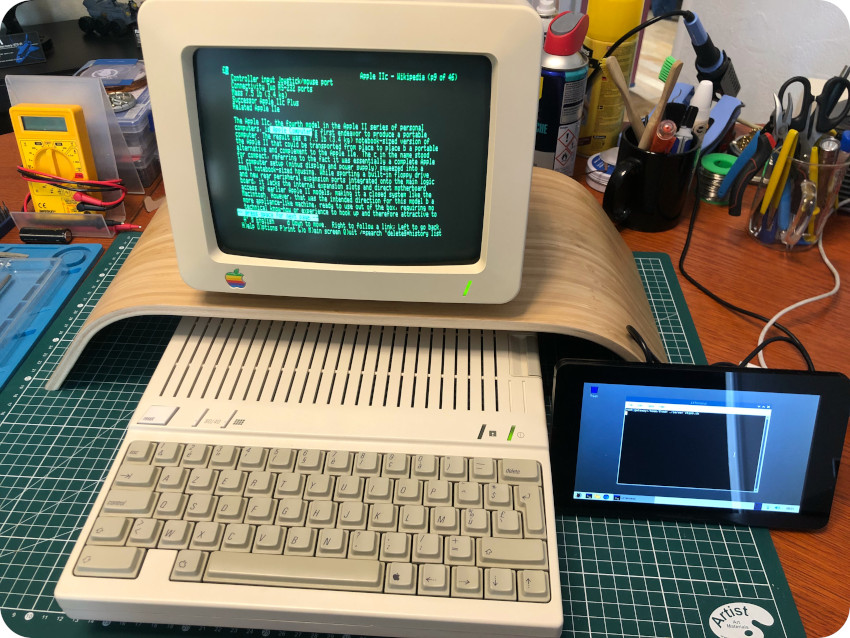
In the very early 90’s, using a character-oriented terminal was actually the way I experienced the web for the very first time.
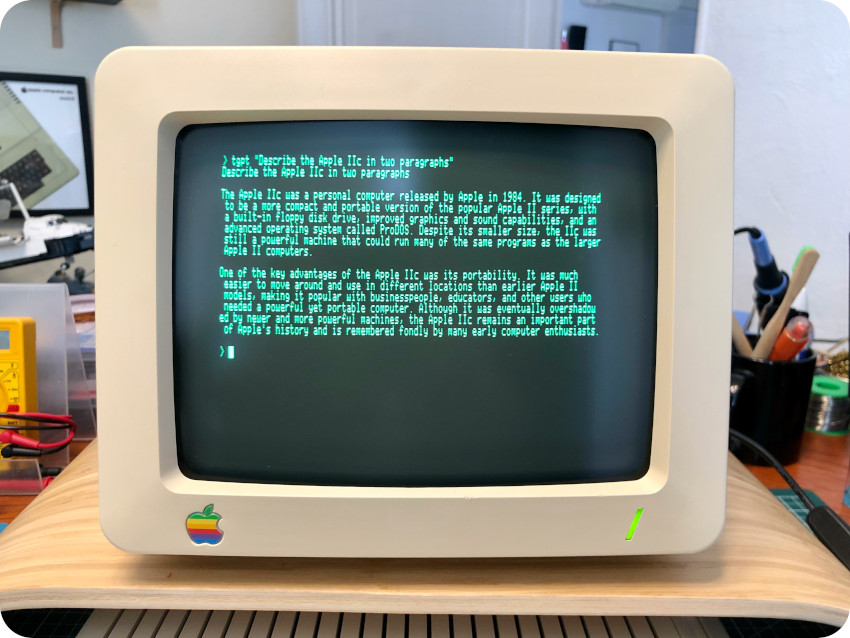
Here is a last screenshot of the Apple IIc, logged into my MacBook (from the gateway, via SSH) and using the tgpt CLI wrapper for ChatGPT:
Transferring disk images with ADTPro
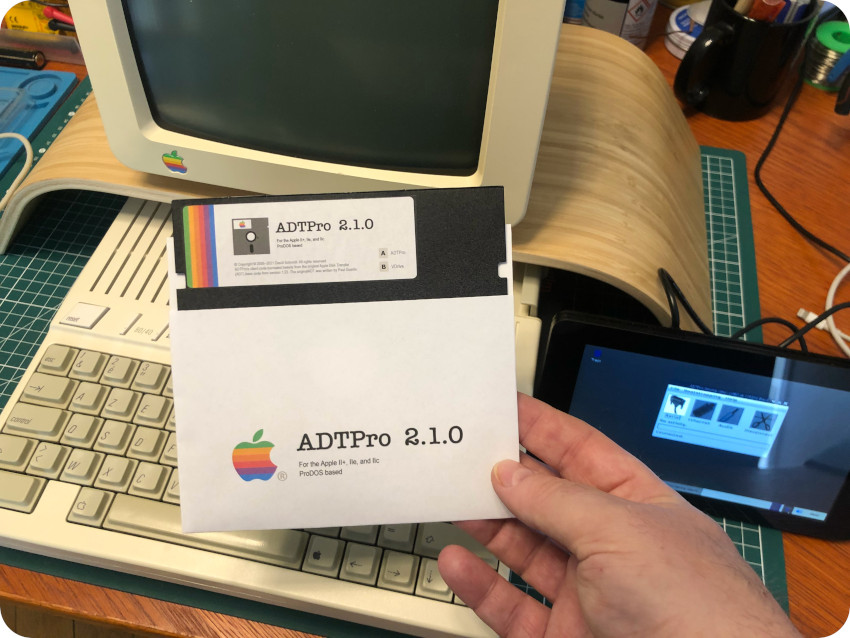
In this second experiment with the Apple IIc, I used ADTPro to transfer disk images between the Apple IIc and the Raspberry Pi gateway. This part is a summary of what was detailed here.
Apple Disk Transfer ProDOS (ADTPro) is a fantastic software that can be used to transfer physical disks and disk images between Apple II computers and a modern host running Java.
I downloaded ADTPro version 2.1.0 (from here: https://github.com/ADTPro/adtpro/releases) and created a floppy disk, with ADTPro on one side, and VDRIVE on the other (more on this later)
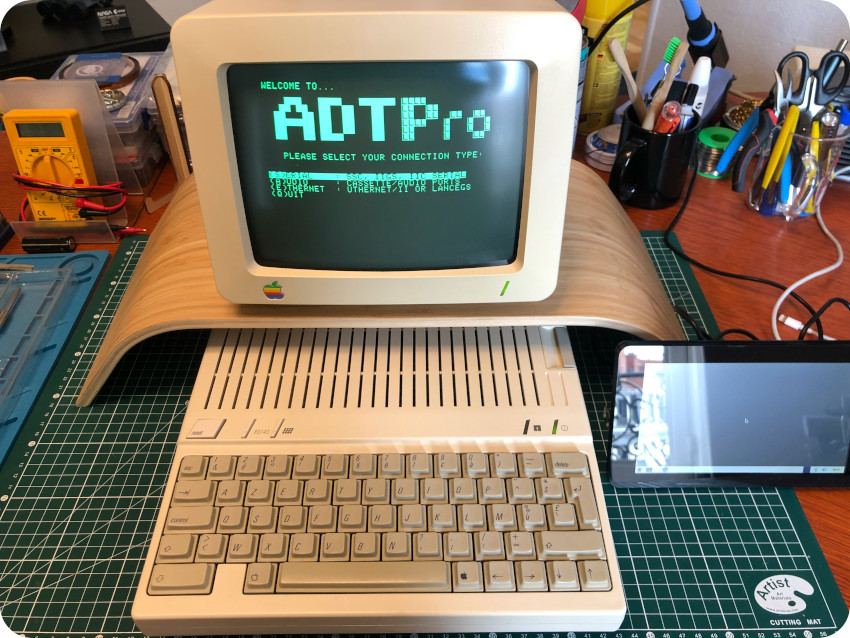
On the Apple IIc side, it is just a matter of booting from the ADTPro disks and selecting the “(S)ERIAL” connection type:
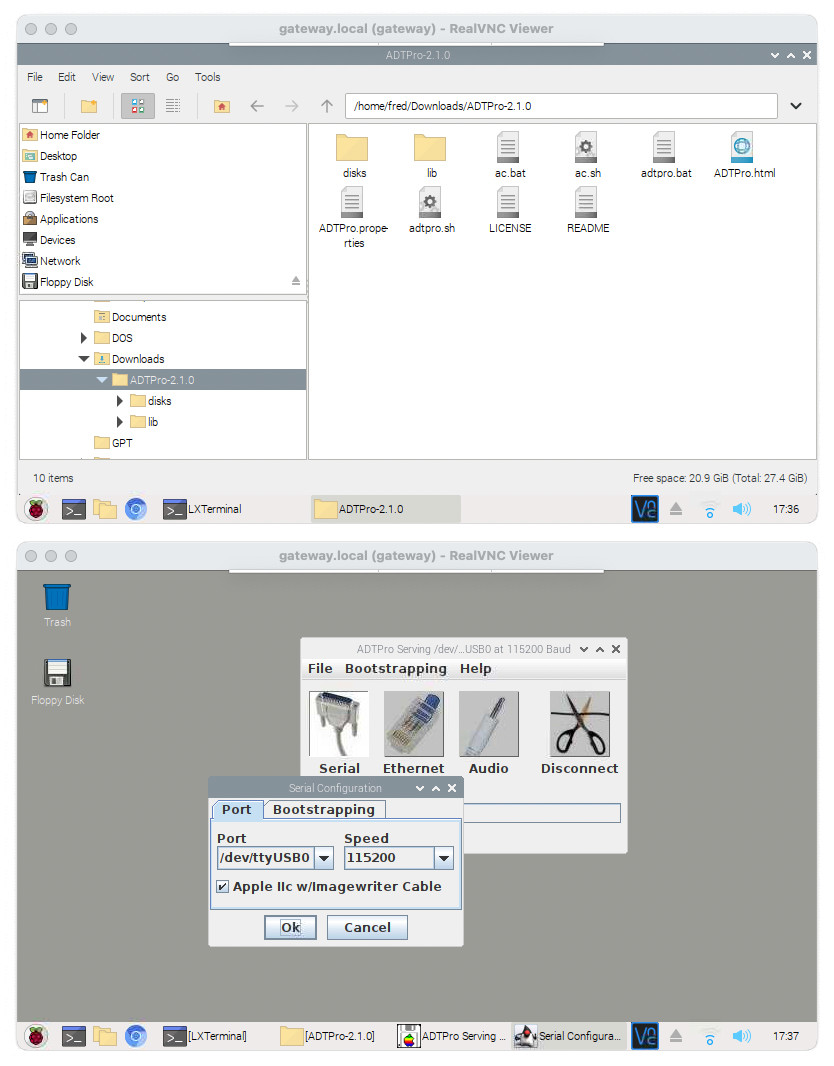
On the gateway side, once Java (17.x) installed via apt-get, ADTPro is launched on the Raspberry Pi using the adtpro.sh script. From there, it just a matter of clicking the “Serial” button and selecting the proper port (/dev/ttyUSB0), speed (115200 bauds):
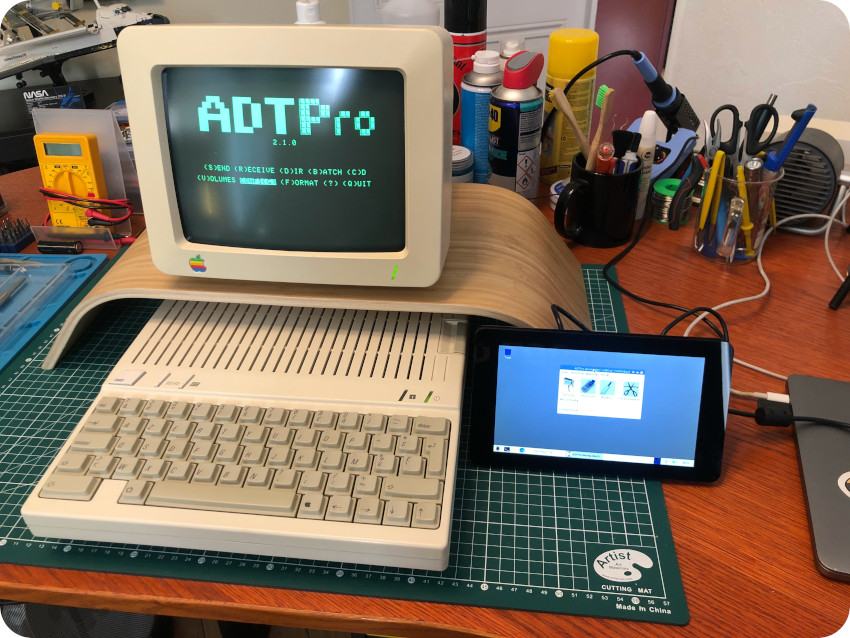
Back to the Apple IIc side:
- hit “(R)ECEIVE” to select and transfer a disk image (stored in the “disks” folder on the gateway) from the gateway to the Apple II and write it to a floppy disk
- hit “(S)END” to read a floppy disk, transfer its image from the Apple IIc to the gateway and stored it in the “disks” folder
![]()
It is as simple as that to transfer new disk images from the gateway to the Apple IIc and create sets of floppy disks:
Accessing a ADTPro Virtual Drives over null modem cable
Up to now, I only used half of ADTPro capabilities. Not only can ADTPro transfer disk images over a serial null modem cable, it can also host two virtual drives through a specific VDRIVE driver running on the Apple IIc computer.
When this driver is loaded (booting from the VDRIVE disk I created earlier on), one can access from the Apple IIc computer, over the serial cable, two remote disk images (located into the “disks” folder of ADTPro):
- virtual.po
- virtual2.po
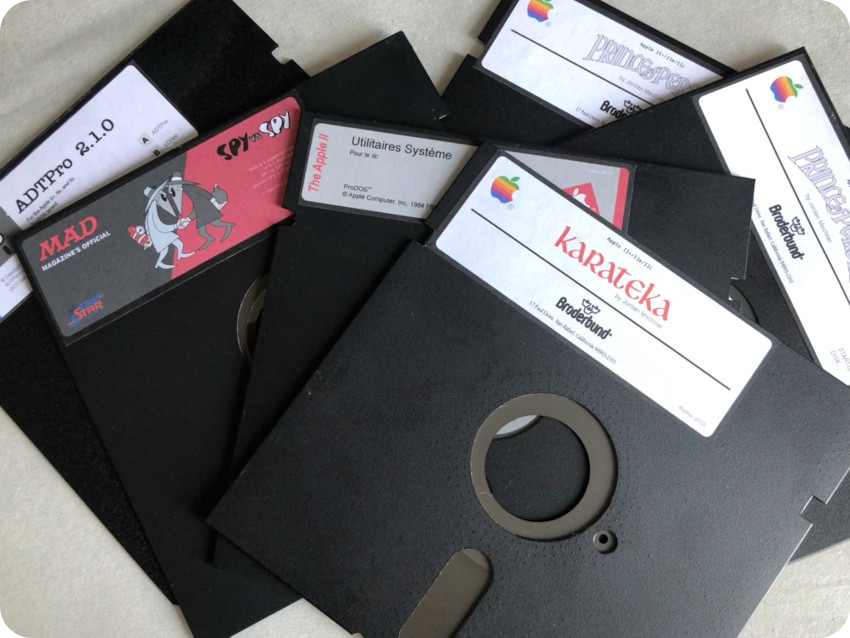
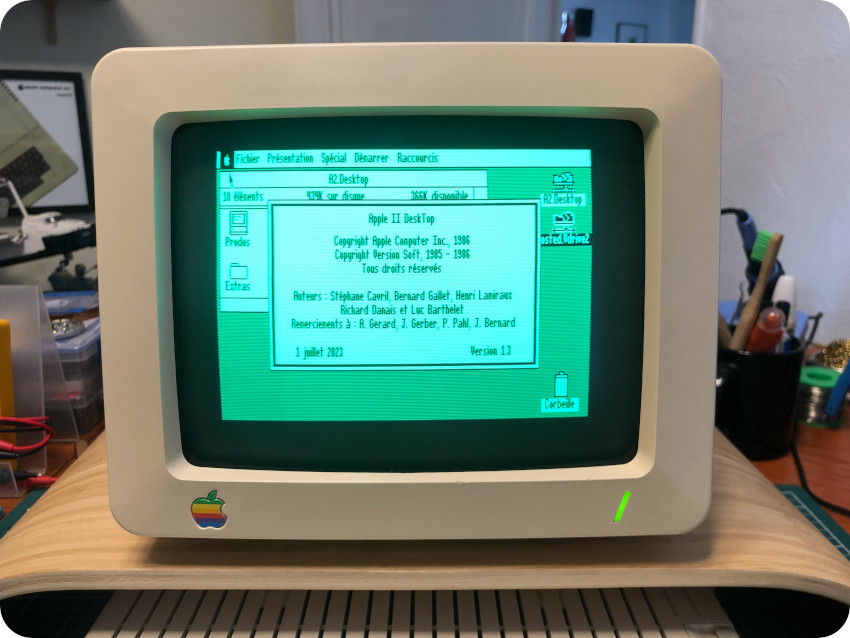
These two 800K empty virtual disk images come pre-built with the ADTPro distribution. Of course, I didn’t want to use empty images. By a happy coincidence, Apple II Desktop 1.3 was just released two days ago:
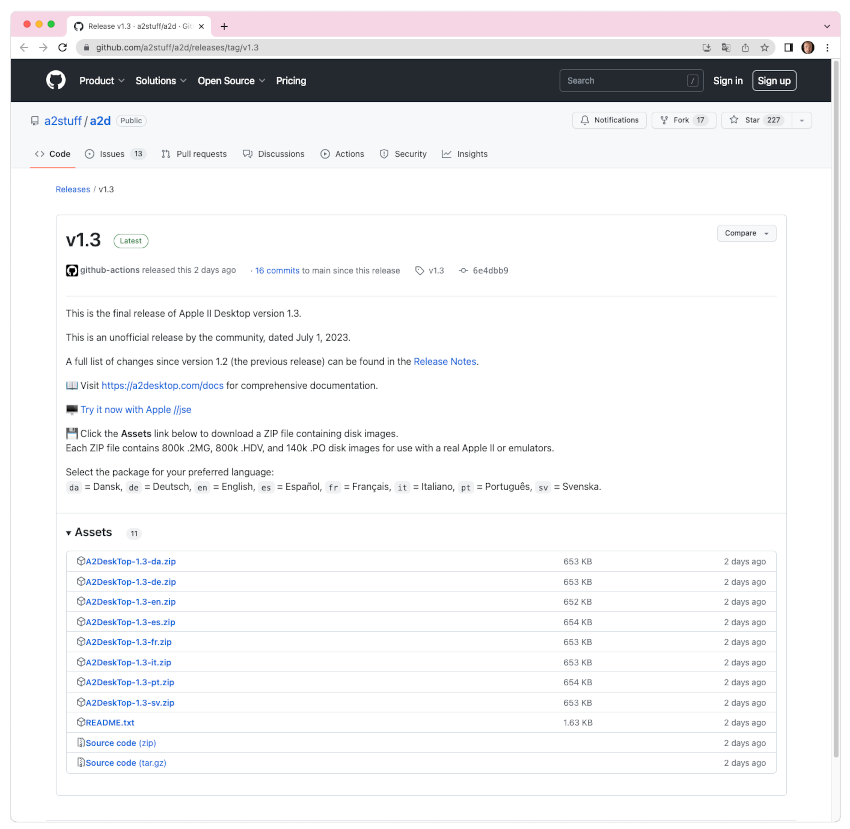
I downloaded the French version of Apple II Desktop, unzipped it on my MacBook, and
- transferred the A2DeskTop-1.3-fr_800k.2mg file to the gateway via SCP
- renamed the file it into “virtual.po” and copied it over the “virtual.po” image into ADTPro “disks” folder
- left the “virtual2.po” file unchanged
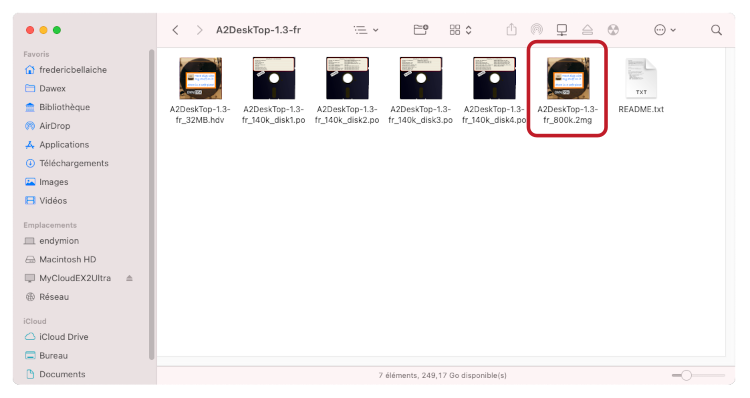
Then I launched ADTPro on the gateway, hit the “Serial” button, and booted the Apple IIc on the VDRIVE diskette:
I typed in:
- -VSDRIVE to load the driver, then
- CAT,S1 to list the content of the first virtual drive
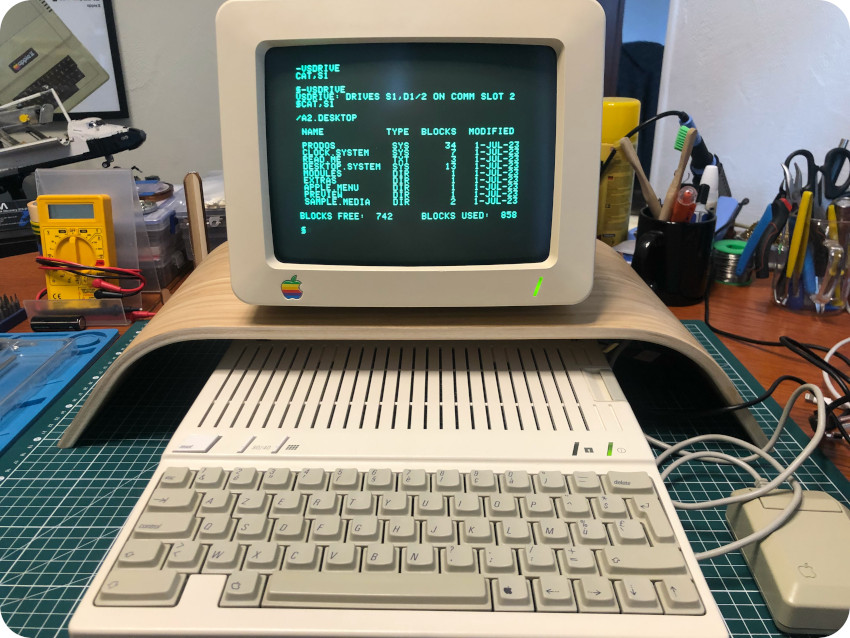
And it freakin’ worked !
Since, I am still not totally familiar with Apple II commands, I typed in “BYE” to get an interactive access to files, selected the “DESKTOP.SYSTEM” file and hit the enter key:
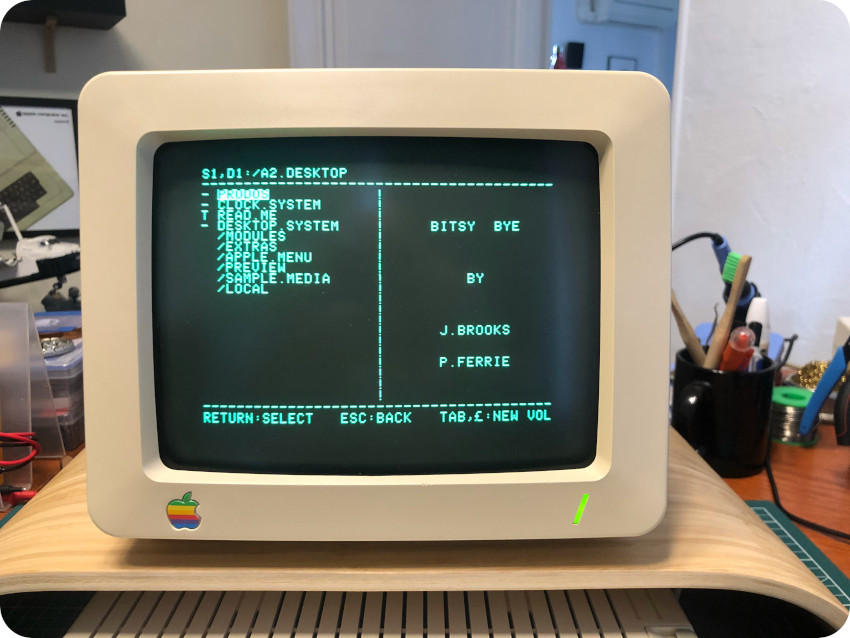
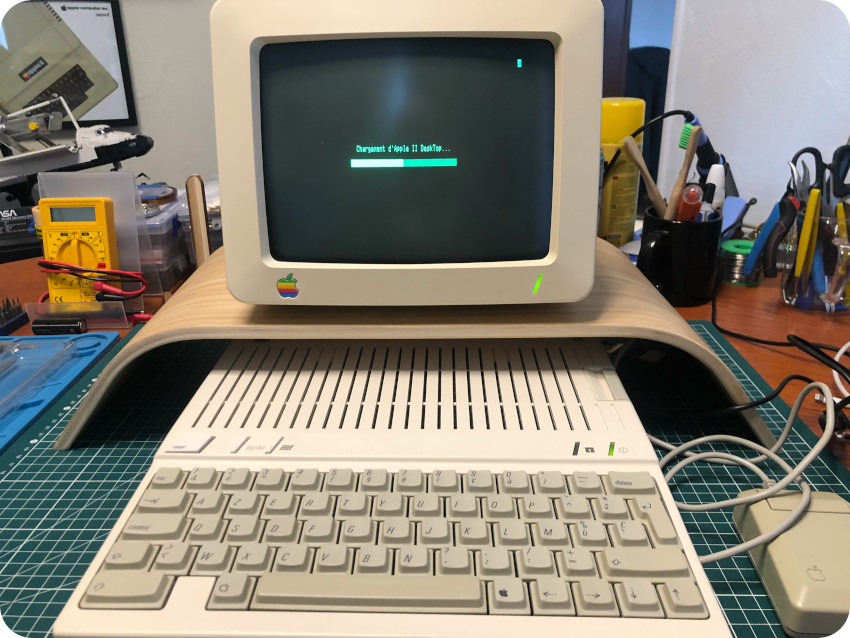
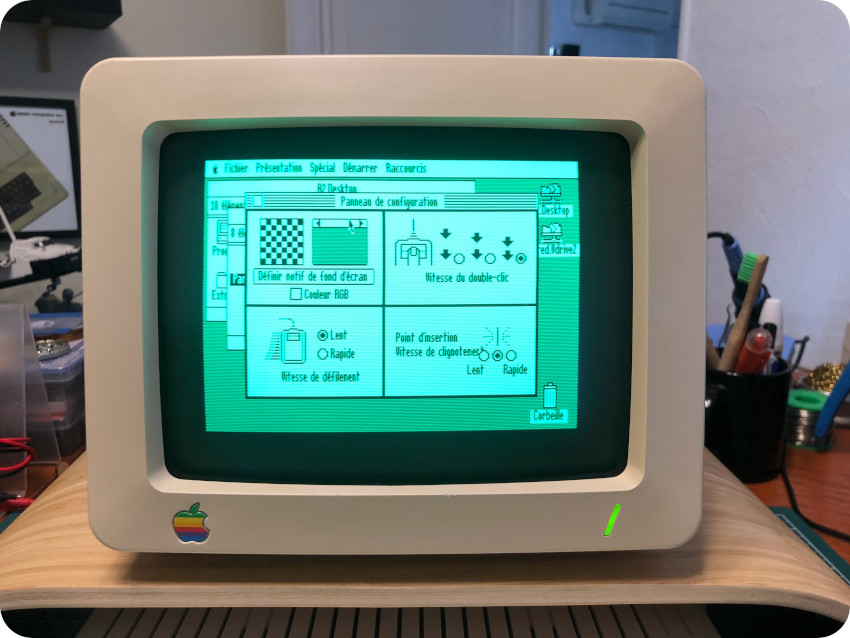
It launched the Apple II Desktop right away, over the serial cable !
How cool is that ? The two virtual ADTPro disks appeared:
- As “A2.Desktop” (for virtual.po), containing the Apple II desktop files
- As “Hosted.Vdrive2” (for virtual2.po), empty, but ready to be used to store new files
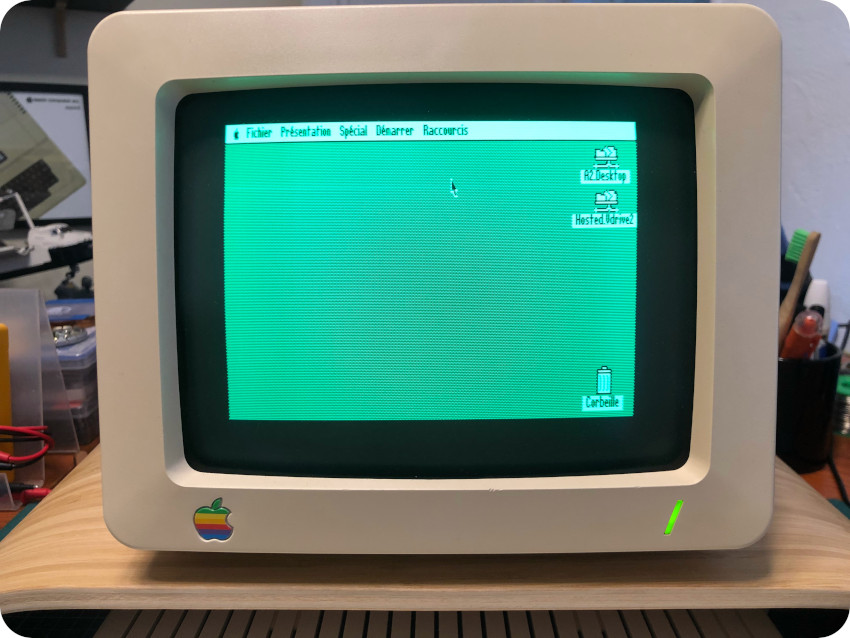
Here are a few other screenshots:
This is very cool !
TCP/IP stack
Can we do better ? The next level challenge is a TCP/IP stack on the Apple IIc and use it over a serial null modem cable.
Indeed, there are TCP/IP stacks available for the Apple IIc:
- Contiki OS: this OS by Olivier Schmidt targets 6502 based computers (C64, C128, Atari XL and Apple II). Amazingly, it includes a TCP/IP stack as well as a text-based web browser and IRC client. Alas, Contiki OS requires Ethernet hardware (Uthernet, Uthernet II or LANceGS). There is no support for TCP/IP over serial connections in the standard build. There is experimental support for SLIP instead of Ethernet when building the environment with the proper SLIP flag defined. Unfortunately, I could not find a pre-built version of Contiki OS with this option (last release was in 2019), and building Contiki OS from source is out of the scope of my little experiment…You can nevertheless watch this video of Contiki OS in (retro) action here: https://www.youtube.com/watch?v=NentMKyVGog
- IP65: this project (now also maintained by Olivier Schmidt) is a TCP/IP stack for C64, Atari XL and Apple II. It consists of TCP/IP libraries as well as ready-to-run TCP/IP programs using these libraries. Just like Contiki, there is no support for TCP/IP over serial connections unfortunately…
- Marina: the now defunct Marina project started in 2012 with low-level routines for the Uthernet card and expanded to a TCP/IP stack a few years later, with ARP, IP, UDP, ICPM, DHCP, DNS resolution and Uthernet II support. A SLIP interface was planned … but, alas, never came to fruition.
Then, I came across the A2osX project. It is a multi-user, multi-tasking OS for the Apple II, Unix-like in spirit. By itself, this is quite amazing ! And A2oSX comes … with a TCP/IP stack, and drivers for LANceGS, Uthernet, Uthernet II and Apple Super Serial Card. Now, there is (some) hope !
I downloaded the STABLE.140.po image disk (version 0.93, Feb-2020) and tried it in Virtual II emulator to familiarize myself with it and start messing with network configurations:

I was very impressed and wanted to test it on real hardware. I created a floppy disk and booted the system, crossing fingers:
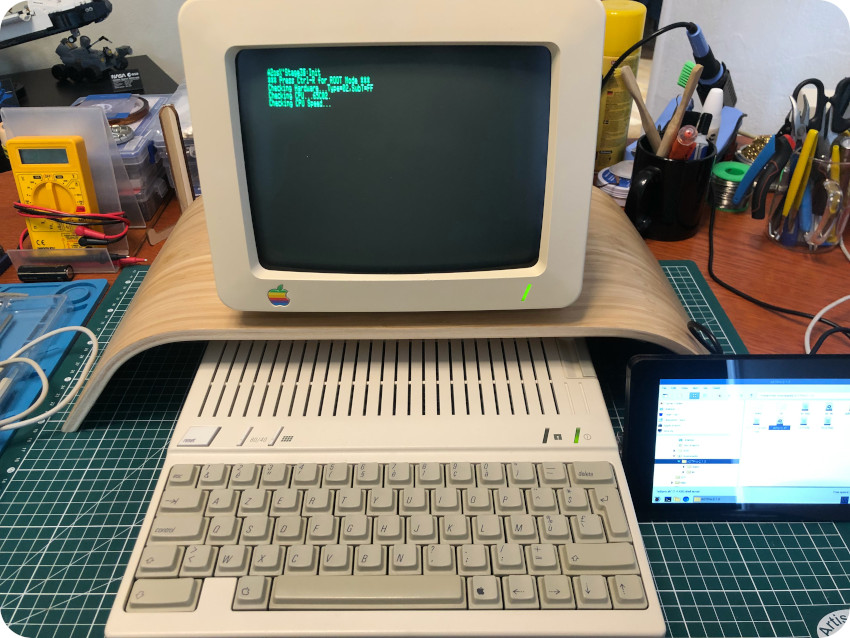
But … it got stuck on the Stage 3 init step, right after the CPU Speed test and didn’t go any further on my hardware. Maybe a ROM problem (the one of my Apple IIc is ROM 255/ Model 1).
So … I am kinda stuck too right now, but the project is alive (there were commits in the main branch only 3 weeks ago). I’m going to watch the A2osX project very closely, I have the gut feeling it may be the right path for our little experiment !
Atari 1040STF
Let’s move on and mess with networking on an Atari 1040 STF. Just like for the Apple IIc, I will:
- Connect the Atari ST to the Raspberry Pi via a null modem cable (from the DB-25 serial port of the Atari ST to the RS232 adapter, plugged into a USB port on the Raspberry Pi)
- Use the Raspberry Pi as a gateway for internet access
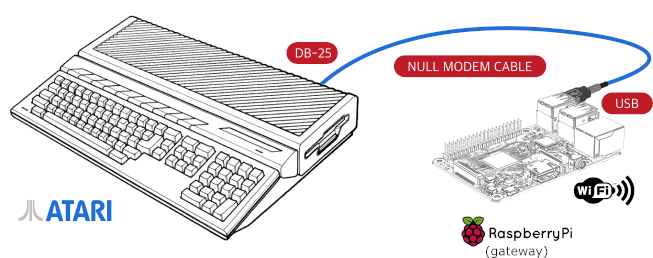
The null modem cable plugs into the modem port (serial) of the Atari ST:
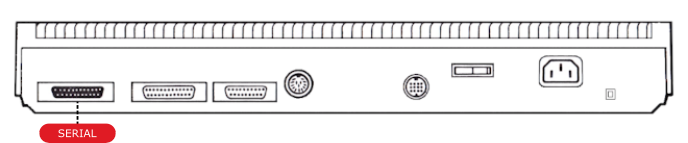
Atari ST null modem cable
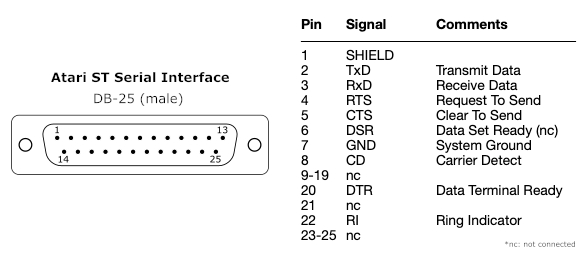
The Atari ST uses a DB-25 male connector for its serial interface. Here is its pinout:
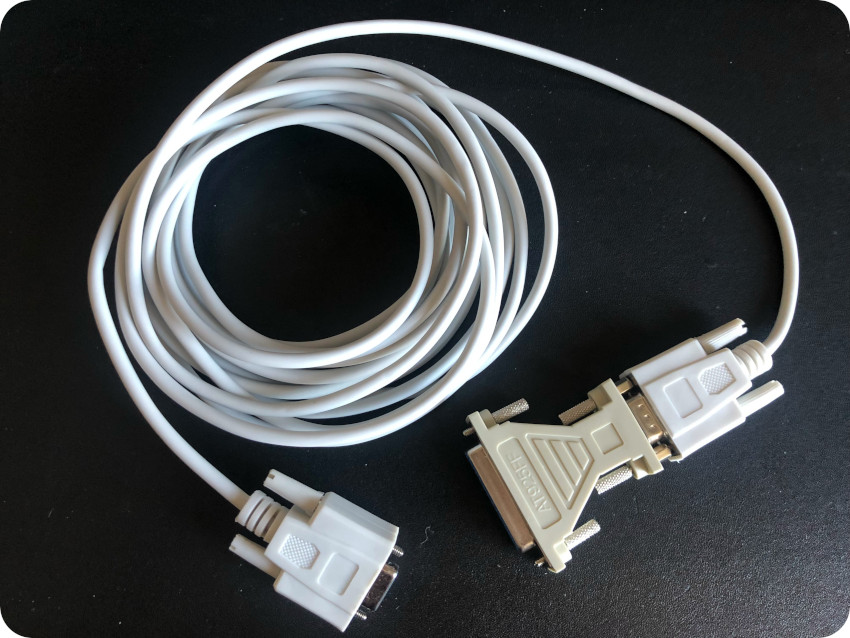
Since the Atari ST uses rather standard ports, building a serial null modem cable is easier than for the Apple IIc. It was just a matter of assembling standard components. I bought online:
- A standard RS232 null modem cable (DB-9, male / female)
- A DB-25 (female) to DB-9 (male) converter
And … here is the result :
Easy peasy:
- the female DB-25 end of the cable plugs into the Atari ST serial port
- the male DB-9 end plugs into the RS232-to-USB connector of the gateway.
VT terminal, take one: VT52 accessory (Atari ST) and getty (GNU/Linux gateway)
Let’s try something easy: using the standard Atari ST VT52 emulator accessory. For this, I created a floppy disk image named “network.st” with the the standard TERMINAL.ACC VT52 accessory and a few other utilities likes SYSINFO.
For this, I used my usual workflow (see here for more details):
- Format a floppy disk on the Atari ST
- Mount the floppy disk on the gateway: sudo mount -t msdos /dev/sda /mnt
- Download the needed .st image to the gateway
- Mount the .st image disk on the gateway: sudo mount -o loop -t msdos xxxx.st /home/fred/image/ (where xxxx.st is the name of the image disk)
- Copy the needed file from /home/fred/image to /mnt
- Unmount the disks: sudo umount /mnt and sudo umount /home/fred/image
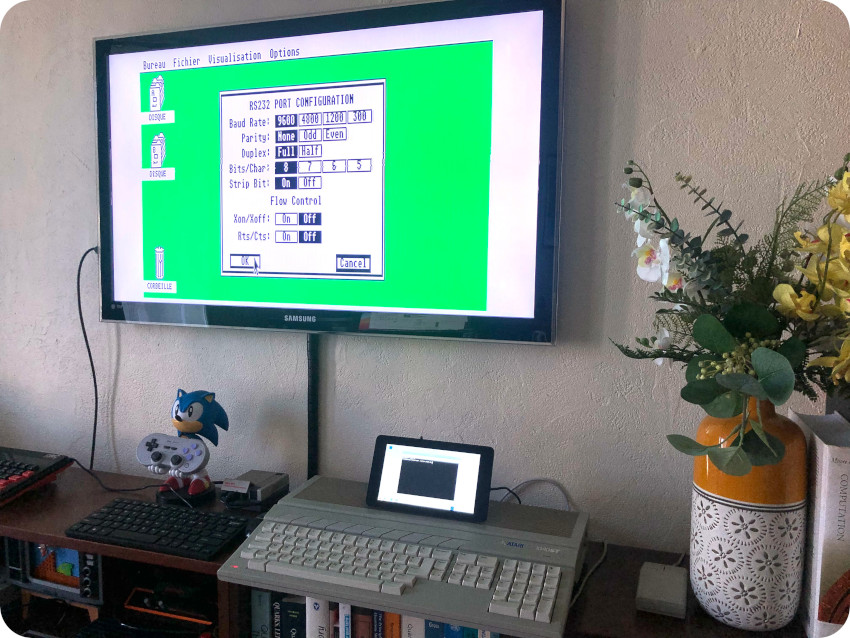
I booted the Atari ST on this newly created disk, and setup the RS232 port configuration:
Once done, I launched the VT52 emulator from the Desktop pull down menu:
On the gateway side, I launched the server_vt100.sh script I used for the Apple IIc:

… and the login screen showed up, allowing me to access the gateway on the Atari ST as a terminal:
Not that bad ! But the VT52 accessory is not a great terminal emulator. As told by its name, it cannot emulate a VT100. There are actually “patches” that are supposed to extend its capabilities to VT100 or even ANSI, but I didn’t find the results convincing. Though it is working, the user experience is mediocre: no backspace, no arrows, clearing the screen doesn’t properly work. This make using lynx to browse the web a terrible experience. So … close, but no cigar.
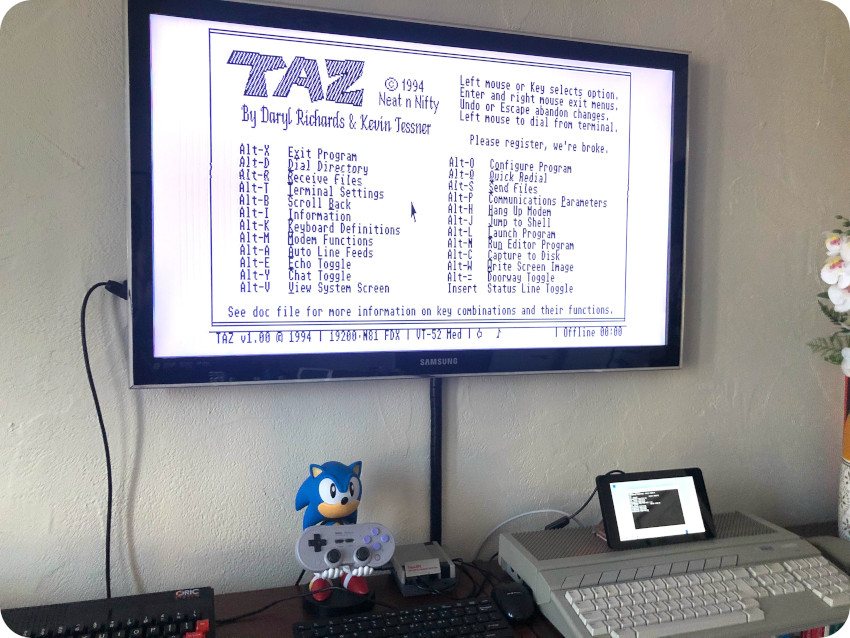
VT terminal, take two: TAZ (Atari ST) and getty (GNU/Linux gateway)
Let’s find another VT terminal emulator. I tried a few (Uniterm, Minicom, ANSIterm, etc.) which turned out to have a not much better user experience than the VT 52 accessory. Sometimes even worse, with a lot of flickering.
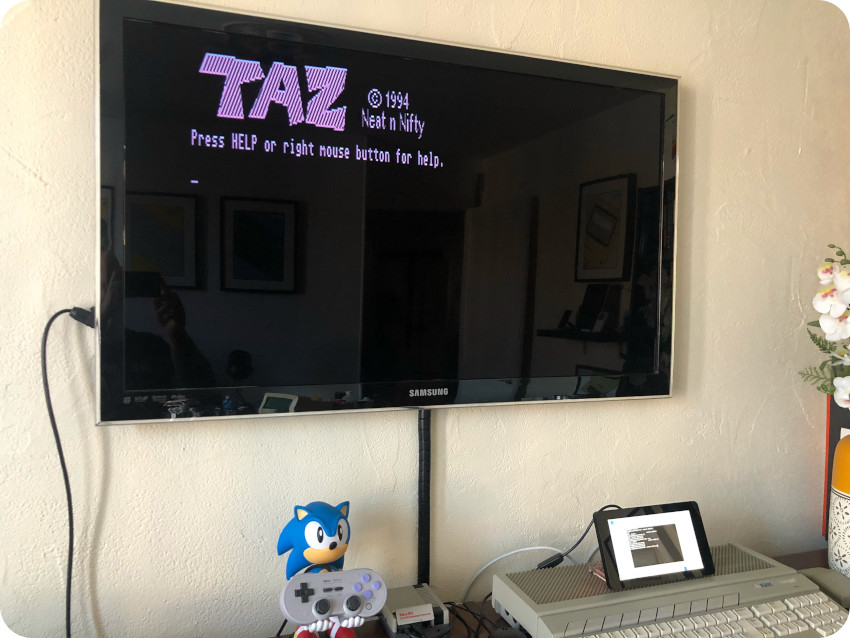
Most forums were pointing to another terminal emulator: TAZ (available here for example). TAZ is a full featured terminal emulator for the Atari ST, with VT100 and ANSI compatibility. I downloaded it, added it the the floppy disk and launched it.
There are quite a list of configuration options:
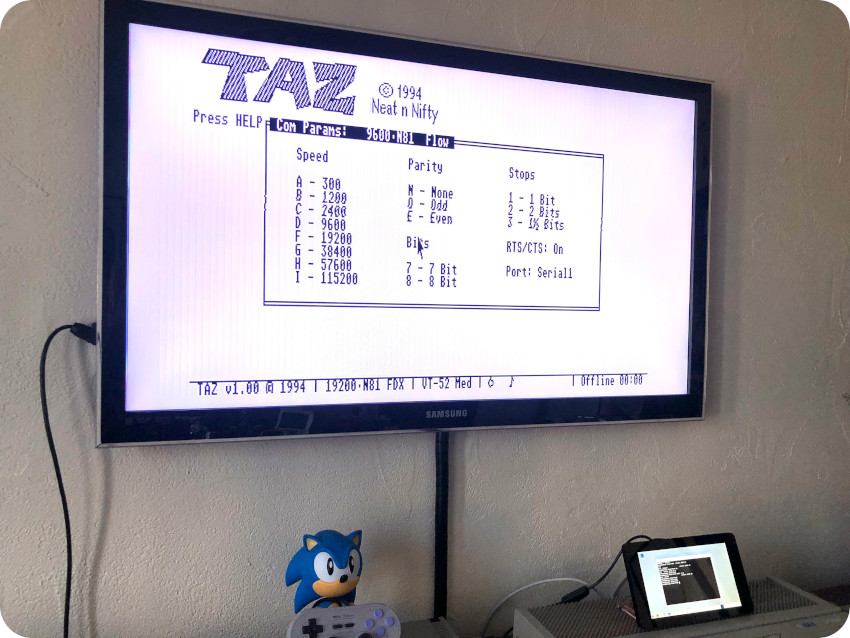
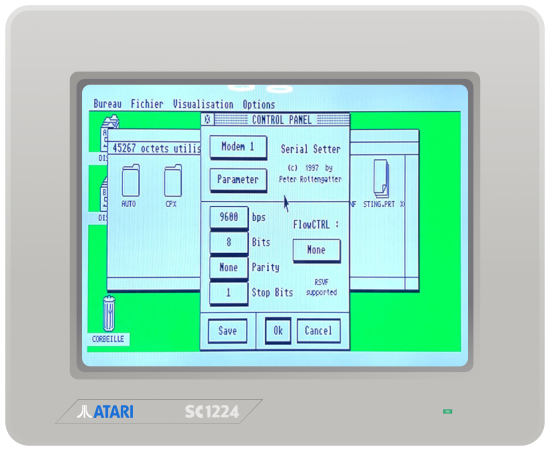
Hitting Alt-P, I configured the Communication Parameters (Serial port, 9600 bauds, etc.):
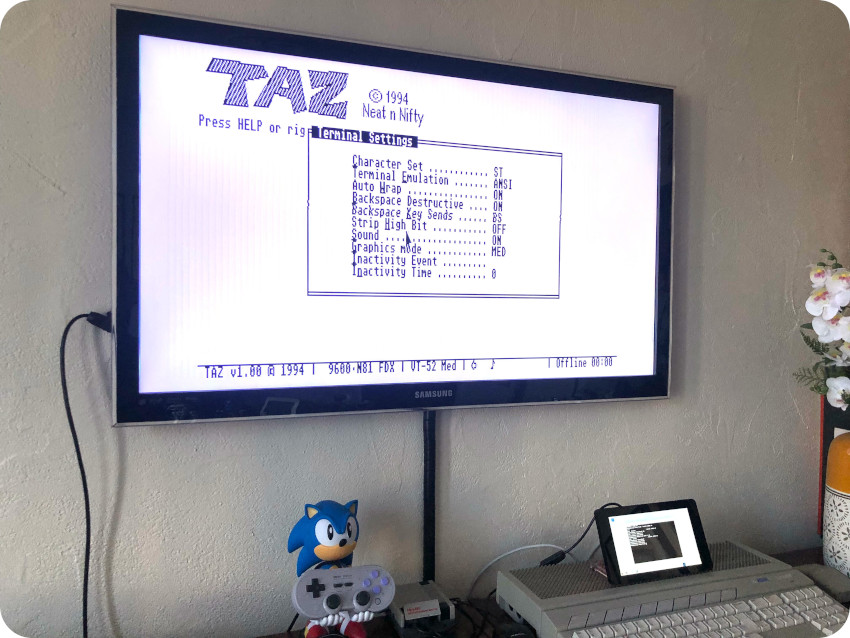
Hitting Alt-T, I configured the Terminal Setting (ANSI, Backspace configuration, etc.):
Surprisingly, when the ANSI option is selected, the screen changes its frequency and inverts colors (I had to slightly adjust my Samsung TV zoom parameters so the image was not cropped)
Since TAZ is ANSI capable, on the GNU/Linux side, I created the following “server_ansi.sh” script on the gateway:
#!/bin/bash

while true
do
/sbin/getty -L 9600 ttyUSB0 ansi
done
Note:
- this is basically the same script as server_vt100.sh, with the ansi option added
- I could have set the baud speed higher, but since the null modem cable I bought was long (6m), I chose a conservative setting
Once the server_ansi.sh script launched, the prompt showed up in TAZ, allowing me to log into the gateway from the Atari ST:
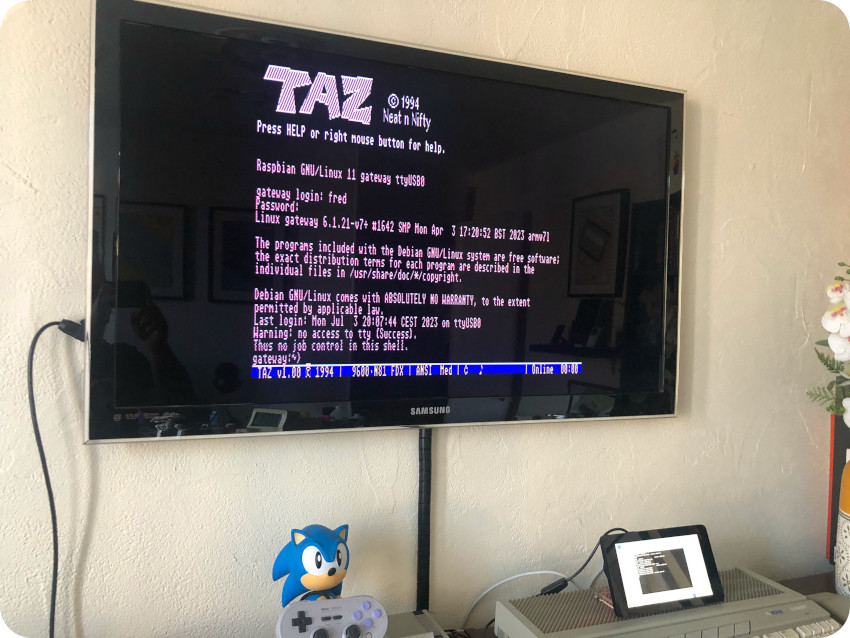
It is so much better than the VT52 accessory, and it manages colors. Here are a few screenshot (Wikipedia’s page on the Atari ST, Google search engine):
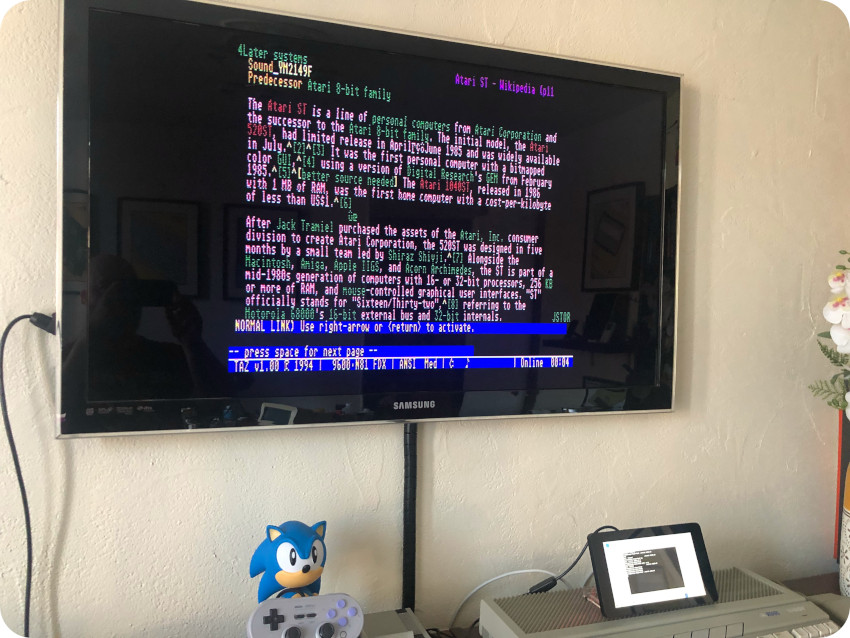
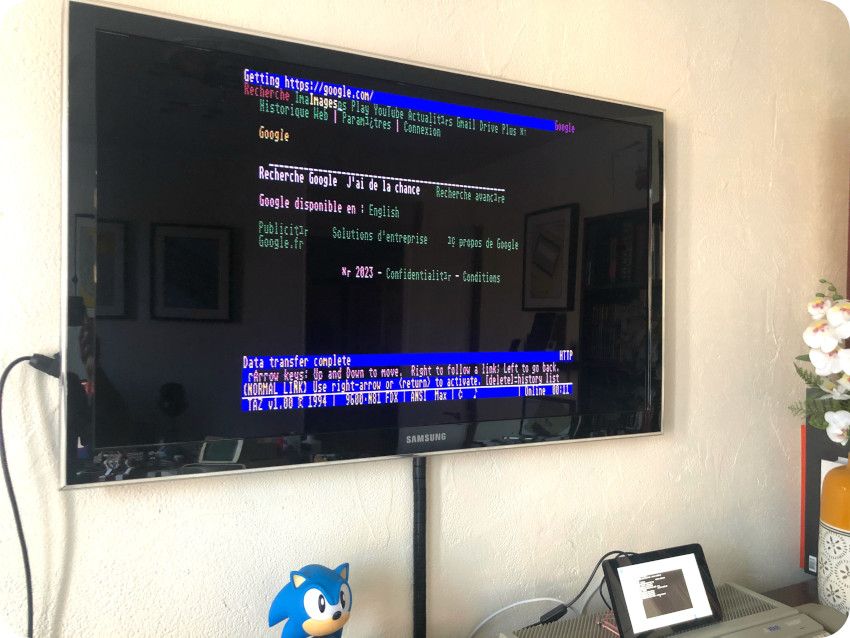
Though it was not perfect (there are a few artifacts, French accents are mangled for example), I call this a win !
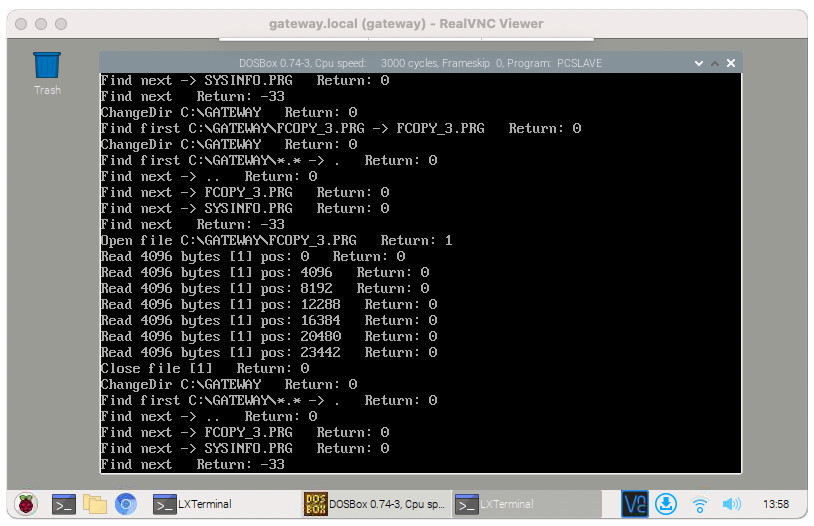
Transferring files with Ghostlink
Let’s move on to a new experiment: transferring files between the gateway and the Atari ST, over serial cable. There are plenty of possibilities, including using TAZ for file transfers. But I wanted to experiment with something a bit more user friendly, and chose to use Ghostlink (available here). It allows to mount a remote folder as an extra drive on the Atari ST GEM Desktop. Nice !
Ghostlink is therefore a two-part software:
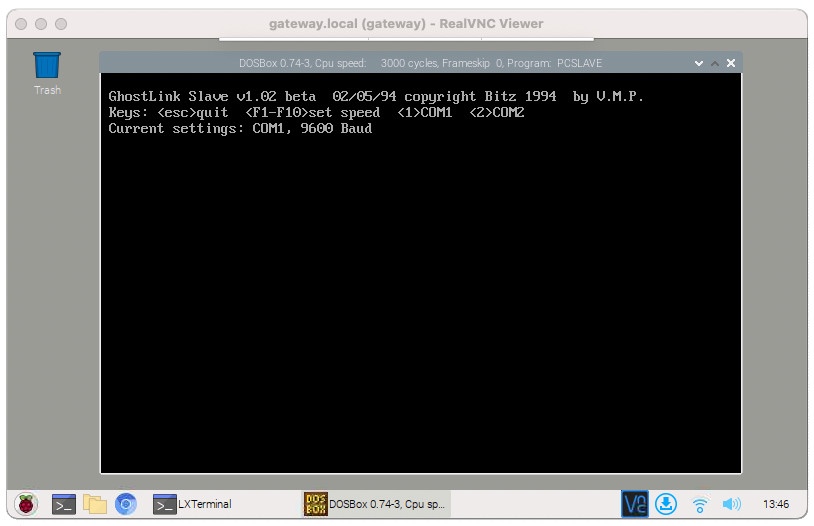
- On the Atari ST side runs the Ghostlink client: STMASTER.PRG
- On the gateway side runs the Ghostlink server: PCSLAVE.EXE
The Atari ST part was quite simple: I just had to add the STMASTER.PRG file to the floppy disk I already prepared for TAZ.
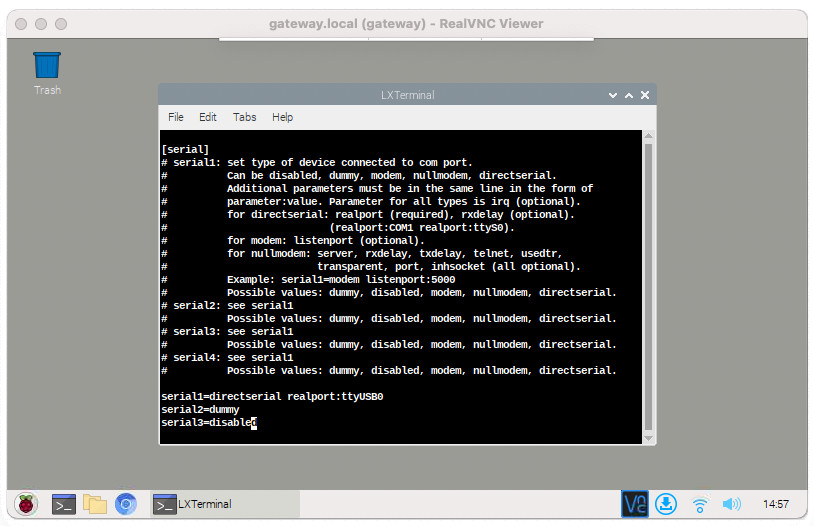
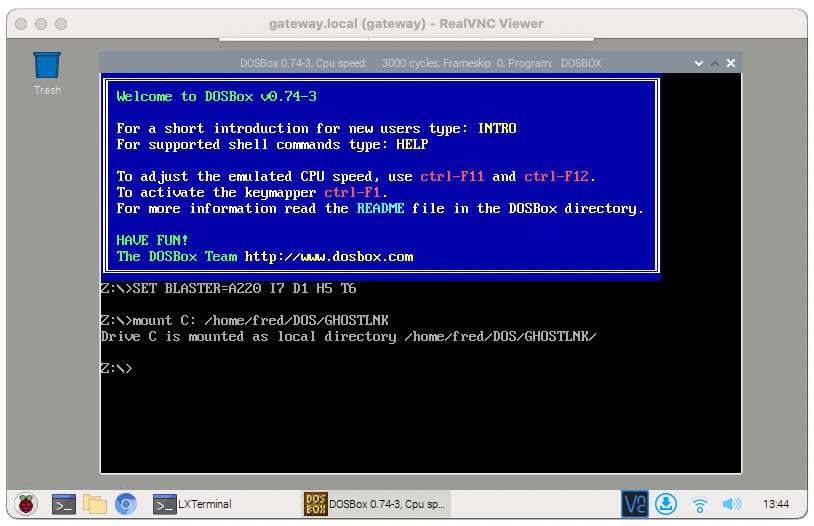
The gateway part is a bit trickier: PCSLAVE.EXE is de MS-DOS program. And it doesn’t play nice with current versions of MS Windows. The problem nevertheless is easily solved with DOSBOX:
- to install DOSBOX (version 0.74-3): sudo apt-get install dosbox
- to configure DOSBOX, edit /home/fred/.dosbox-0.74-3.conf, find the [serial] section and add: serial1=directserial realport:ttyUSB0. This will tell DOSBOX to use the host /dev/ttyUSB0 for COM1.
Once done, I launched DOSBOX and setup the C: drive to point to the folder where GHOSTLINK is installed (in my case, /home/fred/DOS/GHOSTLNK):
In this folder, I copied the PCSLAVE.EXE file, and created a directory named GATEWAY with two Atari ST programs (SYSINFO and FCOPY3):
Let’s start the GHOSTLINK server, and configure the speed to 9600 bauds (using function keys):
On the ATARI ST side:
- Launch STMASTER.PRG
- On the “Partitions” section, remove all pre-configured partitions (if any)
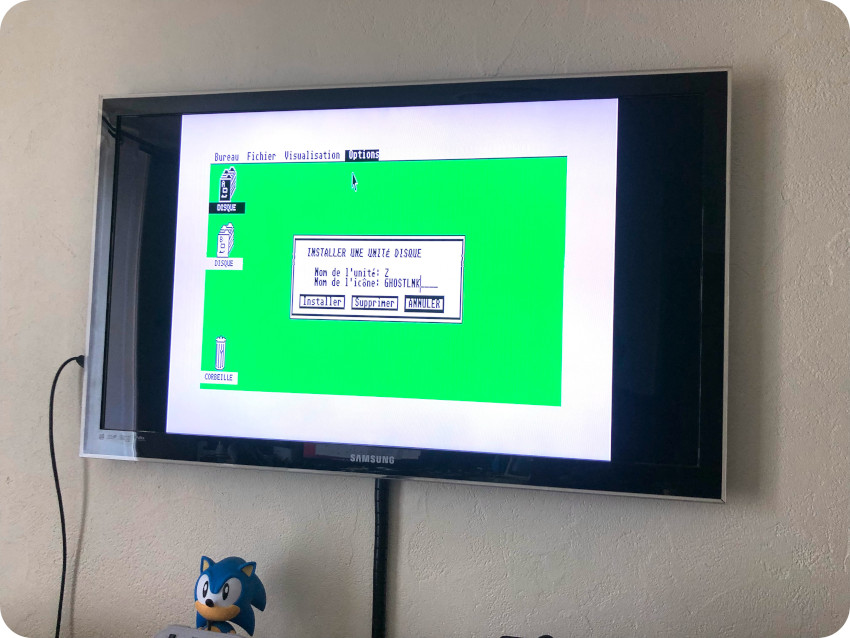
- Click “Add“, then select “Z” as local drive and “C” as remote drive
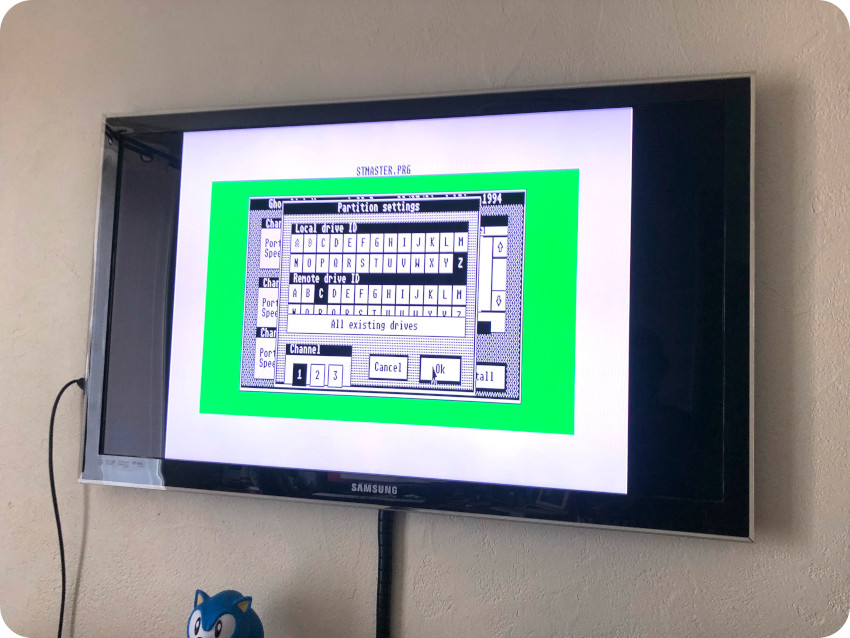
The GHOSTLINK client is now configured to use the Serial Port (Channel 1), and map the remote C: drive of the gateway to the local Z: drive of the Atari ST. Click “Install” to proceed to the next steps.
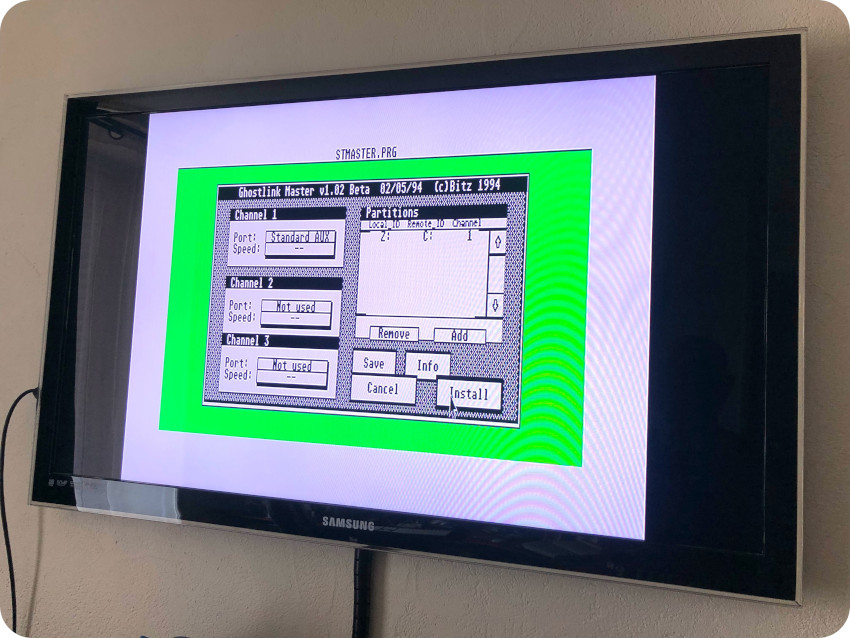
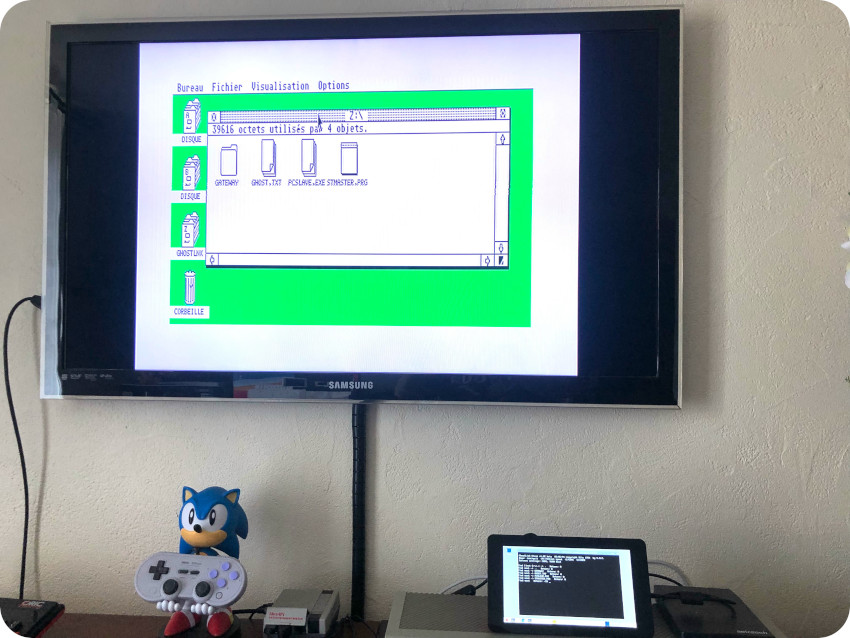
The next step is to install a new Z: drive on the GEM Desktop (I called it “GHOSTLNK”, but any name will do):
And … that’s it ! The newly installed local Z: drive maps the content of the remote C: drive of the gateway !
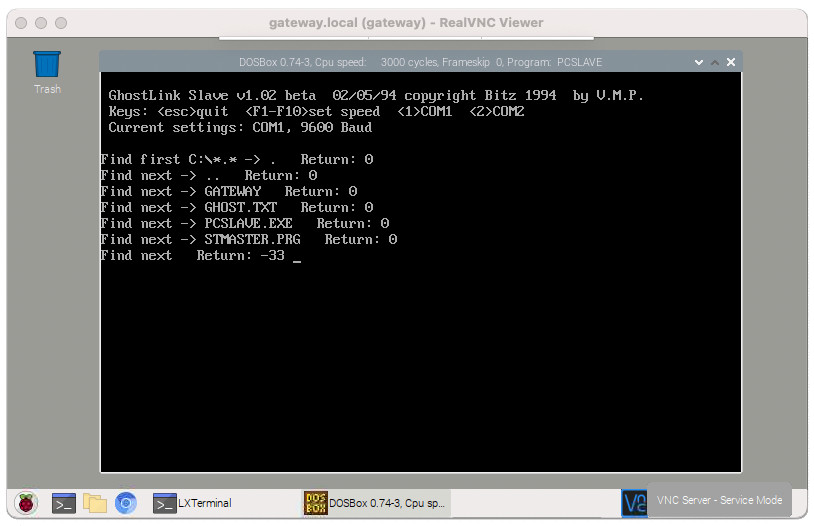
On the gateway side, PCSLAVE.EXE displays the current operation (listing C:\*.*):
The GEM Desktop can be used to drag / drop files between the gateway and the Atari ST:
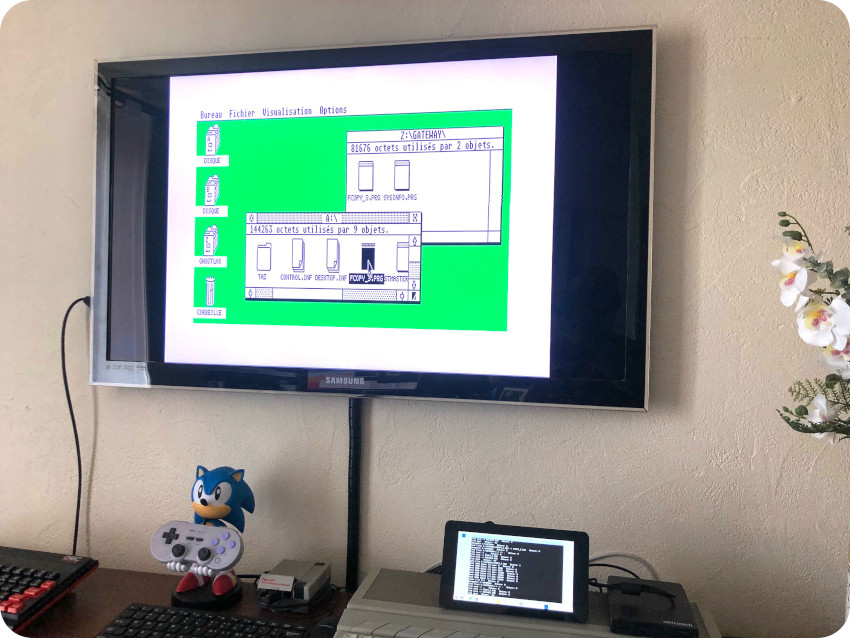
You can see here PCSLAVE.EXE ouputs showing FCOPY_3.PRG being transferred:
Great !
TCP/IP over null modem
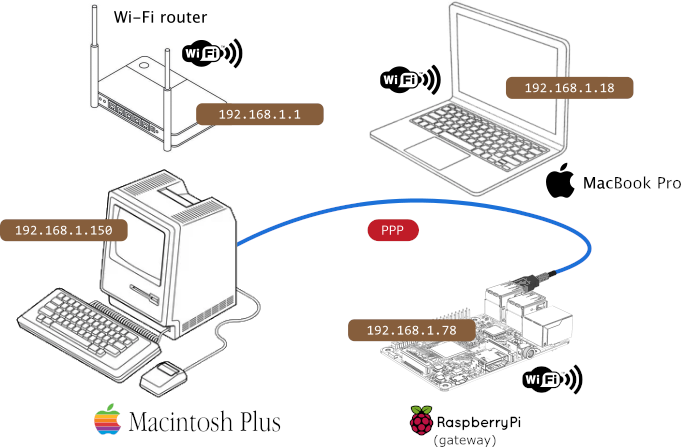
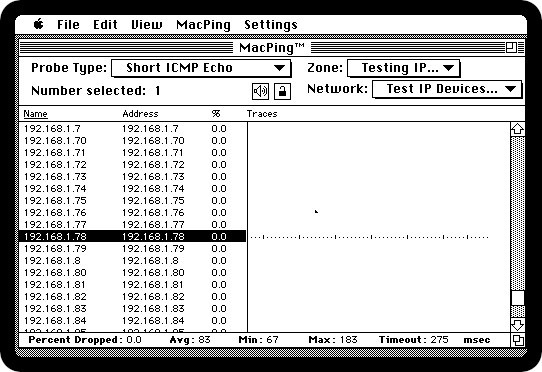
Let’s move on to the next level: adding a TCP/IP stack to the Atari ST, and connect it to the Internet via the gateway. Here is a little schema of my setup:

- My router (192.168.1.1) provides broadband access (FFTH) and Wi-Fi network
- The gateway (192.168.1.78) is connected to the Wi-Fi network (wlan0) on one hand, and is connected to the Atari ST via a serial null modem cable on the other hand. It runs a PPP daemon, and provides NAT (to wlan 0) and IP Forwarding
- The Atari ST (192.168.1.150) runs the STinG TCP/IP stack and gets it’s internet access via PPP
- My MacBook Pro (192.168.1.18) is used to get access to the Raspberry Pi (via SSH and VNC) and test network connectivity
Note: in this experiment, to keep things simple, the gateway, the router and the Atari ST are configured to have fixed IP addresses.
PPP (Point-to-Point Protocol) is a layer 2 (data link layer) communication protocol between two hosts. It was widely used by Internet Service Providers for customer dial-up access to the internet. PPP can be used over many types of physical network, including serial cable. It works with numerous layer 3 protocols (network layer), including IP.
For this to work, we will need to run a PPP daemon (pppd) on the gateway. On the Atari ST side, we will configure the TCP/IP stack to use PPP as a serial Point-to-Point link.
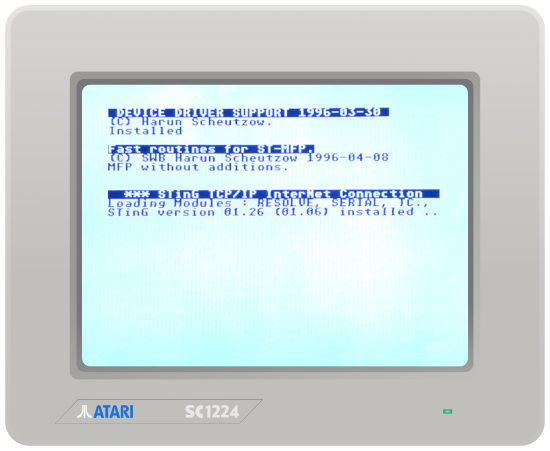
Let’s take a closer look at the Atari ST configuration. STinG is a TCP/IP stack for Atari ST computers running TOS, created by P. Rottengarter and R. Andersson. For this experiment, I used STinG version 1.26, available here: https://www.chebucto.ns.ca/Services/PDA/AtariSTComm.shtml
Note: there are other TCP/IP stacks available, like STiK, MintNet or PPP-Connect. But STinG is the only stack that would run on my old TOS 1.0-based Atari ST and provide PPP capabilities.
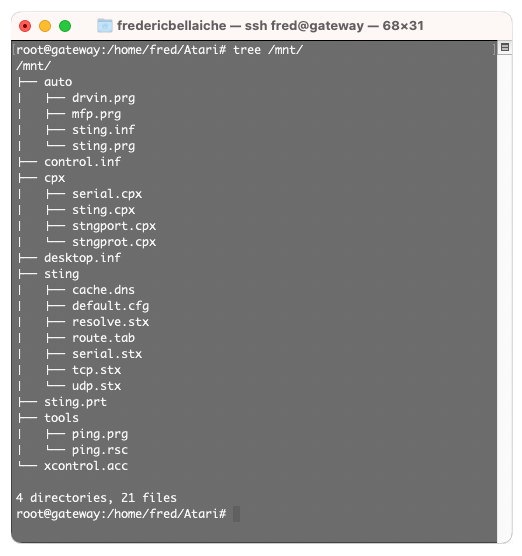
I created a floppy disk with:
- STinG 1.26
- XCONTROL 1.31
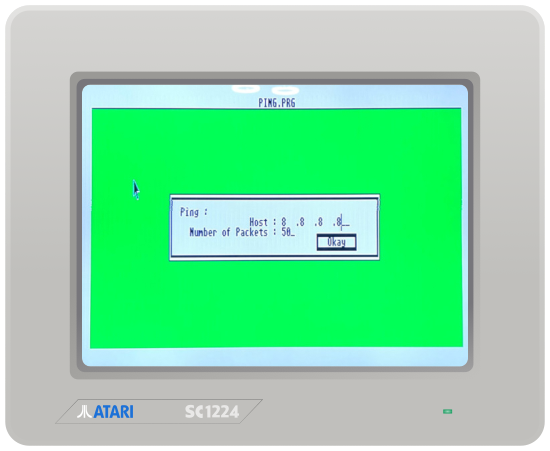
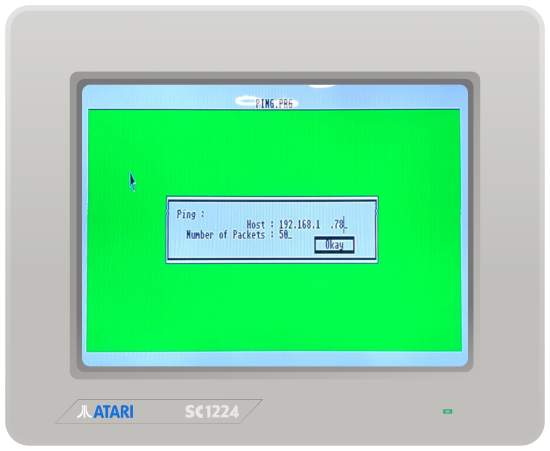
- PING (to test network reachability)
Here is the layout of the disk:
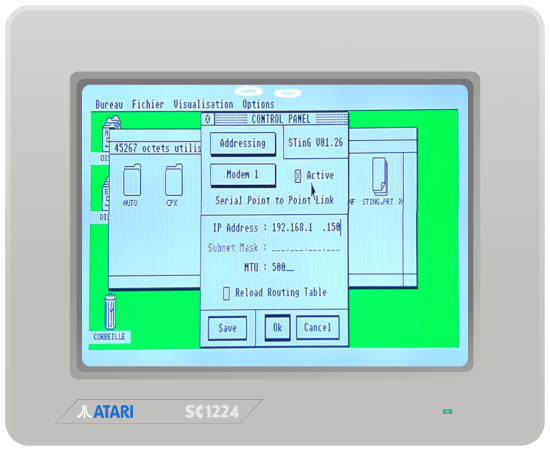
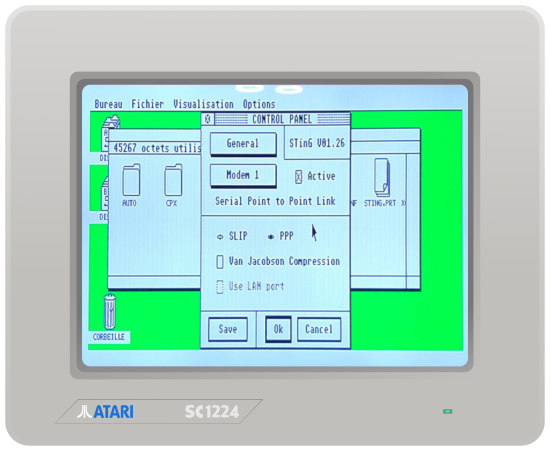
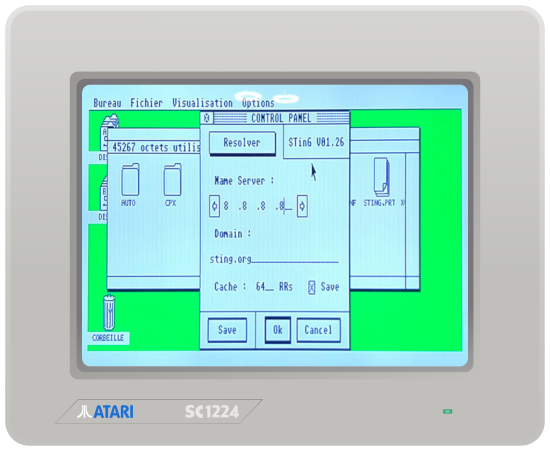
The Serial Port and STinG TCP/IP stack are configured via the XCONTROL accessory:
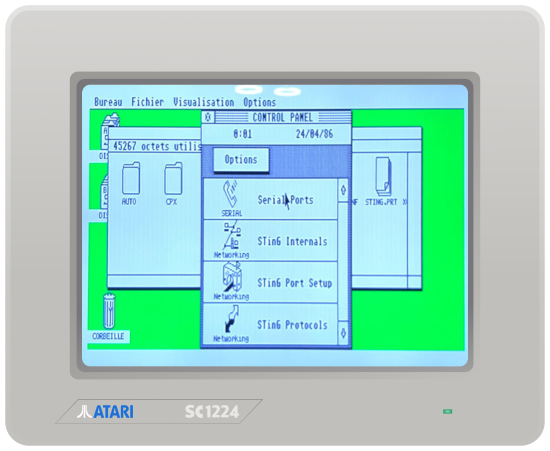
Here is the Atari ST configuration:
- Serial Port – Speed set to 9600 bauds (I tried higher settings, but its induced too many errors / lost packets)
- STinG (Port Setup, Addressing) – I fixed the Atari ST’s IP to 192.168.1.150
- STinG (Port Setup, General) – PPP setting
- STinG (Protocols / Resolver) – I used Google’s DNS 8.8.8.8
- Routing table (ROUTE.TAB) – Setting the gateway to be 192.168.1.78 and setting a default route:
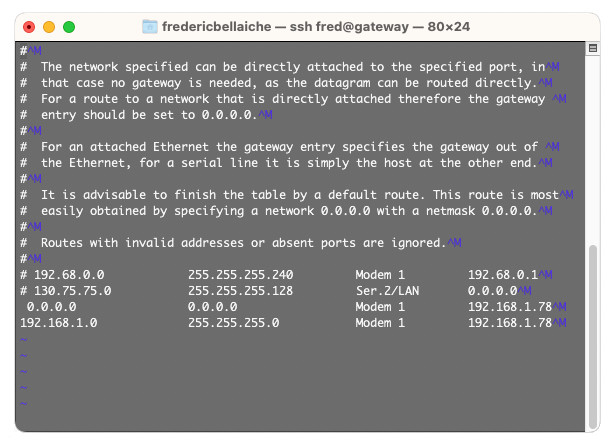
Note: in ROUTE.TAB, make sure to leave the CR/LF at the end of the lines, and make sure to only use tabs and not spaces between columns.
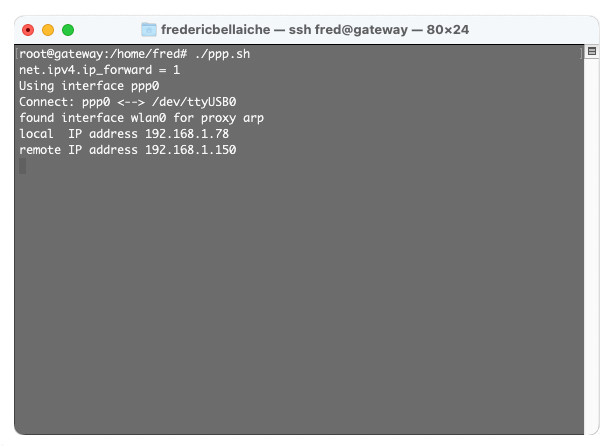
Now, let’s take a look at the gateway side. I created the following “ppp.sh” script:
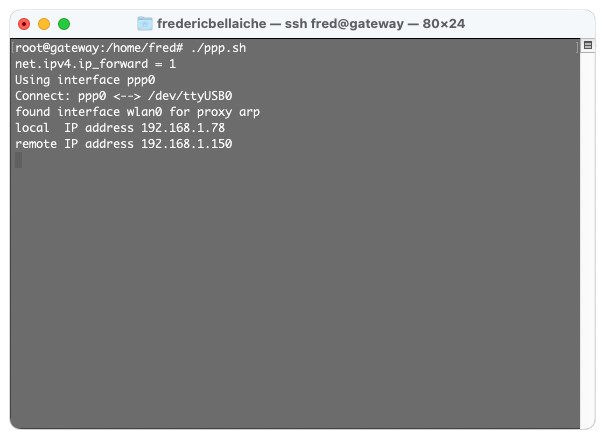
sysctl -w net/ipv4/ip_forward=1
iptables -t nat -A POSTROUTING -o wlan0 -j MASQUERADE
pppd /dev/ttyUSB0 9600 local noauth nodetach proxyarp netmask 255.255.255.0 192.
168.1.78:192.168.1.150
Here is an explanation:
- The gateway will act as a NAT device, thus, it will need to be capable of forwarding packets (a.k.a IP forwarding) that are meant for other destinations (other than itself). Linux uses the net.ipv4.ip_forward kernel variable to toggle this setting on or off. The first line of the script tells the Linux kernel to enable IP forwarding.
- IP Masquerading is a network function using NAT, allowing devices connected to the gateway (via PPP for example) to reach the Internet through it. The second line uses iptables for IP Masquerading via the wlan0 link (Wi-Fi)
- The third line invokes the PPP daemon, over the serial port (/dev/ttyUSB0), at 9600 baud, without authentication, linking the local gateway IP (192.168.1.78) to remote Atari ST IP (fixed to 192.168.1.150)
This is a rather crude script, meant for experimentation, without any error management (timeouts, etc.) that would re-spawn pppd if needed. Therefore, this script has to be manually launched at the proper time, i.e, at the end of the boot sequence, after STinG installation message:
A few seconds after the GEM Desktop appeared on the Atari ST screen, I was greeted by this on the gateway side:
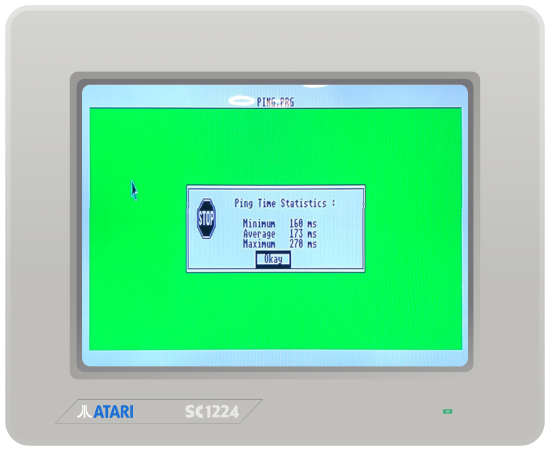
Wow, this seems to work ! Let’s test basic connectivity:
- PING from the Gateway to the Atari ST: check
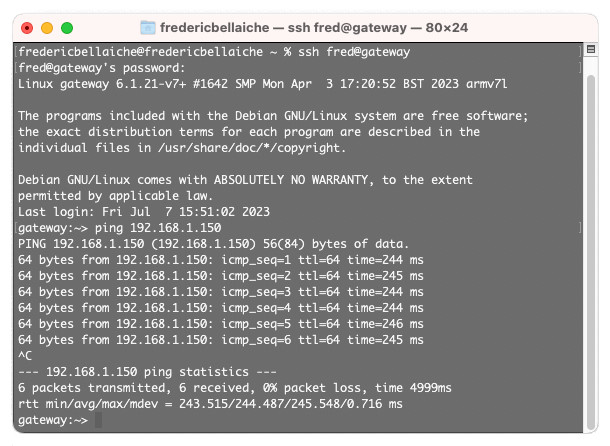
- PING from MacBook Pro to the Atari ST: check

- PING from the Atari ST to Google’s DNS: check
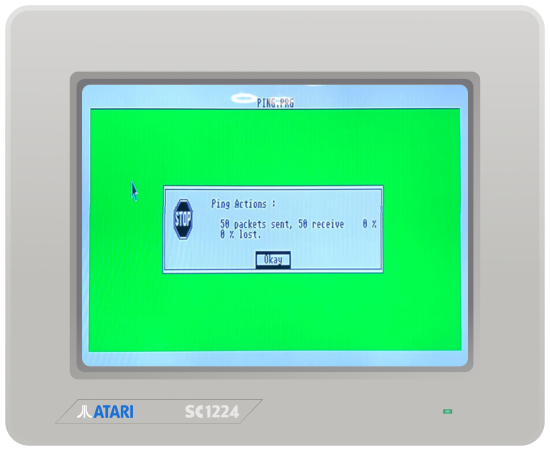
- PING from the Atari ST to the gateway (for good measure): check
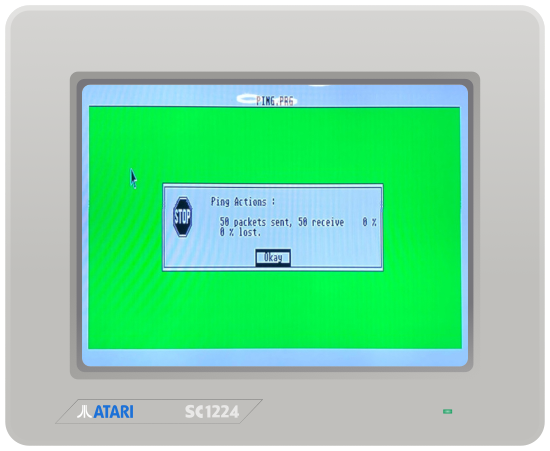
Houston, this Atari ST has access to the LAN and to the Internet ! Hurray !
Let’s move on an try to find a proper web browser. And … I struggled a lot. There are not that many web browsers for TOS. Crystal Atari Browser (also known as CAB), created by Alexander Clauss, appears to be the best one. Alas, I comes in a variety of versions. All these versions are still available online: 0.30 (beta), 1.x (freeware), 2.0 (demo), 2.7 (shareware), 2.8 (shareware).
CAB renders (old) HTML fine as long as they are stored locally. It needs a specific module – called an “overlay” (CAB.OVL) – to get HTML content over HTTP, via a TCP/IP stack. And … there is a dozen of versions of this module, written by different people, for different versions of CAB, and for various TCP/IP stacks. This … is a lot of possible combinations, and I tried a lot of them ! Some CAB.OVL do not load at all with incompatible CAB version, some combinations fails with errors when trying to retrieve an HTML content, some seems to work … then bombs.
In the end, the only combination that worked for me (my Atari ST runs an old TOS 1.0, this is a strong constraint) was found here:
- ftp://kurobox.serveftp.net:3021
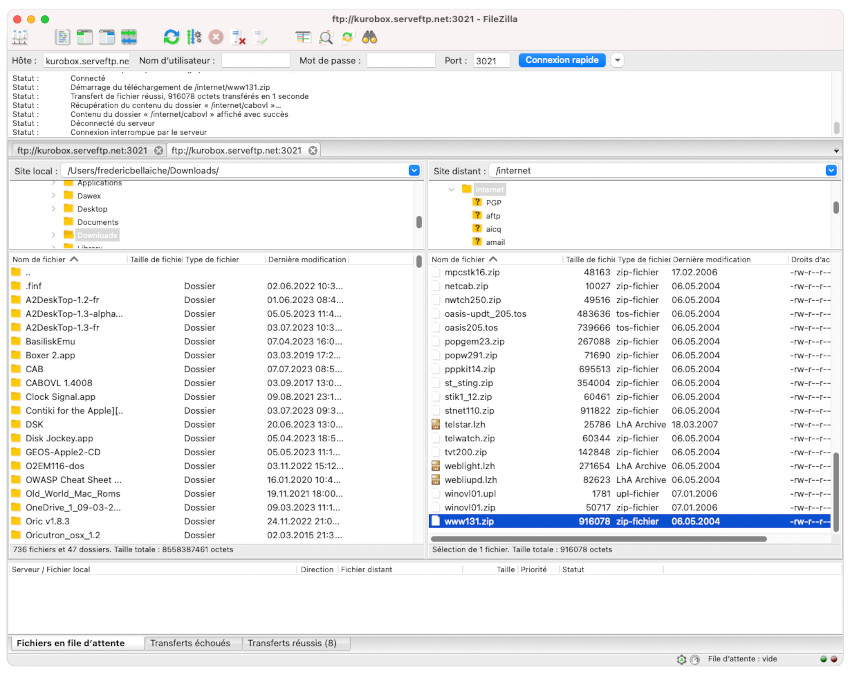
The “www131.zip” package contains:
- network utilities: Telnet, IRC, Finger, AntMail
- the STik TCP/IP stack
- CAB 1.3
- CAB.OVL (from Dan Ackerman, version 1.1800)
I created a new floppy disk with the following layout:
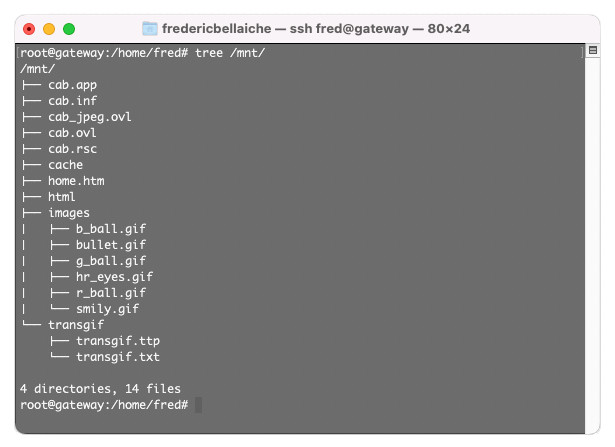
I did the following, using the content of CAB from www131.zip as a starting point:
- Copied CAB_E.RSC over CAB.RSC resource file (CAB defaults in German, CAB_E.RSC is the English resource file)
- Copied CAB.OVL at the root of the disk
- Customized the landing page HOME.HTM (my German being … not that great)
- Created the CACHE folder (more on this later)
- Removed documentation and unnecessary resource files, so that all would fit into a single floppy disc
Note: I did not use the STik TCP/IP stack, nor the network utilities from www131.zip, but only the CAB related files
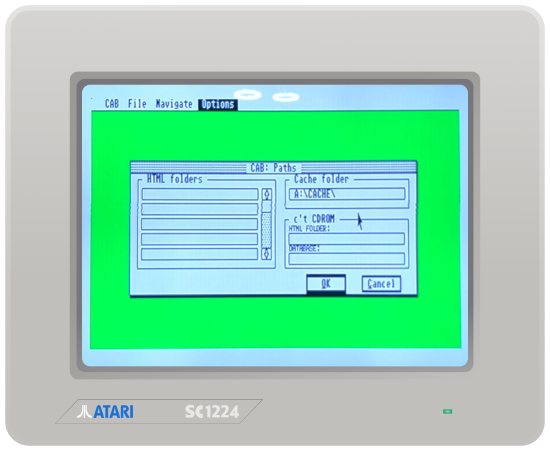
Once done, I launched CAB and set the cache folder path to A:\CACHE\ (it defaults on C:):
And … there you go !
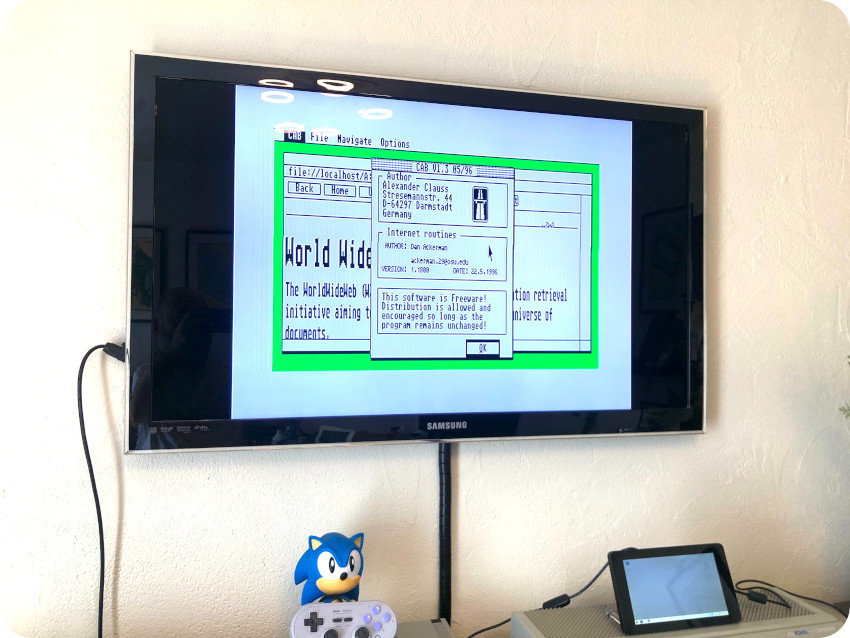
Here is CAB loading the customized HOME.HTM landing page from disk:
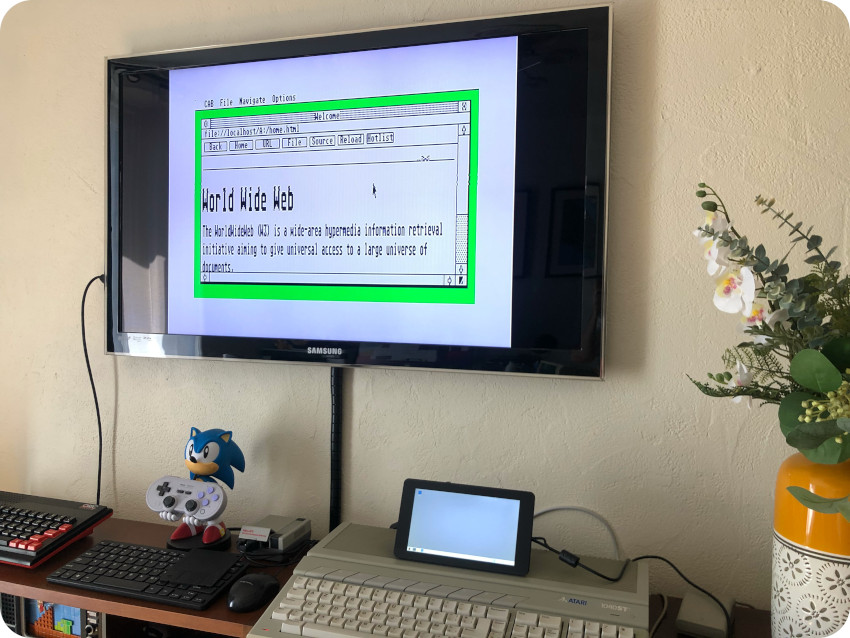
Here is picture of CAB in actions, browsing the Internet via http://frogfind.com (the search engine for retro computers, by ActionRetro):
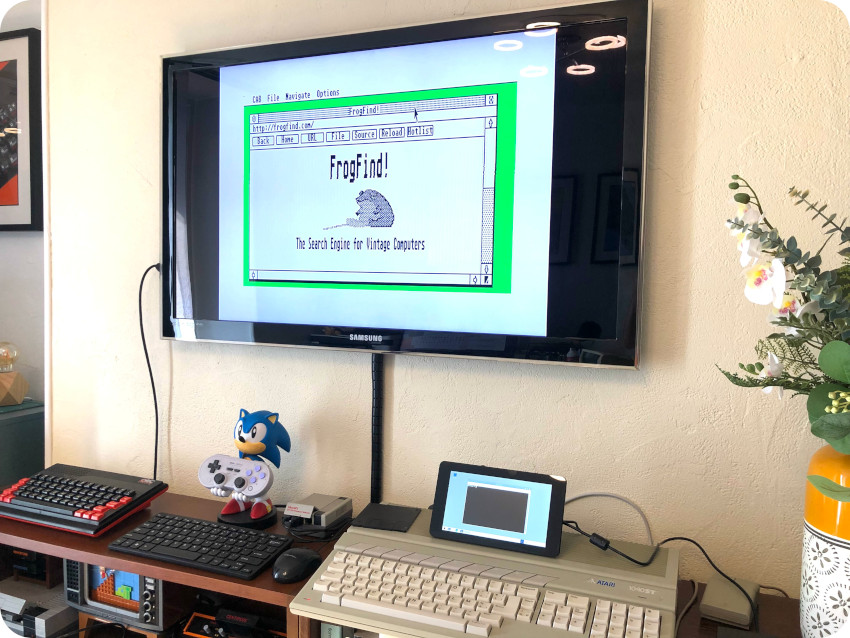
Internet on the Atari ST (at 9600 bauds) is … slow as hell, but still, it rocks !!
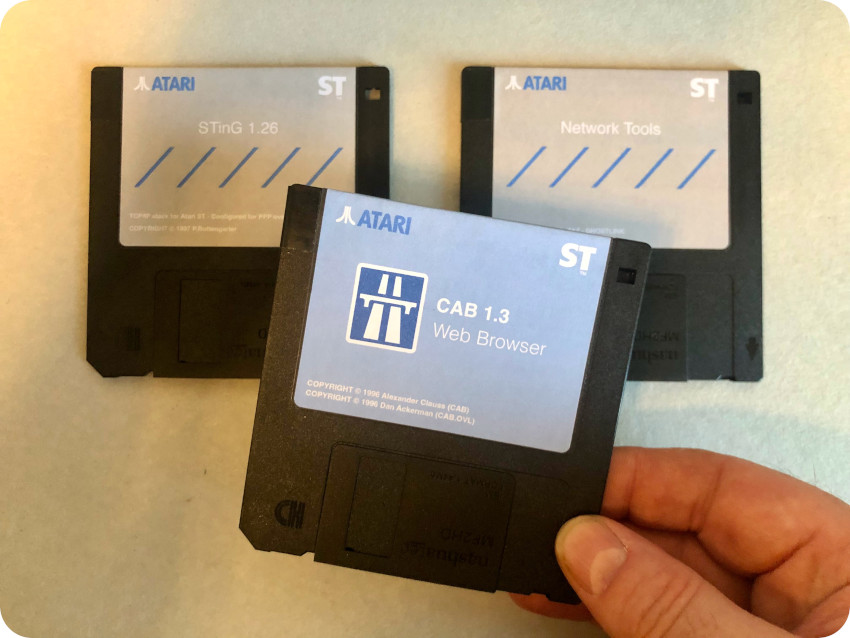
To celebrate, I created three stickers to these newly created Atari ST networking diskettes:
Macintosh Plus
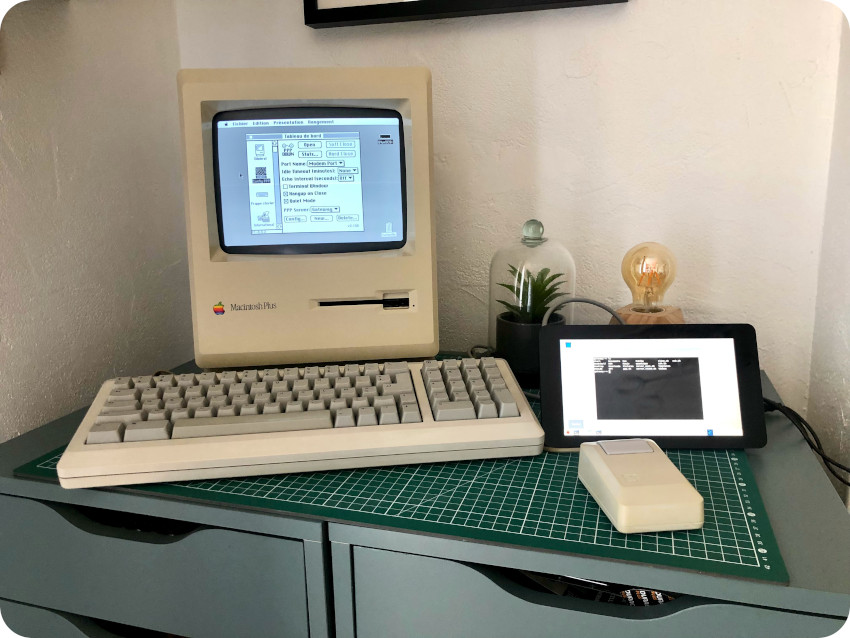
Let’s move on and work on adding network capabilities to my Macintosh Plus:
- Connect the Macintosh to the Raspberry Pi via a null modem cable (from the mini DIN-8 port of the Mac to the DB9 RS232 adapter, plugged into a USB port on the Raspberry Pi)
- Use the Raspberry Pi as a gateway for internet access
The null modem cable plugs into the modem port (serial), located on the back of the Macintosh Plus:
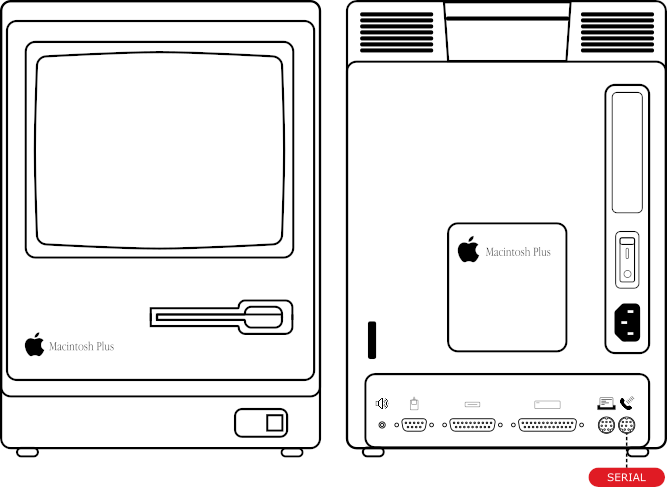
Macintosh Plus null modem cable
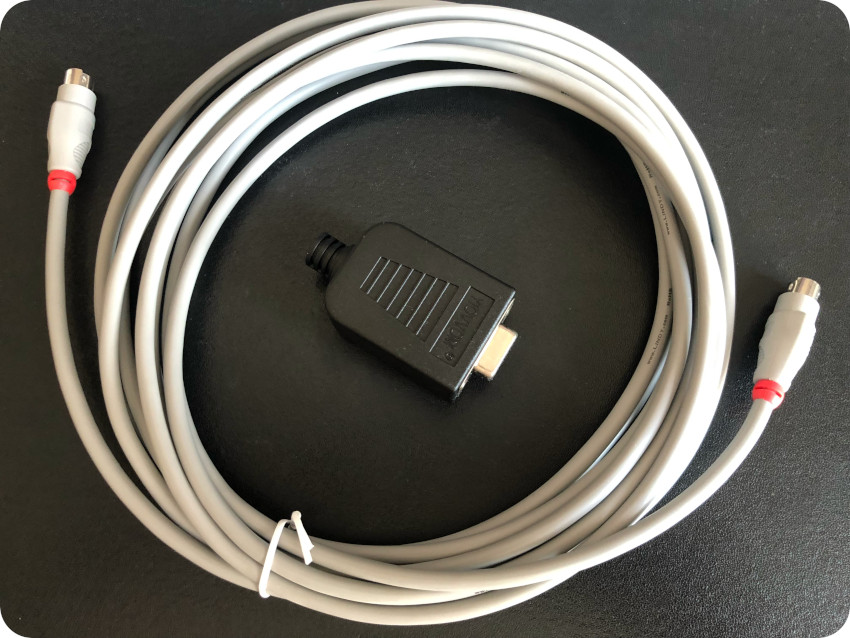
To build a Macintosh Plus serial null modem cable, I bought online:
- A 5 meter male-male mini DIN-8 cable,
- A RS232 female D-Sub (DE-9) connector
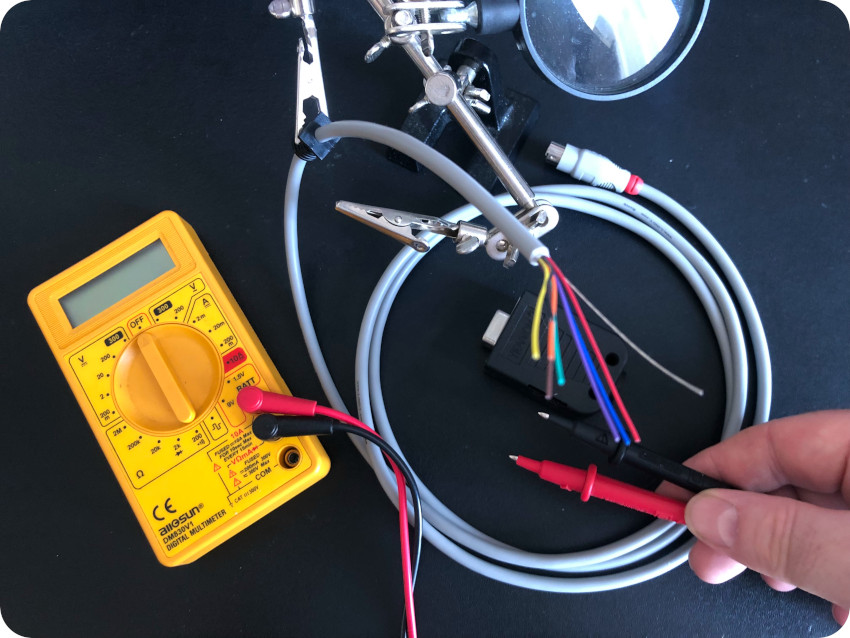
I started by cutting the mini DIN-8 in half, and identified the pins / wires with a multi-meter in continuity mode:
Let’s take a look at the wiring for our needs:
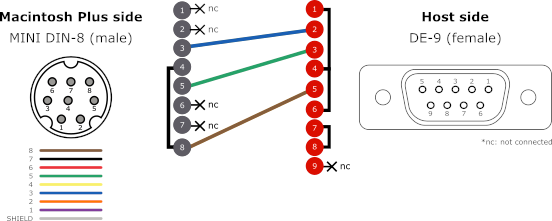
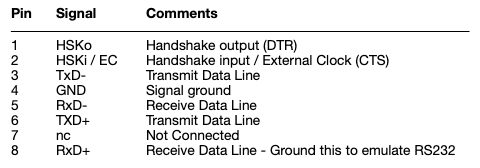
Note:
- There are many wiring schematics floating around, but I could not find one that suited my needs. So I created this one, based on Apple’s documentation of the serial port pinout.
- The Macintosh Plus serial port is actually a RS-422 interface (not an RS-232). The signals come in a balanced pair, a positive (plus) and a negative (minus), for each data signal (RxD-/RxD+, TxD-/TxD+). Moreover, the GPIn (General Purpose Input, pin 7) is not implemented on early Macintosh Plus.
- To emulate a RS-232 interface, pin 8 (RxD+) on the Mini DIN-8 connector has to be grounded (connected to pin 4/GND on the DIN-8 connector and to pin 5/GND on the DE-9 connector)
- TxD- (pin 3) and RxD- (pin 5) are used for Transmit / Receive signals, respectively connected to pin 2 and pin 3 on the DE-9 connector
- To disable hardware handshake, on the DE-9 side, pins 1, 4 & 6 are connected together and pin 7 & 8 are connected together
Let’s start with the wiring on the DE-9 side, connecting pin 7 to pin 8 and soldering pins 1, 4, & 6 together:
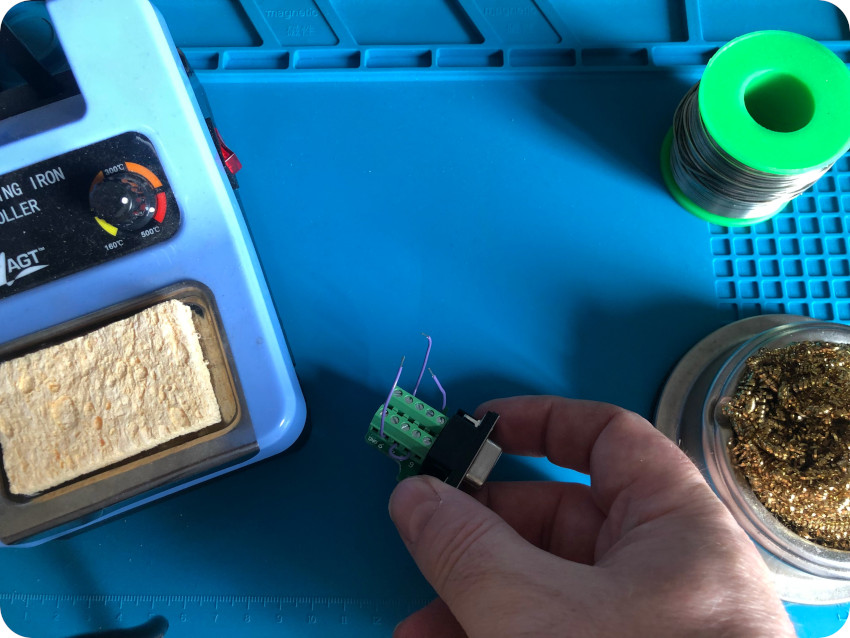
Once done, it is just a matter of:
- connecting pin 4 & 8 (yellow and brown wire) to pin 5
- connecting pin 3 (blue wire) to pin 2
- connecting pin 5 (green wire) to pin 3
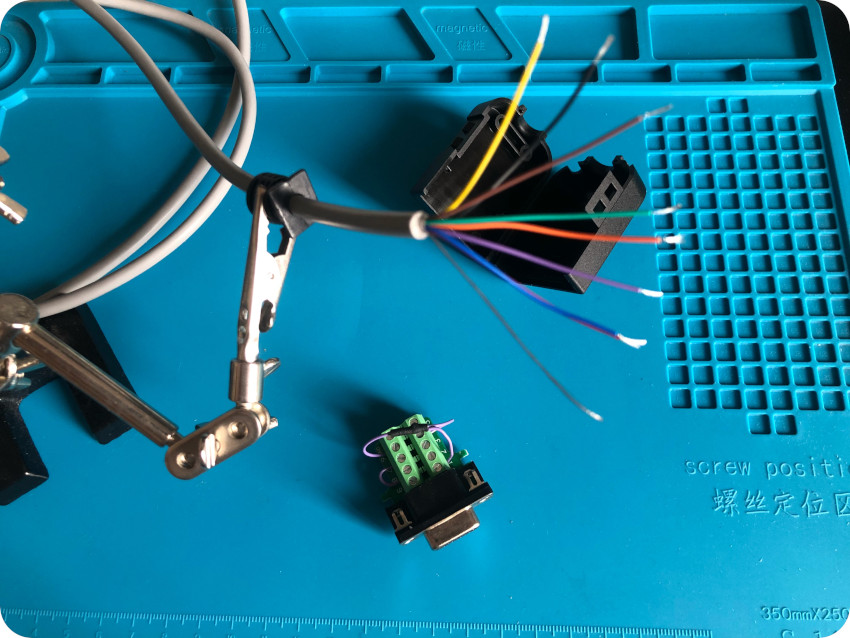
There you go ! A brand new serial null modem cable for the Macintosh Plus:
The male mini DIN-8 plugs into the serial port of the Macintosh Plus:
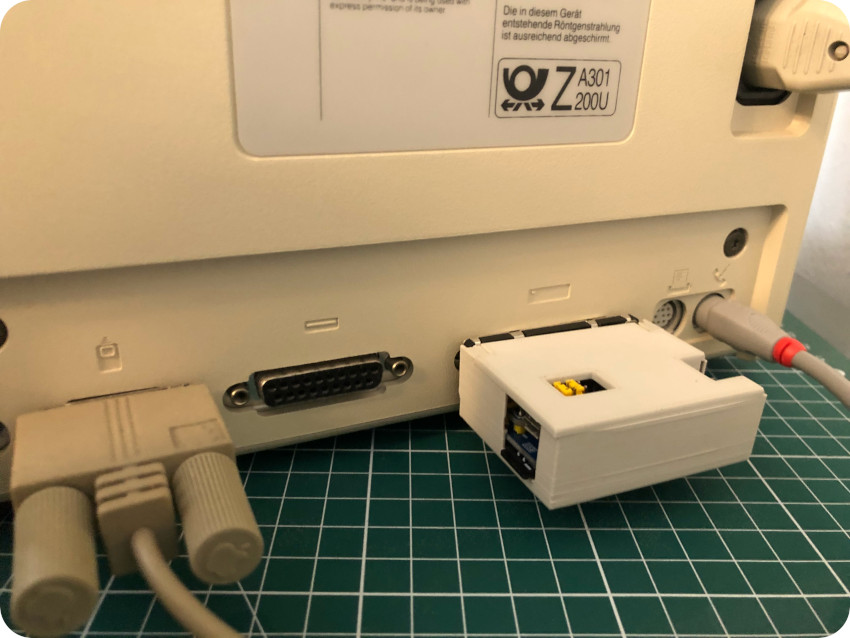
And the female DE-9 connector plugs into the RS-232 USB adapter, connected to the gateway (Raspberry Pi):
VT Terminal
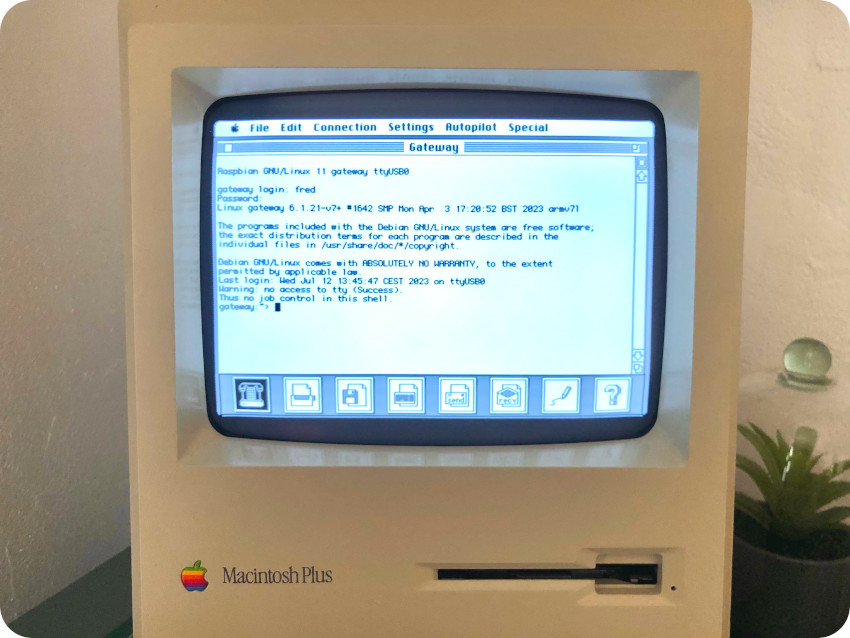
We are now ready to test terminal emulation on a Macintosh Plus / System 6. There are many terminal emulators available. I tried the following ones:
- ZTerm 1.0: ZTerm is a terminal emulator that can run on System 6. It includes a lot of features, but – for some reasons – the key mapping was wrong: mapped to a QWERTY keyboard, and I am using a French Mac Plus. I was working well, but, for this practical reason, I did not use it.
- Kermit 0.98: Kermit is a networking tool focused … on the Kermit file transfer protocol (more on that later on). But it also includes excellent terminal emulation features.
- Smartcom II 3.3: Smartcom is a suite of tools that allows the user to communicate with other personal computers, mainframes, bulletin boards, … It provides both terminal emulation and file transfer features.
Both Kermit and Smartcom are easily configured:
- Direct communication (no modem)
- Serial / Phone port
- Speed set to 9600
- Terminal emulation: VT100 and / or ANSI
On the gateway side, all I had to do was launching the server_vt100.sh script (or server_ansi.sh for ANSI compatibility)
Here is a (bad) picture of Smartcom II logged into the gateway:
And here is another (bad) picture, using lynx on the gateway to access to http://info.cern.ch:
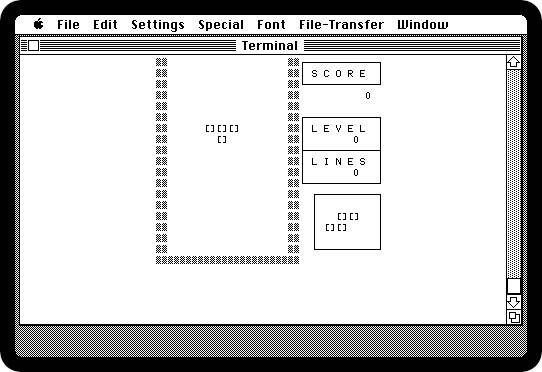
Kermit was actually a bit better at terminal emulation. Since I am really bad at taking picture of CRTs, here are a few screenshot (spoiler alert: these screenshots were transferred from the Macintosh Plus via the serial cable, more on this in the following paragraph):
- Logging into the gateway
- Playing TermTris
Transferring files
For file transfers, I choose to go the old fashion way: using the Kermit protocol. Born at the Columbia University in the early 80’s, it supports text and binary file transfer between computers over serial connection.
Over time, Kermit has been implemented on hundreds of computer systems, including:
- C-Kermit (on GNU/Linux)
- Kermit and Smartcomm II (on Macintosh / System 6)
On the gateway side, I installed C-Kermit via: sudo apt-get install ckermit
I launch kermit and and configured it:
- to use a null modem
- to use device /dev/ttyUSB0 (the RS232 USB adapter)
- to set the speed to 9600 baud
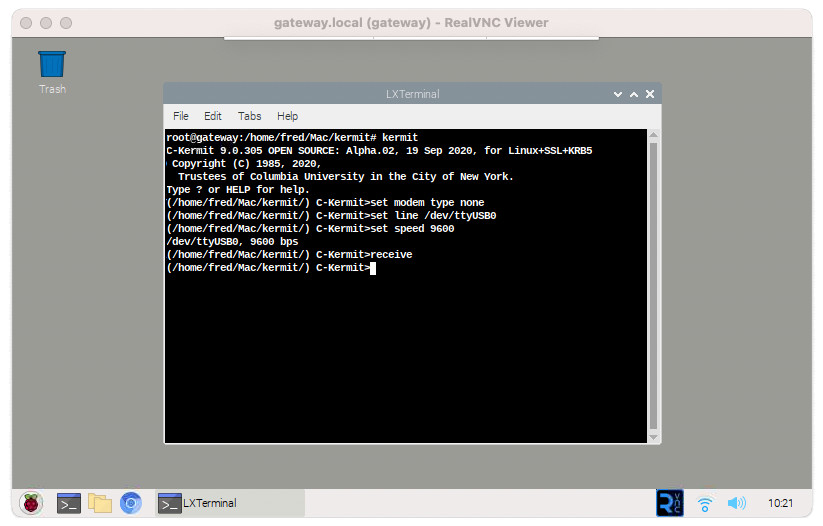
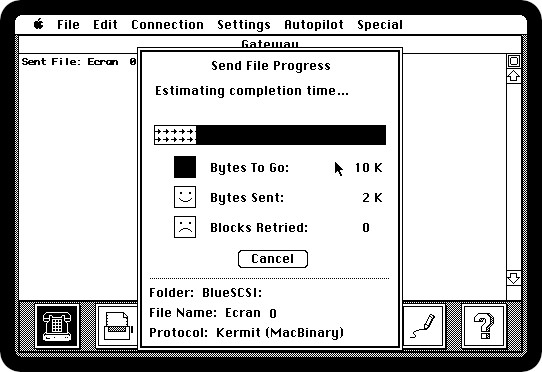
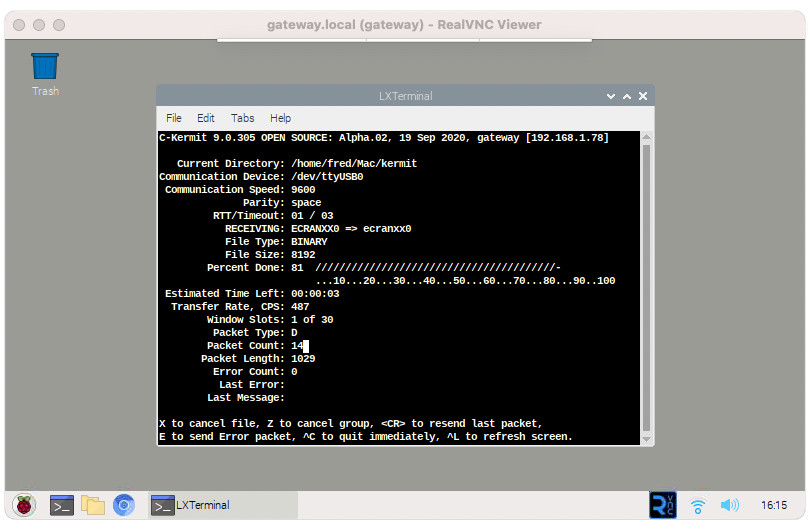
Then, I typed in the “receive” command to initiate a file transfer from the Macintosh Plus to the gateway:
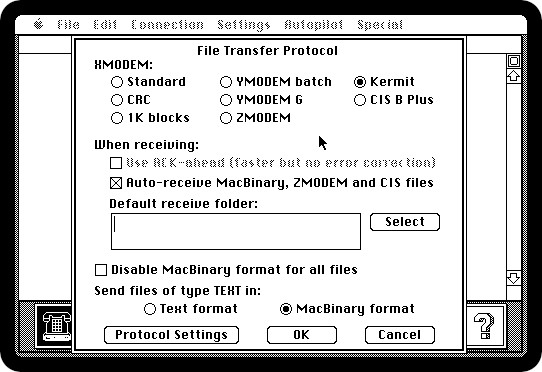
Meanwhile, on the Macintosh side, I used Smartcomm II (which I found to be the more reliable for file transfer). In the File Transfer Protocol settings, I chose:
- The Kermit protocol
- To send and receive files as MacBinary (more on this later)
I clicked on the “Send” icon, then
- I selected one of the screenshot files (“Ecran 0“, MacPaint format)
- Clicked on the “Add” button
- Clicked on the “Send List” button

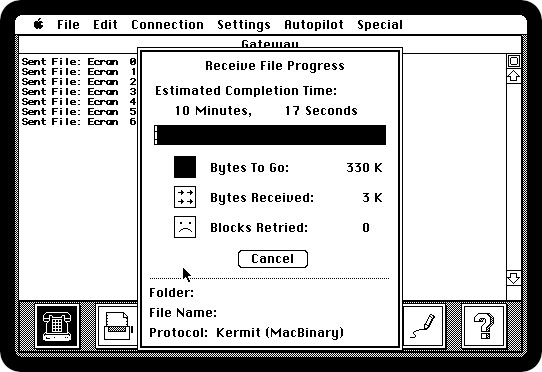
After a brief handshake with the gateway, the transfer started:
Here is the corresponding screenshot on the gateway side:
I repeated this process to retrieve more screenshots taken on the Macintosh Plus. Here is a (blurry) screenshot showing both sides during the transfers:
![]()
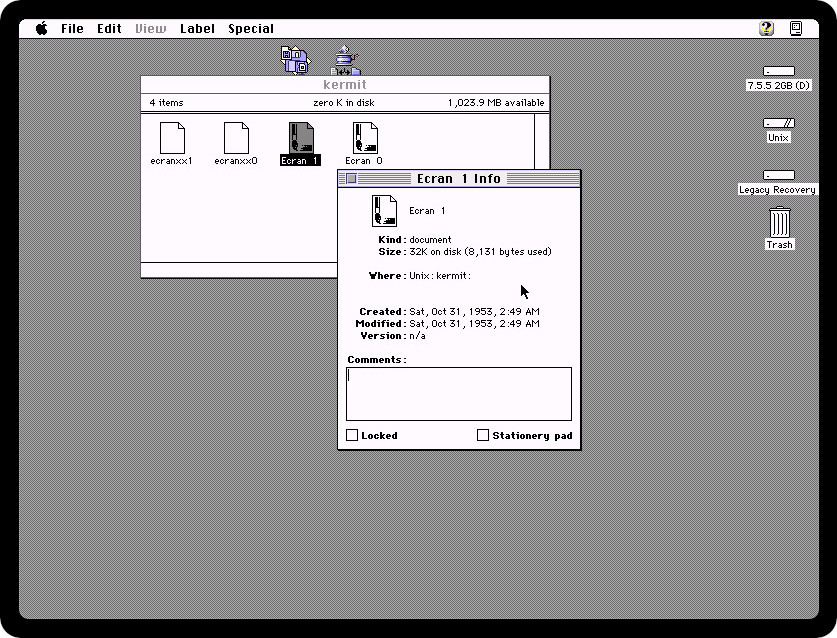
Now, let’s take look at the retrieved files. I transferred them from the gateway to my MacBook Pro and copied them into a Basilisk II emulator shared folder (named “/Unix/kermit/” in the next screenshots).
I launched the emulator (running System 7.5.5) to see if I could open the screenshot files. Since I created them on the Macintosh Plus (pressing command-shift-3), these should be MacPaint files:
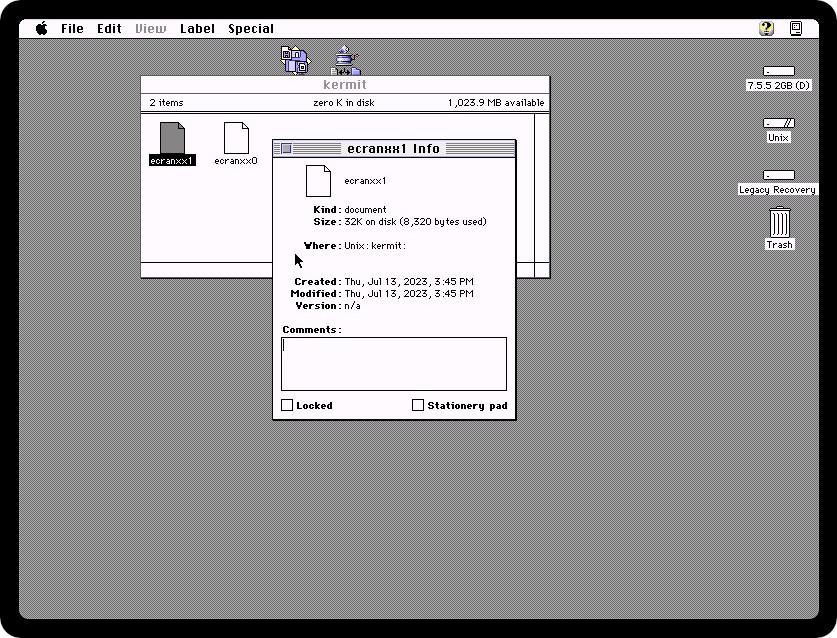
Alas, I could not open them:
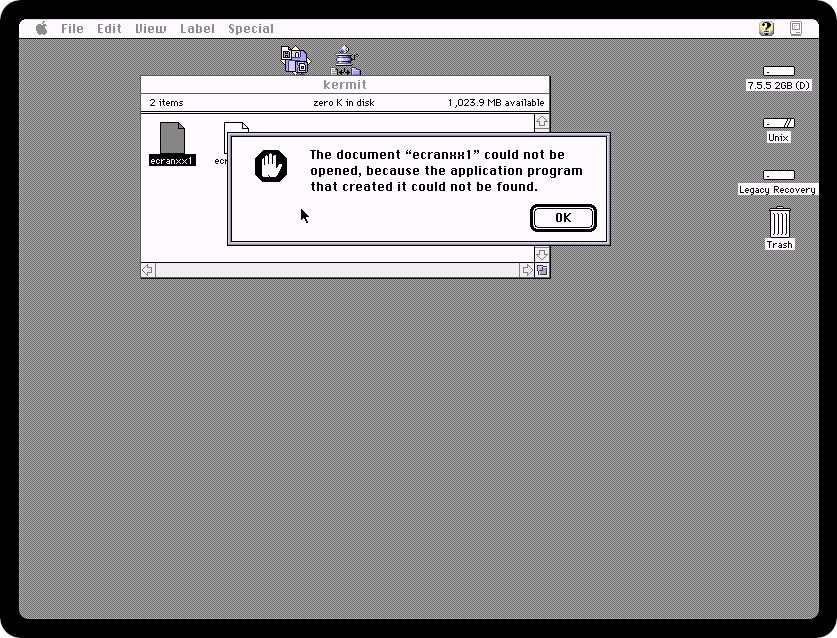
Were they corrupted during transfer ? Well … no ! To understand this, we have to learn a bit more about HFS and the MacBinary format.
Starting with System 2.1, classic Macs use the HFS filesystem. In a computer filesytem, a fork is a set of data associated with one filesystem object. Filesystems without forks only allow a single set of data for the content, while filesystems with forks allow multiple such contents. With HFS, files have two forks: data fork and resource fork. A data fork contains unstructured binary data. A resource fork contains structured data in a specific format, to store information such as icon bitmaps, shape of windows, file association, etc. Physically, these are separate files, but the OS transparently ensures the two separate files are treated as a one.
In order to losslessly transfer HFS files or for storage purpose on non HFS-aware systems (i.e almost all systems, including GNU/Linux and … current mac OS versions) the MacBinary combines the two forks into one file, suitable for transfer. That is why I selected the MacBinary format when configuring the Kermit setup.
To use the transferred files, one has to “decode” these files. Fortunately, current mac OS versions bundle the macbinary tool:
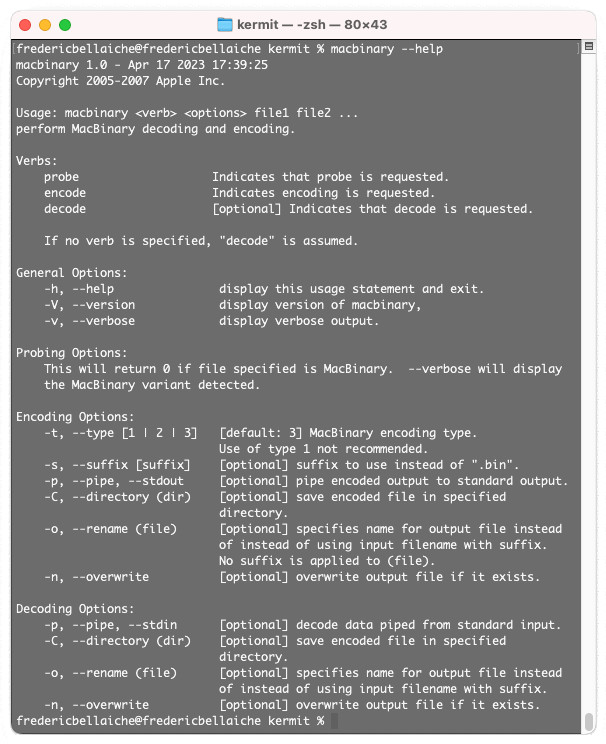
Note: there are also similar tools available for GNU/Linux (and MS Windows, I guess), but I have not tried them yet.
I used the CLI to decode the transferred files:
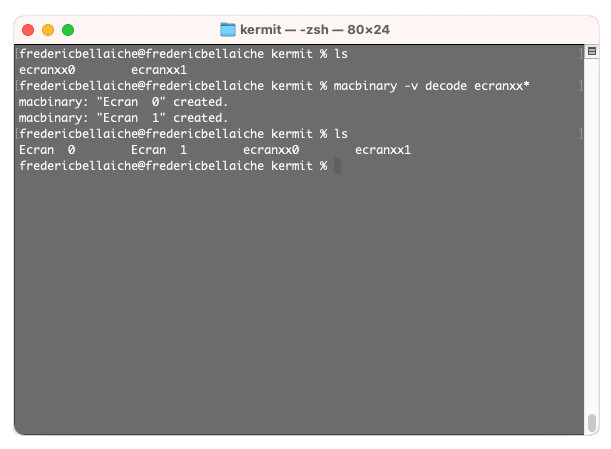
Using Basilisk II emulator, we can see that the decoded files are now properly recognized and can be used in MacPaint (or PhotoShop):

Great ! From there, I could convert them into a modern format … and use them in this very blog post !
Note: of course, this works both ways, and I could also use the Kermit protocol to send files from the gateway to the Macintosh plus:
TCP/IP over null modem
Let’s tackle our last challenge: using the Internet on a Macintosh Plus running System 6, over a serial null modem cable. For this, I used the very same kind of setup that I used for the Atari ST:
- The router (192.168.1.1) provides broadband access (FFTH) and Wi-Fi network
- The gateway (192.168.1.78) is connected to the Wi-Fi network (wlan0) on one hand, and is connected to the Macintosh Plus via a serial null modem cable on the other hand. It runs a PPP daemon, and provides NAT (to wlan 0) and IP Forwarding
- The Macintosh Plus (192.168.1.150) runs a TCP/IP stack and gets it’s internet access via PPP
- My MacBook Pro (192.168.1.18) is used to get access to the Raspberry Pi (via SSH and VNC) and test network connectivity
Note: to keep things simple, the gateway, the router and the Macintosh Plus are configured to have fixed IP addresses.
Let’s start with the TCP/IP stack. To properly run a TCP/IP stack, I found out that I needed to upgrade my Mac Plus system to at least System 6.0.3. This wasn’t a straightforward task, since I couldn’t not find a proper French version for it. I ended up using a French/Canadian version of System 6.0.5.
But, before breaking anything on my venerable Mac, I did a dry run test using the Mini vMac emulator. For this, I extracted and backed-up the current .hda image from the SD card of the BlueSCSI device my Mac Plus uses as a SCSI Disk Drive:
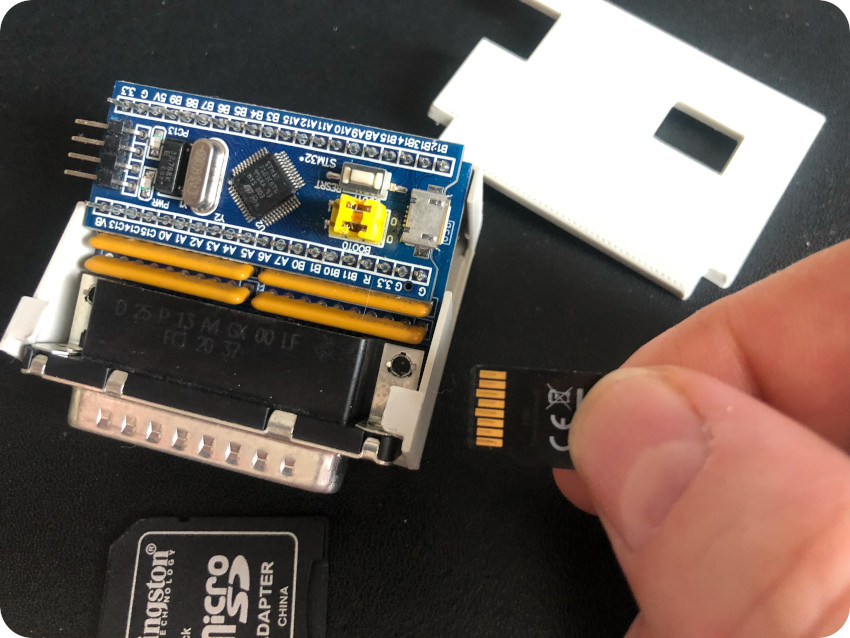
I used the incredibly useful Disk Jockey application to convert back and forth disk images for BlueSCSI, Mini vMac and Basilisk II:
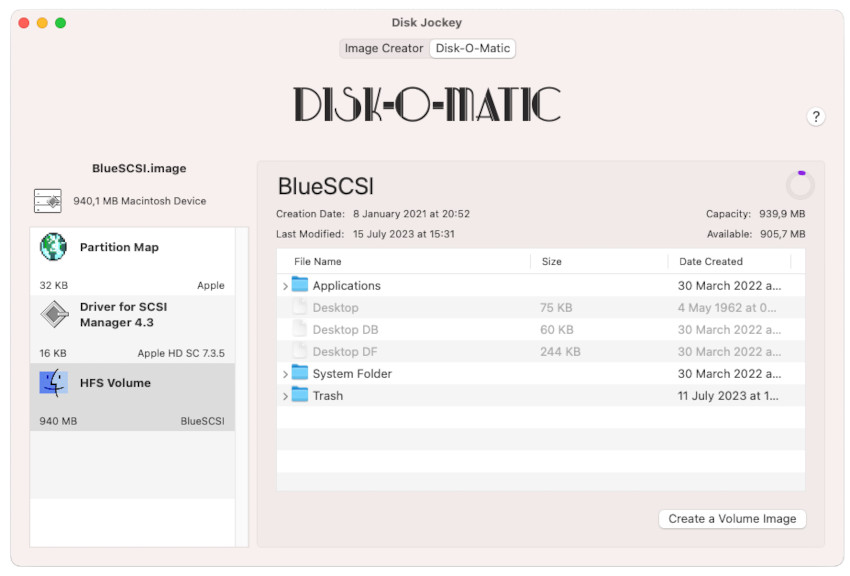
I took the .hda image from my BlueSCSI and mounted it into Basilisk. From there, I could add the software I wanted to test. Then I converted the image into a volume image suitable for Mini vMac, messed with configurations, found I needed other versions … and repeated this cumbersome process until it worked. This allowed me for test various configurations (System, MacTCP, MacPPP, settings, …);
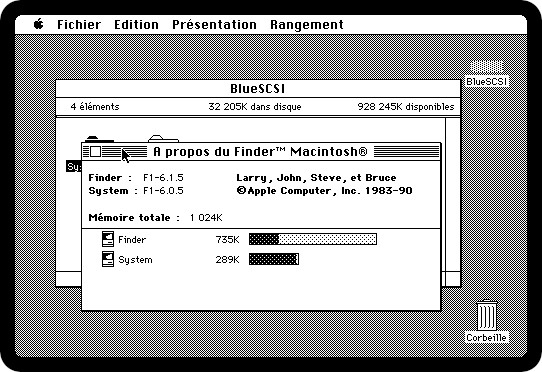
A couple of days later, I found the right combination and put a working setup back to the SD card. I now have a Macintosh Plus running System 6.0.5 (French/Canadian) !
This procedure also allowed me to find and test a TCP/IP setup. I needed these two components:
- MacTCP: MacTCP was developed by Apple to provide TCP/IP networking for System 6.0.3 and later. At the time (1988), it was the first implementation of a TCP stack for a non-Unix platform (and cost a whooping 2500$). It had reliability issues, and was replaced in 1995 with Open Transport. MacTCP is configured via the Control Panel. For my setup, I used MacTCP 2.0.6 (MacTCP-2-0.6.dsk).
- MacPPP: MacPPP was a freeware developed by Merit Network (for the University of Michigan). It implements Point-to-Point Protocol, which allows to use TCP/IP over serial lines. MacPPP is configured via the Control Panel. There are 2 parts (PPP – which adds features to MacTCP – and Config PPP). For my setup, I used MacPPP 2.1SD (MacPPP.dsk)
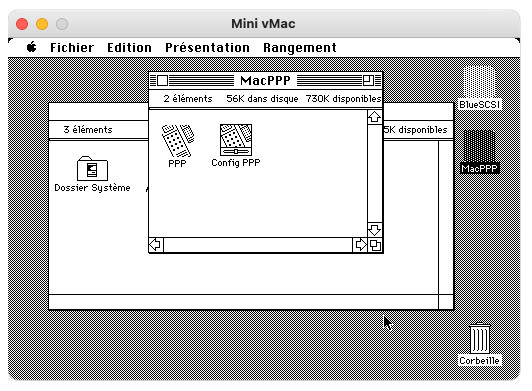
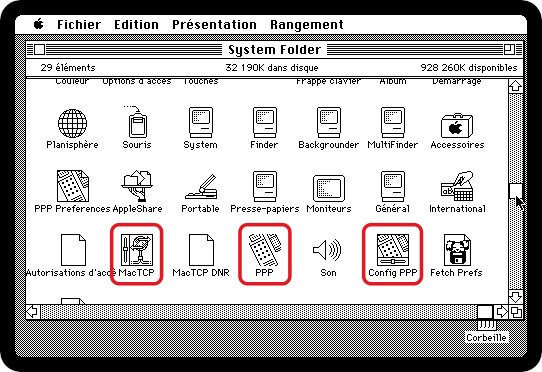
Note: during the tests with Mini vMac, Config PPP kept crashing or displayed errors whenever I clicked on the configuration icon. I found out that this was caused by a localization problem. Renaming “Dossier Système” into “System Folder” solved the problem:
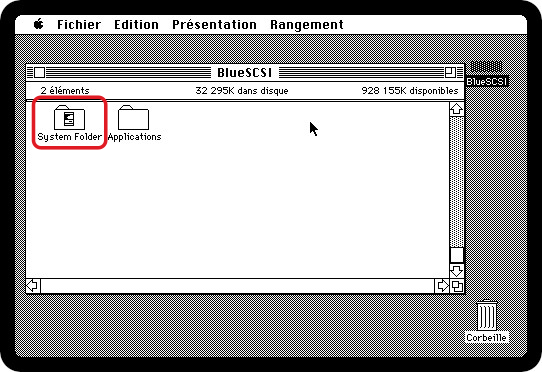
Indeed, MacTCP, PPP and Config PPP files are to be dropped into the “System Folder“:
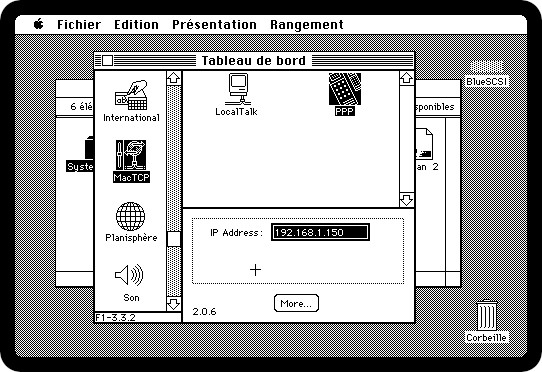
Once the Macintosh Plus rebooted, the TCP/IP stack could be configured through the Control Panel:

First, bring up the MacTCP panel, select PPP and click on the “More…” button:
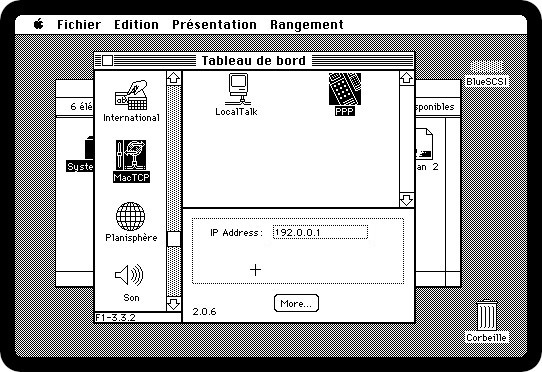
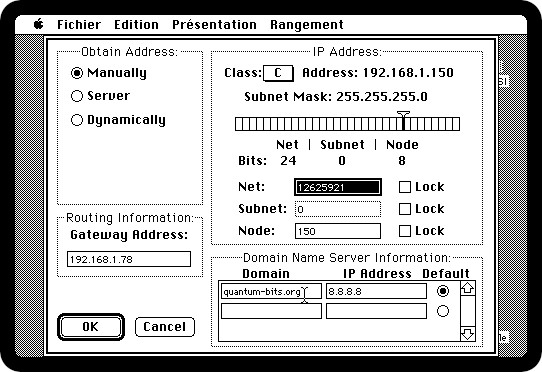
This brings up these new settings:
- Obtain Address: select Manually
- Routing Information: enter the gateway address (192.168.1.78)
- IP Address: select a class C address:
- Domain Name Server Information: add Google’s DNS (8.8.8.8) and tick the “Default” selector
- Click on the “OK” button
Now, in the IP address box, enter the (fixed) IP address of the Macintosh Plus: 192.168.1.150
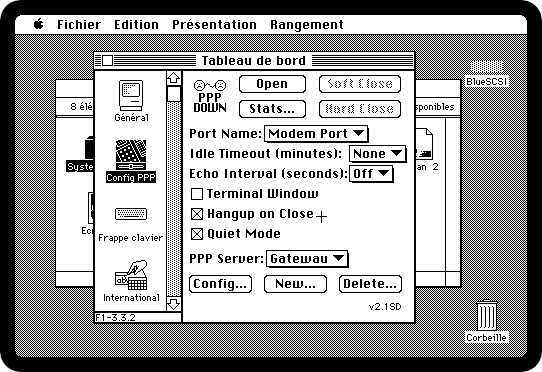
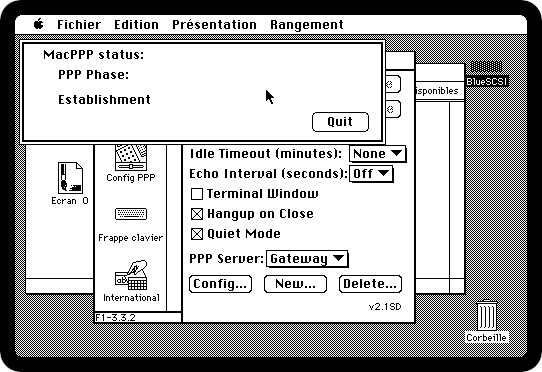
The next step is to bring up the Config PPP panel:
- Port Name: select “Modem Port“
- PPP Server: click on “New…“
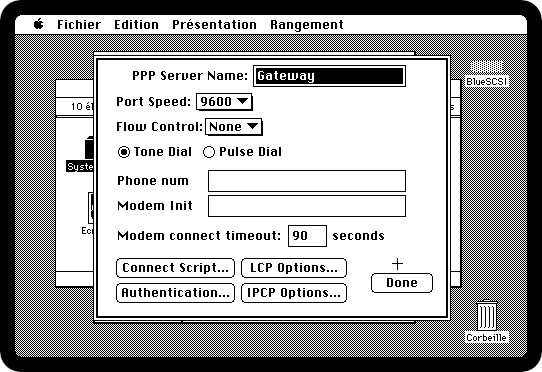
In the PPP server panel:
- PPP Server Name: enter the name on the new configuration (Gateway)
- Port Speed: select 9600
- Click on the “Done” button
We are all set ! Let’s try !
Clicking the “Open” button from the Config PPP panel initiates the protocol:
On the gateway, I launched the “ppp.sh” script:
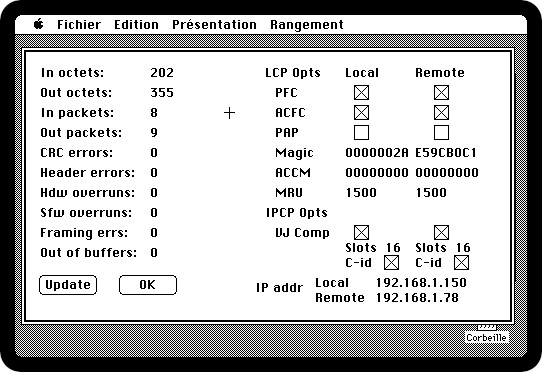
It freakin’ worked ! The following screenshot is taken from the Config TCP panel (clicking on the “Stats …” button):
Let’s test the network connectivity:
- PING from the gateway to the Macintosh Plus: check

- PING from my MacBook pro to the Macintosh Plus: check
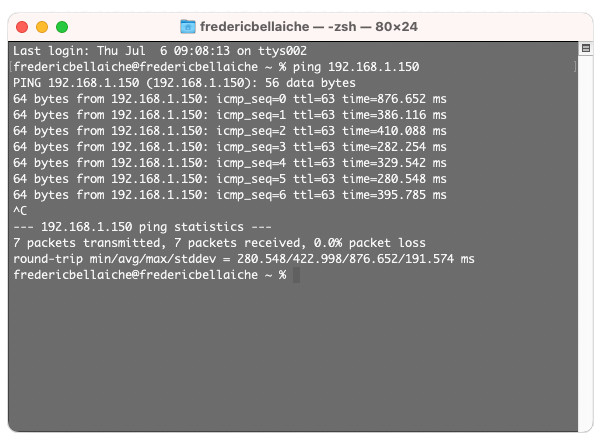
- Using MacTCP Ping to PING from the Macintosh Plus to the gateway: check
Cool ! This Macintosh Plus has a working MacTCP stack and is using MacPPP via the gateway !
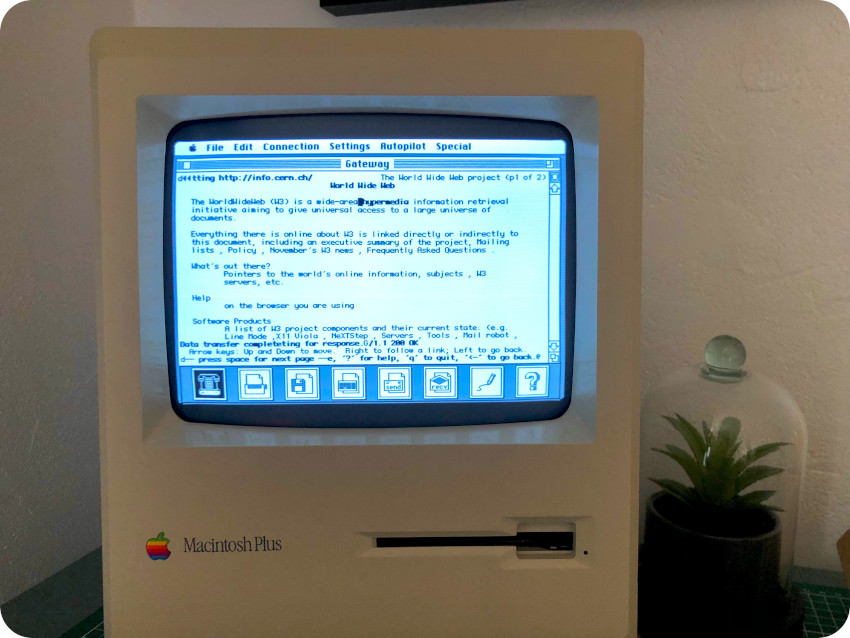
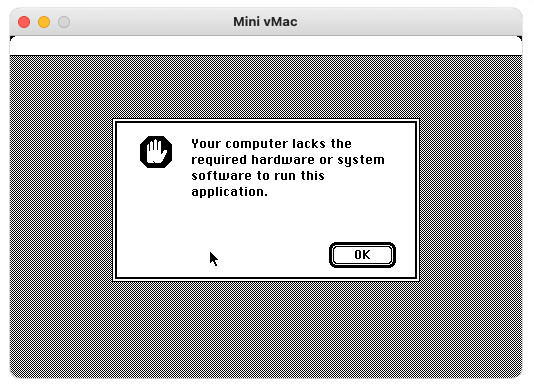
Let’s move on an try to find a web browser. Just like for the Atari ST, this wasn’t an easy task. There are very few web browsers actually working with System 6. For example, the venerable NCSA Mosaic (which was the first graphical Web Browser I ever used, on HP/UX, around 1994), though is supposed to work on System 6 … does not:
I could find 3 web browsers that could (up to a point) be launched on System 6:
- MacLynx: MacLynx is the Macintosh port of the text-based Lynx web browser. The beta version runs on System 6 … but bombs each time I try to open an URL.
- MacWeb: MacWeb is an early web browser, first released in 1994. Early versions runs on System 6 … but bombed also.
- MacWWW: Also known as Samba, this web browser was released in 1992. It was co-written by none other than Robert Cailliau himself and bears the CERN logo ! As a former particle physicist, who studied and worked at CERN in the early/mid 90’s and witnessed the birth of the web there, this had to be my web browser of choice for the Macintosh !
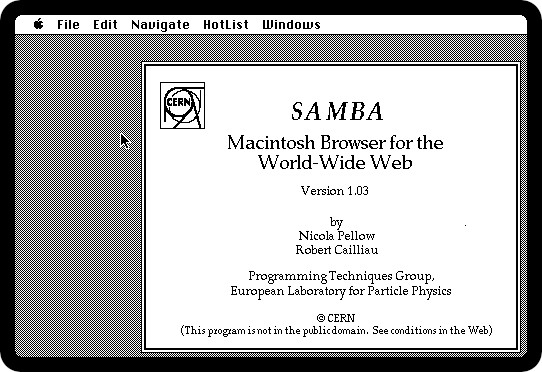
Version 1.00 was released on 12 May 1993 with the commentary: “We know there is much to be improved, but it works well on system 7 and system 6.0.5“. Let’s take this beast for a spin !
Samba is very finicky and prone to crash. Moreover, it was released with old standards in mind. It does not support HTTPS. This rules out most of today’s web. Moreover, Virtual host names (which is needed to host multiple websites on a single IP address) are not supported. This means that for most (if not all) web sites, Samba will respond with URL redirection or a Not Found error messages.
This includes unfortunately both sites I wanted to use: http://frogfind.com and http://info.cern.ch
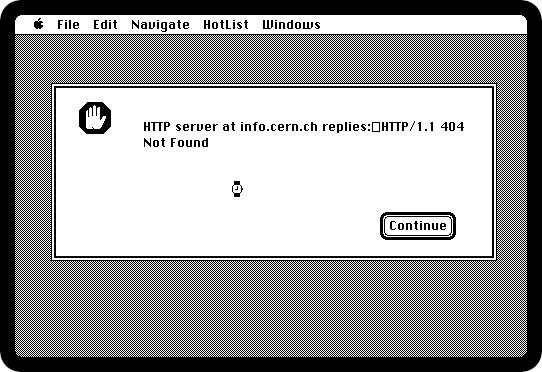
Thus … to get something working, I installed and configured an Apache server on the gateway, and created a landing page with the content of the very first web page:
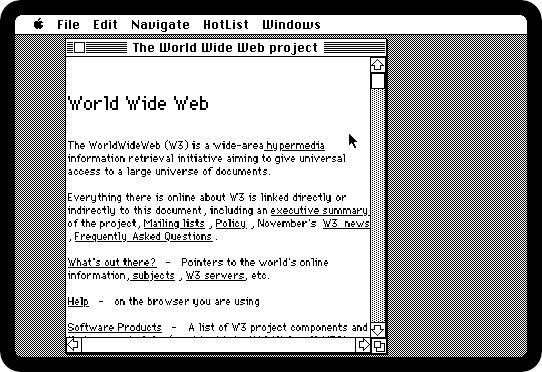
And … yes, this worked. Web browsing from a Macintosh Plus, running System 6, over serial null modem cable is possible. But most certainly very limited and very frustrating.
But seeing this web page, on a browser written by Robert Cailliau, on my beloved Macintosh Plus … was glorious !
Since the web browsing user experience was … frustrating, I wanted to test another Internet tool. I chose the FTP protocol, which was easy to setup:
- On the gateway side, I chose to install the proFTPd server: sudo apt-get install proftpd
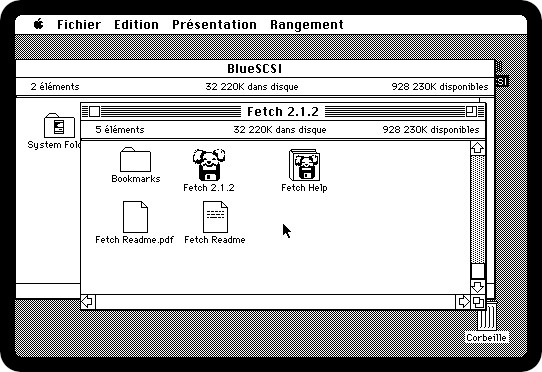
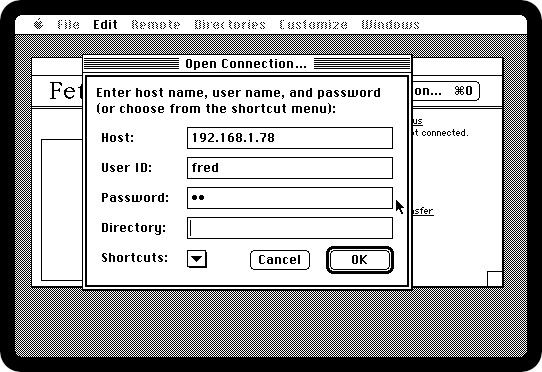
- On the Macintosh Plus side, I chose to use the Fetch 2.1.2 FTP client:
I created a empty ftp folder in the home directory of the fred account, and used this account to log into the gateway FTP server:
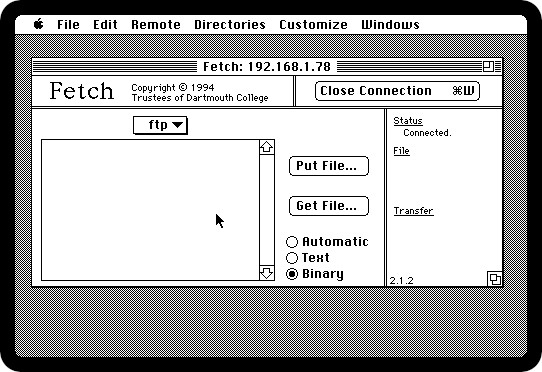
Once connected to the FTP server, I chose a few files (screenshots) on the Macintosh Plus. I selected the MacBinary II format for binary transfer:
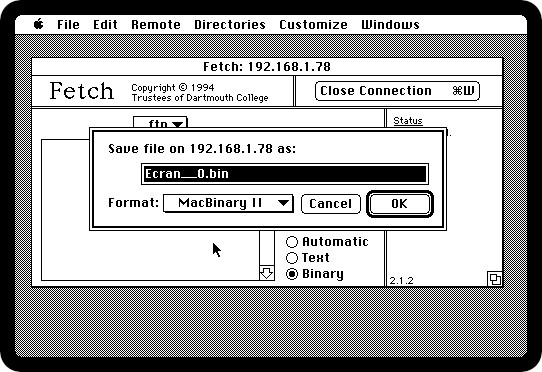
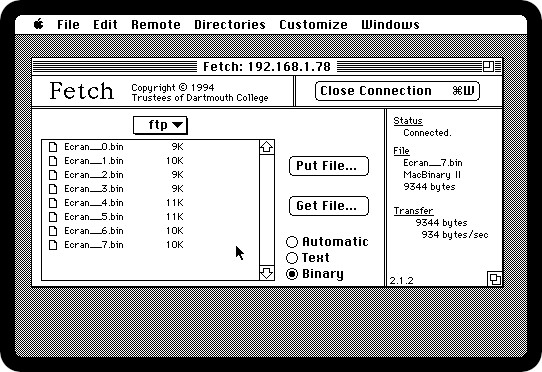
It worked very well, and was much faster and easier to setup than for Kermit. The MacBinary II format used by Fetch is an evolution of the MacBinary format. Fortunately, the MacOSX macbinary tool can also decode this format and I could read and convert the screenshots into JPEG files (and use them to illustrate the Fetch usage)
Conclusion
We are coming to the end of this little network experiment on vintage computers. This was a fun ride ! Some goals were reached, some were missed. Here is a little score board that sums up the results so far:
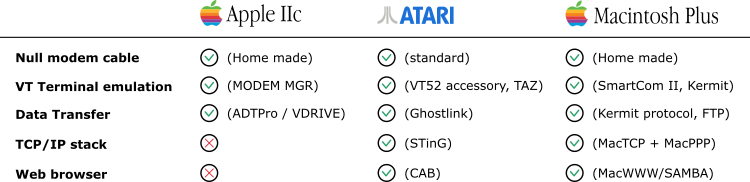
It is unfortunate that I could not find a TCP/IP stack for the Apple IIc that could manage null modem communication. Some stacks are actually running great, but require an Ethernet port. I will most certainly follow the work of the A2osX project that I discovered during this experiment.
The Atari ST results are probably the best, but it may come from the fact that this is the system I am the more familiar with !
As for the Macintosh Plus, the web browsing user experience was very limited and very frustrating. But it is most probably because of the constraint of using System 6. Upgrading to System 7 would allow to run other web browsers, like NCSA Mosaic, or early versions of Netscape Navigator. But this would probably require a RAM upgrade for my Macintosh Plus (up to now, I wasn’t able to run System 7, lacking enough memory).
On the subject of the Macintosh Plus, I’d love to explore sharing data via AppleTalk, but I am not sure this can be done over PPP (first investigations suggest it won’t work). AppleShare would be nice … but requires at least System 7 from what I read.
It seems more experiments are on their way !
Acknowledgment and links
Here are a few links that really helped during these experiments:
Software repositories:
- [Apple IIc] – https://mirrors.apple2.org.za/ftp.apple.asimov.net/ (Software)
- [Apple IIc] – https://github.com/A2osX/A2osX/ (A2osX)
- [Apple IIc] – https://adtpro.com/index.html (ADT Pro)
- [Atari ST] – http://www.atarimania.com/pgemainsoft.awp?type=U&system=S (Software)
- [Atari ST] – http://www.chebucto.ns.ca/Services/PDA/AtariSTMisc.shtml (Ghostlink, various utilities)
- [Atari ST] – https://www.chebucto.ns.ca/Services/PDA/AtariSTComm.shtml (STinG, various network tools)
- [Atari ST] – https://www.chebucto.ns.ca/Services/PDA/AtariSTBrowsers.shtml (CAB, CAB.OVL)
- [Macintosh Plus] – https://macintoshgarden.org/ (Software)
- [Macintosh Plus] – https://www.macintoshrepository.org/ (Software)
Web sites / tutorials:
- [Atari ST] – STing Nullmodem Network HOWTO
- [Atari ST] – Sting + Nullmodem to PC (Atari-Forum)
- [Apple IIc] – A2osX updates (Call-A.P.P.L.E.)
- [Macintosh Plus] – Setting up an internet connection via modem with PPP
- [Macintosh Plus] – Bootstrapping with Smartcom and BinHex
- [Macintosh Plus] – Networking Your System 6 Mac
Youtubers:
- Adrian’s Digital Basement: https://www.youtube.com/c/adriansdigitalbasement
- Action Retro: https://www.youtube.com/@ActionRetro