At the end on the previous post (on the Matra-Hachette Alice 90) I was left with an open question: which vintage computer shall I work on next ?
I had in mind a small form factor one, either an Oric Atmos or an Apple IIc, depending on what would be available and depending on the price tag. I feared the Apple IIc prices would be bit crazy. At the time I started searching online, prices were between 400€ and 900€ … which is sheer madness !
So, I decided to treat myself with an Oric Atmos for Christmas !
![]()
Like the Sinclair ZX81, ZX Spectrum, the Alice 90 or even the Mac Plus, I did not own an Oric Atmos at the time. But I had one friend from school that did have one. And they were indeed famous in France.
I actually could have owned an Oric-1. Around 1983-84, I was looking for a 8-bit home computer to buy. I narrowed down a list of possible one’s:
- The Apple II : the Apple II was one of the first personal computers to gain widespread popularity. It was a myth. The son of an American colleague of my father stayed home for summer 1983. He was a couple of years older than me and he was lucky enough to own an Apple II+. I was keen on learning computer stuff, so I taught how to draw perspectives, and a bit of mathematics. He taught me a bit of AppleSoft BASIC. But these mythical machines were so damn expansive that the dream had to stay a dream.
- The Commodore 64 : it was a serious contender for being the king of the list. In France, the Commodore 64 was released in 1982 and quickly gained popularity due to its advanced graphics capabilities and wide range of software and games. It was cheaper than the Apple II, for sure. But if you added the price tags of a monitor and a datasette … it was out of budget too. Curiously, none of my friends had a Commodore 64 though it was widely used for education and entertainment.
- The Hector HR+ : this one might not be very well known outside of France. Hector computers (also known as Victor Lambda) were a series of 8-bit machines produced in France in the early 80’s. Originally, they were rebranded Interact Home Computer microcomputers. Later models were designed and produced in France by Micronique (which still exists, though does not design computers per se anymore). One of the characteristics of Hectors that made them interesting to me is that they had an integrated tape deck. But, alas, priced around 4700 F (about 1500 € in 2022), it was way too expansive. At this price the Hector series of computers didn’t sell well, and production ended after a few year. It never reached popularity.
- The ZX Spectrum : the ZX Spectrum was probably the most popular choice for home computing in the very early 1980’s in UK, but also in France. It was known for its versatility and its low price. It was the major contender of the list. I had access to Speccies (and software) via friends. I knew its strengths. I knew also how unreliable were Microdrives and how insufferable was its keyboard. Still, it was the king of the list.
- The Oric-1 : I discovered the Oric-1 via ads and flyers. Given its characteristics and price tag, it easily made it to the list. At the time, it was indeed the top selling computer in France.
And … the Amstrad CPC 464 came out of nowhere and took everything by storm. It was (to me) the obvious choice. I was lucky enough to get one for Christmas 1984 and forever felt in love with it.
But enough with personal history. Let’s take a look at the Oric saga !
The Tangerine, Oric & Eureka saga
Tangerine Computer Systems was a British microcomputer company that was active in the 1970s and 1980s. It was founded by Dr. Paul Johnson, Mark Rainer and Nigel Penton Tilbury. Its very first product was the TAN1648 VDU (Visual Display Unit). It was sold as a kit. It received much acclaim and It gave the company the recognition needed to get into the home computer market with the Microtan 65:
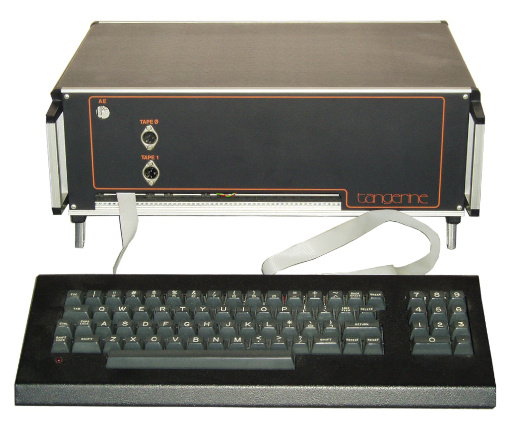
This 6502-based micro-computer went on sale in 1979, available in kit form or as a ready-built system. Additional expansion boards became available later, offering more RAM, dedicated serial and parallel I/O boards.
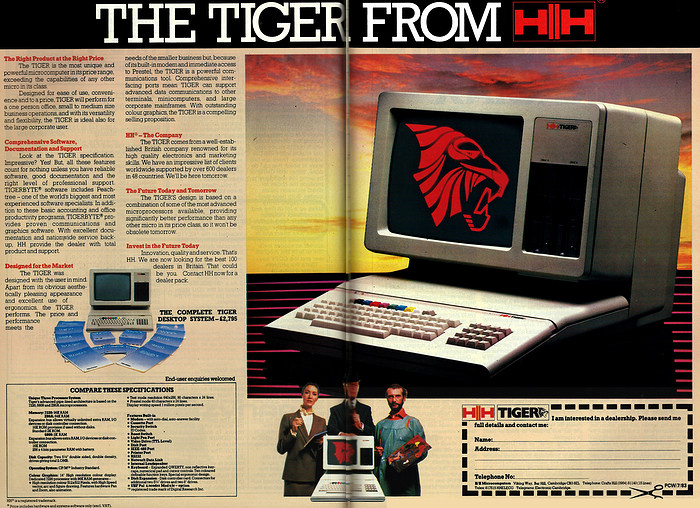
In April 1982 Oric Products International Ltd was incorporated, Tangerine acting as the R&D unit for the new Oric company. The original aim was to produce an executive desktop machine that could use Prestel videotex services and run CP/M. Tangerine started to work on the Z80-based Microtan 2 (also known as Tangerine Tiger). In the end, the design was sold to HH Electronics, and released as the HH Tiger:
A key backer of Tangerine was secondhand car seller British Car Auctions (BCA). With the success of the Sinclair ZX Spectrum, BCA suggested higher volumes from the mass market to be the next target. The Oric-1 was announced in August 1982.
On the 27th January 1983, during the official launch party, six major deals with High Street stores for the supply of over 200 000 units were announced: “We’re going to beat Clive Sinclair by offering much more for much less money“.
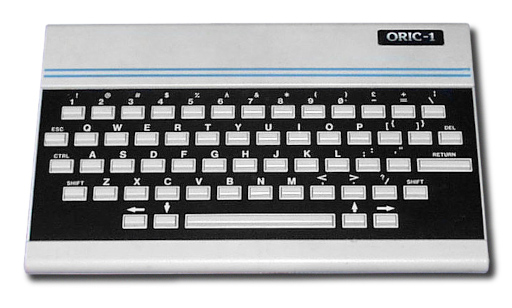
Based on a 1MHz MOS Technology 6502 CPU, the Oric-1 came in 16K and 48K RAM variants for £129 and £169 respectively, matching the Sinclair ZX Spectrum models and undercutting the price of the 48K version of the Spectrum by a few pounds (at launch).
On the 13th of October 1983, the factory of Kenure Plastics in Berkshire, where the Oric-1 was manufactured, burnt to the ground. Production was said to have restarted within 24 hours in a new factory. About 160 000 Oric-1s were sold in the UK in 1983. The Oric-1 was almost immediately exported to France, which proved to be a very successful market. On the 29th of June, 1983, a contract was signed with a French company called A.S.N. making them the exclusive distributors in France. A.S.N. adopted the name Oric France. Around 50 000 units were sold in France, where it was the top-selling machine that year and elected “Computer of the year 1983“.
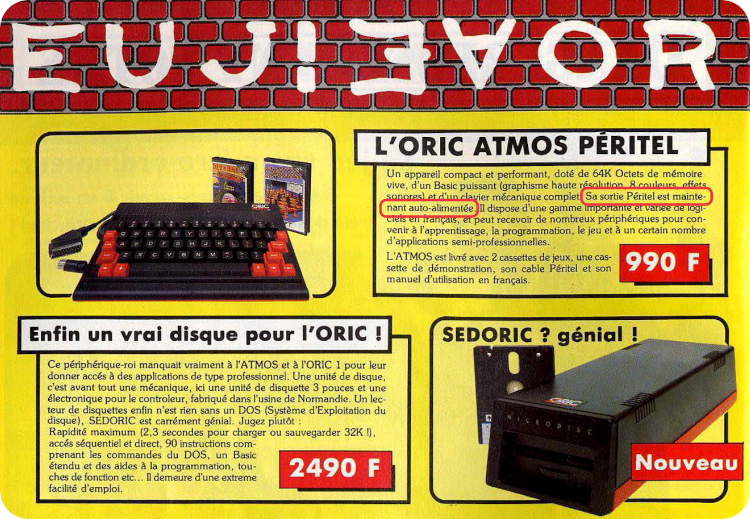
Though Oric did not succeed to beat Lord Clive Sinclair at his own game, it was enough for Oric International to be bought out by Edenspring Investments PLC and given £4m in funding in late 1983. This enabled the release of the Oric Atmos, an improved successor to the Oric-1, which added a true keyboard and improved ROM:
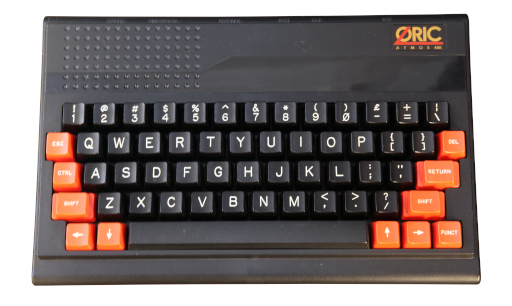
Indeed the Oric-1 had issues. Its chiclet keyboard was really bad. Cables were found to fit poorly, most notably the power line: a slight knock and the Oric would shut down. The Oric Extended Basic 1.0 was rather buggy: “[…] IF… THEN worked but IF… THEN… ELSE didn’t unless the first statement in the ELSE clause was a PRINT statement” (Personal Computer News, 29th of April 1983 Issue). And the loading / saving programs to tapes were unreliable, due to a bug in the error-checking routine, frequently causing programs to fail when loaded back in.
So … the Oric Atmos tried to fix these issues. The mechanical keyboard is a really nice improvement. The new colors of the case are really lovely. The ROM was updated to v1.1, fixing (part of) the Oric Extended Basic. Alas, the updated ROM contained a few breaking changes on certain behaviors or memory addresses within the ROM, slightly breaking compatibility with the Oric-1. Other than that … the Oric-1 and the Oric Atmos are pretty much the same. Including bad power cable fitting and the faulty tape error-checking routine…
Soon after the Atmos was released, the modem, printer and 3-inch floppy disk drive originally promised for the Oric-1 were announced. They were released by the end of 1984. The production of the Oric-1 lasted only a year and 350 000 units of the Oric Atmos were expected to be sold in 1984.
Even though the Oric Atmos was elected “Computer of the Year 1984” in France, things were not so rosy. To understand why expectation were not met, it is interesting to compare the UK 1984 prices of major 8-bits computers
- Oric Atmos: £179
- Sinclair Spectrum 48K: £129
- Acorn Electron: £199
- Commodore VIC 20: £129
- Amstrad CPC 464: £349 (including a green monitor and the integrated tape deck)
Nevertheless, in November 1984, the launch of new computers was announced for Spring 1985:
- The successor of the Oric Atmos: the Oric Stratos/IQ164
- An IBM PC 8086 compatible desktop computer (which was later shelved)
- An IBM PC 8086 portable computer (which also never saw the light)
In January 1985, it was announced that the grand total number of Oric-1 and Oric Atmos units sold since 1983 was around 350 000, meaning that only 120 000 Atmos units were sold so far. Much less than the 350 000 units expected for the year 1984 alone. And the Stratos was nowhere to be found in tech magazines. Oric computers almost disappeared from the UK market by the end of 1984. France was then Oric’s major market. But, in late 1984 / early 1985, Amstrad was already the new hot deal in France, not Oric any more.
In February 1985, the Stratos/IQ164 was finally announced at the Frankfurt Computer Show. The next day, Edenspring put Oric into receivership: Oric had debts of no less than £5.5 million and assets of only £3 million.
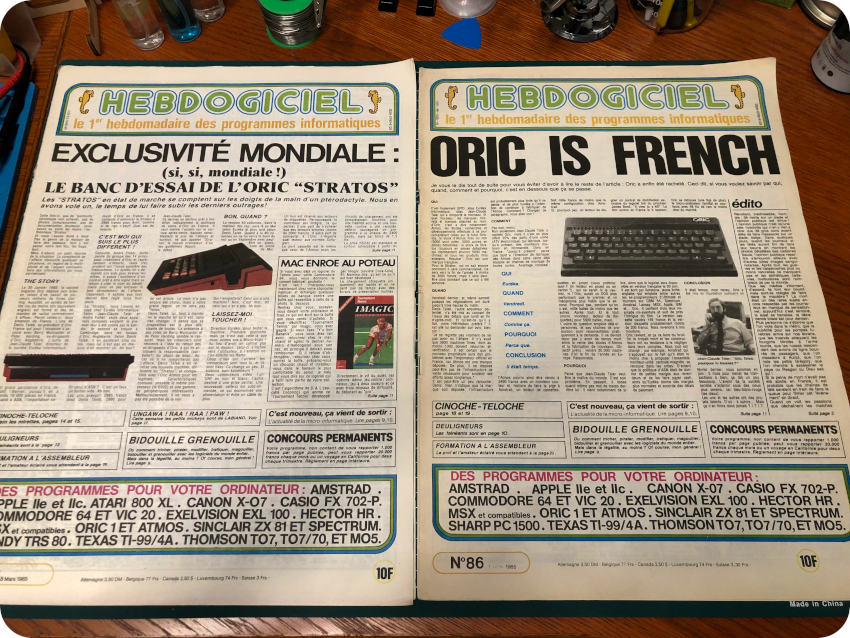
On Mars 1985, Oric Product International was put up for sale and several companies, including the French importer A.S.N. and French company SPID / Eureka Informatique, were biding. On June, Eureka won the market, and took over all the activities of Oric. “Oric is now French” (as reported by Hebdogiciel, issue #86) :
The Oric Statos/IQ164, was renamed Oric Telestrat and launched in April 1986:
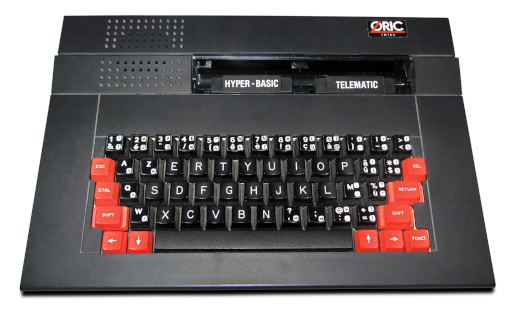
The Telestrat was a telecommunications-oriented machine. It came with a disk drive as standard, and was sold for 3990F (around 1100€ today) with 2 cartridges (Hyper-Basic and Telematic). But, in spite of Eureka best efforts, one year too late to the market, the Oric Telestrat now competed with 16-bit computers like the Atari ST or the Commodore Amiga. Only 6 000 units were sold when the new company went bankrupt in September 1987.
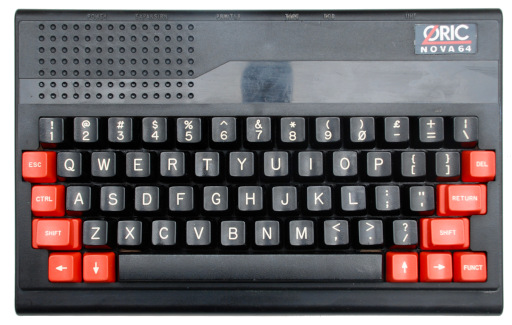
As a side note, it is worth noting that the Oric Atmos was licensed in Yugoslavia and sold as the Nova 64:
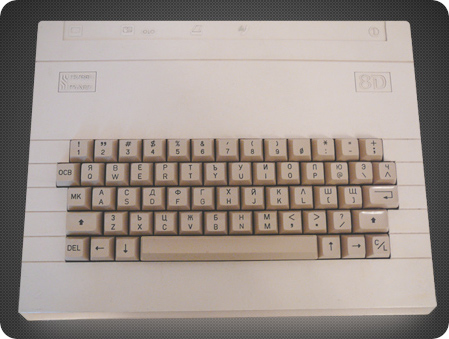
In Bulgaria, the Oric Atmos clone Pravetz 8D was produced between 1985 and 19991:
It is also worth noting that, in early 1985, had Oric started prototyping a Z80-based motherboard (codenamed Oric Phoenix), with the help of a Creotian company. It was designed to run CP/M 2.2. It seems that only 5 motherboards still exists (as well as ROMs), rescued by the late Jonathan Bristow (a.k.a Twilighte) and passed on to people like Fabrice Francès. More information here:
- Defence Force forum (“New Oric Found !” thread): https://forum.defence-force.org/viewtopic.php?t=177
- Silicium.org forum (“oric phoenix” thread): http://www.silicium.org/forum/viewtopic.php?t=14827
- Video link (Fabric Francès, Vieumicro 2018) : https://www.youtube.com/watch?v=C_weEOahGIs (French)
- The Oric Phoenix page: http://oric.free.fr/phoenix.html
- Oric Phoenix board gallery: https://photos.google.com/share/AF1QipNrOv1VTSSooPb2dsZ7mTmLAmVn8j26BgJvXUuPkwEVa-UzYPq_fYVbXFJBQaOI_w?key=SXFQaWwxTGF3TkZReUVwLXlyVTJiRGIyV0F3NWhB
Let’s conclude this saga with a fun fact, proving that the Oric magic still lives on. The Oric Atmos was used as a prop – among other vintage computers – on the set of the beloved British sitcom The IT Crowd:
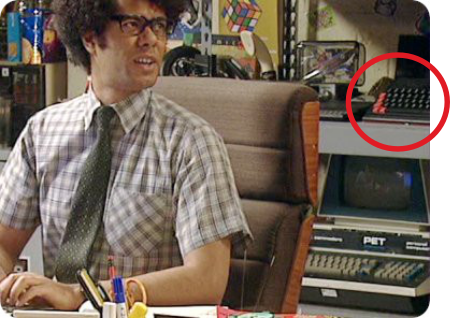
Since then, the prop has been acquired and restored by Rees of ctrl-alt-rees fame: https://www.youtube.com/watch?v=pFL_72HpVwk
Sourcing an Oric Atmos
As usual when shopping for vintage computers, I went straight to LeBonCoin web site and searched for an Oric Atmos to treat myself for Christmas. I hesitated for a couple of weeks. There were only 4-5 good offerings. Some were in shady conditions. All were overpriced. I finally settled for one, lacking power cable, with a SCART connector in poor shape, but that was (only) 30-40€ overpriced. Bad Fred. But I really wanted to treat myself after an intense year at work…
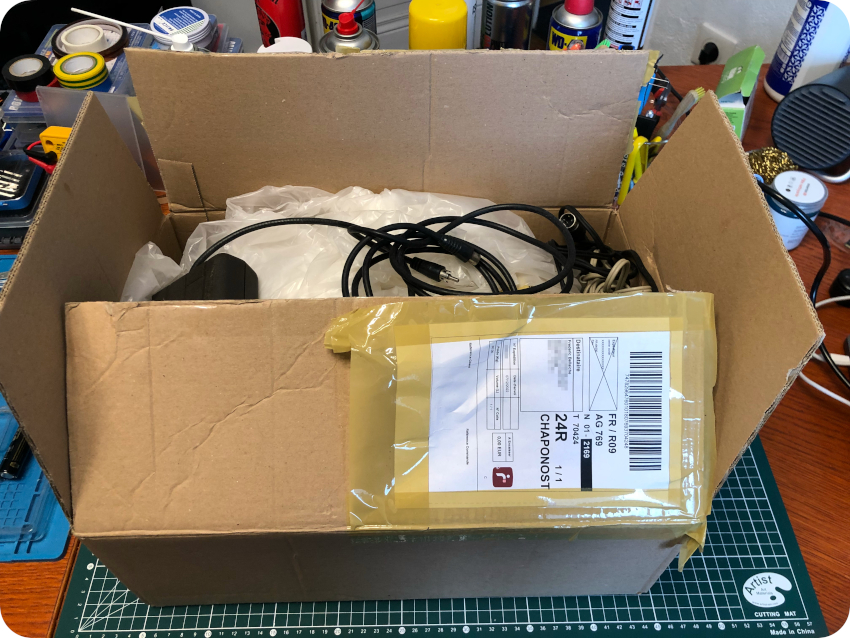
Anyways, a few weeks later (it took longer than usual because of the snow at the time), I received a not so well packaged Oric Atmos. Nothing broken, fortunately:
Unboxing the Oric Atmos
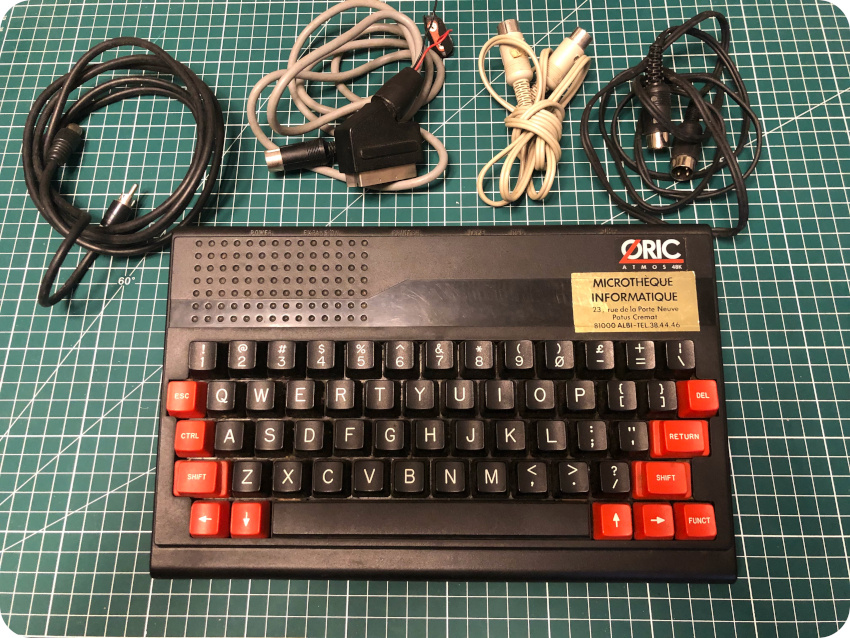
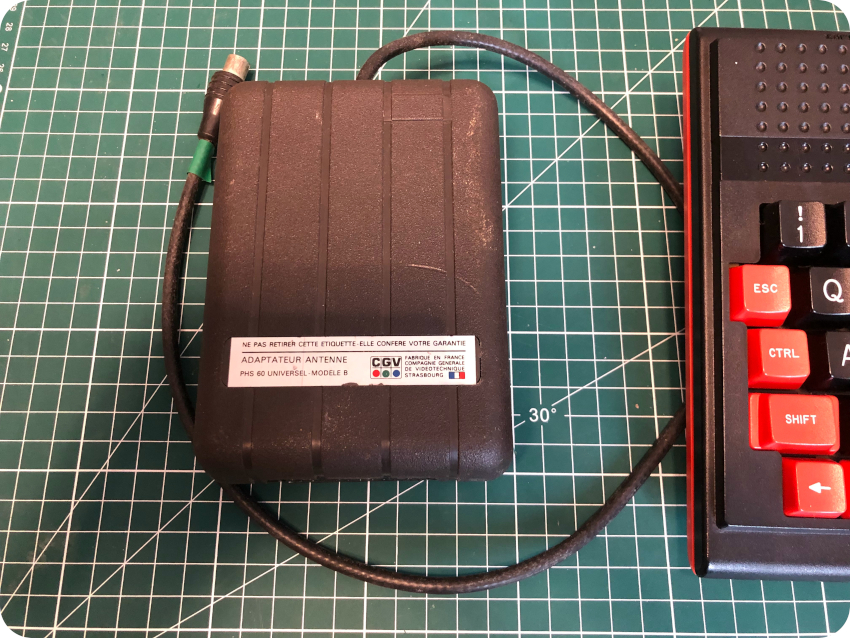
Let’s take a look at it ! The package came with the Oric Atmos itself, a SCART cable (in poor conditions, as advertised), a coaxial antenna cable, a black DIN3-DIN3 connector, as well as a white DIN5-DIN3 connector:
Also included was a SCART to antenna converter by CGV (“Compagnie Générale de Vidéotechnique”):
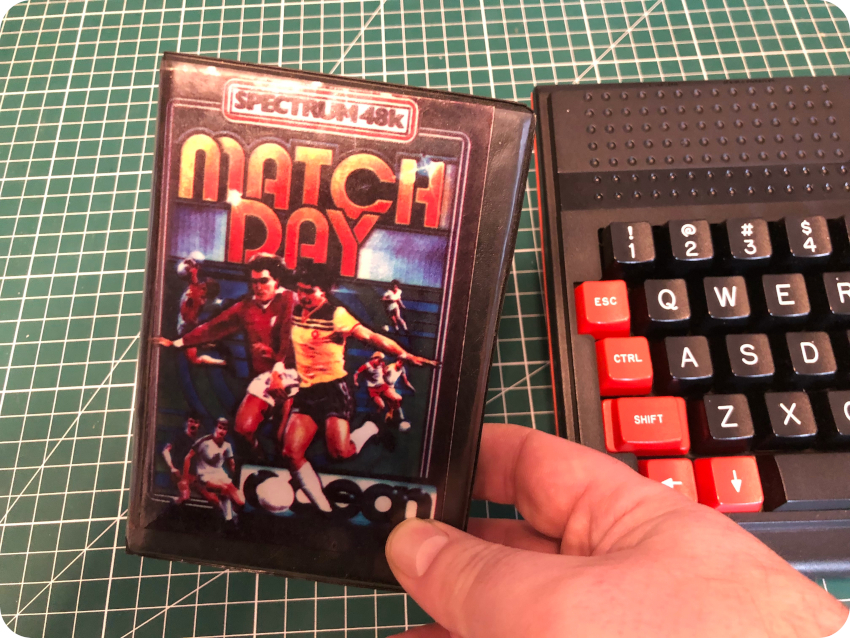
The package also bundled a few cassettes:
- Welcome to Oric Atmos 48K by Tansoft
- Bruce Lee by U.S. Gold (spoiler: not an Oric game, as I figured out only later on)
- L’Aigle d’Or by Loriciels
- Starter 3D by Landscape

For some reasons was also included Match Day by Ocean … for the Sinclair ZX Spectrum !
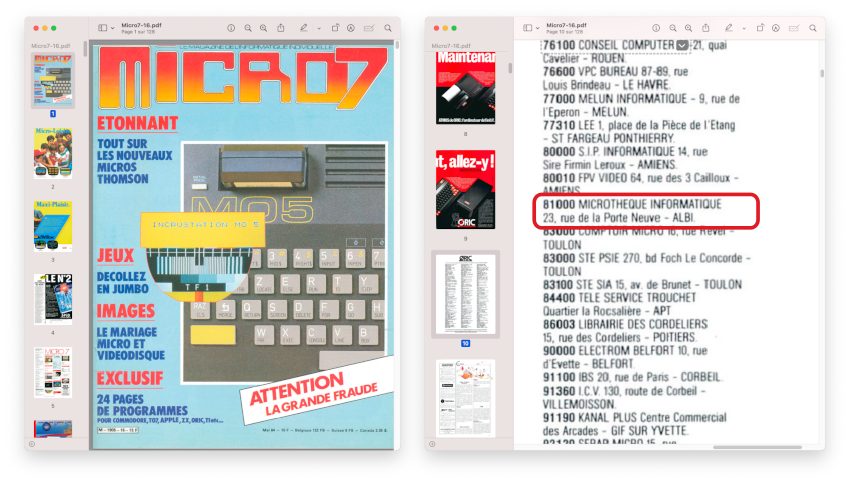
The Oric Atmos came with a golden sticker glued on top:
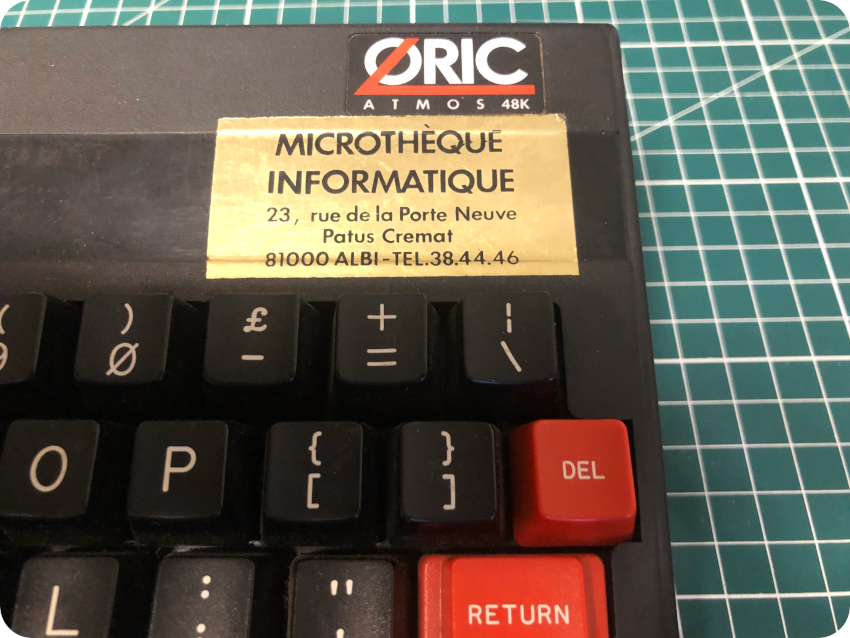
At first, I thought this Atmos had belonged to some kind of computer club from the 80’s called “Microthèque Informatique“. After googling around, I found out in the French magazine Micro7 (May 1984 issue) that “Microthèque Informatique” was in fact an official French Oric reseller, listed by A.S.N. / Oric France:
Let’s flip the computer. It appeared that the printer and expansion connectors on the back were covered with tape:
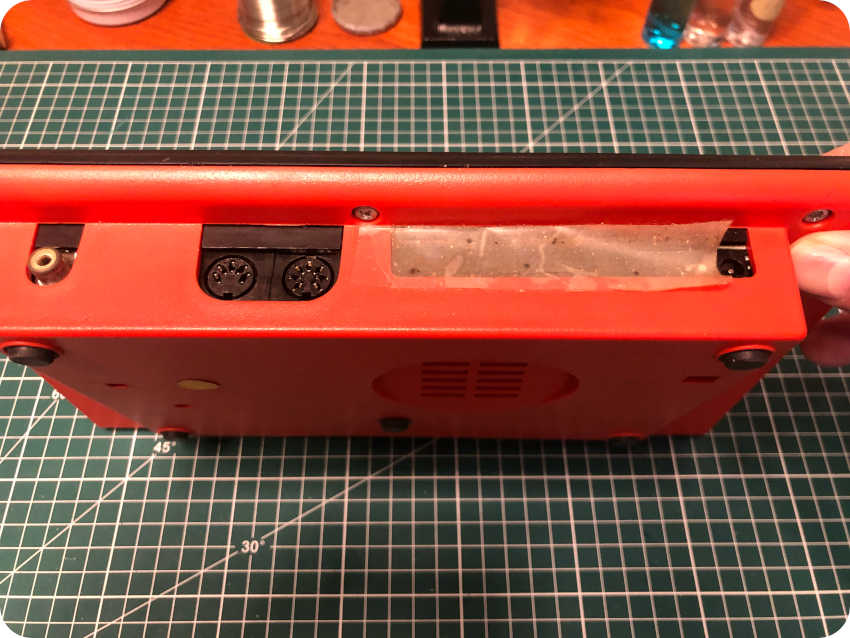
It seems that this was a common practice at the time. The power connector is located right next to the expansion connectors. This wasn’t a great design: if one touches a pin of the connector with the powered-on DC jack … it could fry the PCB !
It was so common that the French version of the User Manual warns about this. Oddly, the original English version does not include such a warning …
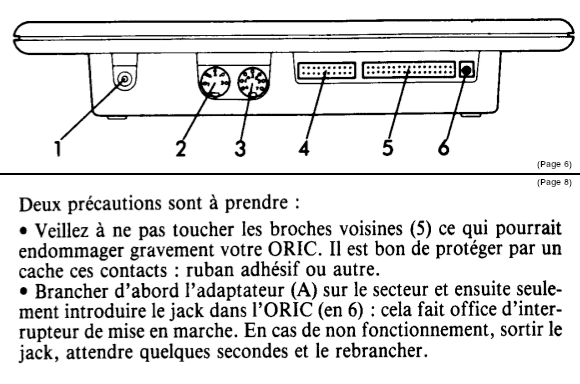
To avoid such an easy mistake, the connectors on the back of the Atmos were therefore often covered with tape. That being said, to start the cleaning process, I removed the tape.
Opening up the Oric Atmos
Let’s first remove the golden sticker glued on the top of the case:

Once done, I flipped the Oric and removed the warranty sticker, since there is a screw hidden underneath:
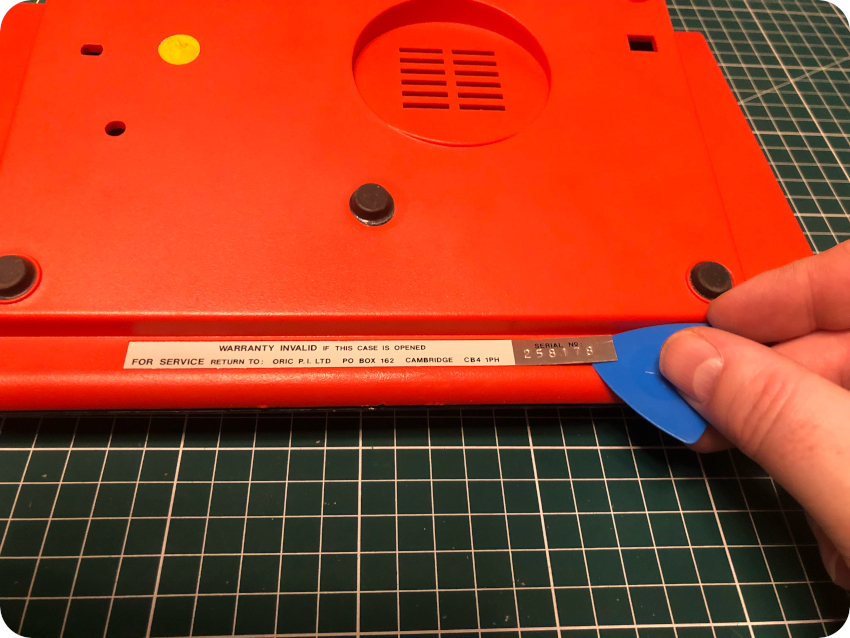
The warranty sticker was still intact, but I am pretty sure someone tried to open this Atmos (maybe not knowing there was a hidden screw):
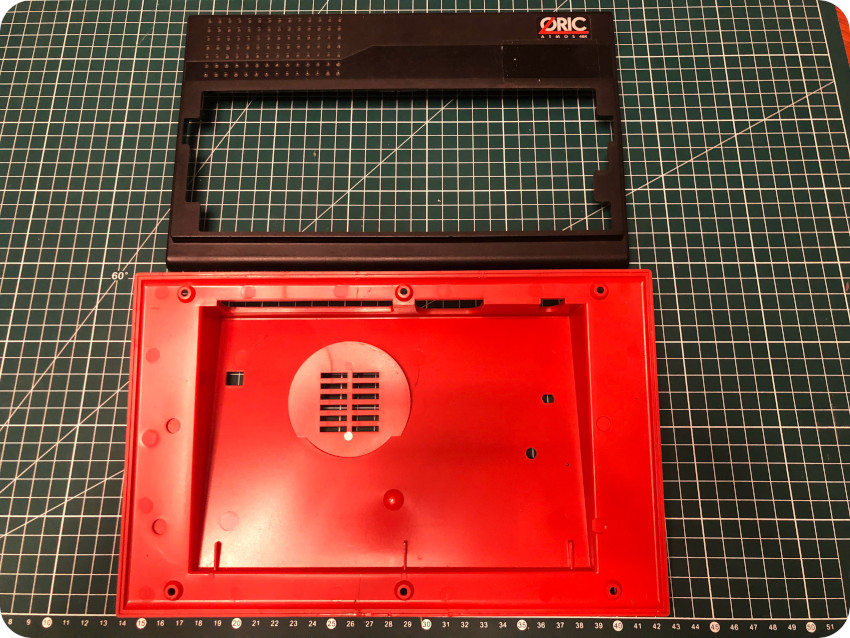
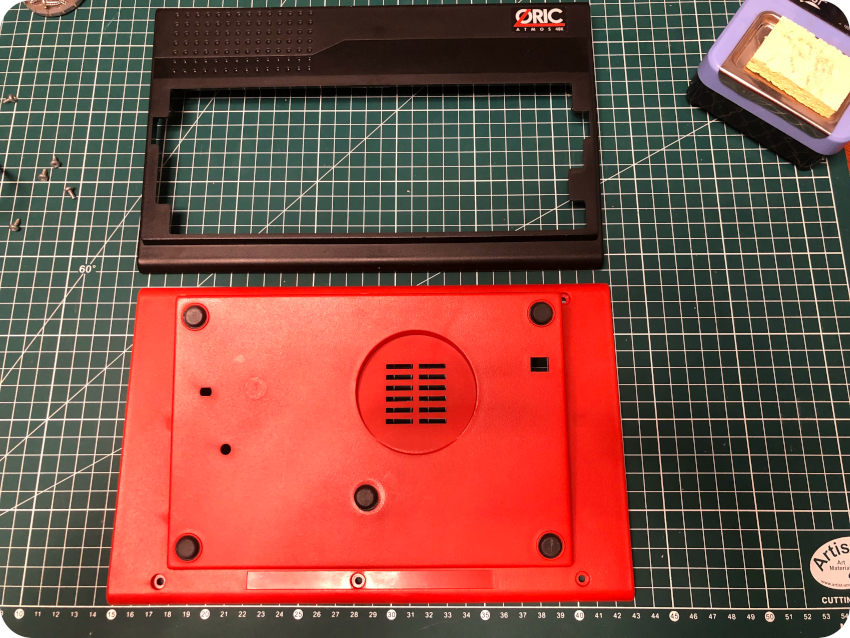
Then, it was a matter of removing 6 screws to free the red bottom part of the enclosure, revealing a few dust bunnies:
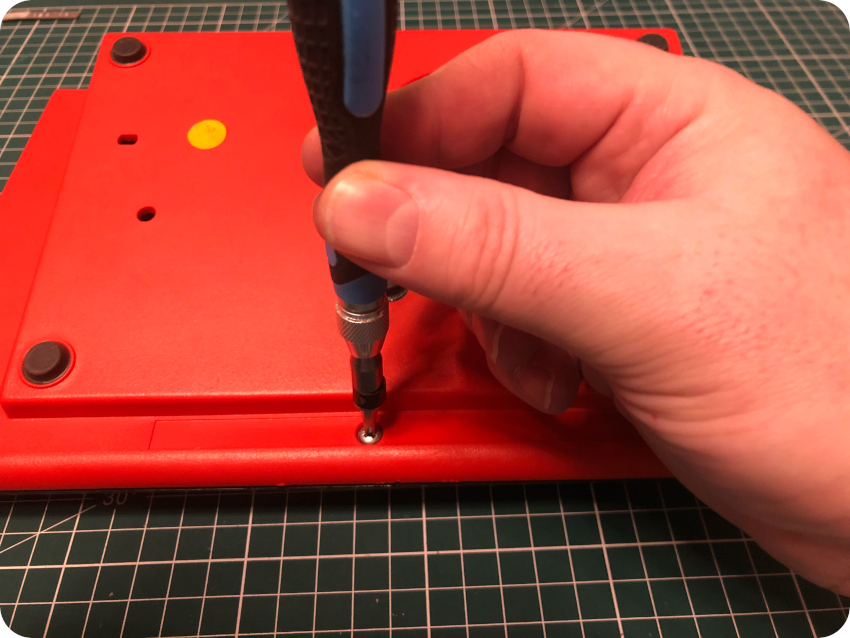

To free the black top part, first, remove the 4 screws on both sides of the keyboard’s PCB:
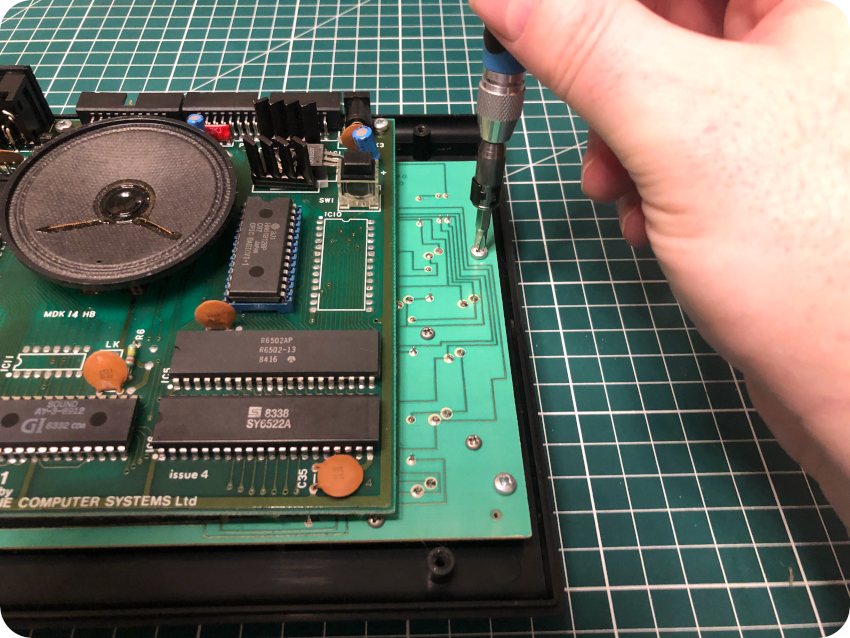
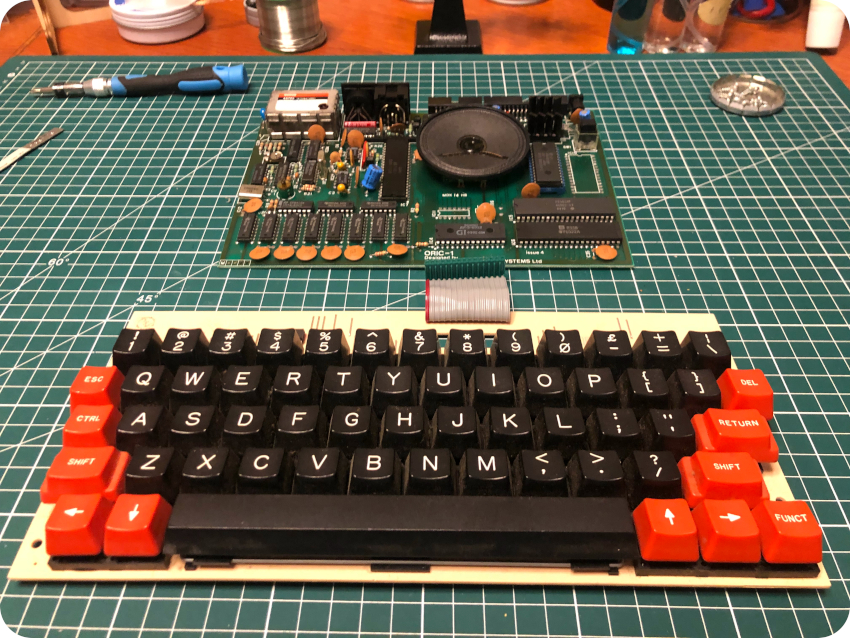
Then unscrew the main PCB:
The main board now just sits on the keyboard’s PCB, connected to it via a flat ribbon cable. Gently raise the main PCB, the solder joints and the ribbon being very fragile (more on this later, unfortunately …):
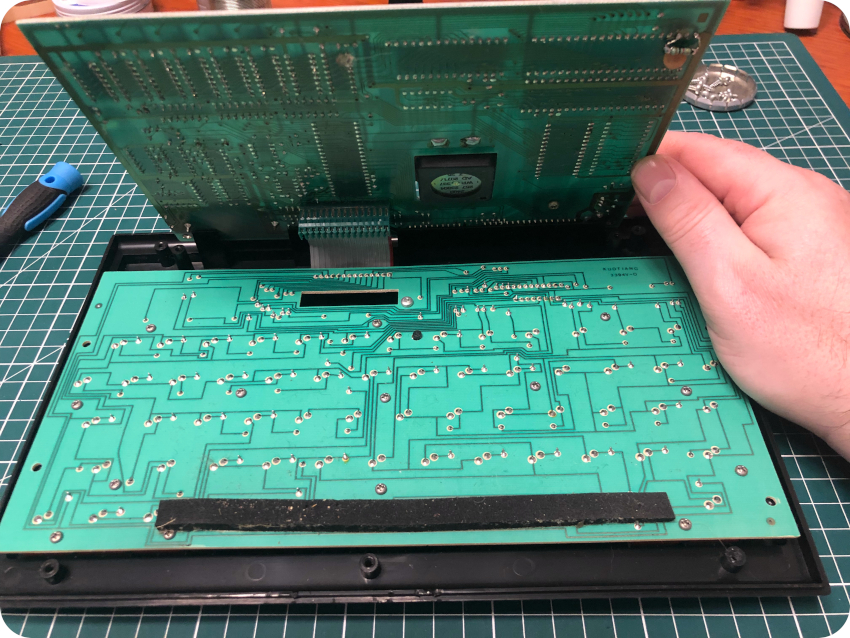
The main PCB can now be freed, slowly pulling off the keyboard connector:
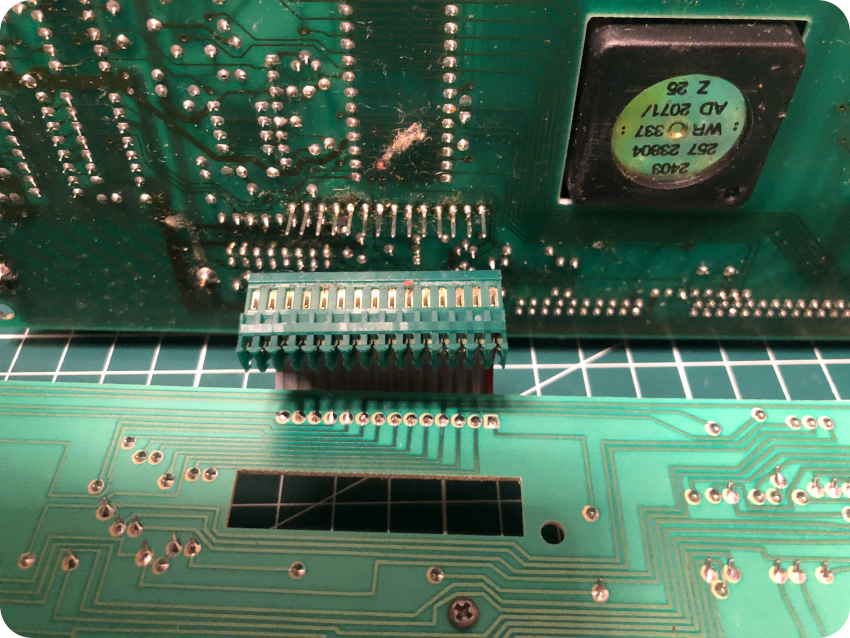
It is worthwhile to note that, for some reasons, it is a 15-pin connector … connected to a 14-pin header. To properly insert it back, one has to align the red wire of the connector to the outermost pin from the header.
Once the connector removed, the keyboard PCB can be separated from the case, removing the last screw that was hidden underneath the main PCB. Both PCB’s are now freed from the case:
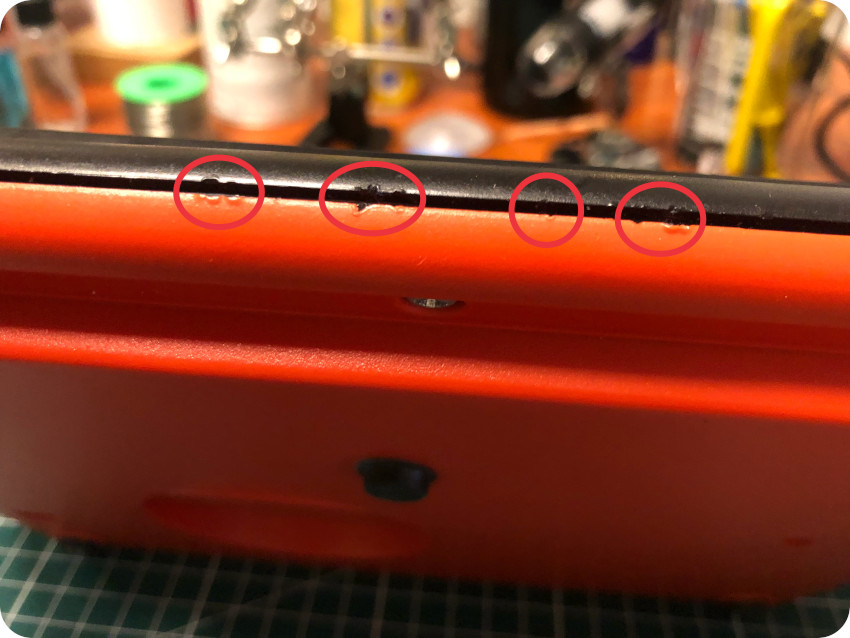
Cleaning the enclosure
It is time to clean the enclosure, using my usual little routine: a warm soapy bath, a good scrub with a toothbrush, let all parts of the casing dry, then IPA to remove residues from the tape and the stickers, then, as a final touch, anti-static cleaning foam applied with a soft micro-fiber cloth:
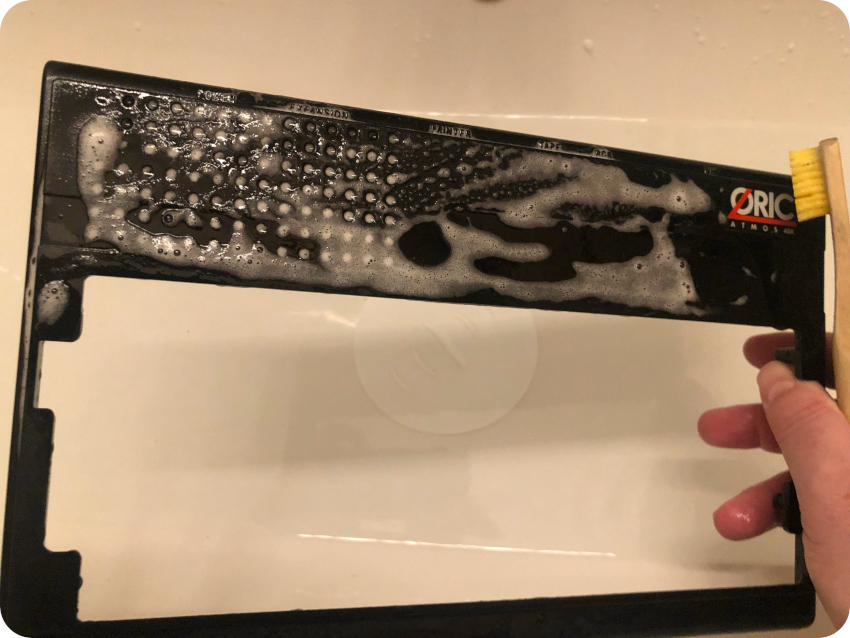
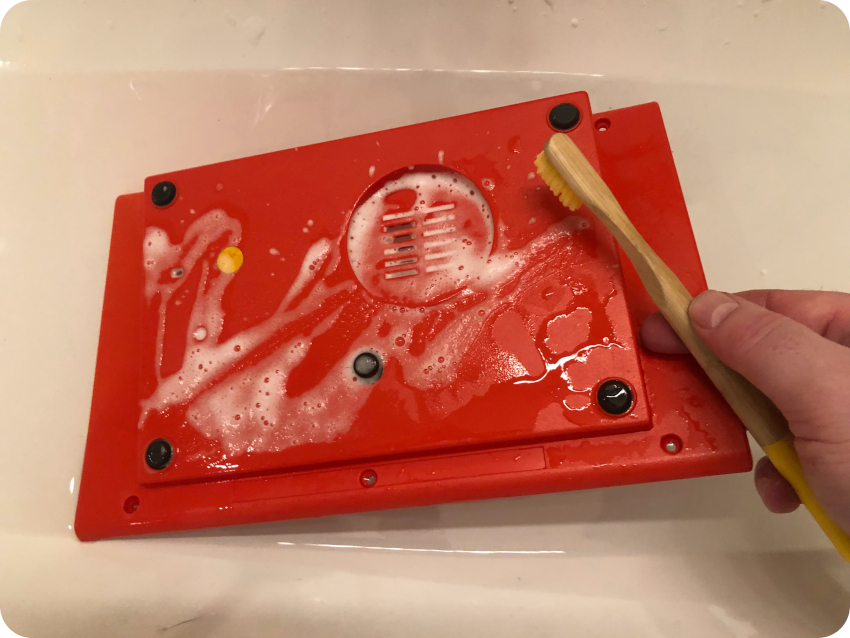
There you go, a cleaned, shiny and fresh smelling case !
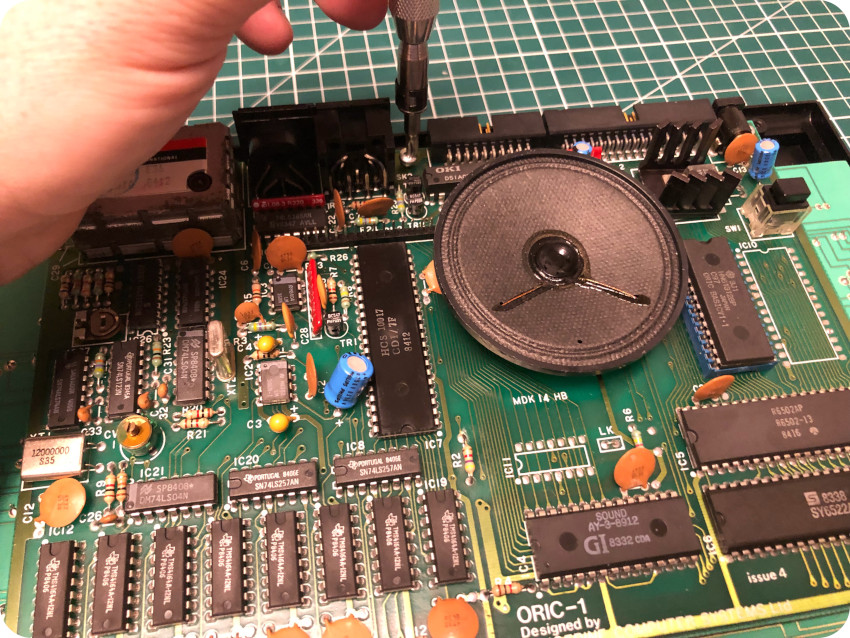
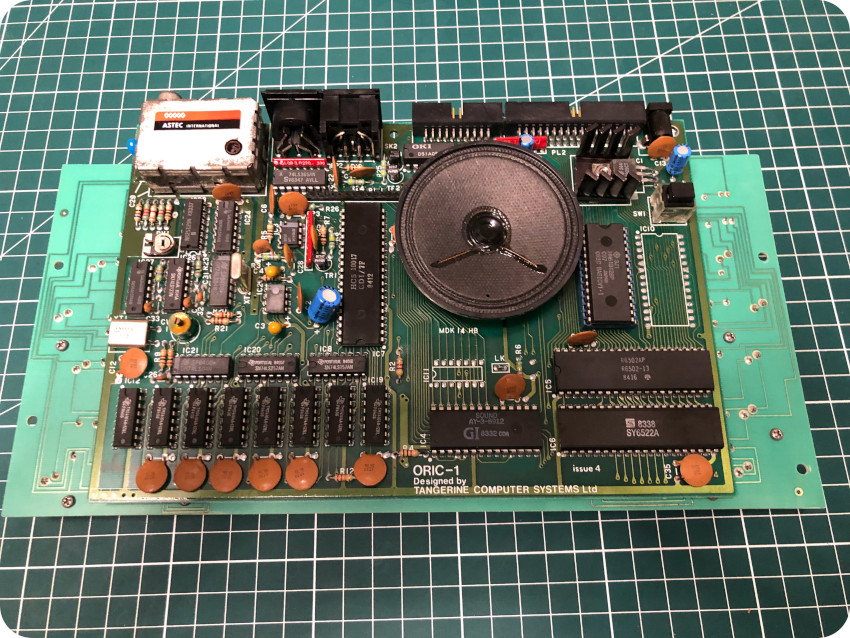
The main PCB
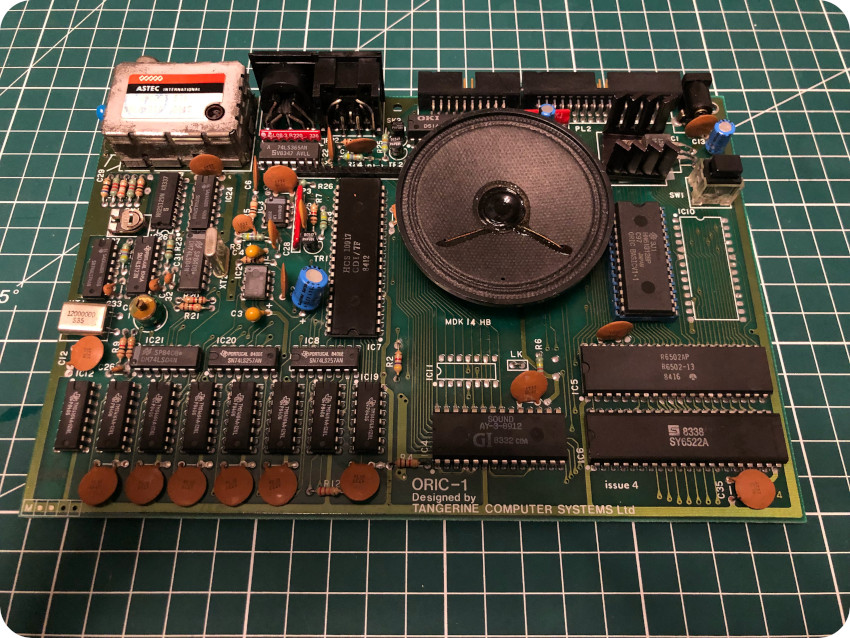
Here is a shot of the main PCB. It is in good conditions:
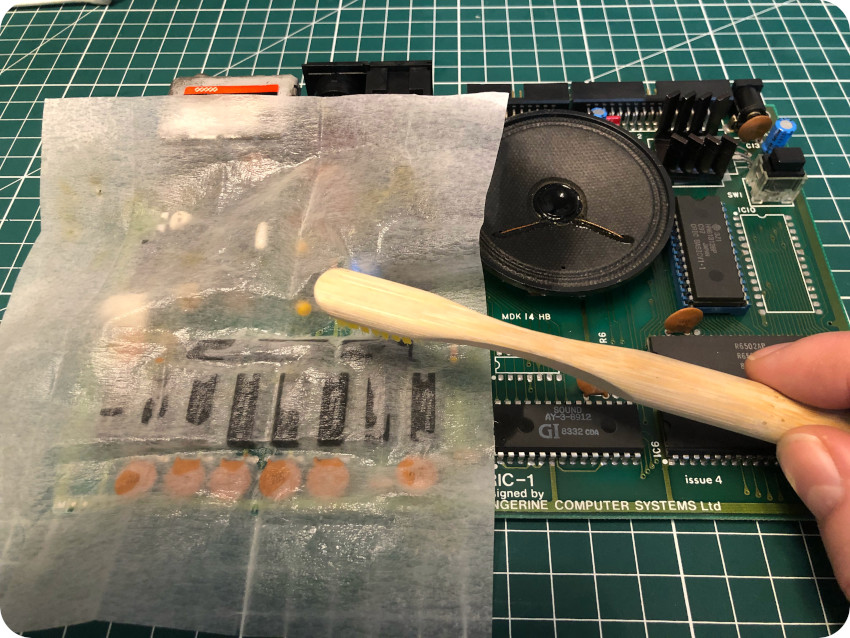
Let’s start the cleaning process, first with compressed air to remove dust, then with a glass cleaning towel soaked in IPA, and a toothbrush:
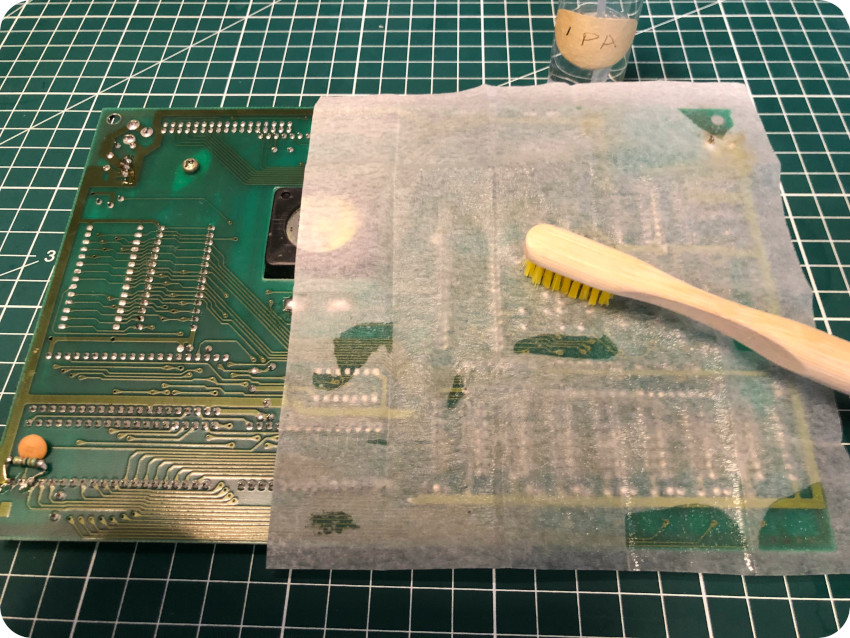
I repeated the process on the other side of the PCB:
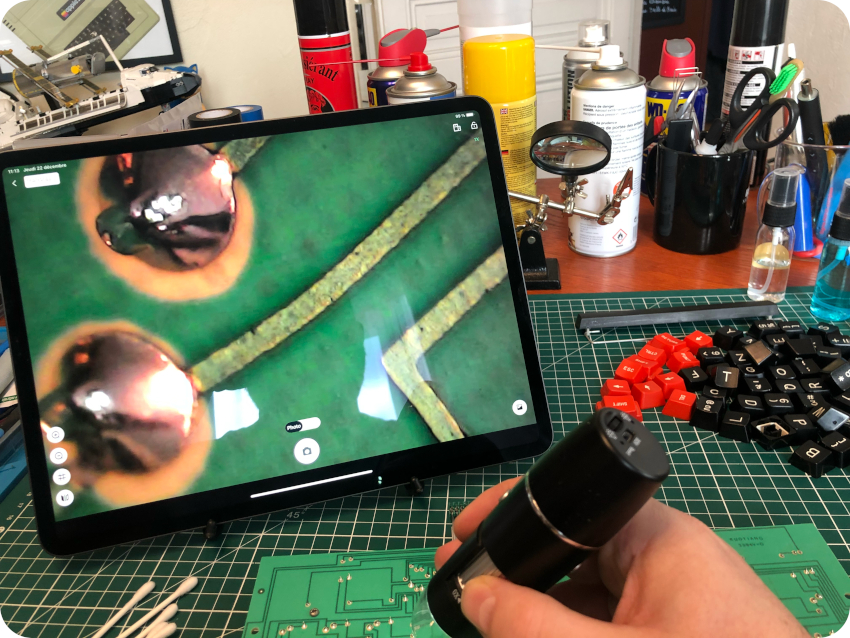
Let’s inspect both sides of the PCB, looking for bad solder joints, broken traces or bad electrolytic capacitors. I had bought a cheap wifi-connected digital microscope, which helped a lot during the process:
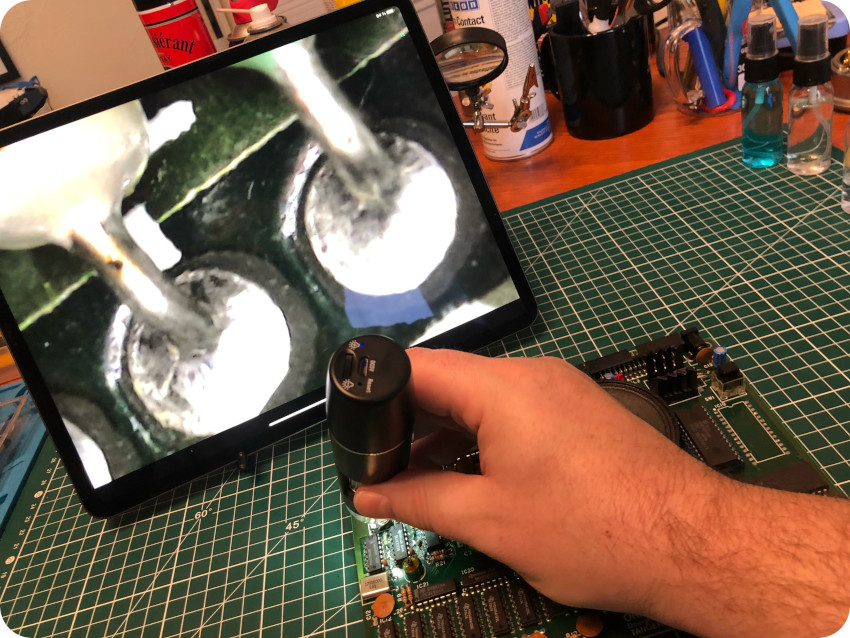
I repeated this process on the other side. Solder joints were good, traces were fine, no bulging electrolytic capacitors. Good !
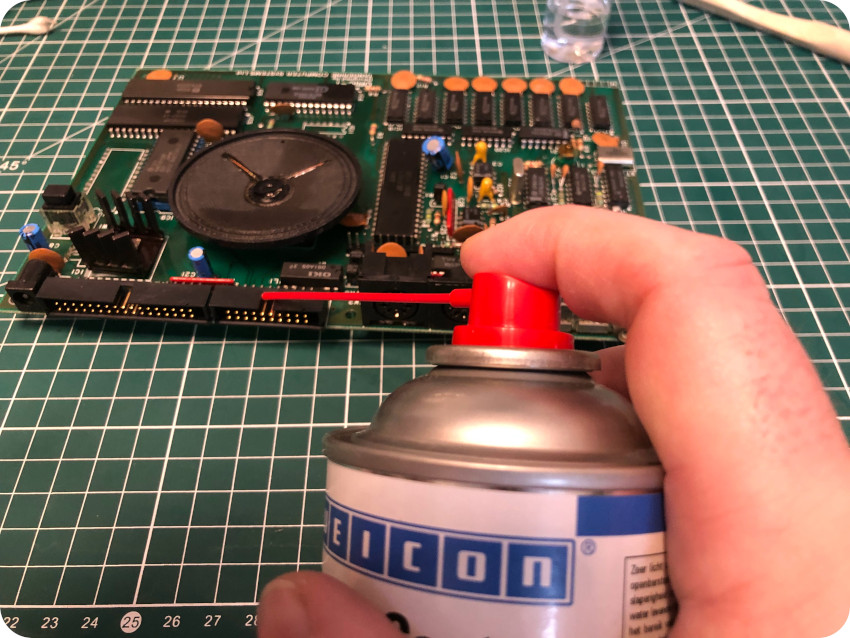
I finished the cleaning process with contact cleaner on each of connectors:
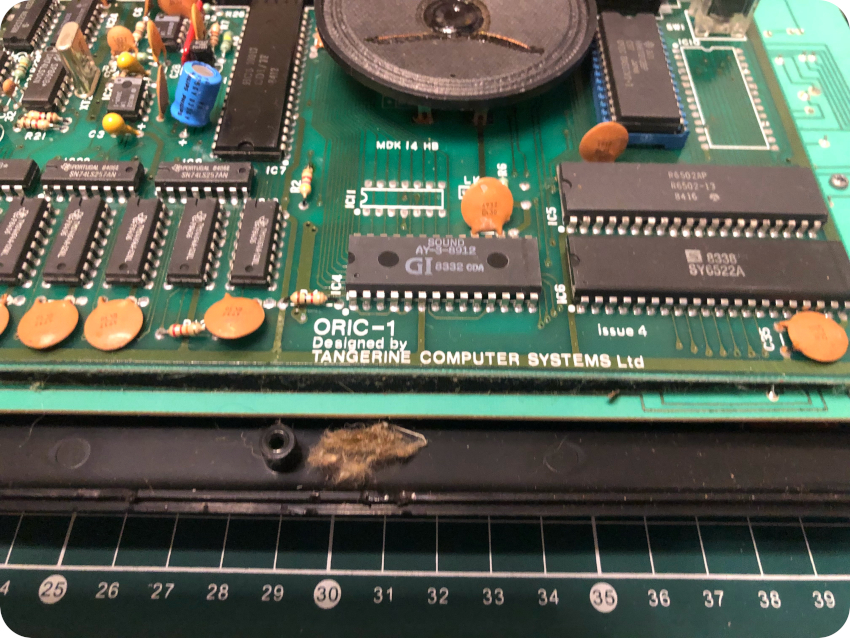
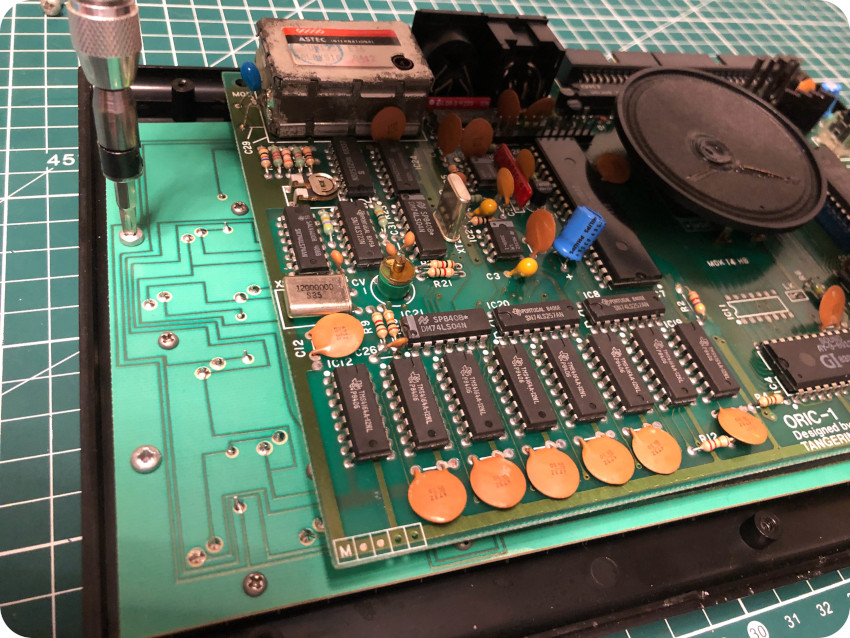
Let’s take a more detailed look at this issue 4 board from 1984 (according to ICs date codes):

Here are the main components of the motherboard (source: https://www.defence-force.org/computing/oric/hardware/motherboard/index.htm):
- Microprocessor: this Oric Atmos is powered by a 8-bit MOS 6502 microprocessor, running at 1MHz and manufactured by Rockwell. It is labelled R6502AP and can actually support up to a 2 MHz frequency.
- VIA: the “Versatile Interface Adapter” (VIA) is an IC specifically designed to work with the 6502 microprocessor. It handles interruptions and I/O’s. It is manufactured by Synertek and labelled SYS6522A.
- ROM: the Oric Atmos has 16 kilobytes of ROM onboard, embedding the Oric Tangerine Basic. It is labelled ORIC BASICV1.1 and is manufactured by Hitachi. The V1.1 ROM of the Atmos is mostly … a debugged version of the V1.0 ROM of the Oric-1. There is an empty spot (IC10) right next to the ROM, used for a second one. It was possible to add de V1.0 ROM for compatibility reasons in this free location. Adding a switch would then allow people to select the ROM version.
- RAM: this Oric Atmos is equipped with 64KB of RAM (8 x TMS4164A-12NL DRAMs manufactured by Texas Instruments). The ROM overlaps 16KB of RAM, thus only 48KB are user accessible. It is nevertheless possible to disable the ROM with a ROMDIS signal (generated by the disk drive controller or other external interfaces) and get access to the freed upper 16KB of RAM.
- ULA: the “Uncommited Logic Array” (ALU) is the core of the Oric. If was designed par Tangerine Computer Systems to handle memory management, bus arbitration and video display. It is labelled as HCS 10017.
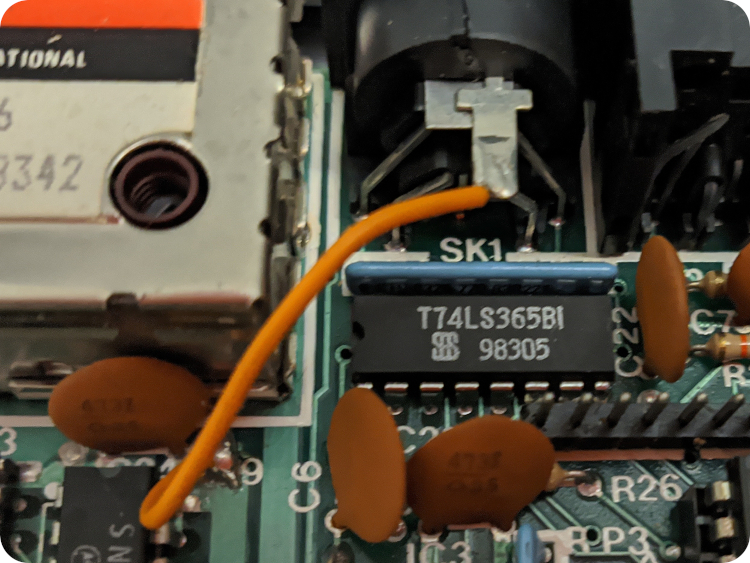
- Sound generator: the Oric Atmos uses the a AY-3-8912 sound chips from General Instrument. It was very common at the time, and was also used by the Amstrad CPC and MSX computers for example. It is able to play sound over 3 channels while using a noise generator. It includes two 8bits I/O ports used by the printer port and for polling the keyboard.
- Speaker: the Oric Atmos includes a huge speaker (relatively to the size of the computer), located right on the PCB.
- Clock: this 12MHz quartz crystal clock feeds the ULA and generates clock signals pour the 6502 (1 MHz) and for display (6 MHz).
- Voltage regulator: the Oric Atmos uses a LM7905 negative voltage regulator manufactured by National Semiconductor. This is a rather strange design, since it generates negative 5 volts, which is converted back to the positive 5V required by the components of the motherboard. Moreover, heat is an issue with this regulator. It is thus screwed to a metal heat sink. Even with the heat sink, it can get extremely hot.
- Reset button: the Oric Atmos reset button is located on top of the PCB. Since the Atmos is designed “upside-down” (keyboard on top, PCB on the bottom, components facing down), this button is, in practice, accessible through a square hole on the bottom part of the case. To reset the Atmos, you would thus have to lift the case up to reach the reset button underneath. Or flip the case upside down. This bad design is made even worse because the DC barrel jack did not fit well, and would often disconnect when moving the case even a little bit, resetting the Atmos … the hard way.
- RF modulator: the board uses an ASTEC International UM 1233 RF Modulator to generate signals for UHF Televisions (the same used for the Sinclair ZX81). It seems that on some later French models (Eureka‘s ?), the RF Modulator was removed. I could not find any pic to confirm.
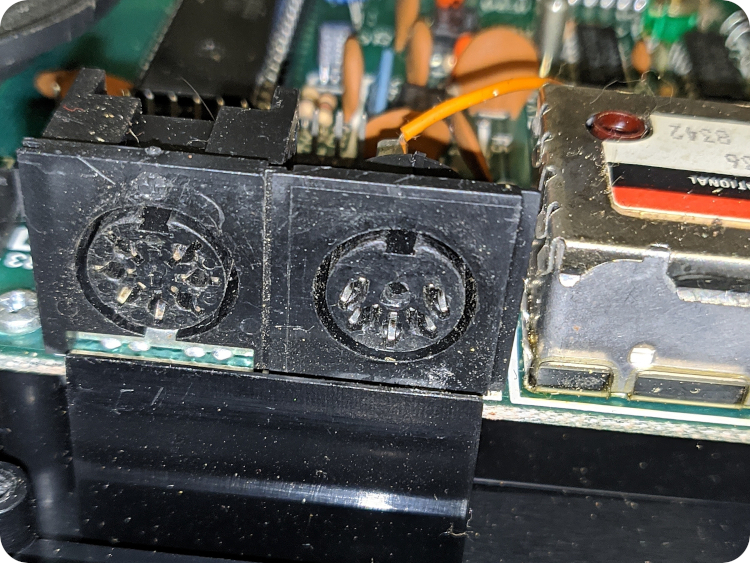
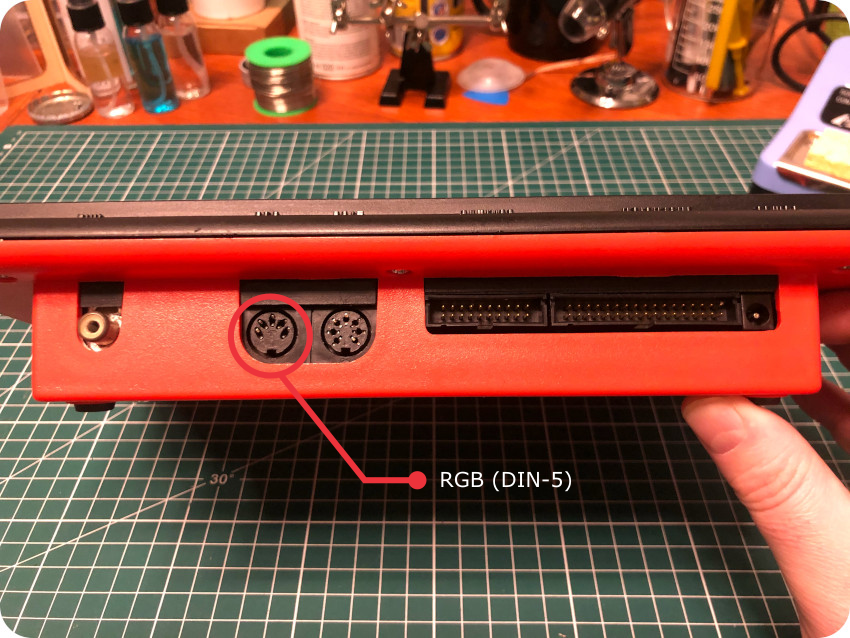
- RGB output: the Oric Atmos uses a DIN-5 RGB video output connector. On some later French models, tweaked by Eureka, the Atmos used a DIN-6 connector, the middle extra pin supplying +5V.
- Tape connector: the Oric Atmos uses a DIN-7 tape connector. Tape reading / writing is said to be very unreliable on Oric’s.
- Keyboard connector: the main board is connected to the keyboard PCB via a 14-pin header.
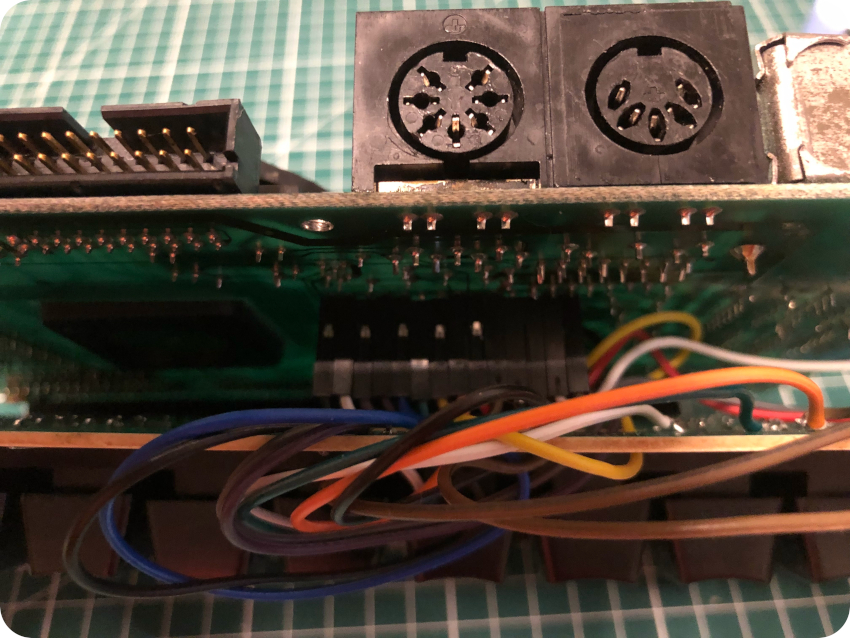
- Expansion port: a 34-pin expansion port is available, to be used by various peripherals, such as a disk drive controller or a V23 modem. The pinout of the Bus expansion is available here for example : http://www.48katmos.freeuk.com/ports.htm
- Printer port: printers are connected via a standard mono-directional Centronics parallel port. The pinout of this 20-pin bus is available here: http://passionoric.free.fr/fr/oric.htm.
- DC power jack: the Oric Atmos is powered by a +9V DC 2.5mm power jack (center positive) that barely fits and is very, very capricious. There is no on/off button. It usualy takes a couple of tries to properly boot an Atmos.
The SCART cable
Video output on the Oric Atmos is a bit … cumbersome. While the original English User Manual skips a most of the subject, the French version goes into 3 pages detailing the different options and types of cable needed (SCART to UHF, UHF, RGB to SCART, powered or not, …), depending on the monitor capabilities (mono, color, with or without SCART interface, PAL, SECAM, …):
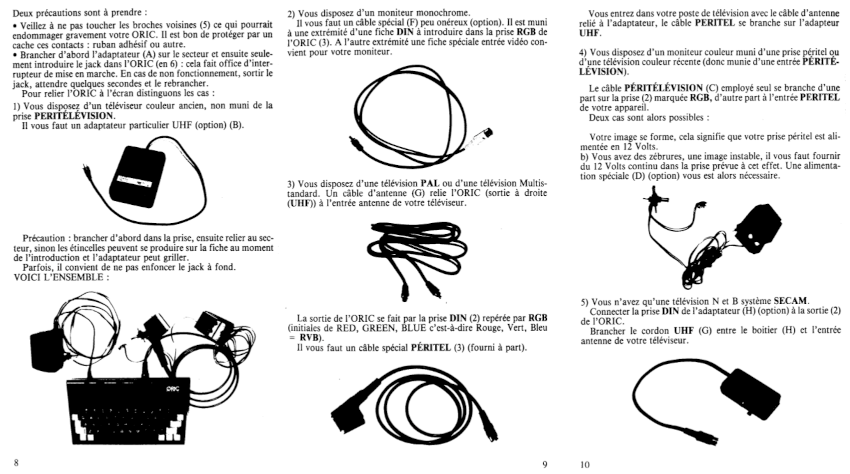
I guess, depending on your own configuration, there was a pretty good chance that the cable you actually needed was not the one sold with the Atmos but one of the optional ones (the C.G.V. SCART to UHF converter packaged with the Atmos I bought being one these).
On top of that, some later models – produced in France by Eureka – had a different RGB connector (DIN-6 instead of DIN-5, with an added +5V pin on the center, to power the SCART connector):
[Credits: shots from user jluis on system-cfg.com‘s forum, https://forum.system-cfg.com/viewtopic.php?f=1&t=13976]
[Eureka Informatique ad. in French magazine Tilt #24 (Sept. 1985): “Its SCART output is now self-powered“]
Anyway, in my case, I will be using the regular DIN-5 RGB output connector of my Atmos, and the bundled powered SCART cable:
Let’s take a look at this RGB-to-SCART cable. Here is a shot of the cable once cleaned with soapy water:
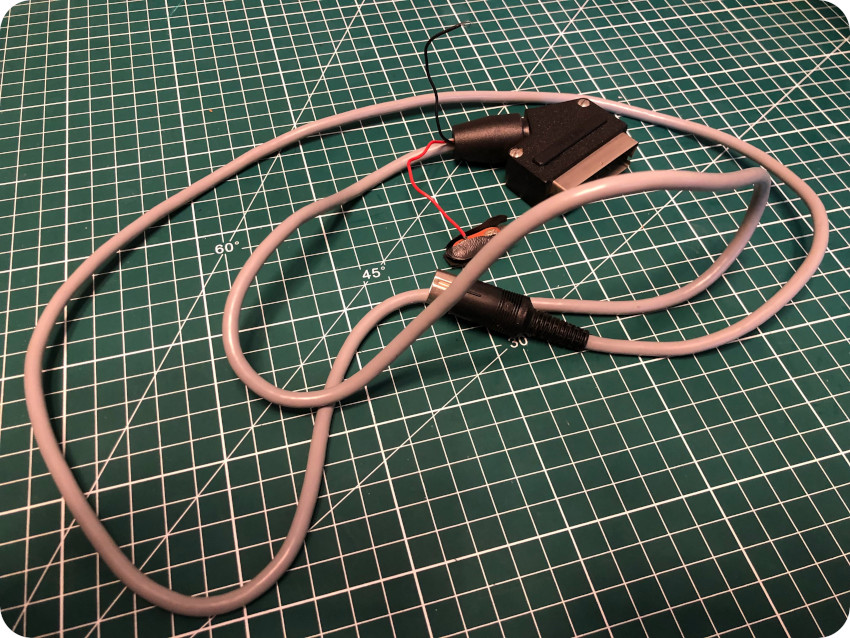
It is powered by a 9V battery via an specifically added plug. This part is damaged (it was advertised as so in the pictures of the offering), but it can be easily repaired, fortunately.
Before that, let’s take a look inside this SCART connector:
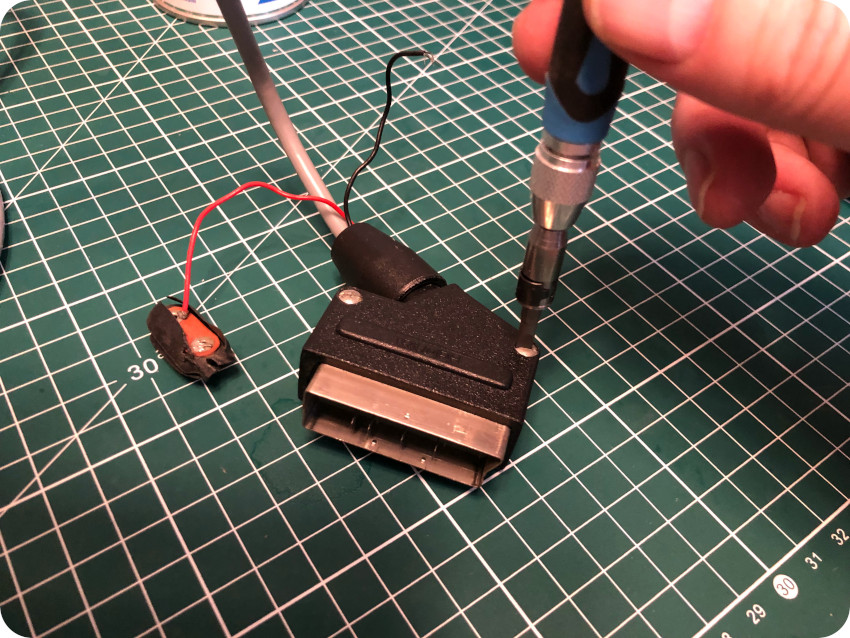
I am not quite sure, but by the look of it, this connector may have been home-made or customized …
Time to repair the damaged battery plug:
There you go. Not perfect, but it should be working now !
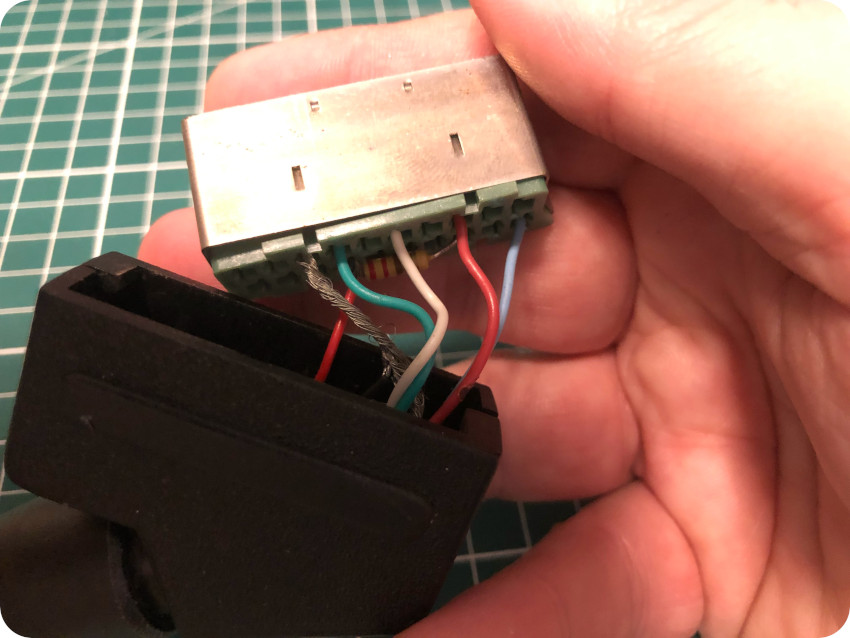
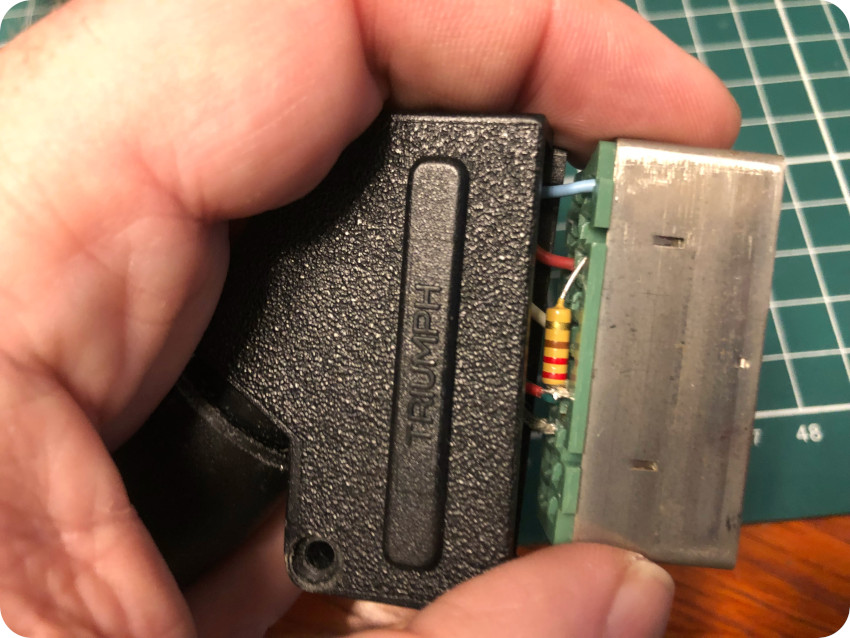
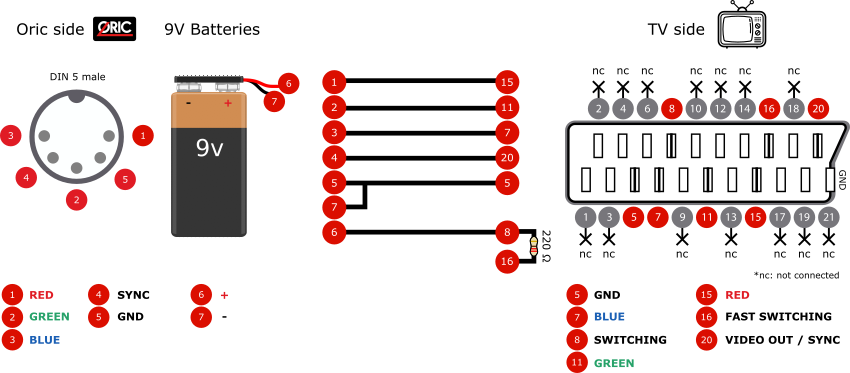
Now, let’s go a little further and let’s find out the wiring of this SCART cable:
Here is a summary of the wiring of this particular cable, from visual inspection of the RGB-SCART connector and from continuity tests (the DIN-5 and SCART connectors on the drawing are seen from the top, as pictured in the above photo):
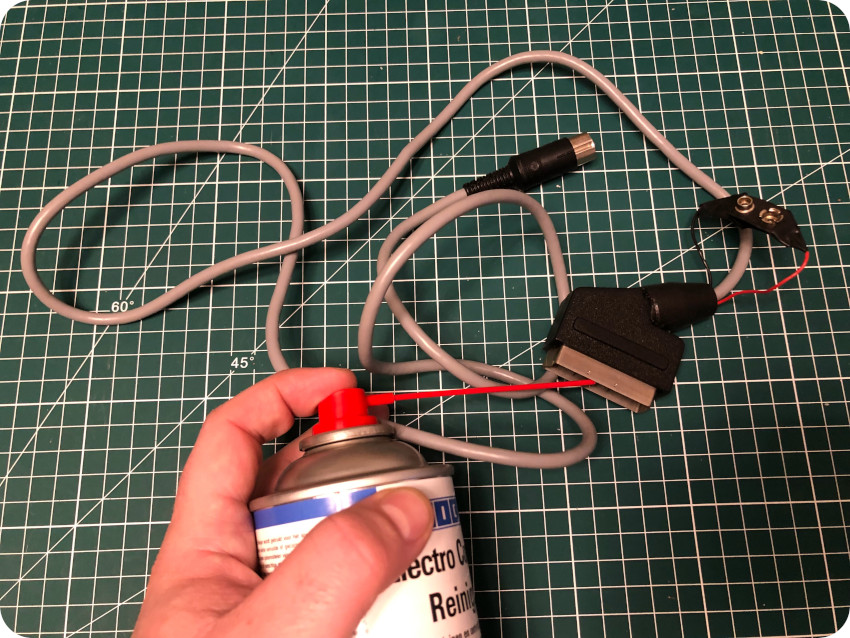
Let’s end this process by spraying contact cleaner on both the DIN-5 and SCART connectors:
The keyboard
Let’s take care of the keyboard. I started by removing the keys one by one with a keycap puller:
As always, it is a real mess under, with dust, gunk and things that used to be alive at some time:

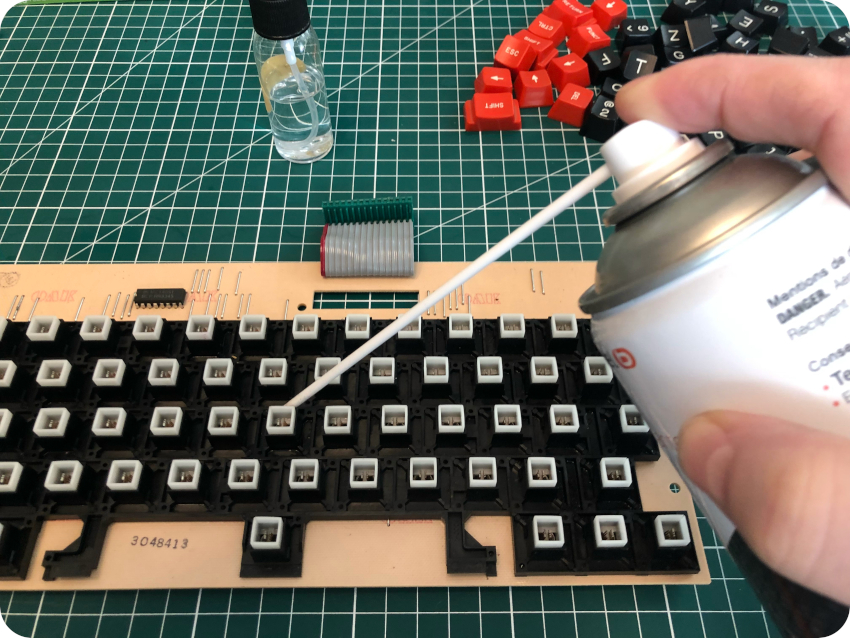
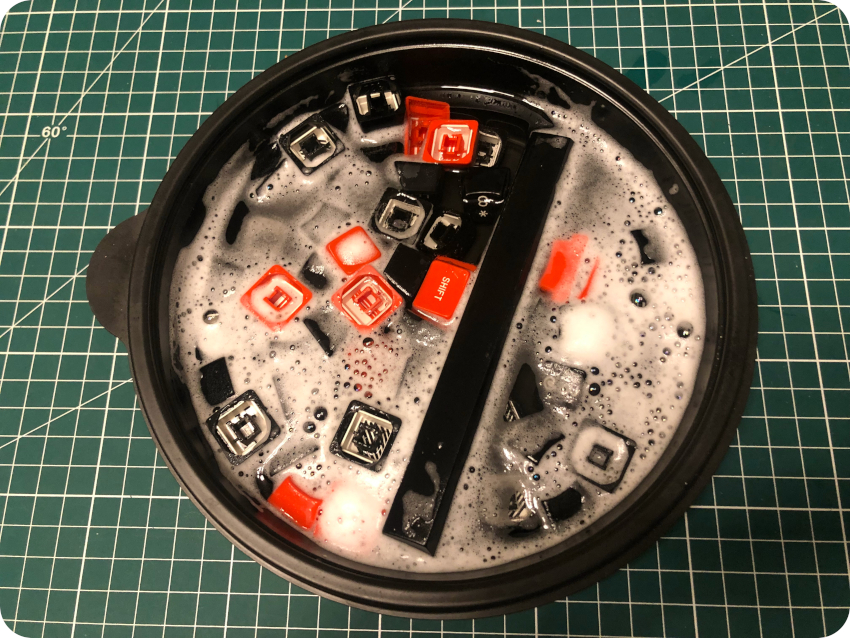
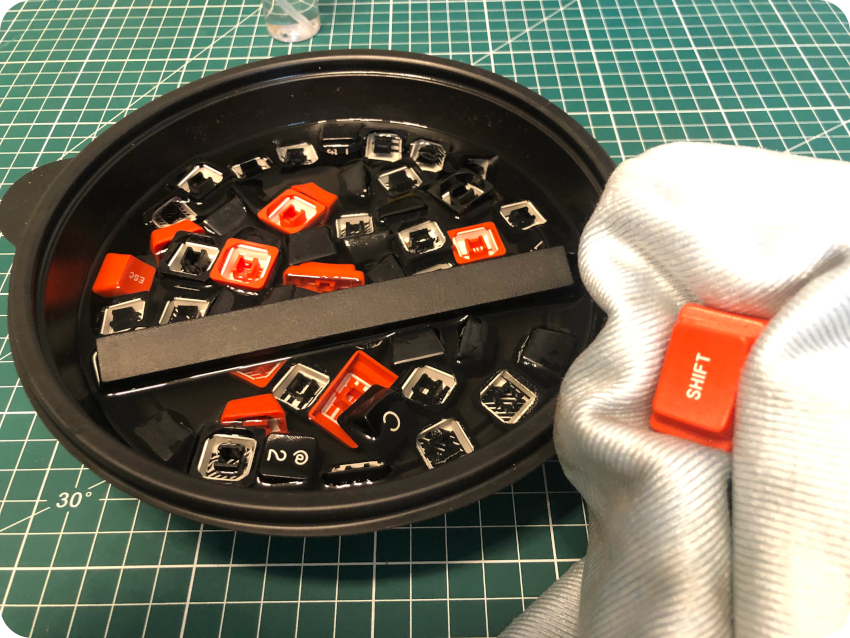
Once dusted, vacuumed and cleaned with isopropyl alcohol, I sprayed contact cleaner on each key switch. Then it was time for a warm soapy bath, followed by the usual scrub with a cloth for each key:
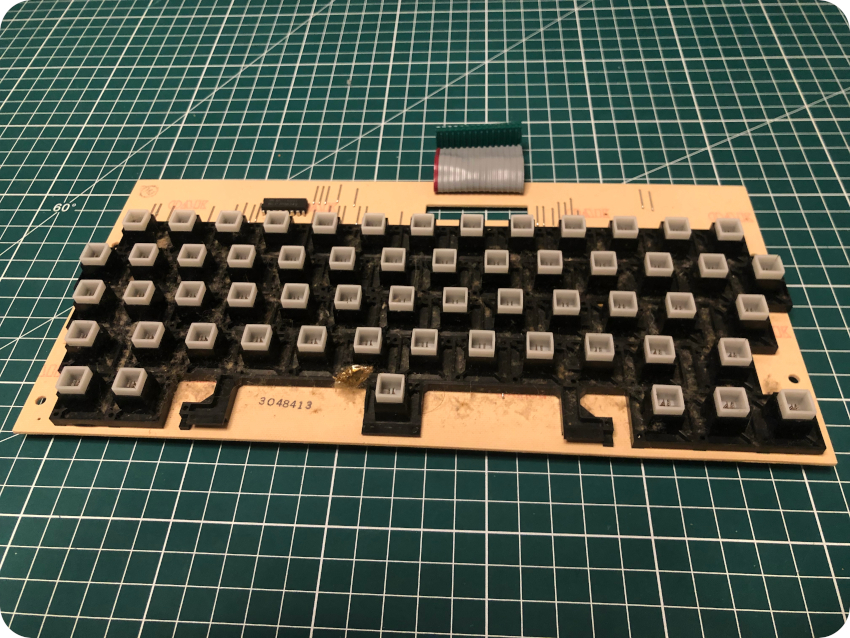
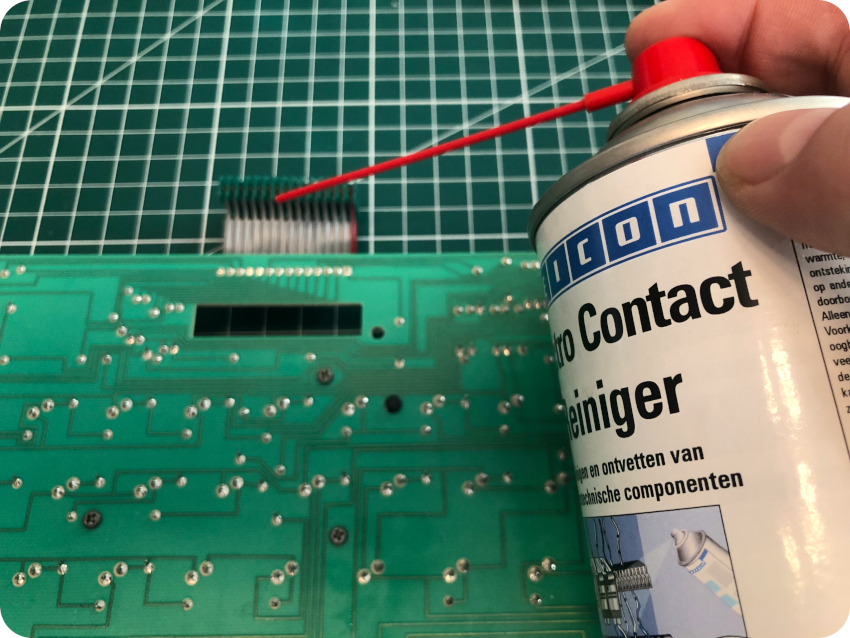
Now, let’s take care of the keyboard’s PCB itself. As I usually do, I used glass cleaning towels soaked into IPA and a soft toothbrush:

Then I sprayed contact cleaner on the keyboard connector:
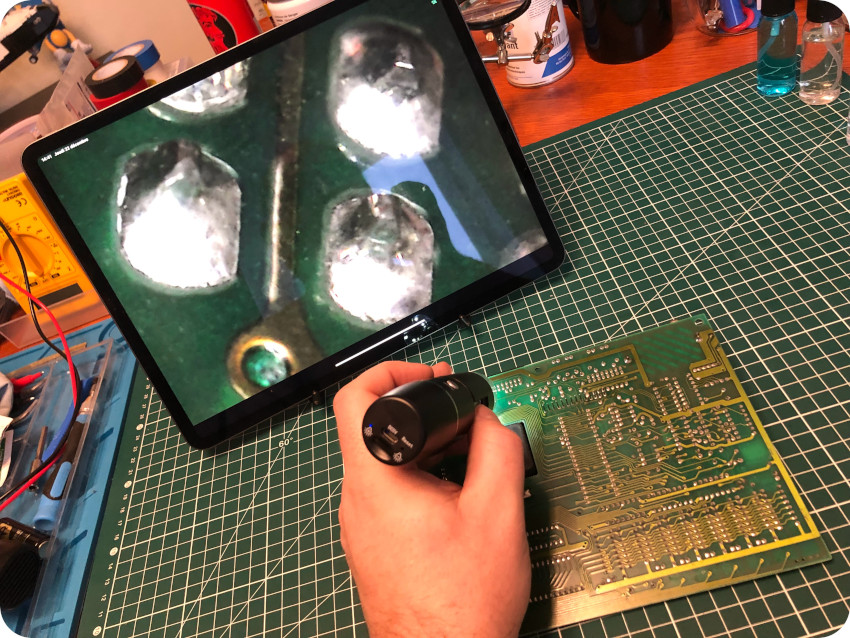
It is time for a visual inspection with the digital microscope :
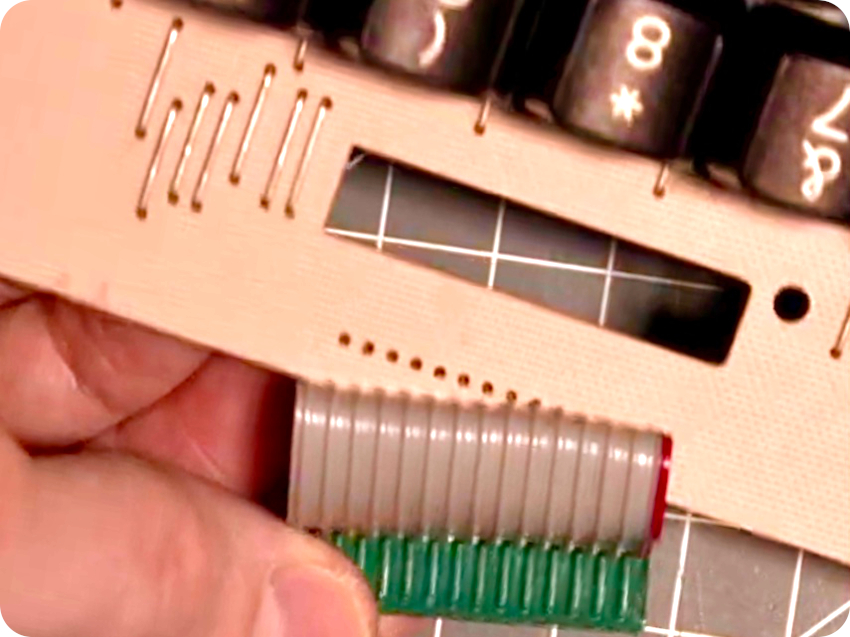
I inspected each solder joint with the digital microscope. I flew fresh solder on a couple of ones that weren’t looking great. All in all, it wasn’t that bad … until I checked the ribbon connector, which I must have teared apart inadvertently ! Damn it !
The pins were rusty and so fragile that the ribbon came right off when I touched it to have a better look at it:
Note: I was so sad that I did not take pictures of the broken ribbon connection. The above pic is extracted from RetroLab‘s video https://www.youtube.com/watch?v=FxXmP9deeKk, but is a perfect illustration of the mess.
Repairing the keyboard
It seems this my misfortune is not uncommon, the connector being particularly fragile after 40 years of loyal services.
Some of the pins broke when the ribbon teared apart and were still attached to the PCB. I tried to remove each of the remaining ones. Even though I took great care not heating the soldering iron too much, I ended up like this:
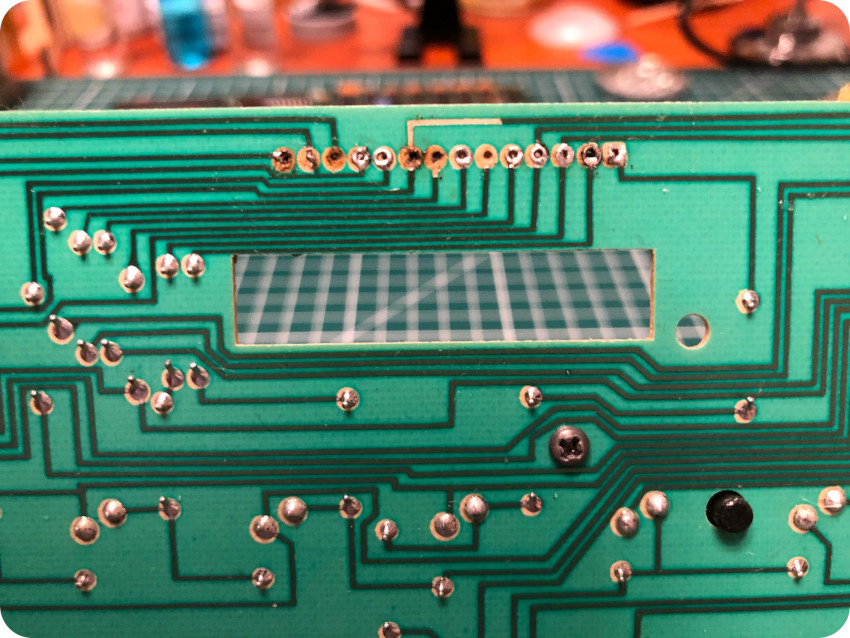
Some of the traces had started to lift and crack. Continuity was lost on most of the connector’s vias : only seven of them were still usable. The ribbon connector itself was corroded, falling apart, and could not be reused.
It is pretty clear that I need proper desoldering tools. A soldering iron and a copper wick are definitely not well suited for such a fragile PCB !
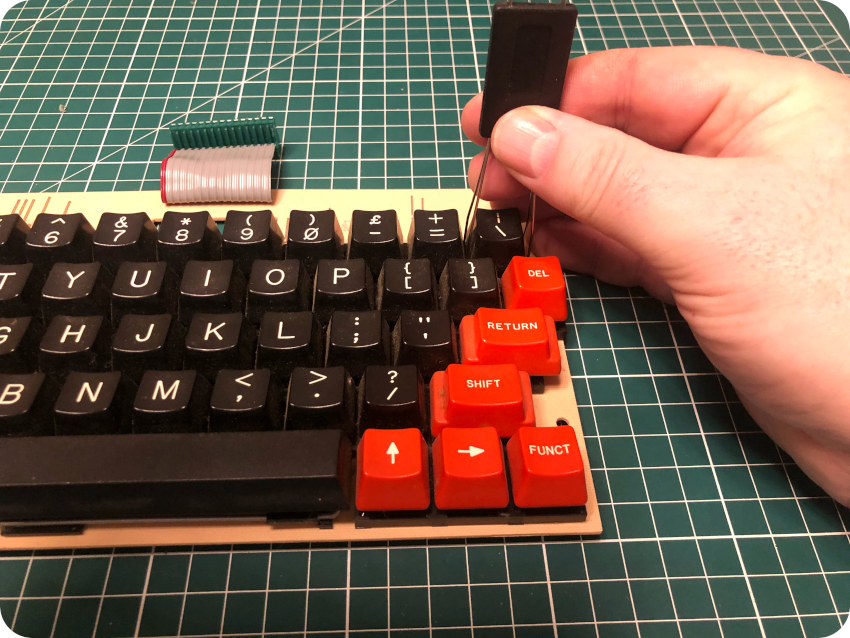
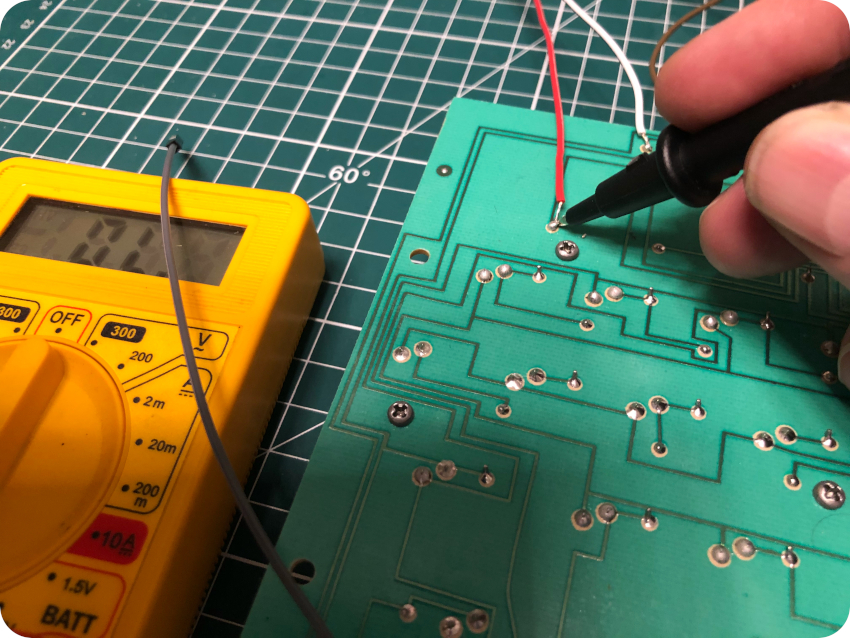
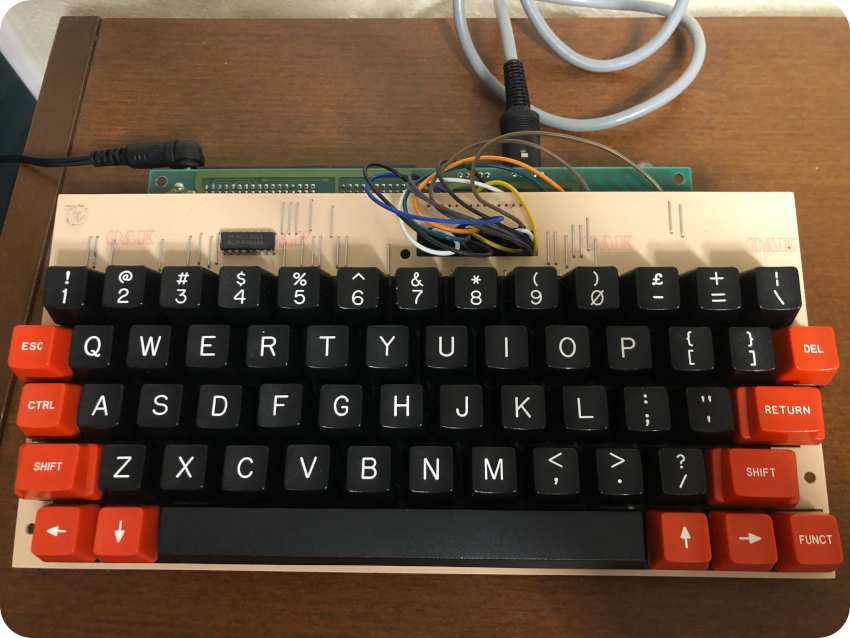
I figured I could use a set of 14 Dupont wires as a replacement. I started to follow each trace to find out a corresponding available solder joints, solder a wire to it (and check for continuity) and use the female Dupont endings to connect things back to the keyboard header on the main PCB:
It was a long and tedious process (proving once again that my eyesight is definitely not what is used to be). Here is the final result:
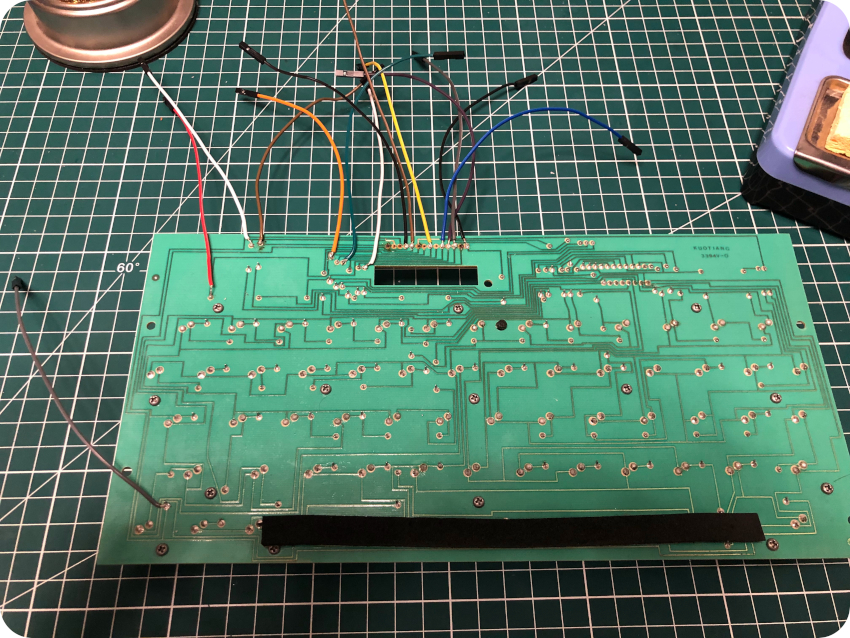
Here is another picture, with a bit of cable management:
Here is a shot of the Dupont connectors hooked to the keyboard pin header. Nothing to be proud of, it is messy …
… but … it fits, and, I hope, it will work:
Let’s go for a first test, crossing fingers !
First tests
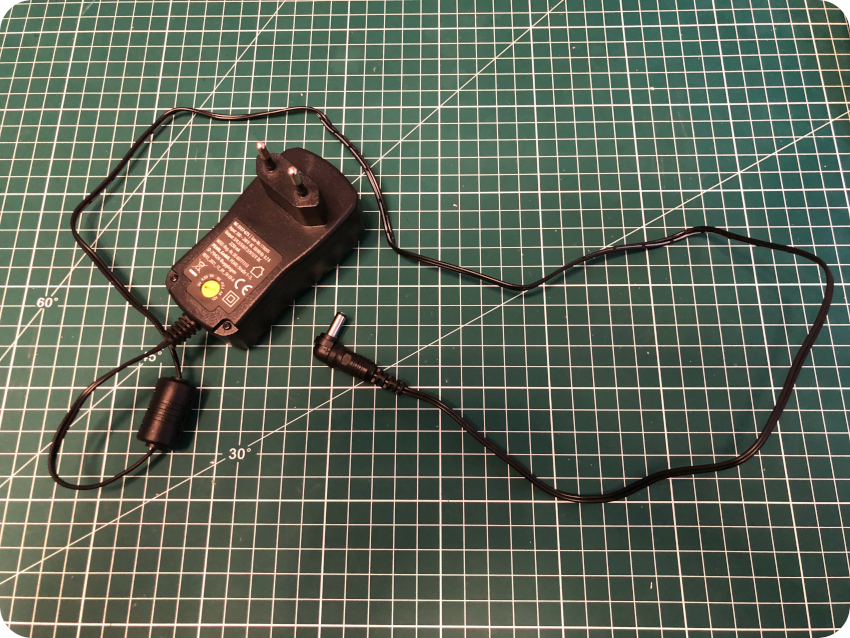
To power the Oric Atmos, I used a standard PSU, bought just around the corner (2250 mA, more than the 600 mA needed), selecting:
- 9V (among 3V / 4.5V / 5V / 6V / 7.5V / 9V / 12V positions)
- a 2.5mm barrel jack (plugged to be center positive)
I hooked the PSU to my surge protector power strip, and turned its switch on:
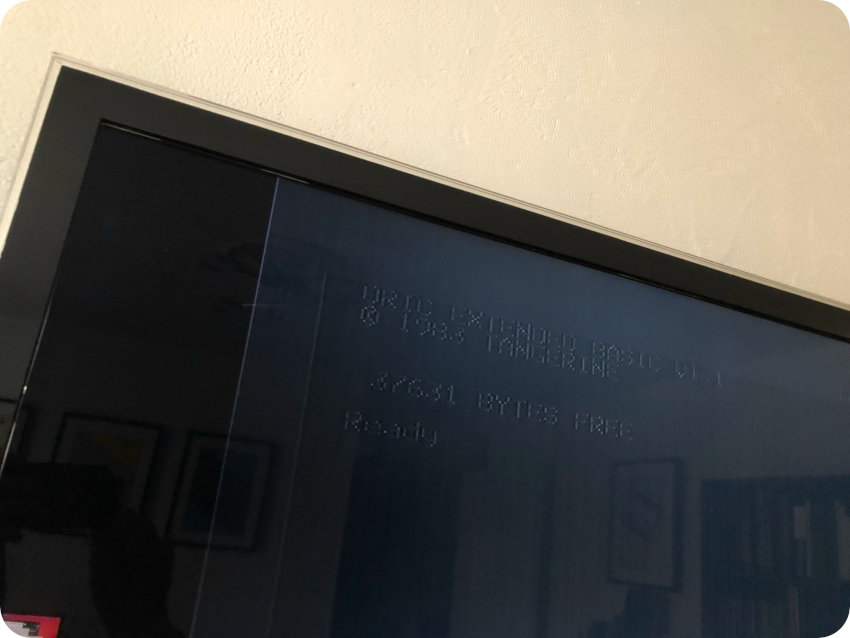
No magic smoke. Just a very faint buzz coming from the speaker. Garbage on the screen. No sound when pressing keys. Damned !
But, after some fiddling with the barrel jack … voilà ! The Amos powered on correctly this time. The repaired RGB-to-SCART cable worked ! You can see on this shot the 9V battery powering the SCART connector:
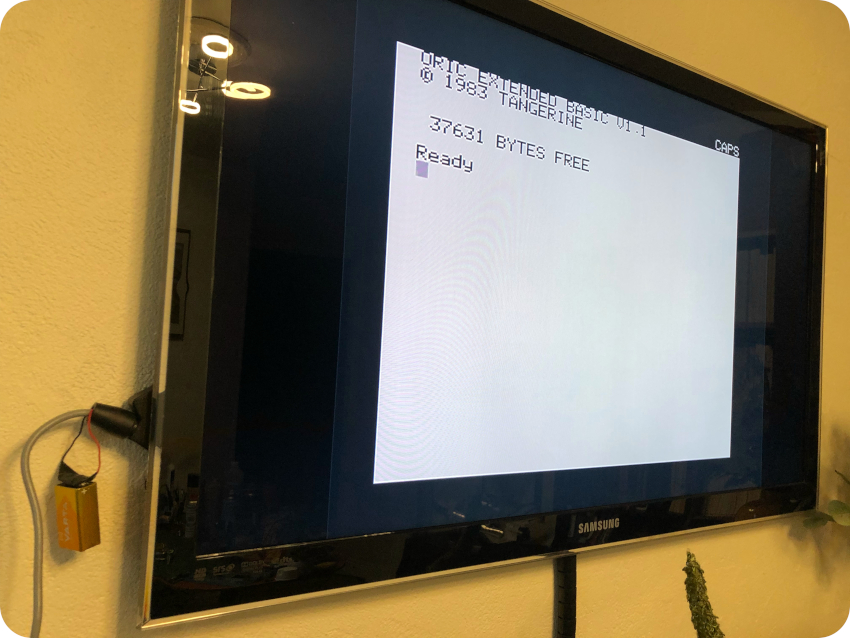
Without the batteries powering the SCART connector, as expected, it does not properly work (doesn’t switch to RGB). When powering on the Atmos, the screen goes therefore like this (it is dimmer in real life):
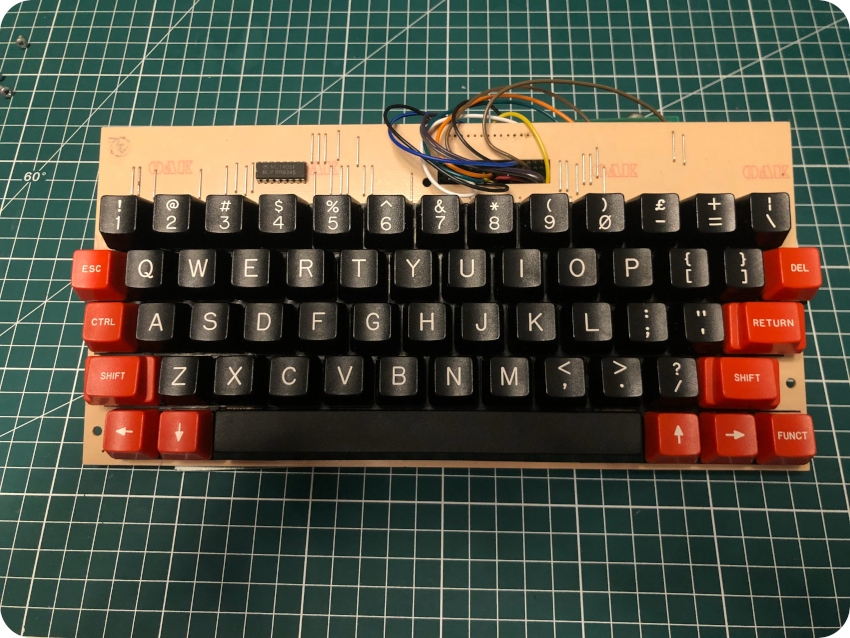
For the next round of tests, I put the case back together – next to my RecalBox console and my Atari ST – and tried the (hopefully) repaired keyboard :
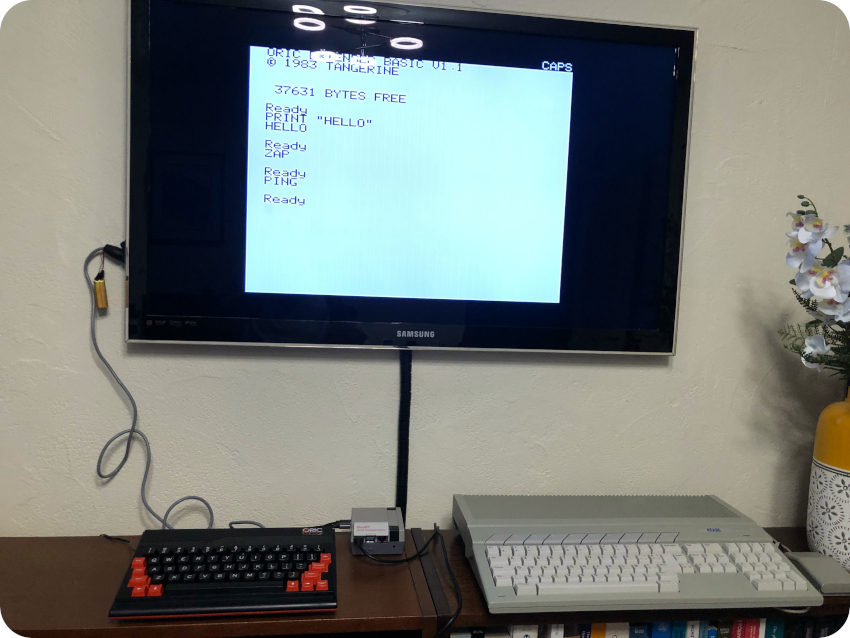
Yes ! It freakin’ worked ! (and so does the sound chip, tested thanks to the sound emitted at each key stroke, and via the ZAP and PING commands)
Cassette tapes restoration
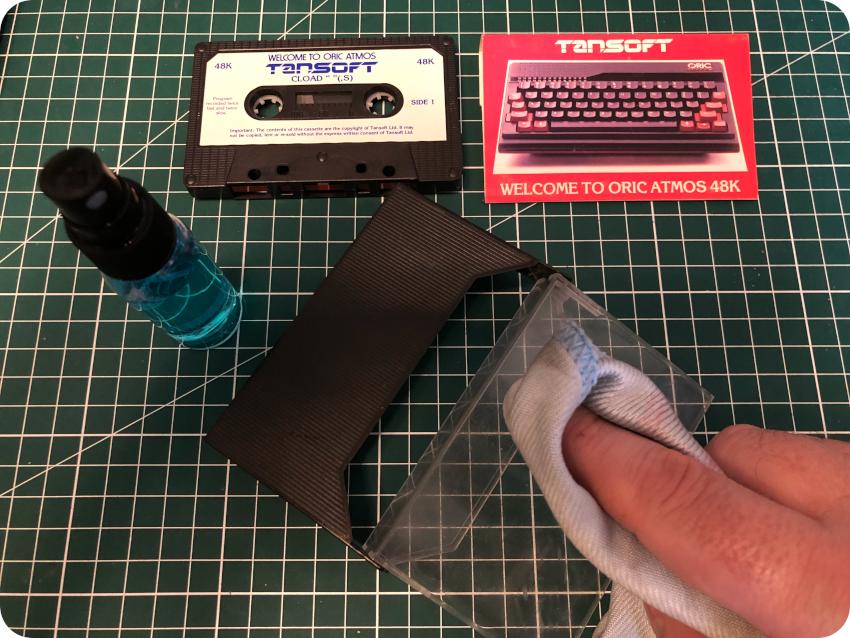
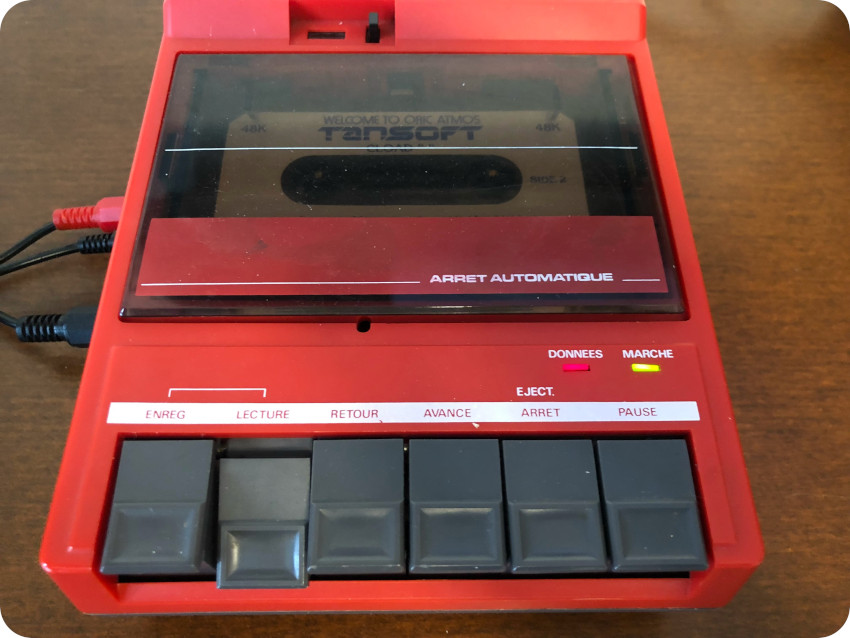
Let’s take care of the cassette tapes bundled with the Atmos I acquired:
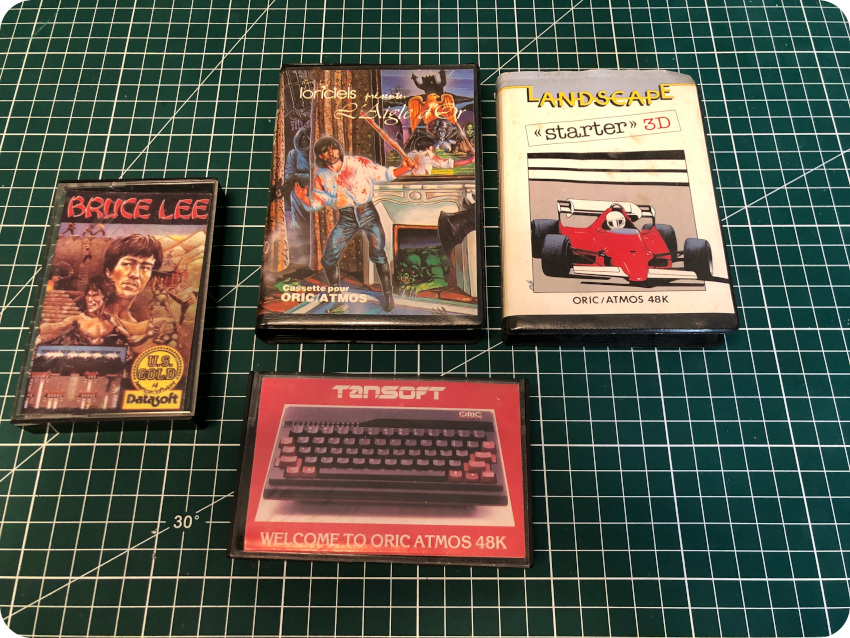
The cases were not in bad conditions. For most, it was just a matter of a good cleaning:
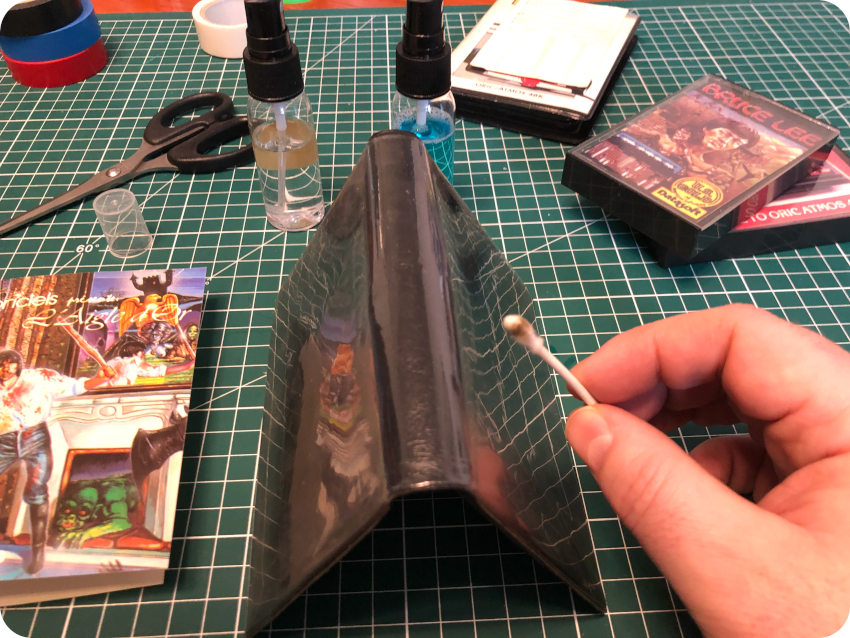
The “Starter 3D” box needed a little more work. Once cleaned, I consolidated the broken case with black tape:
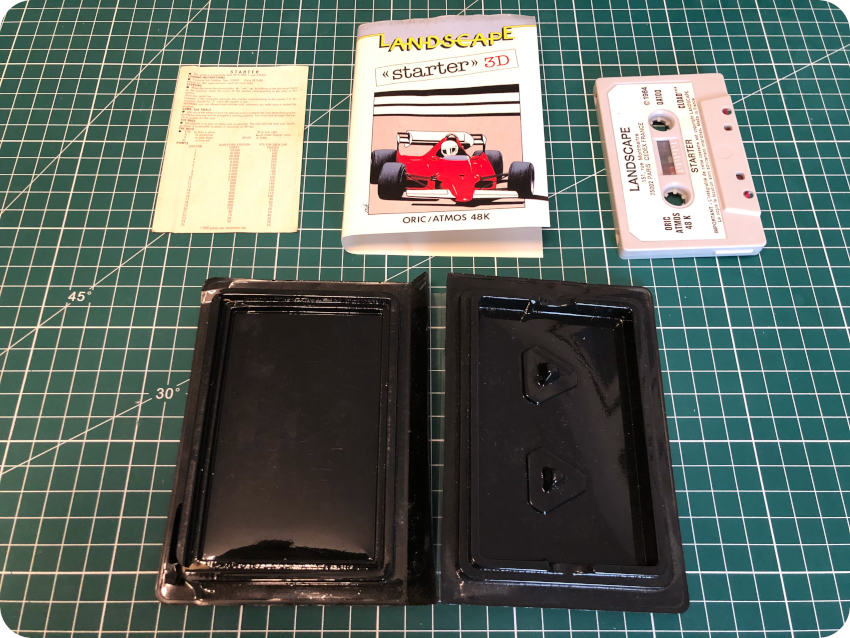
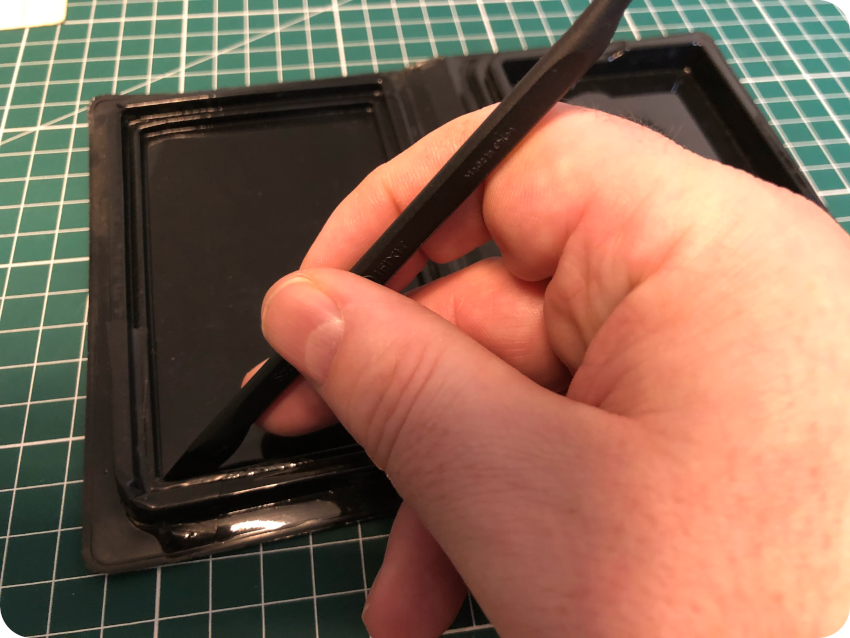
Here is the final result. Not that bad:
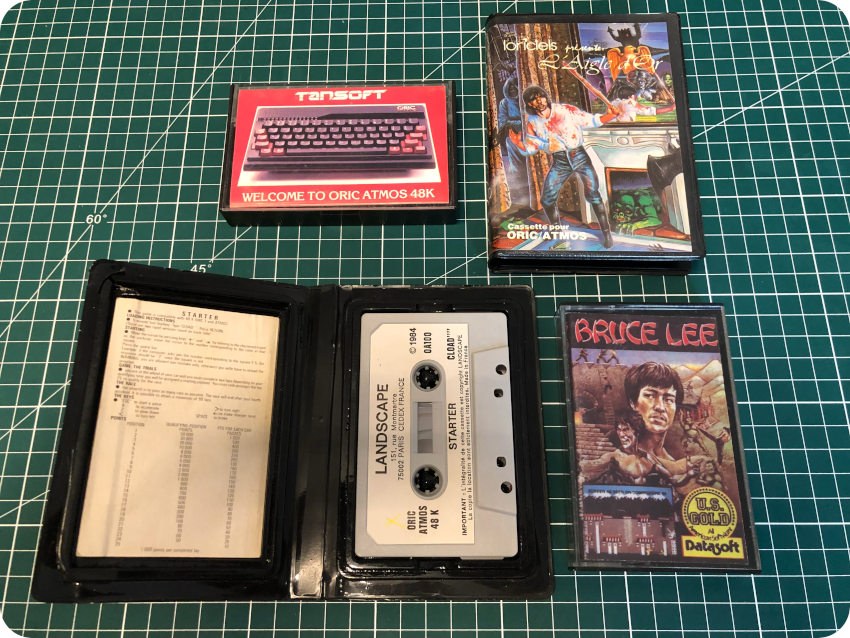
Note: it turned out that the “Bruce Lee” tape was also for the Sinclair ZX Spectrum, and not for the Oric Atmos, just like “Match Day”. I guess I’ll have to try both of them on my Speccy !
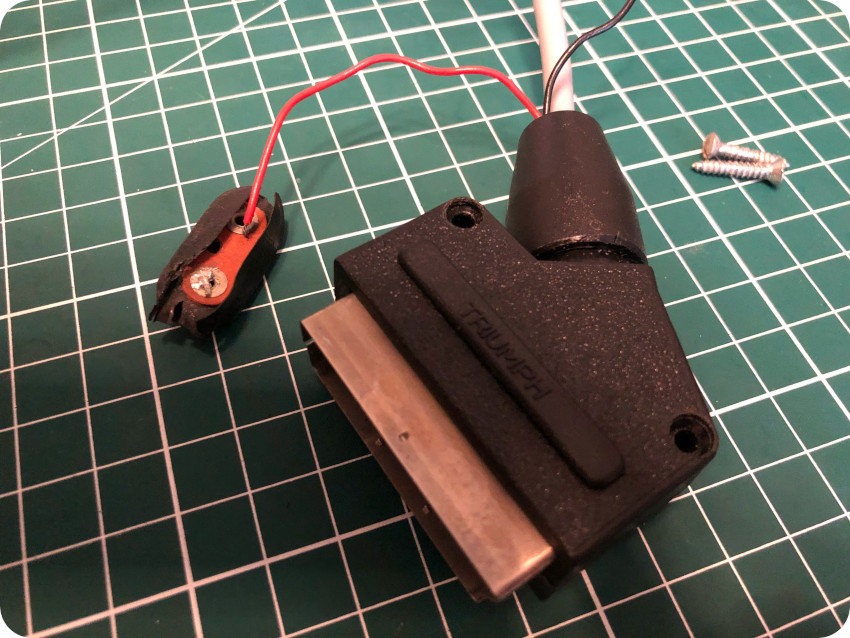
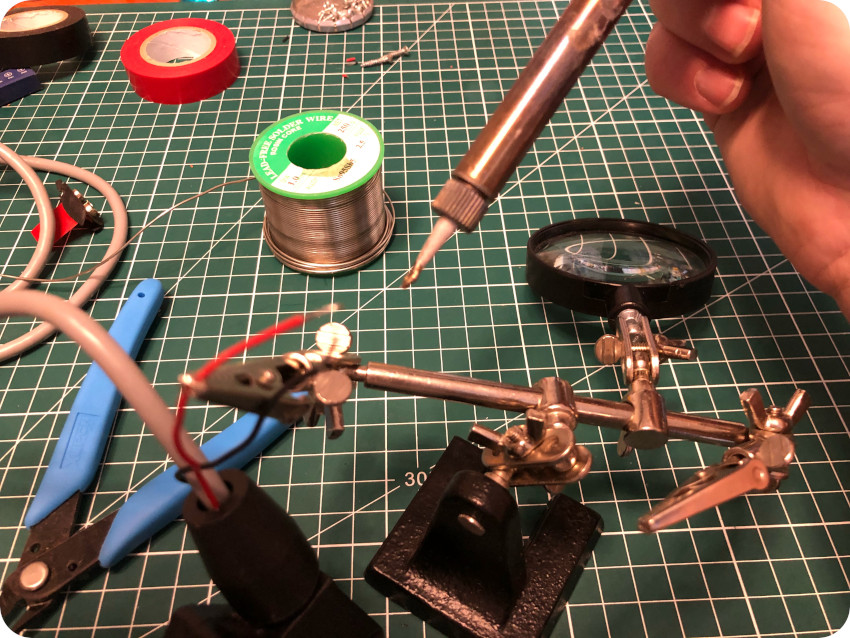
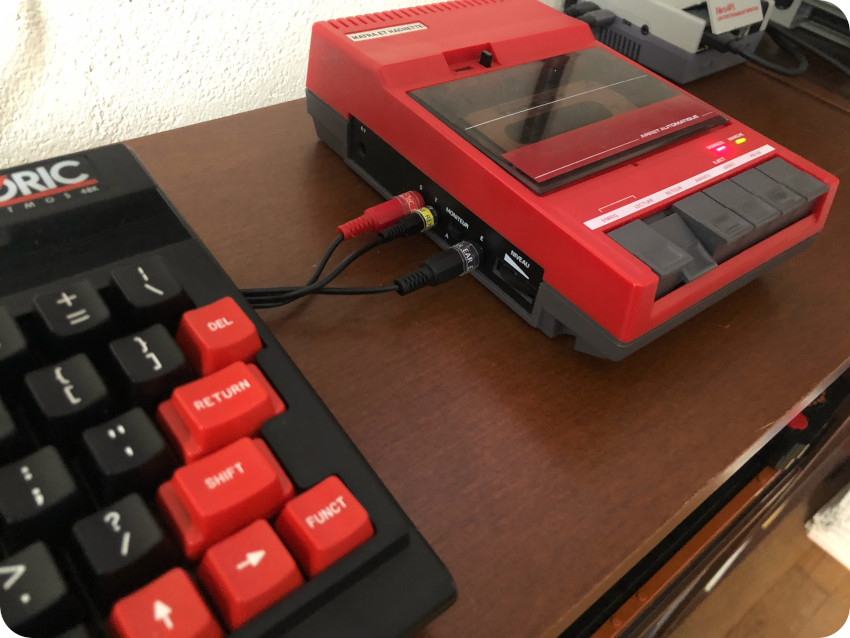
Tape recorder cable
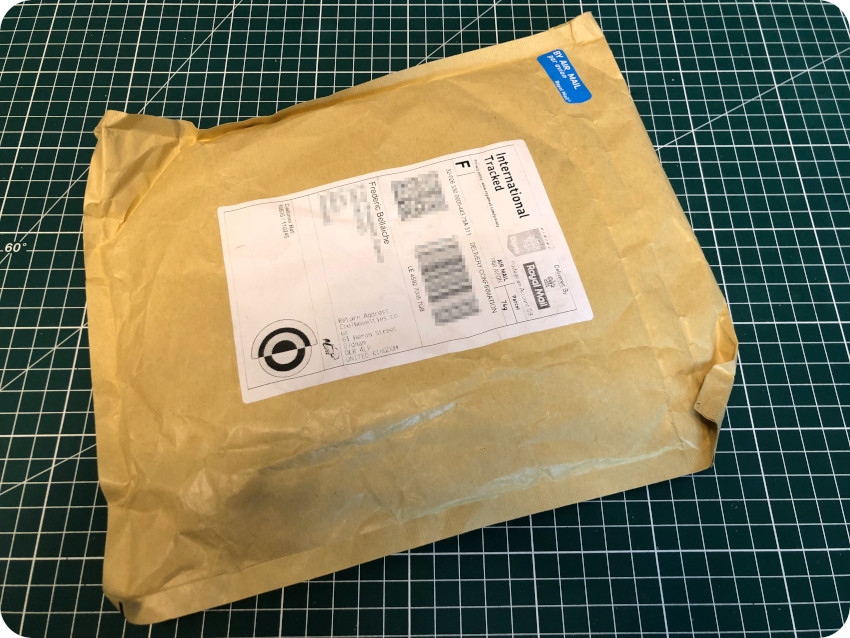
The Oric Atmos I bought was bundled with some cables, but none that I could use to connect it to a tape recorder. So I ordered an Oric-1 / Oric Atmos cassette tape recorder cable from coolnovelties, in the UK.
Unfortunately, a few days later, Royal Mail suffered a LockBit cyber attack. The consequences of the ransomware halted all international shipments for weeks:

[Royal Mail cyber incident]
[coolnovelties information update for their customers, following Royal Mail cyber attack]
So … instead of the dozen of days (including Brexit custom red tape) it usual takes, it took this time over a month for the cable to arrive:
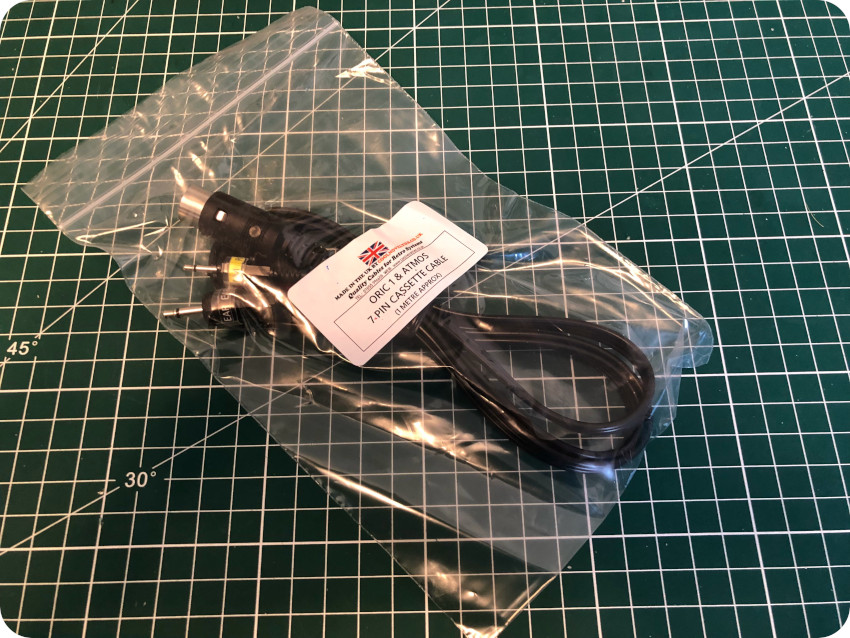
Hip Hip Hurray !
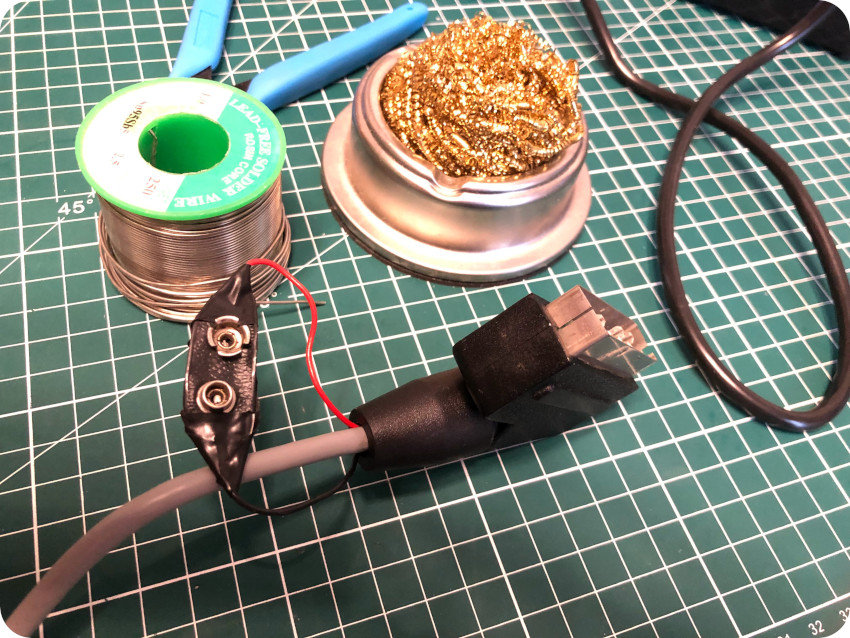
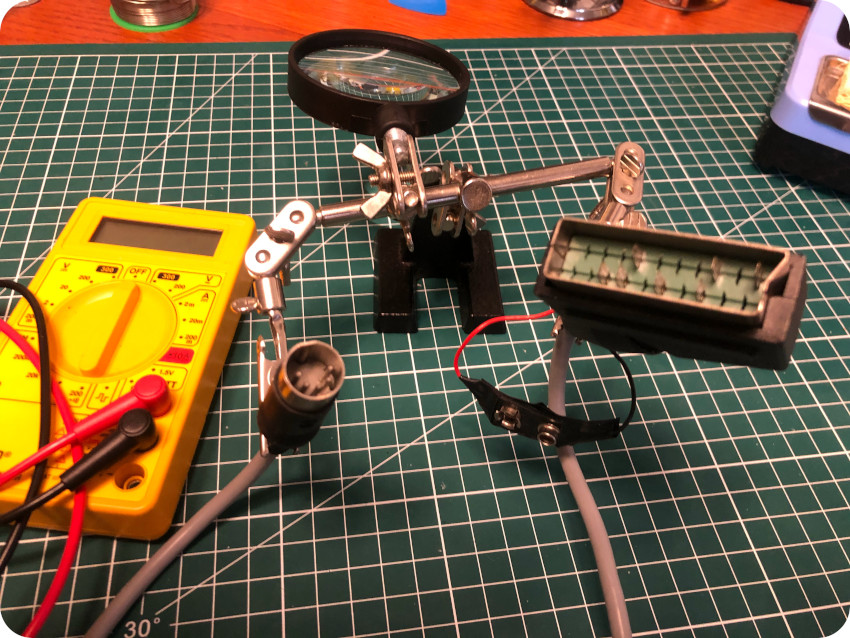
The tape recorder cable is composed of a DIN-7 connector on one side and of two 3.5mm jack (MIC, EAR) plus a 2.5mm jack (REM) on the other side:
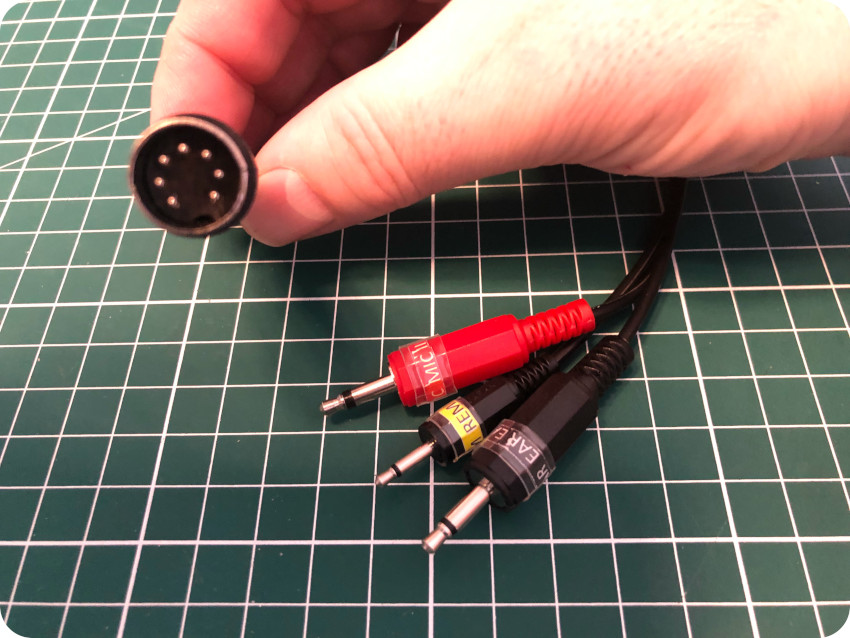
Here is the wiring of the cable (DIN-7 seen from the top, as pictured in the above photo):
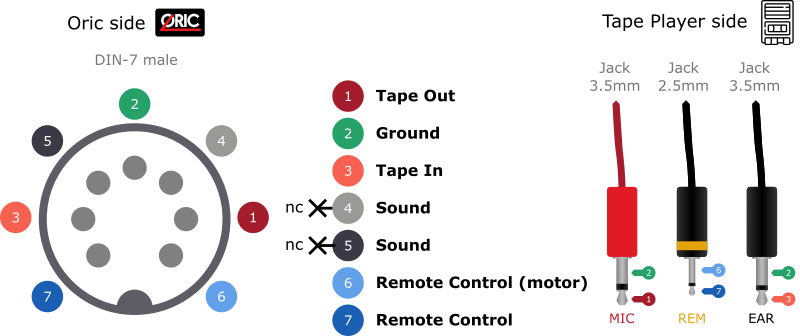
Note that pin #4 and pin #5 (sound) from the DIN connector are not wired.
Testing software
Shall we play a game ? The Oric series of computers is notorious for being capricious when it comes to loading software from tape. So, I was expecting a bumpy ride ! And … it turned out to be true.
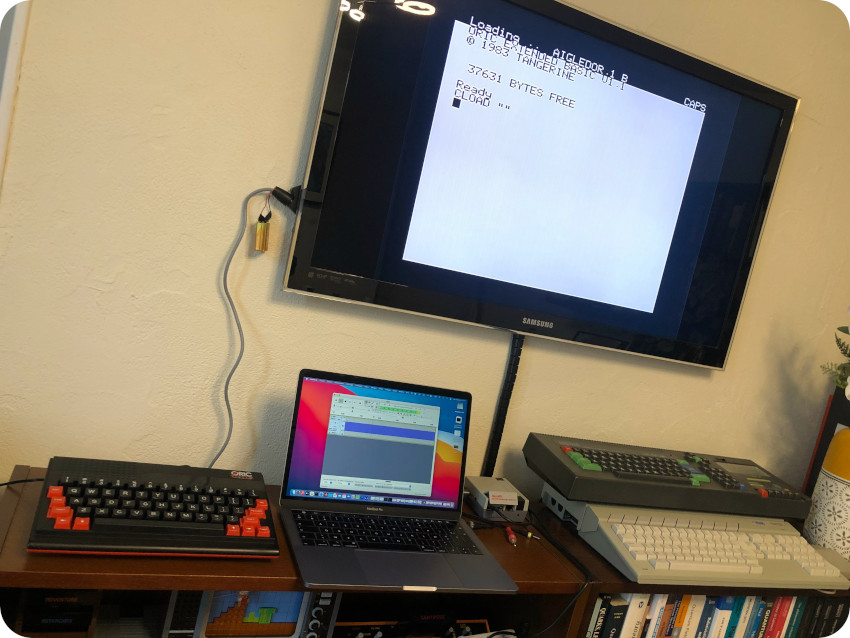
To test the cassettes that were bundled with my Atmos, I used the tape recorder from my Matra-Hachette Alice 90. Not sure if it would work, but at least, it matched the black and red colors of the Oric Atmos !
In the end, excluding “Bruce Lee” and “Match Day” that were actually ZX Spectrum games, I had only 3 cassette tapes to experiment with:
- Welcome to Oric Atmos 48K by Tansoft
- L’Aigle d’Or by Loriciels
- Starter 3D by Landscape
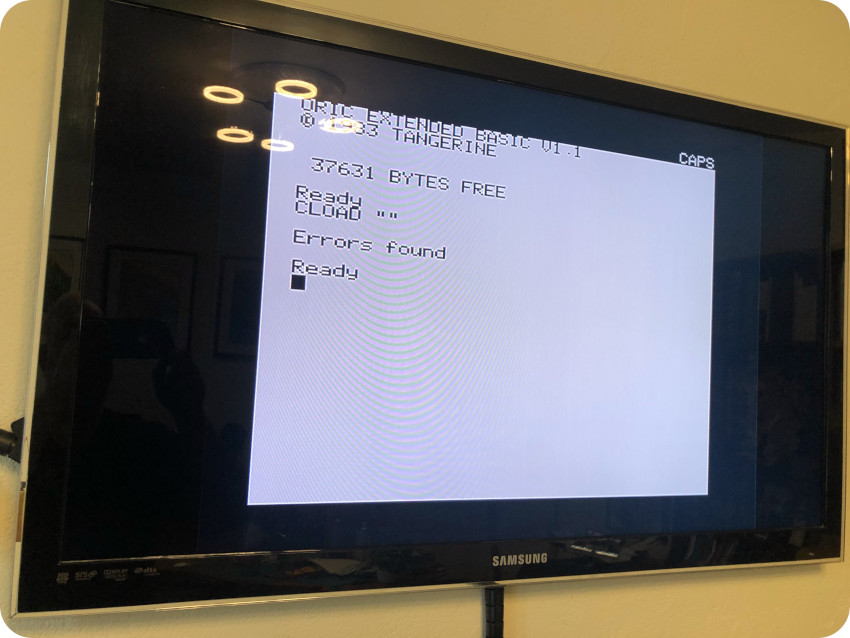
I started with the first one, typing in CLOAD “” …

… and it started to load from the tape. Nice !
After a long while, I was greeted with this welcome screen:
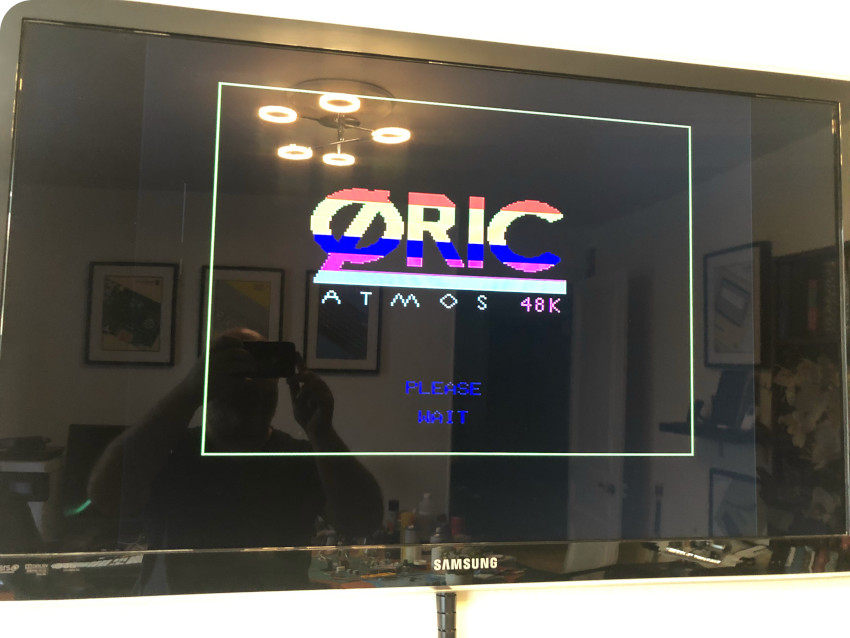
Hey ! This is working, though colors are a bit washed out ! Alas … it did not go further than the welcome screen, no matter how long I waited. I tried pressing a few keys. Nothing. Humm… how frustrating !
Then, I tried the other two cassettes, while also adjusting the volume level, knowing that the Oric is very sensitive to it:
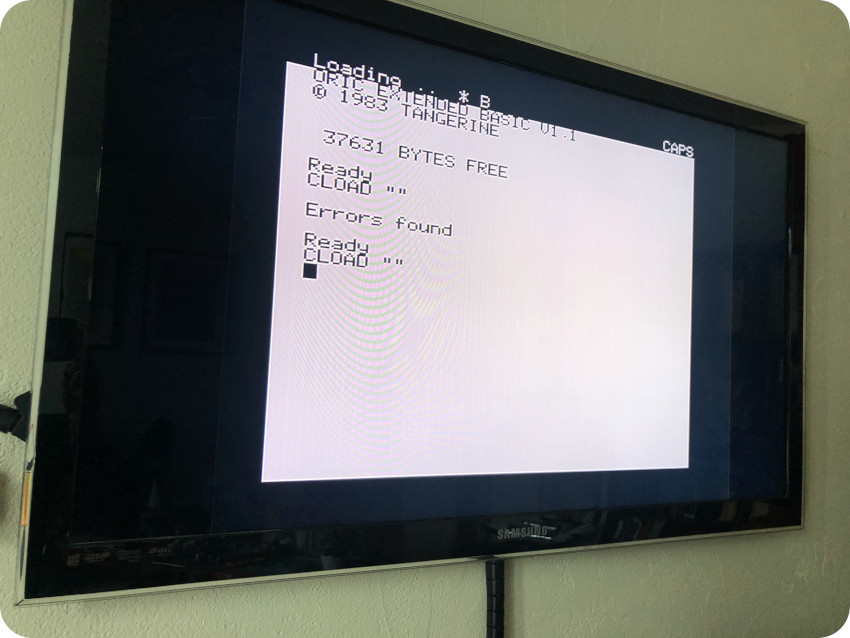
I could not load “Starter 3D”, no matter what. At one time, it almost loaded “L’Aigle d’Or” … but I ended up with a white blinking cursor on a black screen. It had probably failed to run the program and gave up, since I could blindly type in the ZAP command and hear corresponding the sound:

So disappointing ! Were the cassette tapes failing ? Quite possible after almost 40 years. Was the Matra-Hachette tape player unreliable when used by the Oric ? Possible. Was it the volume level ? May be. Was it … the Oric being as stubborn as it is known to be ? Most probably too !
Let’s investigate. First, let’s take a look the tape player. I cleaned its head with a cotton swap soaked in IPA:
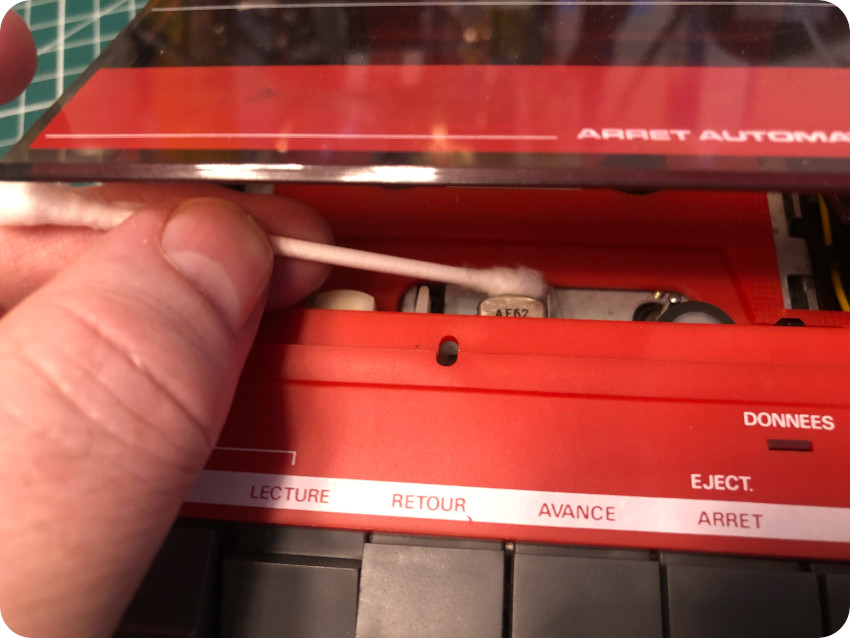
I had cleaned the head just a couple of months before. Since then, I had kept the recorder safe, away from dirt. The head turned out to be quite dirty after the many many attempts at loading tapes. I guess at least one of the cassettes was in poor conditions… Difficult to draw definitve conclusions.
Getting more software
Since I had only three software to play with, and since they wouldn’t load, I had to find another source of software. Fortunately, the Oric community is quite active. Finding .tap or .dsk files for the Oric is very easy.
But I didn’t plan on buying a device such as the Erebus, Cumana reborn or SVI-CAS or any other equipment to load .tap or .dsk file from SD cards. So I needed a way to convert these files into .wav file that I could play back, feeding in the tape recorder cable EAR jack.
This is where OSDK (Oric Software Development Kit) came to the rescue. It is a cross-development system to create new software for the Oric. Incredibly enough, version 1.20 of the kit was released only a few weeks ago: 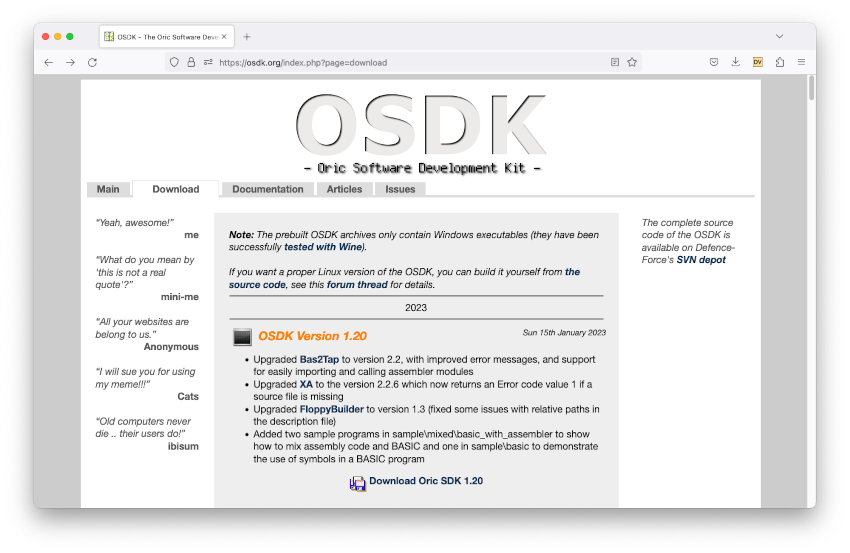
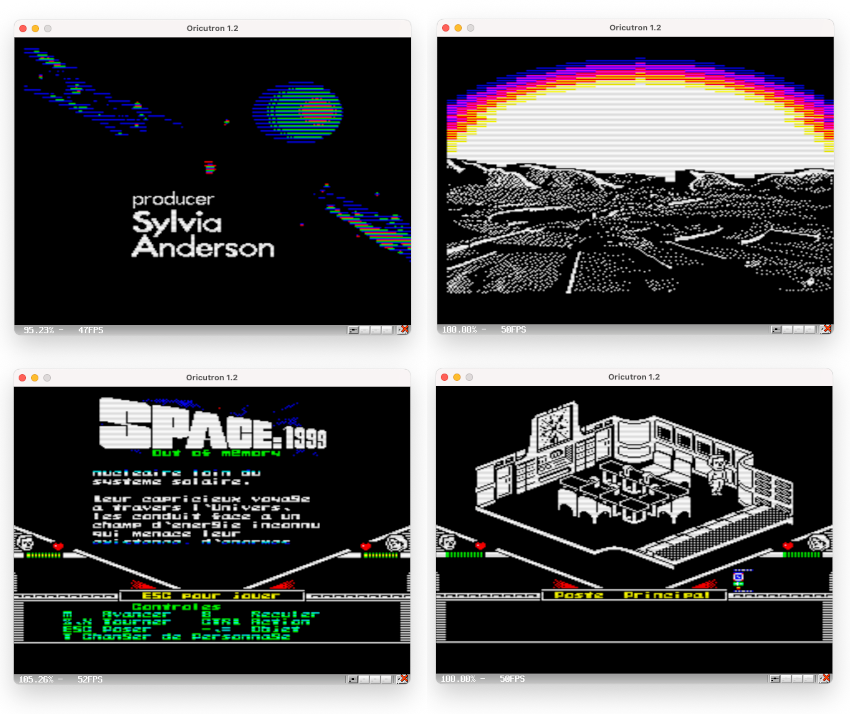
OSDK provides tools (compiler, assembler, linker, …) to cross-develop software for the Oric line of computers. It also includes Oric emulators (Euphoric, Oricutron) and a set of tools to manage floppies, convert .tap files to .wav or even .tap to .dsk files. Very cool ! And indeed, there are amazing new Oric games built on OSDK, such as Space 1999, here running on the Oricutron emulator for macOS:
Since I was testing Oricutron, I figured I might as well try the software that failed to load on the Atmos, starting with “Welcome to Oric Atmos 48K“:
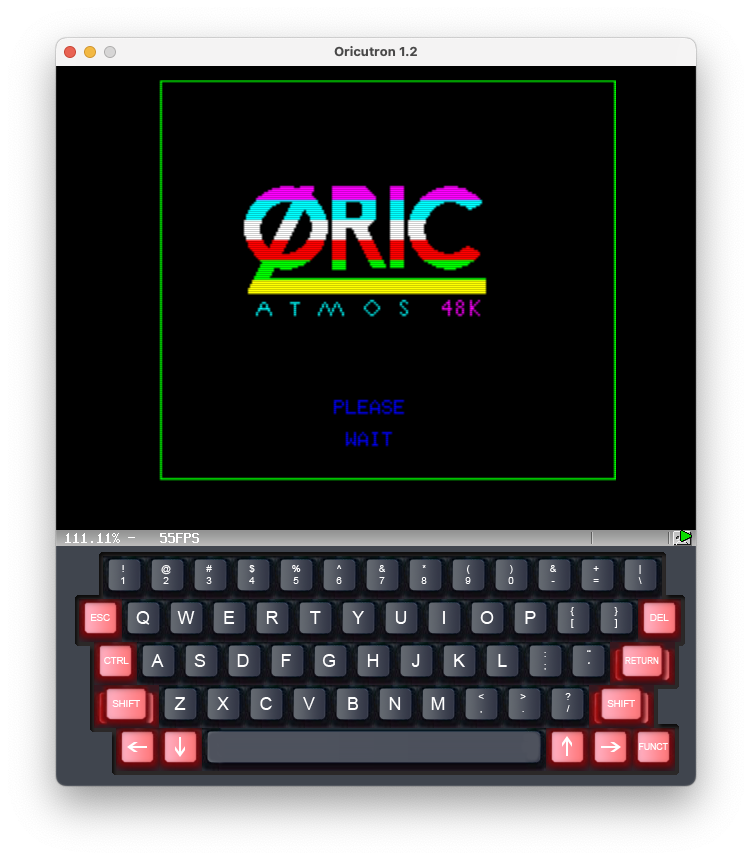
Oddly enough … it stopped exactly where it froze on my Atmos. Hummm. May be I had been missing something here… a keystroke or anything to do to go beyond the welcome screen ? Had the demo actually loaded from the tape on the Oric ? Now, I kinda think it did…
I also tried “L’Aigle d’Or” and “Starter 3D”, which both worked lawlessly on the emulator:
Anyways, I was looking for a set of tools to converts .tap files into .wav. So I fired up my Windows XP virtual machine, and copied OSDK 1.2 into it. I downloaded a few .tap files, convert them into .wav files with Tap2Wav.exe and transferred them back to my mac so that I could play them back:
I used the default Tap2Wav settings (4800 Hz). Here is what a resulting .wav file looks like in Audacity:
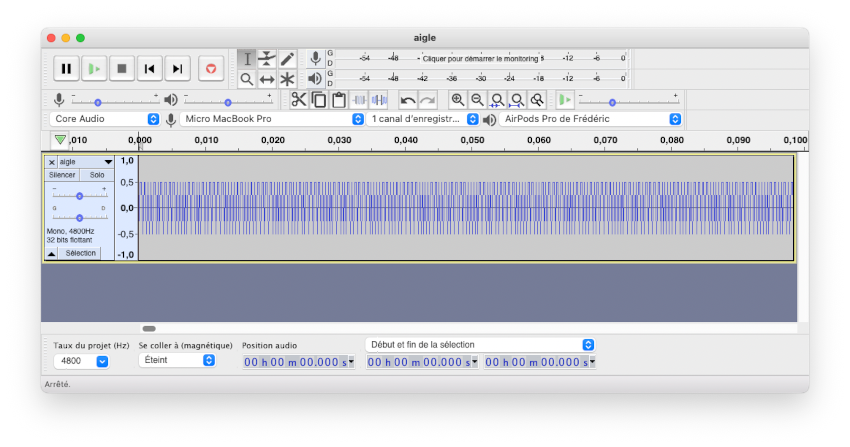
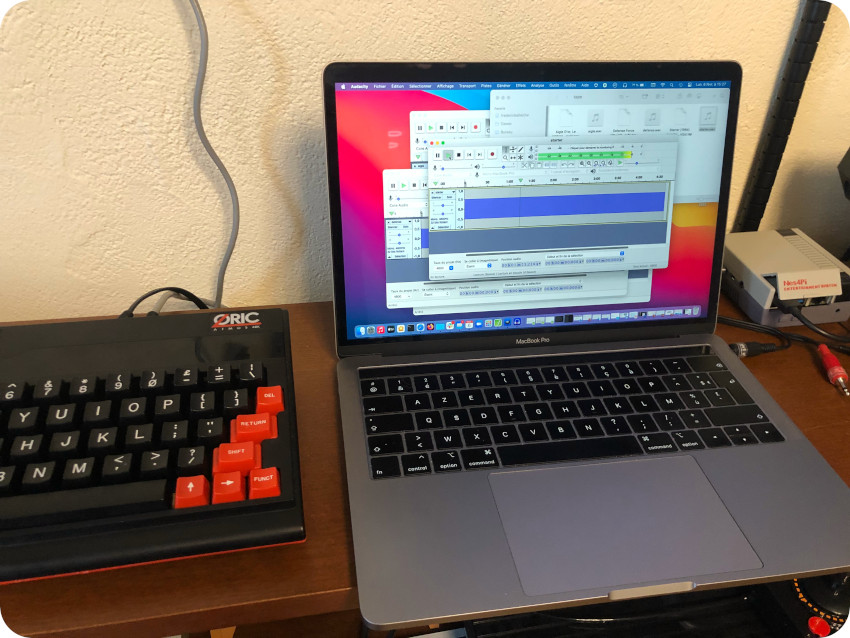
My test setup was the following:
- The Atmos was hooked up to my Samsung TV, using the SCART cable, powered by the 9V battery,
- The tape recorder cable was connected from the input of the Oric to the output of my MacBook pro (EAR Jack pugged in),
- For each try, I typed the usual CLOAD “” command on the Atmos, and played the corresponding file from Audacity, fiddling with a few parameters (volume level, sometimes slightly adjusting the speed):
I took a lot of trials and errors. Mostly errors !
I had to find the proper volume level for it to start loading. Without the proper volume level, the Atmos doesn’t find anything to load. And, even when it finds the proper header and starts to load, most of the time, it sadly ends with errors:
Nevertheless, after a lot of failures, and something like an hour messing with Audacity parameters (and cursing), I managed to load “L’Aigle d’Or” from this setup.
Loading a software from tape requires a bit of Voodoo incantations. Maybe the good spirits of the Amstrad CPC and Atari ST, sleeping peacefully close to the Atmos, helped taming the Oric Atmos. Who knows ? Victory at last !
I thought that the parameters were now settled and that loading games would now be easy.
Not so fast ! I learned the hard way that you have adjust the volume to find its proper level for each game. I never managed to load Starter 3D. That being said, I am not fond of car races… so … meh.
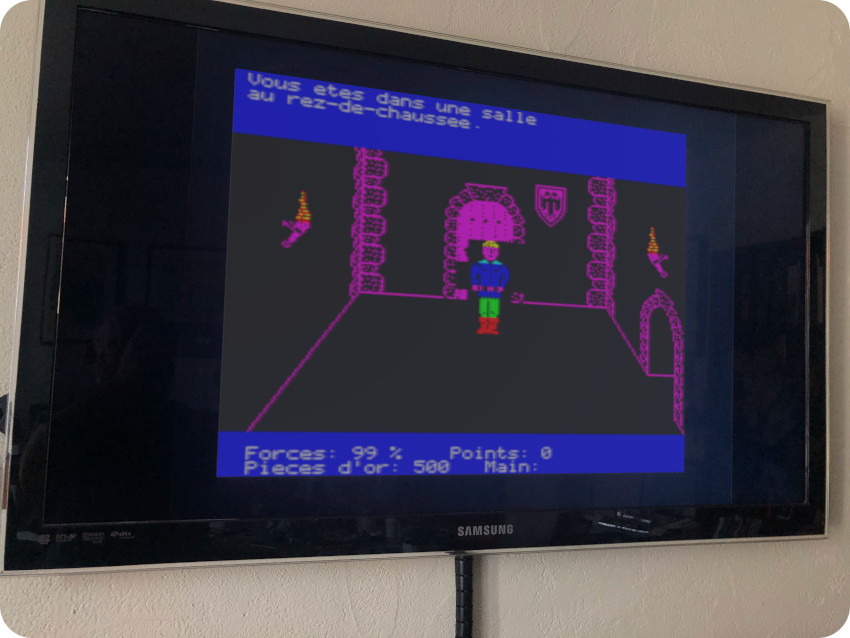
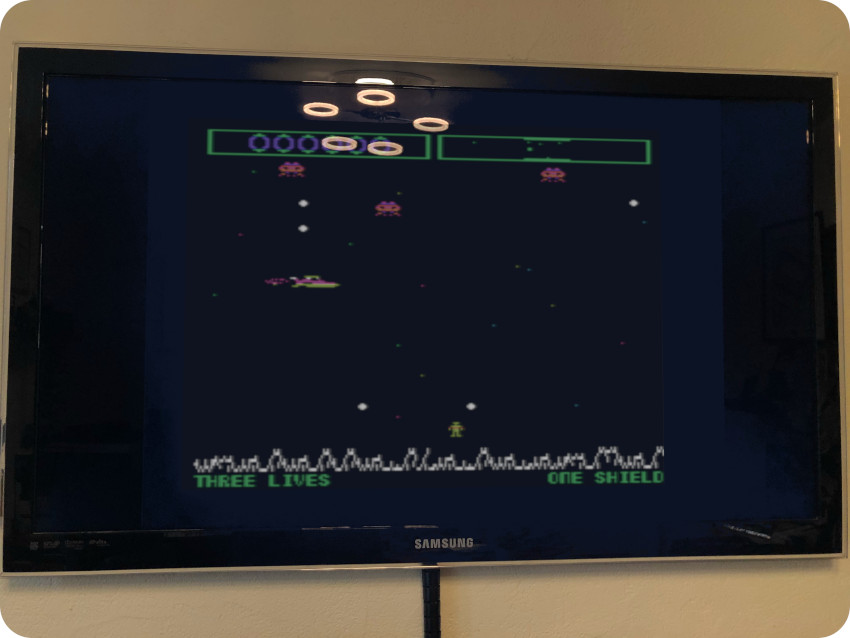
But, later that night, I managed to load “Defence Force“, which is probably one of the best games for the Oric:
Next steps
Well, that was a long and bumpy ride. I am not entirely happy with the keyboard repair. I will probably try to improve that.
In the end, I have a working Oric Atmos. It is a capable little machine, no doubt about that. Certainly one of the cutest 8-bit computers from the 80’s. It definitely has a strong character. Its power jack is very, very peaky. It is a bit moody when it comes to load software from its tape interface. The disk interfaces were much more reliable. I certainly will investigate in that direction.
Now comes usual the question: what shall be the next vintage computer to work on ? Last time, I had hoped to find a decently priced Apple IIc. A few months later, I am now pretty sure this will not be the case any time soon (but I’ll be keeping an eye on the various offerings, of course).
So … I am looking for either:
- a Commodore 64
- a Commodore Amiga 500
- or a Texas Instrument TI99/4A
I am also trying to complete my Amstrad CPC464 setup, actively looking for a DDI-1 external disk drive as well as a Vortex expansion RAM card (256K or 512K).
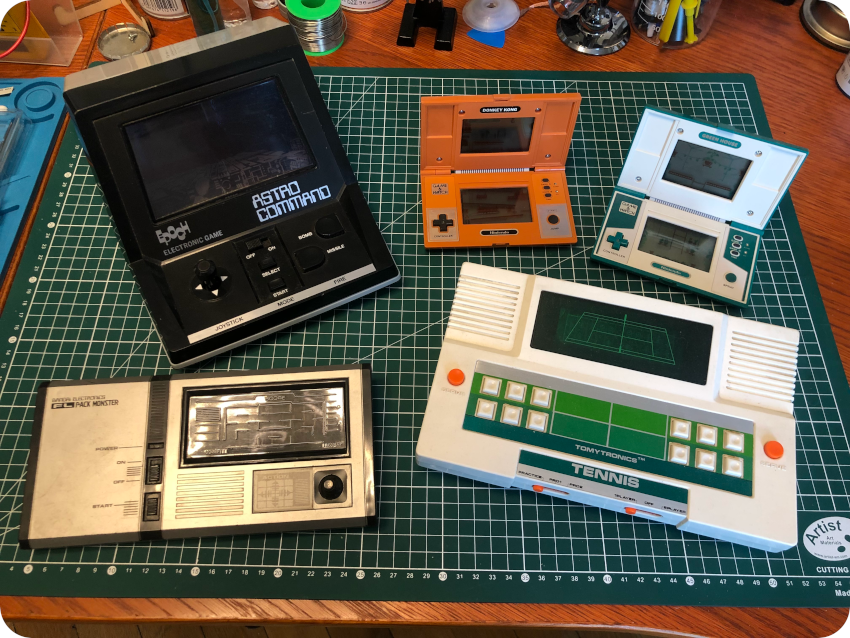
In the meantime, I also have a few Game & Watch and electronic tabletop games from my own childhood that are waiting for some well deserved love :
Acknowledgments and links
As usual, I am deeply indebted to the retro-computing and Oric community, which is incredibly active. Dbug (Mickaël Pointier), in particular, does an amazing work ! Here are a few thanks and links (sorry, some resources are French only):
Communities and dedicated web sites:
- Defence Force: https://www.defence-force.org/index.php?page=main
- OSDK: https://osdk.org/index.php?page=main
- Dbug’s blog: https://blog.defence-force.org
- Oric, the story so far: http://oric.free.fr/STORY/contents.html
- System.cfg Forum (8bits topic): https://forum.system-cfg.com/viewforum.php?f=1 (French)
- Defence Force Forum: https://forum.defence-force.org
- Silicium.org (oric topic): http://www.silicium.org/forum/viewforum.php?f=61 (French)
- MO5: http://mo5.com/musee-machines-atmos.html (French)
- Muso’s ORIC Site: http://www.48katmos.freeuk.com
- The Oric site: https://www.oric.org
YouTubers:
- Ddbug’s stuff: https://www.youtube.com/@DbugII
- ctrl-alt-rees: https://www.youtube.com/channel/UCe7aGwKsc40TYqDJfjggeKg
- Noel’s Retro Lab: https://www.youtube.com/c/NoelsRetroLab
- GalaMoon Retrogaming: https://www.youtube.com/channel/UCHoSrYaPSHUIMXoXH3bRRbQ (French)
- RetroLab: https://www.youtube.com/@retrolabo
- Re-Tech: https://www.youtube.com/@Re-Tech
Manuals, Book & Schematics:
- The Oric Library: https://library.defence-force.org
- PCB schematic (issue 4): https://github.com/Fred72z/ORIC/blob/main/Schemas_materiel/SCHEMA%20ORIC_ISS4.pdf
- Service Manual: http://www.48katmos.freeuk.com/servman.pdf
- Oric and Atmos repair guide: http://oric.signal11.org.uk/html/repairguide.htm