It’s been a couple of months since my last vintage computer acquisition. I have been hunting for a DDI-1 external disk drive and a Vortex internal expansion RAM card for my Amstrad CPC464, an Apple IIe or IIc, a Texas Instruments TI-99/4A, a Commodore 64 and an Amiga 500, with no luck yet (at least at reasonable prices, even to treat myself with a birthday present).
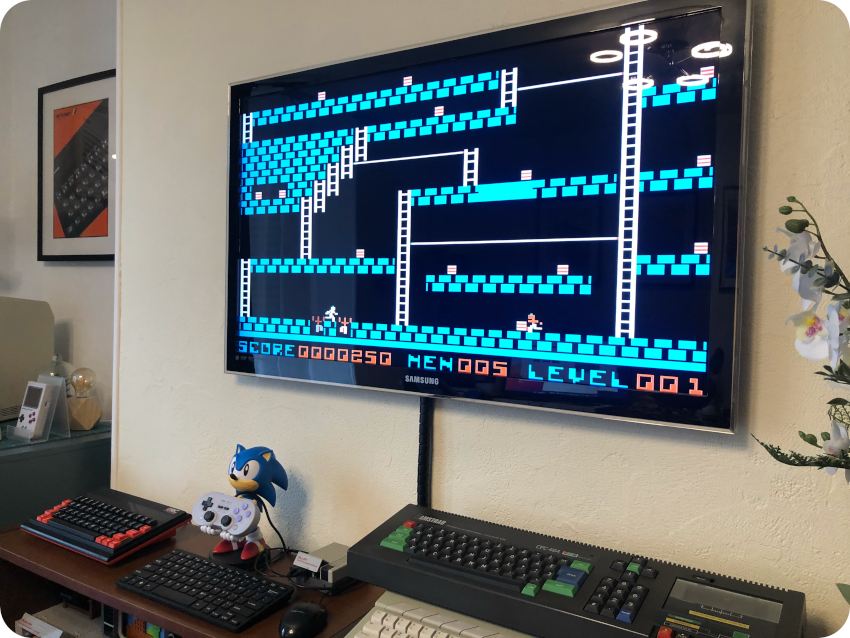
So, I went back to emulation, spending time tweaking my RecalBox-based home-made retro-console, with the idea of configuring as many vintage computers as I could.
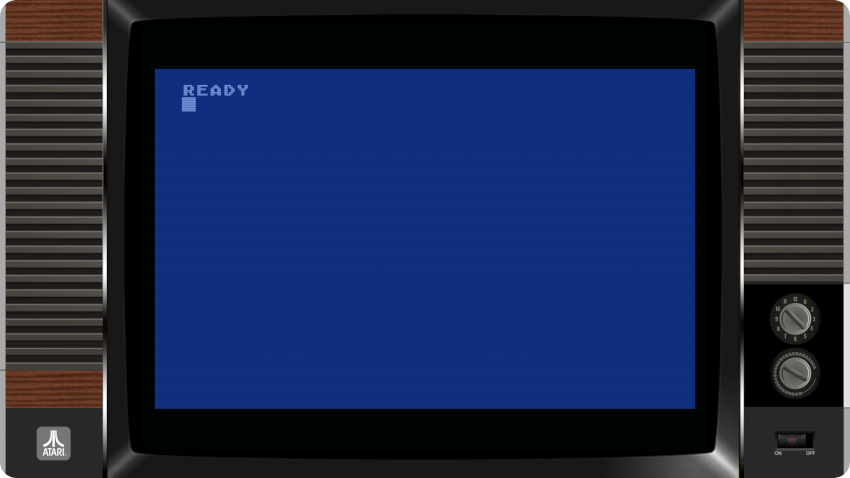
![]()
The RecalBox 9 setup
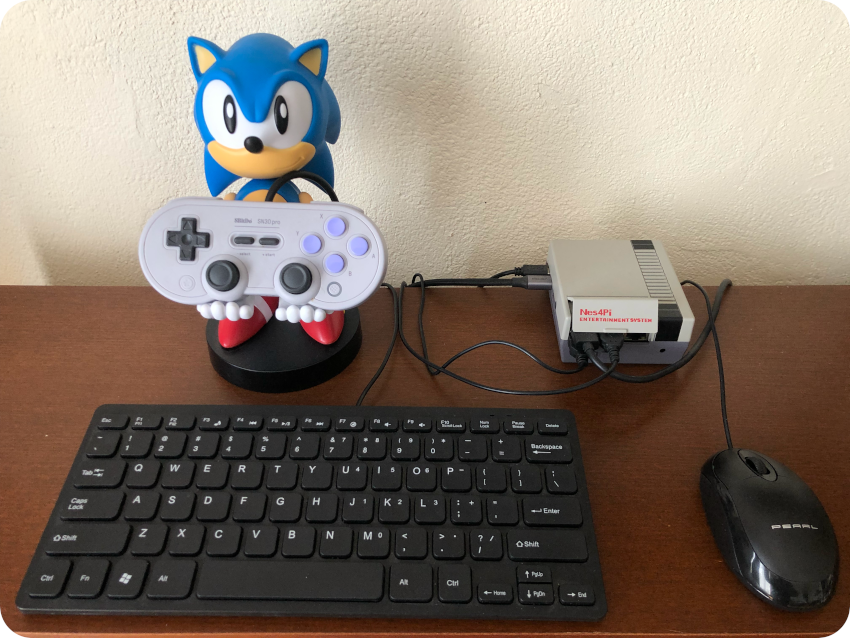
At the hardware level, my RecalBox setup is still the same:
- A Raspberry Pi 4
- A Nes4Pi case
- An small USB QWERTY keyboard (my RecalBox console is set to use a QWERTY keyboard since most vintage computers use such a keyboard, except a few french ones)
- A small USB Mouse
- A very nice gamepad from 8bitdo
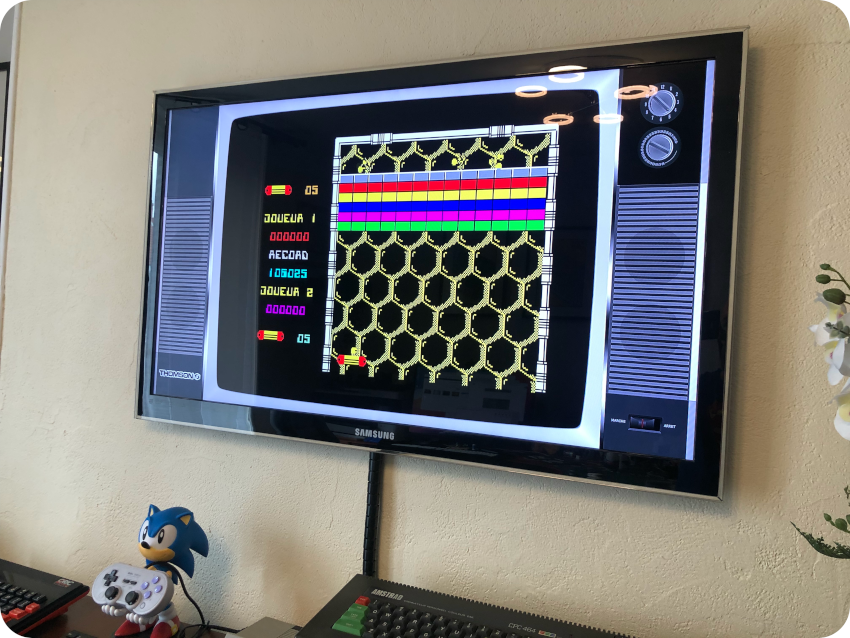
- My good old 42″ Samsung TV set (16/9, 1080, HDMI+VGA+RF+SCART)
I had built this retro-console over a year ago. Since then, a lot had changed on the software front and the release of RecalBox 9. I had already explored Macintosh Classic features for MARCHintosh 2023.
This time, I wanted to explore the other cores, including Dosbox Pure which allows to install classic PC Operating Systems such as MS Windows 3.0, 3.11, … up to 98.
Objectives
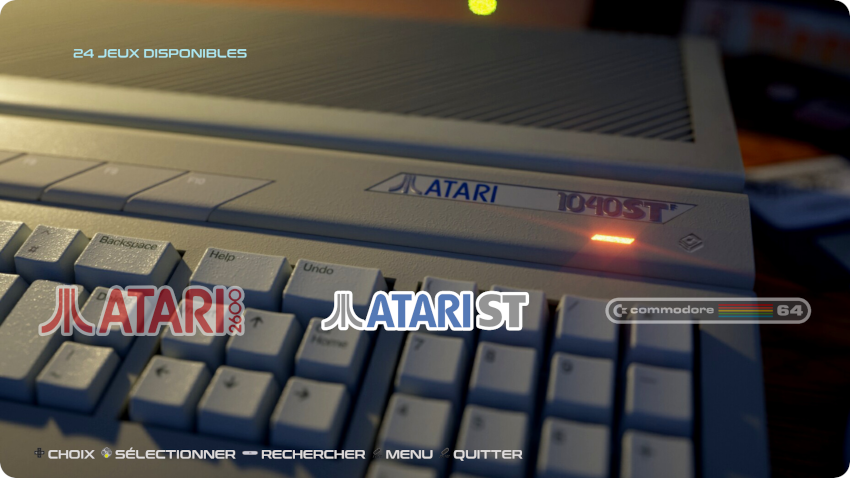
The RecalBox console I built was focused on old Arcades (mostly Capcom via FBNeo) and Consoles: Atari 2600, ColecoVision, Nintendo Famicom, SNK Neo Geo, Nintendo 64, NES, SNES, PC Engine, Sega MasterSystem, Sega Mega Drive, and Sony PlayStation. I had configured a few vintage computers (Amstrad, Atari ST, DOS, …), but only to launch games.
My new objectives were the following:
- Installing and configuring as may cores for vintage computers as possible, focusing on the ones I wish to acquire but could not get my hands on up to now (Amiga 500, C64, TI99/4A, Apple ][, …) or the ones I already acquired (Macintosh Plus, Atari ST, Sinclair ZX81 / Spectrum, Amstrad CPC464, Matra-Hachette Alice 90, Oric Atmos, …)
- Tweaking and optimizing their configurations: I like to get as close as possible to the configuration I had when I had these computers. For example, I tweaked the Amstrad Caprice32 core configuration to get a green monochrome display, like I had at the time
- Updating the customized theme I use (based on the old “Bill Games” theme), adding & updating artworks
- Tweaking overlays for Libretro-based cores so that they look closer to TV sets or monitors
- For each core, adding & updating games and getting access to as many as possible supported Operating Systems. This way, I could get my hands on the ones I a not familiar with (Amiga, C64, TO7, TI99/4A…) in preparation of getting real ones (soon, hopefully). Or discover new (old) ones !
I wanted also to focus on the DOSBox Pure core and get to install old Operating Systems for PCs. And get as angry at fscking MS-Windows as I was in the old days, remembering why I ditched it for Unix-like Operating Systems so quickly in the 90’s.
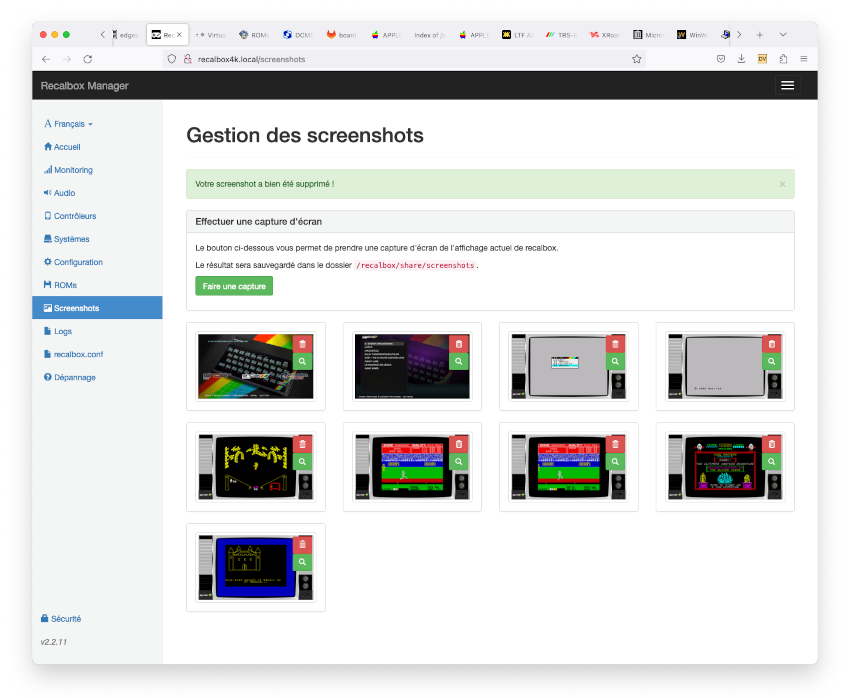
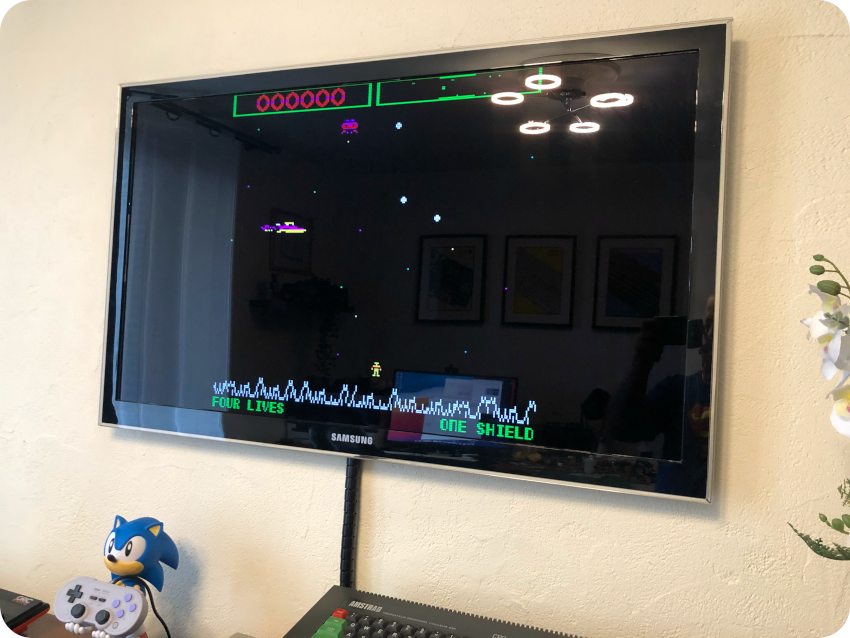
During long this process, I either took (bad) live pictures or took (better) screenshots via the RecalBox web interface:
I tried quite a few systems, so this blog post is a bit long. Here is a table of contents
Here are a few links:
- Recalbox: https://www.recalbox.com/
- Documentation: https://wiki.recalbox.com/en/home
- Collection of BIOSes: https://retrogaming.me/recalbox-telecharger-les-bios/
Note: BIOS files are located here in RecalBox: /recalbox/share/bios
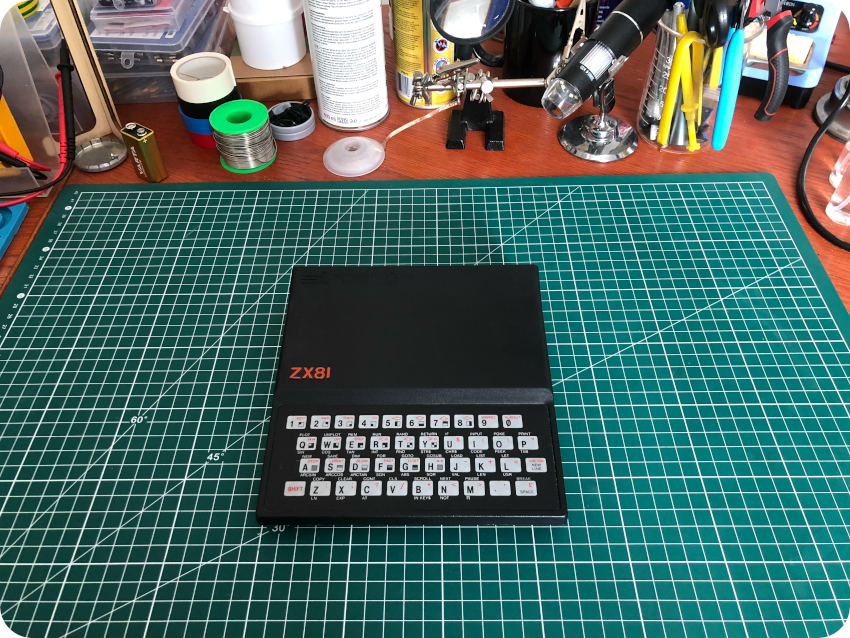
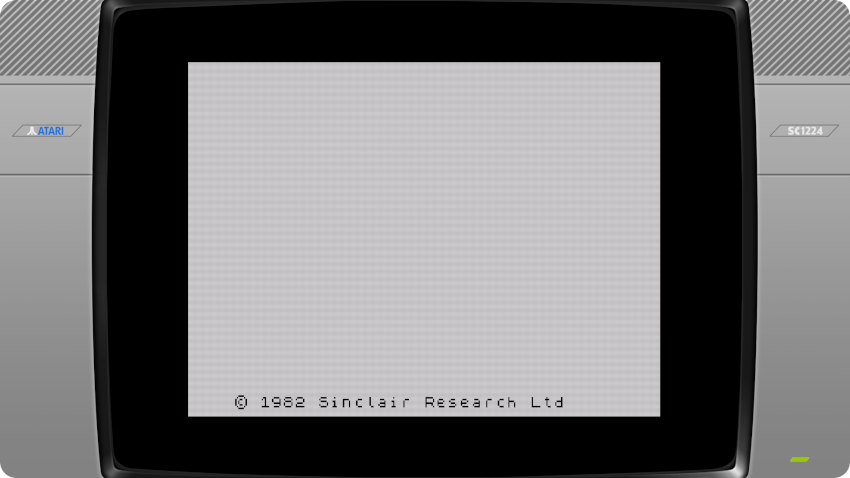
Sinclair ZX 81
Let’s start with the vintage computer I started my little collection with:
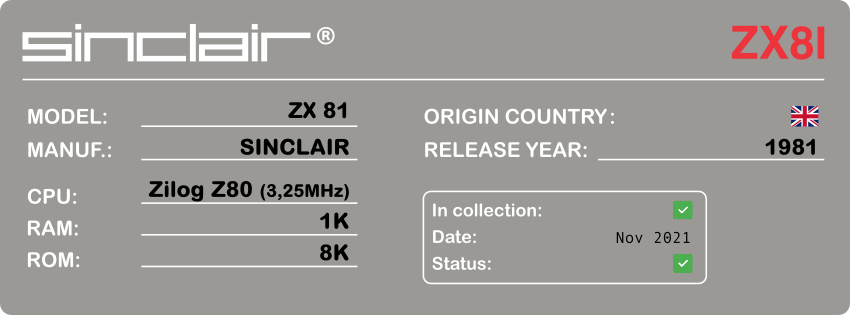
Here is the mandatory picture of the actual hardware on my workbench:
Here is a summary of my RecalBox configuration for the ZX81:
I used the “Libretro 81” core, and didn’t have to change any of its options (file “retroarch-core-options.cfg“, options named “81_*“).
Note: the “retroarch-core-options.cfg“, is located here: “/recalbox/share/system/configs/retroarch/cores“
Note: no BIOS files are required with this core.
Here are the default artwork & logo (no theme customization) :
For the Libretro 81 core to boot into Sinclair Basic, I downloaded a .p file containing a few lines of BASIC instructions, named it “System.p“, loaded it into a ZX81 emulator on my Mac, deleted all lines, and saved it back so that it would be empty of instructions. I uploaded “System.p” to RecalBox, and renamed it “0 – SYSTEM: SINCLAIR BASIC” so that it appears first in the selection menu:
Here is the process I used to customize the overlay:
- Create a new .PNG image for the overlay (1080 resolution) named “zx81.png“
- Copy the original overlay to its destination folder: cp /recalbox/share_init/overlays/zx81/* /recalbox/share/overlays/zx81/
- Edit the copied “zx81.cfg” file to change “input_overlay” into : input_overlay = “/recalbox/share/overlays/zx81/zx81_overlay.cfg”
- Upload the new overlay “zx81.png” into the destination folder “/recalbox/share/overlays/zx81/”
- EmulationStation will now use the overridden overlay configuration instead of the original one, displaying the customized overlay PNG
You can download the customized overlay (to be renamed “zx81.png”) here:
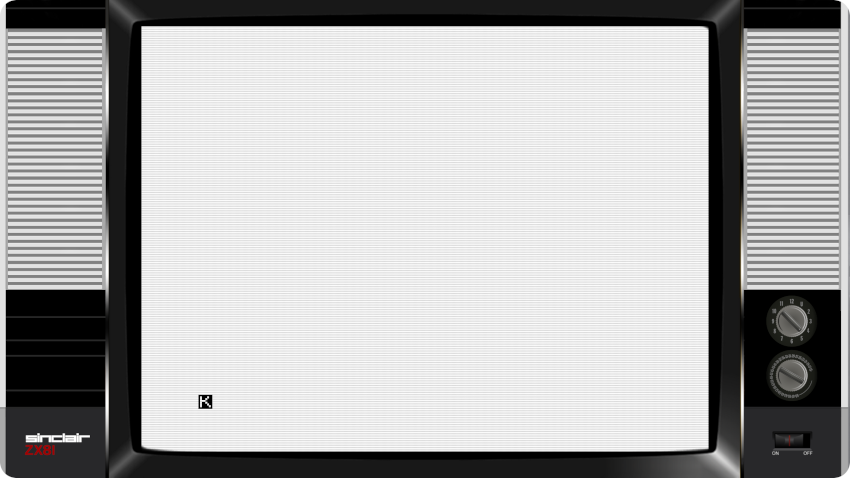
Here is a screenshot of the Operating System (“0 – SYSTEM: SINCLAIR BASIC”), using this customized overlay:
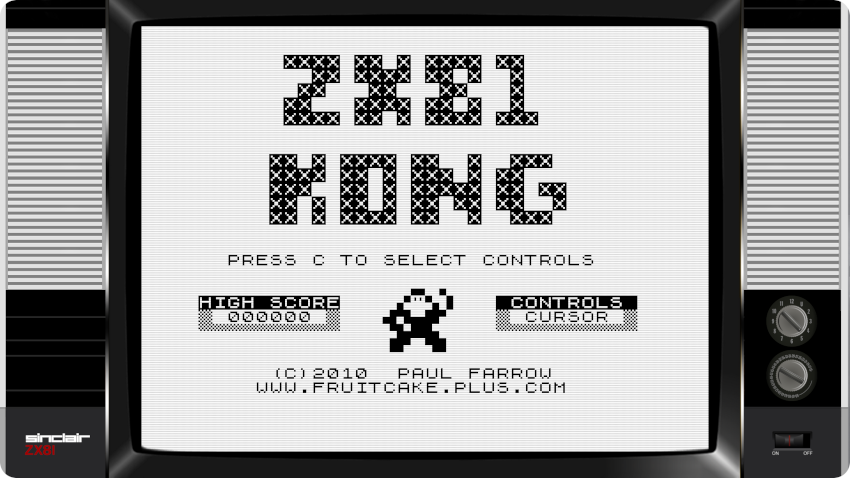
And a screenshot of the game “KONG”:
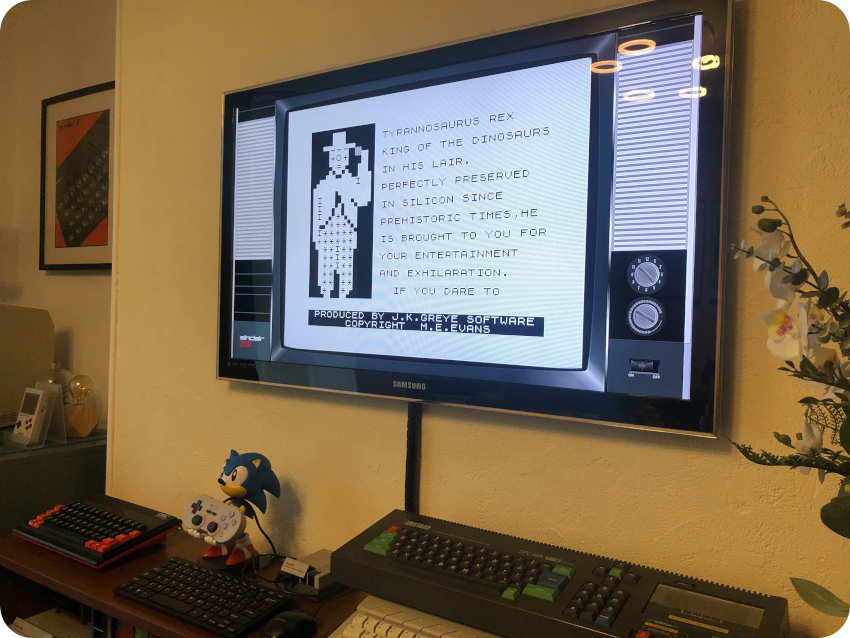
And let’s conclude with a picture of “3D Monster Maze”:
Here is a few links:
- Documentation
- Recalbox (Libretro81): https://wiki.recalbox.com/en/emulators/computers/zx81/libretro-81
- ROMs
- wowroms.com: https://wowroms.com/en/roms/list/sinclair+zx81?letter=#
- www.zx81.nl: https://www.zx81.nl/files.html
- Dedicated web sites and forums:
- System.cfg Forum (8bits topic): https://forum.system-cfg.com/viewforum.php?f=1 (French)
- Videos:
- Micro Men (BBC): https://www.youtube.com/watch?v=sIcAyFVK0gE
- YouTubers:
- RMC – The Cave: https://www.youtube.com/c/RMCRetro
- GalaMoon Retrogaming: https://www.youtube.com/channel/UCHoSrYaPSHUIMXoXH3bRRbQ (French)
Sinclair ZX Spectrum
Let’s move on and focus on the Sinclair ZX Spectrum:
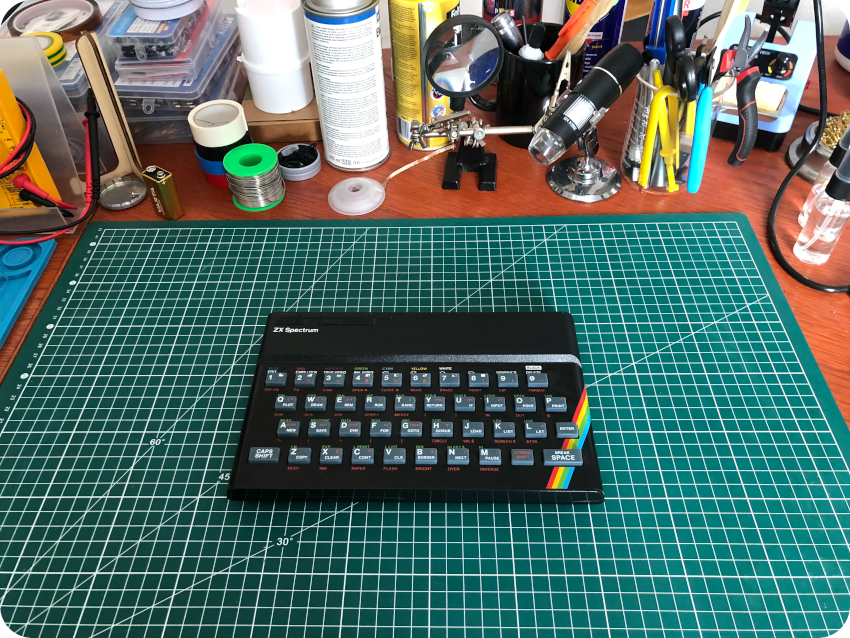
Here is a picture of my dear little Speccy:
Here is a summary of my RecalBox configuration for the ZX Spectrum:
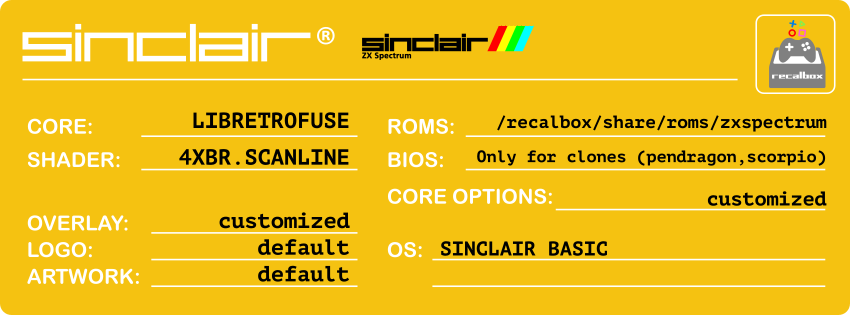
I used the “Libretro Fuse” core, and only made one modification to “retroarch-core-options.cfg“:
- fuse_machine = “Spectrum 48K“: to emulate … a Spectrum 48K (more on this later)
Note: no BIOS files are required with this core, unless you want to try Spectrum clones like the Pendragon or the Scorpio.
Here are the default artwork & logo (no theme customization) :
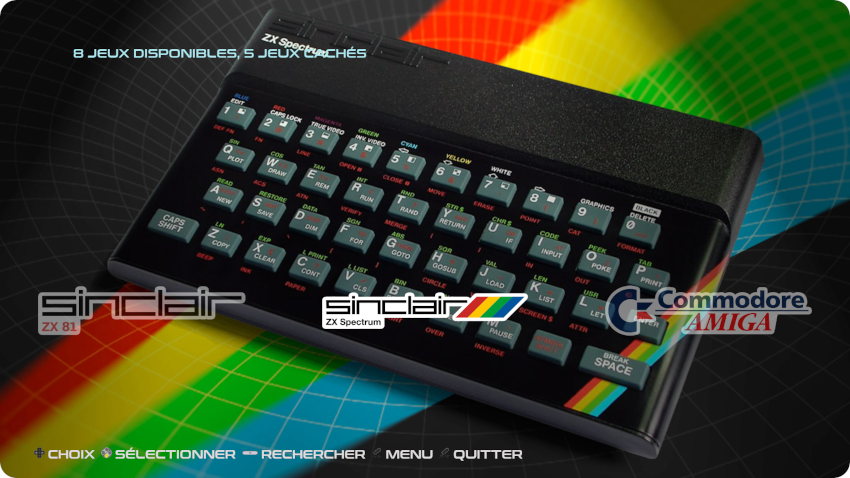
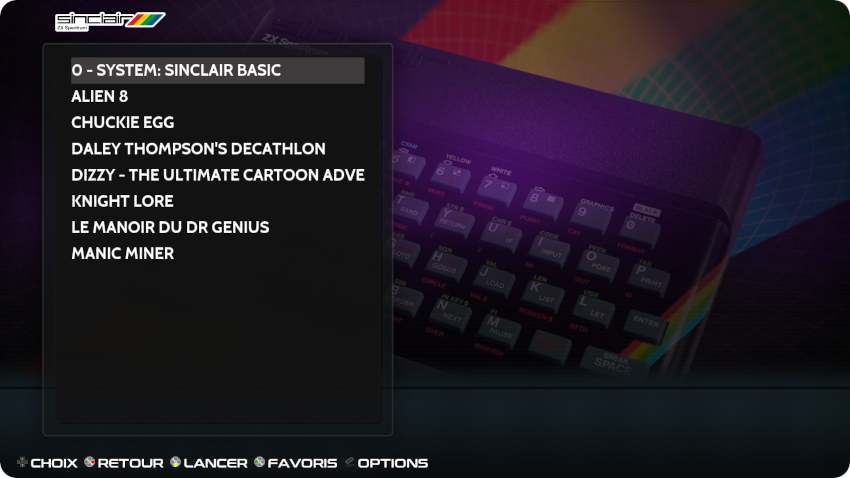
To boot Libretro Fuse into an Operating System, I simply downloaded a blank disc, named it “boot.dsk” and added it to the list of software labelled as “0 – SYSTEM: SINCLAIR BASIC”:
I created a customized overlay, similar in style – but slightly different – to the one created for the ZX81. I followed the same procedure used for the ZX81 (using the “/recalbox/share/overlays/zxspectrum/” folder).
You can download the customized overlay I created (to be renamed “zxspectrum.png“) here:
Here are screenshots of the Operating System (“0 – SYSTEM: SINCLAIR BASIC”), using this overlay:
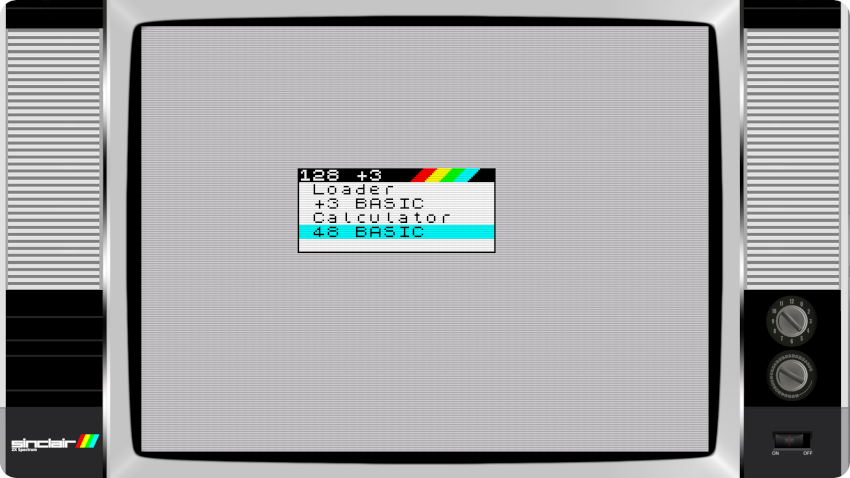
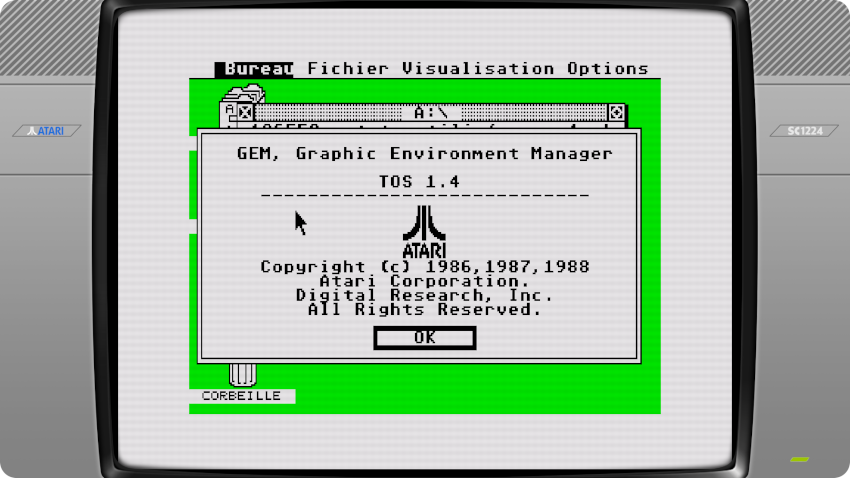
As you can see, even though I used the core option fuse_machine = “Spectrum 48K”, it boots as a Spectrum +3. I am not sure why. Is this a bug ? Is this because I used a blank diskette to boot and this wouldn’t be supported by the original Spectrum 48 ? I will have to investigate a little more. But, still, it boots and gets me access to an Operating System, as I wanted.
Here are a few other screenshots:
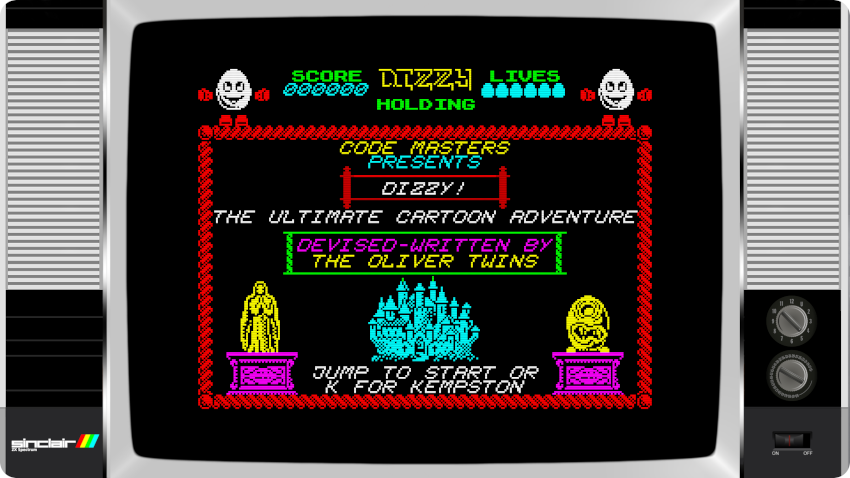
- The delightful “Dizzy – The Ultimate Cartoon Adventure”:
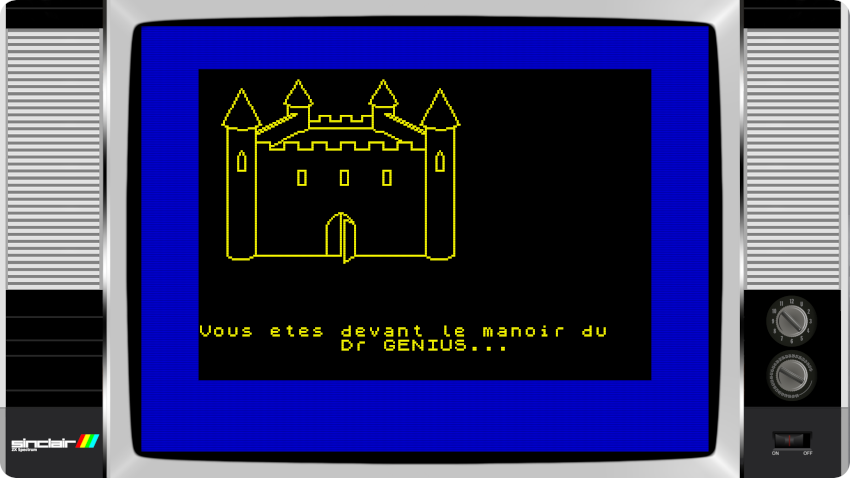
- The text adventure game “Le manoir du Dr Genius”:
- And “Daley Thompson’s Decathlon”, which killed so many joysticks (and fingers)
Let’s conclude with a picture of “Knight Lore”:
Here is a few links:
- Documentation
- Recalbox (LibretroFuse): https://wiki.recalbox.com/en/emulators/computers/zx-spectrum/libretro-fuse
- ROMs
- Planet Emulation: https://www.planetemu.net/machine/zx-spectrum
- Dedicated web sites and forums:
- System.cfg Forum (8bits topic): https://forum.system-cfg.com/viewforum.php?f=1 (French)
- YouTubers:
- RMC – The Cave: https://www.youtube.com/c/RMCRetro
- Mark Fixes Stuff: https://www.youtube.com/c/markfixesstuff
- Mr Lurch’s Things: https://www.youtube.com/c/MrLurchsThings
- Noel’s Retro Lab: https://www.youtube.com/c/NoelsRetroLab
- GalaMoon Retrogaming: https://www.youtube.com/channel/UCHoSrYaPSHUIMXoXH3bRRbQ (French)
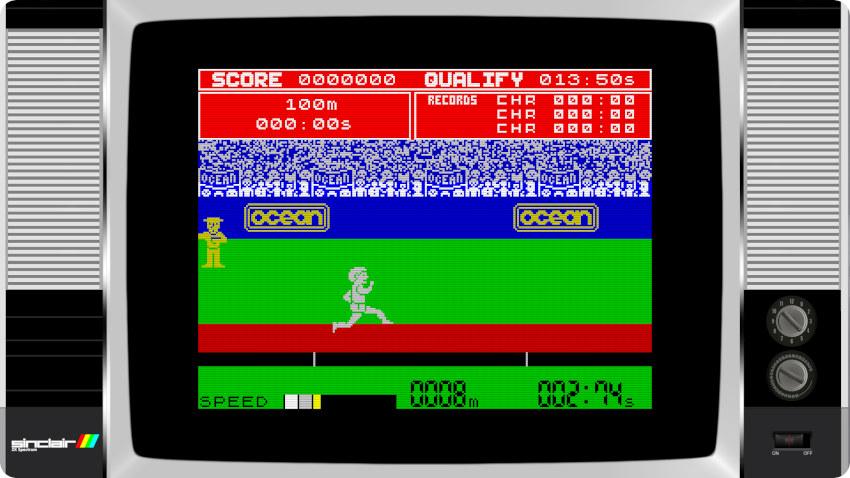
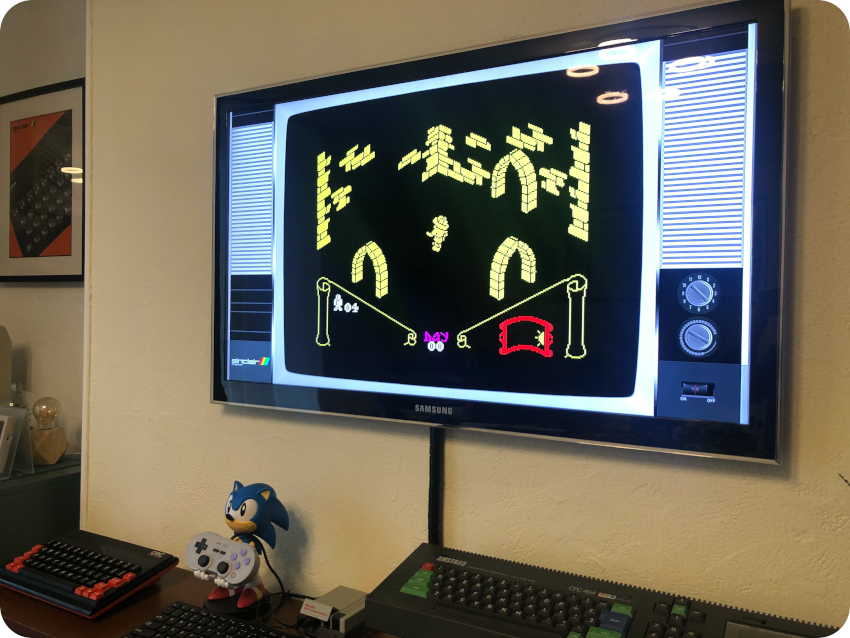
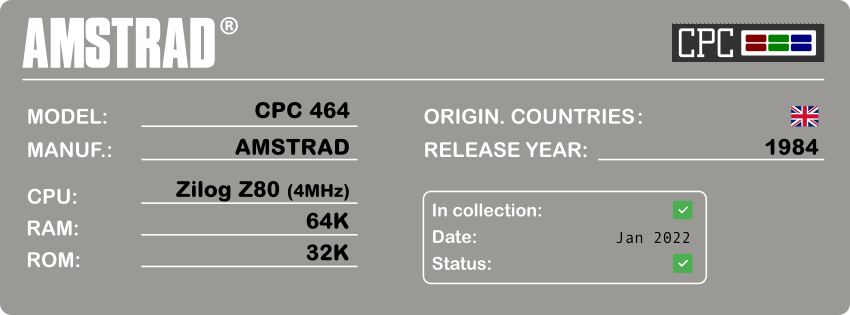
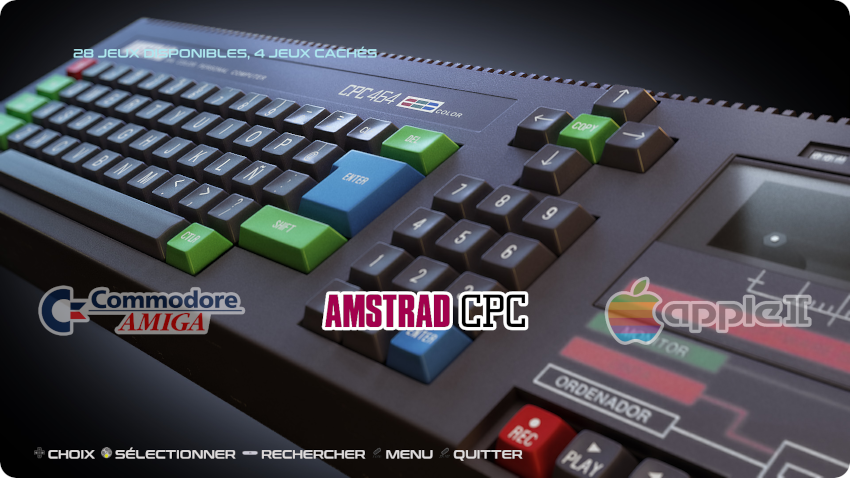
Amstrad CPC 464
Let’s move on to another British vintage computer: the Amstrad CPC 464:
Here is a picture of my beloved Amstrad CPC:

This summarizes my RecalBox configuration for the Amstrad CPC 464:
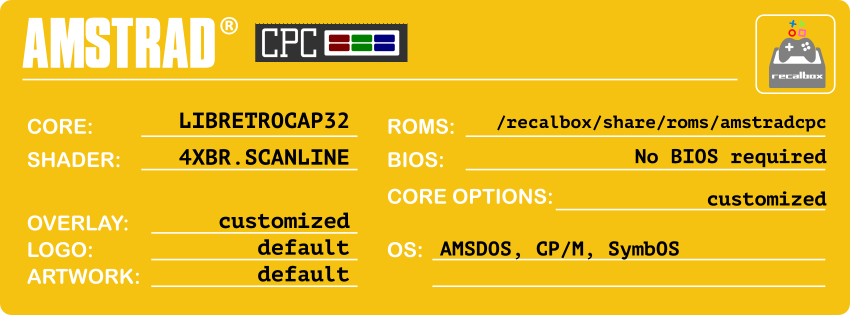
I used the “Libretro Cap32” core, and made the following modification to “retroarch-core-options.cfg“:
- cap32_scr_tube = “green”: I used to have a green monochrome monitor for my Amstrad CPC 464 in the 80’s, so I change this option from “color” to “green“.
- cap32_model = “6128”: I actually tried to changed it to “464“, but no matter what, it changed back to “6128“. I will have to investigate this later on …
- cap32_ram = “576”: since I needed more RAM to run SymbOS, I bumped this parameter up to the maximum allowed (576K).
Note: no BIOS files are required with this core.
Here are the default artwork & logo (no theme customization) :
I created a customized overlay, based on the original RecalBox one (just a bit more “plain”). I followed the usual procedure (using the “/recalbox/share/overlays/amstradcpc/” folder).
You can download the customized overlay I created (to be renamed “amstradcpc.png“) here:
Here is the selection menu:
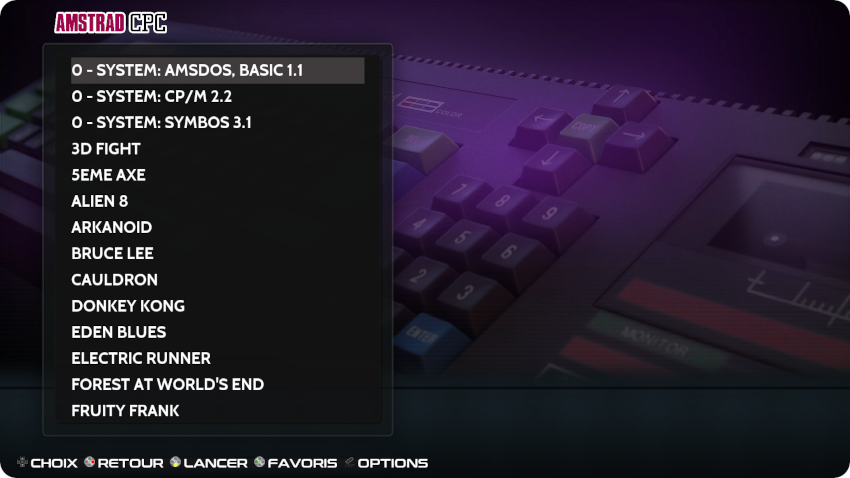
As you can see, I managed to make it boot under 3 different Operating Systems
- AMSDOS
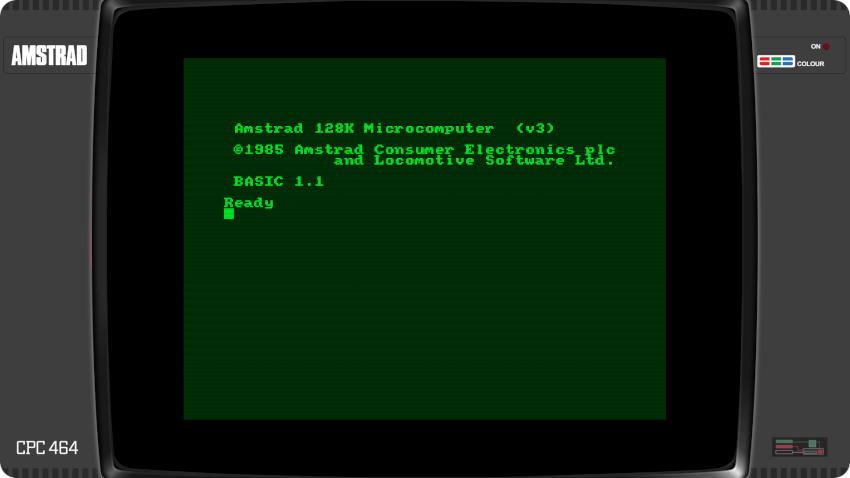
To boot into the standard AMSDOS Operating System, I downloaded a CP/M 2.2 disk image and made a copy of it (named “boot.dsk“). I fired up my favorite Amstrad emulator for macOS (RetroVirtualMachine) and insterted the CP/M 2.2 disk.
I typed “|CPM” to boot the CP/M operating system from disk. The, I used the ‘FORMAT.COM” CP/M utility and inserted the “boot.dsk” to create a new blank disk. Once done, I uploaded the “boot.dsk” image to RecalBox, and labelled it “0 – SYSTEM: AMSDOS, BASIS 1.1”:
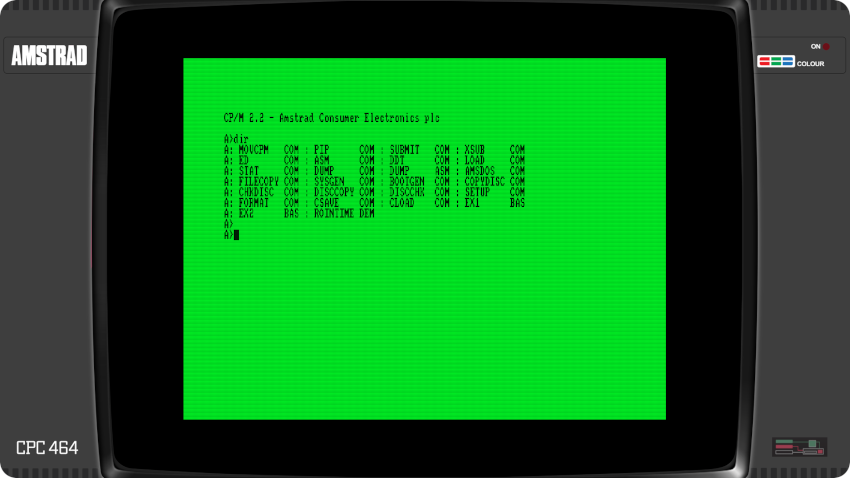
- CP/M
This one was easy, since I already downloaded a CP/M 2.2 disk image. I uploaded the image to RecalBox and labelled it “0 – SYSTEM: CP/M”:
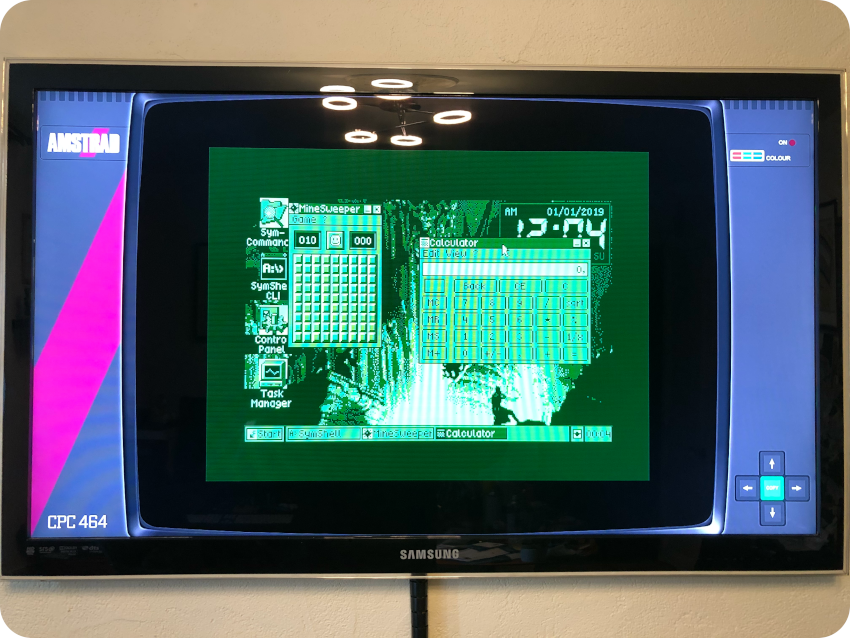
- SymbOS
This one was a lot trickier. First, I never had the chance to try this Operating System. Second, I needs several disks
-
- A boot disk (“SymbOS-CPC-BootFast.dsk“)
- A disk with the Standard SymbOS Applications (“SymbOS-CPC-AppsStandard.dsk“)
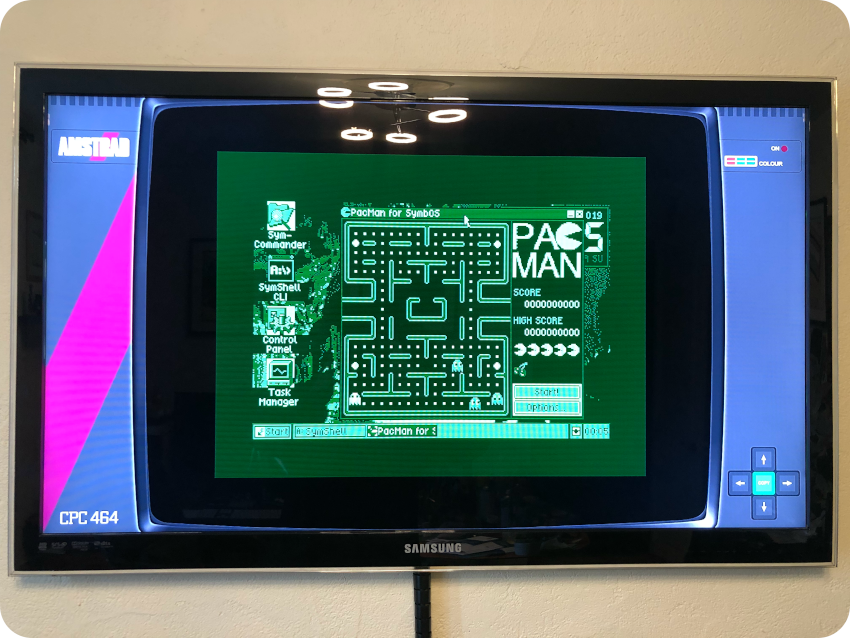
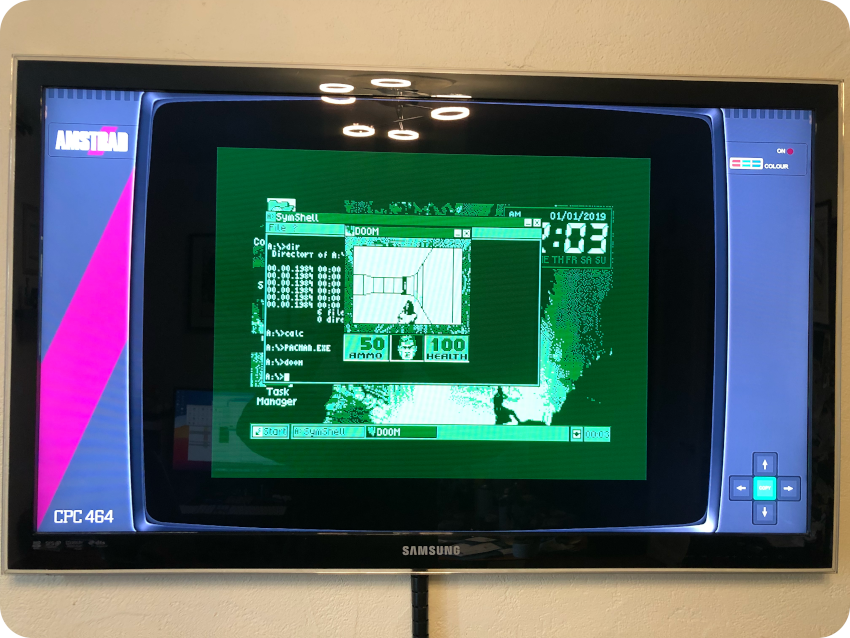
- Option: a collection of games (Doom, Pac-Man, Mine Sweeper, ..), and utilities (Video player, Music player, Notepad, …). They are not distributed as .dsk Amstrad image, but as a ZIP file
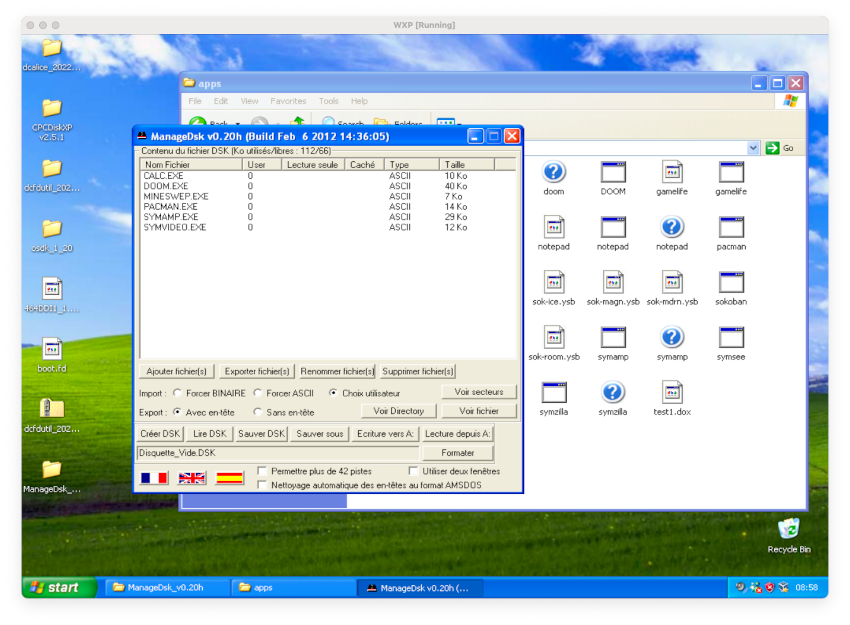
The first tricky part is to create a third disk for the optional software. For this, I used the ManageDsk utility. Alas, it only runs on MS Windows ! So I fired up my good old Windows XP Virtual Machine and used ManageDsk to create a “SymbOS-CPC-AppsMisc.dsk” image with this selection of software:
Once done, I uploaded the 3 images to the “/recalbox/share/roms/amstradcpc” folder. The, I created a “SymbOS.m3u” file to bundle them together into a single file. The .m3u file is composed of these 3 lines:
SymbOS-CPC-BootFast.dsk
SymbOS-CPC-AppsStandard.dsk
SymbOS-CPC-AppsMisc.dsk
Finally, I edited the gamelist.xml file to rename “SymbOS” as “0 – SYSTEM: SYMBOS” in the selection menu. The emulator boots on the first disk “SymbOS-CPC-BootFast.dsk“:
But, once booted, you have to swap in the proper disk:
- to access common utilities like “Sym-Commander” or the “Control Panel”, use the “SymbOS-CPC-AppsStandard.dsk” disk image
- to get access to games and multimedia players, use the “SymbOS-CPC-AppsMisc.dsk” disk image
The trick to do the following during the session:
- On the gamepad, press simultaneously “hot key” + “left joystick up”:it will open the disk drive
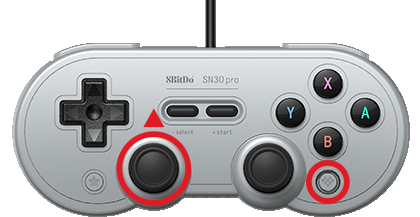
- On the gamepad, press simultaneously “hot key” + “left joystick right“: it will select the next disk image in the .m3u file
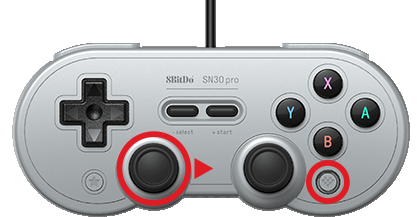
On the gamepad, press simultaneously “hot key” + “left joystick up“: it will close the disk drive, the image disk is now ready to be used
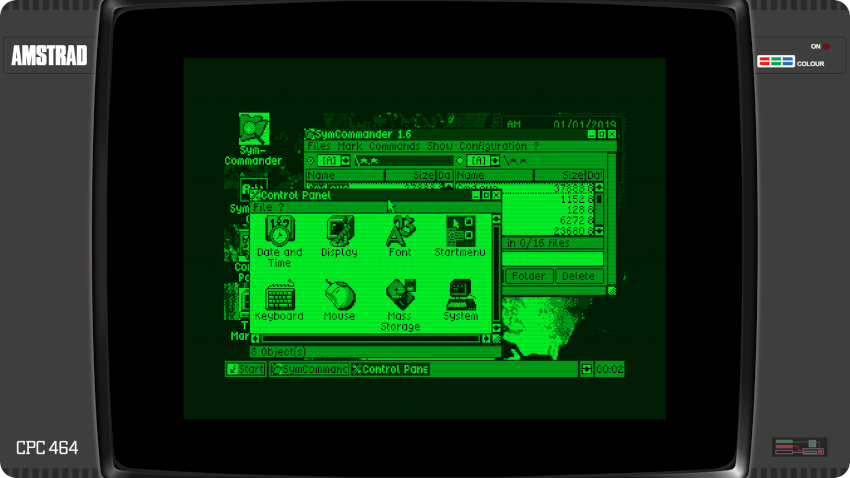
I must say that I am very impressed by SymbOS ! (the following picture were taken before I tweaked the overlay):
Let’s conclude this part with a picture of my favorite Amstrad game: Fruity Frank

Here is a few links:
- Documentation
- Recalbox (LibretroCap32): https://wiki.recalbox.com/en/emulators/computers/amstrad-cpc/libretro-cap32
- ROMs
- Planet Emulation: https://www.planetemu.net/machine/amstrad-cpc
- Dedicated web sites and forums:
- CPC Wiki: https://www.cpcwiki.eu/index.php/Main_Page
- CPC Rulez : https://cpcrulez.fr/applications.htm (french)
- System.cfg Forum (8bits topic): https://forum.system-cfg.com/viewforum.php?f=1 (French)
- SymbOS: http://symbos.de/download.htm
- YouTubers:
- Noel’s Retro Lab: https://www.youtube.com/c/NoelsRetroLab
- RMC – The Cave: https://www.youtube.com/c/RMCRetro
- Mark Fixes Stuff: https://www.youtube.com/c/markfixesstuff
- Mr Lurch’s Things: https://www.youtube.com/c/MrLurchsThings
- Rodrik Studio: https://www.youtube.com/c/RodrikStudio (French)
- The Retro Channel: https://www.youtube.com/@TheRetroChannel
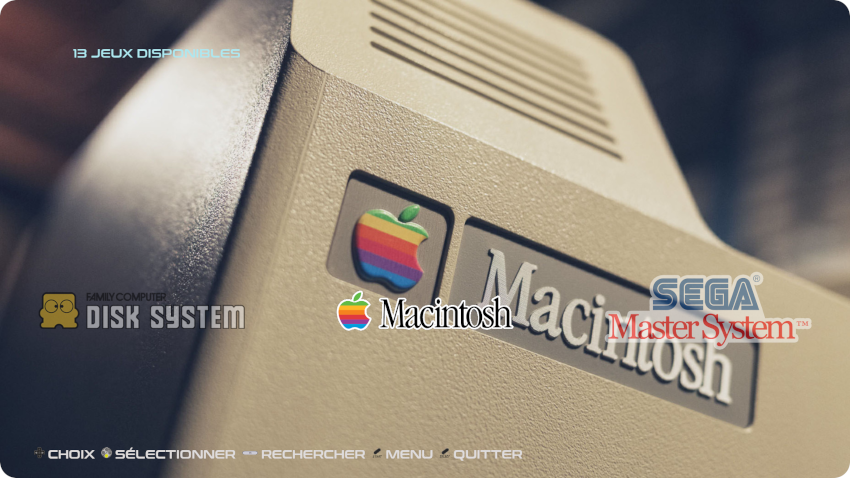
Apple Macintosh Plus
Let’s move on to the Macintosh Plus:
Here is a picture of my own Macintosh Plus:
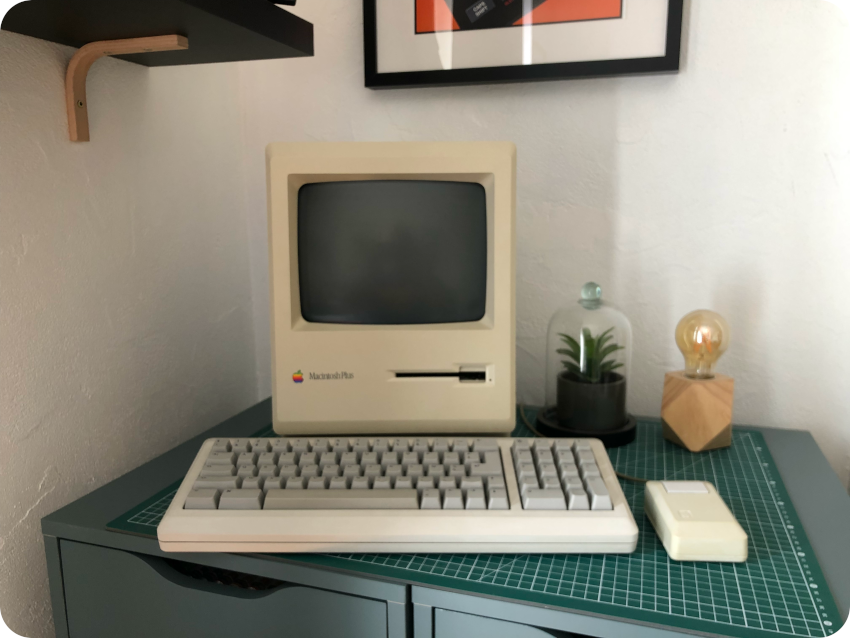
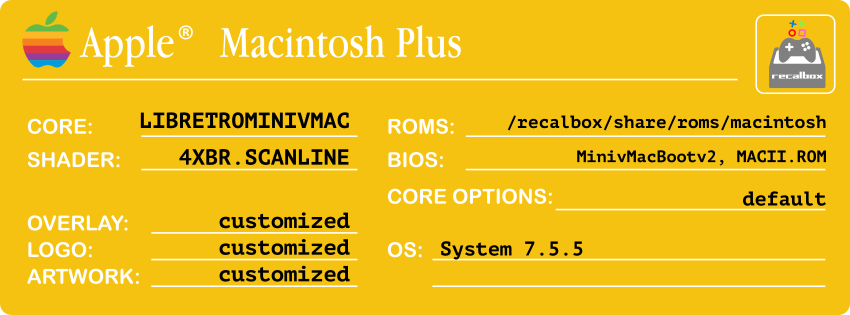
I have already posted for MARCHintosh on how to emulate a Macintosh Plus with Recalbox, so I won’t go into details here. Nevertheless, this summarizes my RecalBox configuration for the Macintosh Plus:
There were no artwork for Macintosh computers in the theme I use a basis, so I found a nice background and created a new logo from scratch:
- The background image is available here: macintosh.jpg
- The logo is available here: macintosh.png
Note: this core needs two BIOS files (MinivMacBootv2 and MACII.ROM, see here for details)
Here are the results:
For some reasons, there is no overlay files for the Classic Macintosh computers in this release of RecalBox. So, I created the corresponding configuration files:
- macintosh.cfg:
input_overlay = “/recalbox/share/overlays/macintosh/macintosh_overlay.cfg”
input_overlay_opacity = “1.0”
input_overlay_hide_in_menu = “true” - macintosh_overlay.cfg
overlays = 1
overlay0_overlay = macintosh.png
overlay0_full_screen = true
overlay0_descs = 0
I dropped the images and files (“macintosh.cfg“, “macintosh_overlay.cfg“) into the “/recalbox/share/overlays/macintosh/” folder.
You can download the overlay I created (to be renamed “macintosh.png”) here:
I used the “Libretro MinivMac” core, and made no modifications to “retroarch-core-options.cfg“.
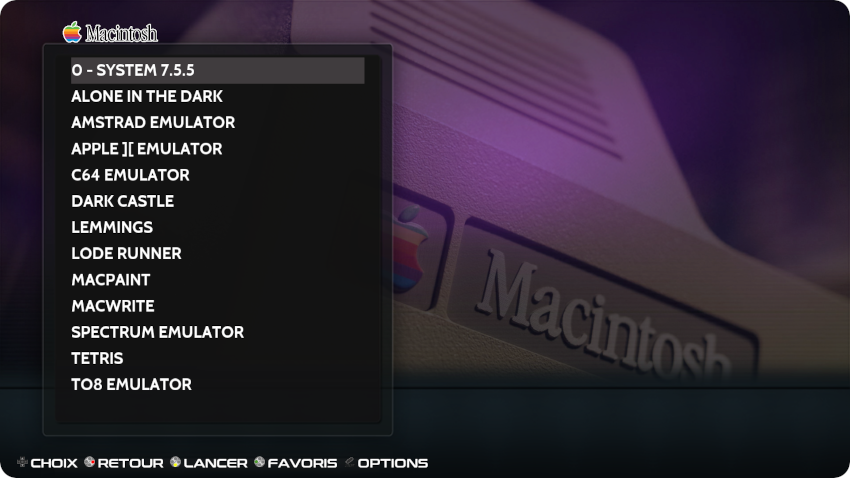
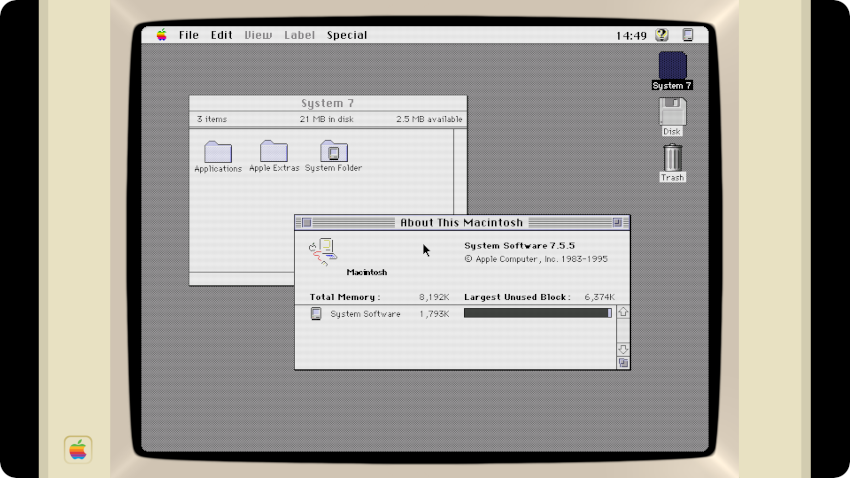
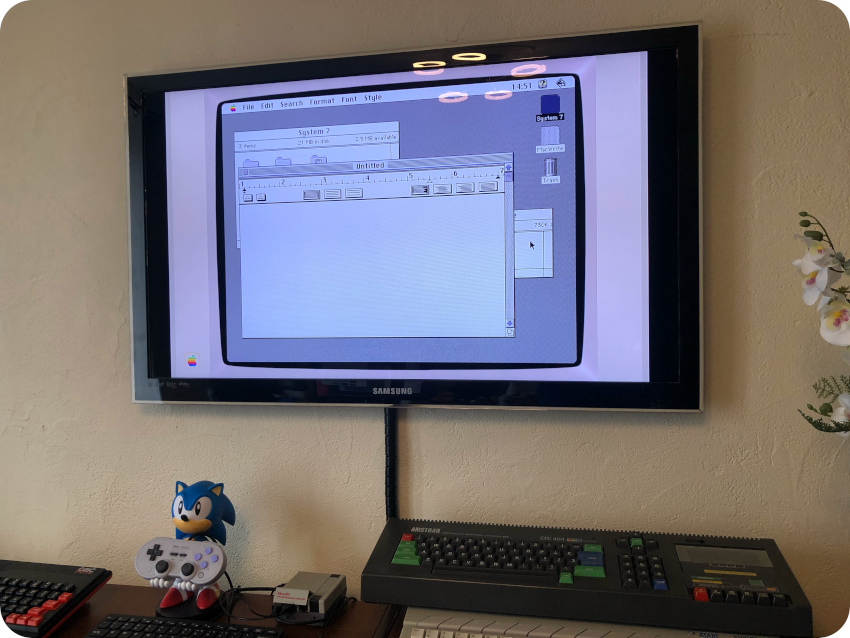
Booting to MacOS 7.5.5 was really easy: all I had to do is grab a blank disk image (from here for example), upload it to /recalbox/share/roms/macintosh and label it “0 – SYSTEM 7.5.5”:
Here is a screenshot showing System 7.5.5:
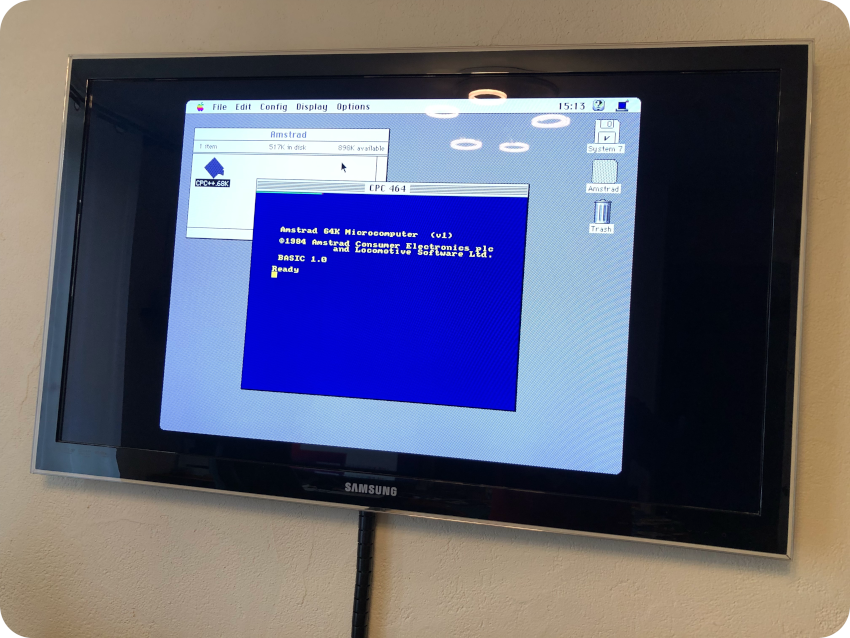
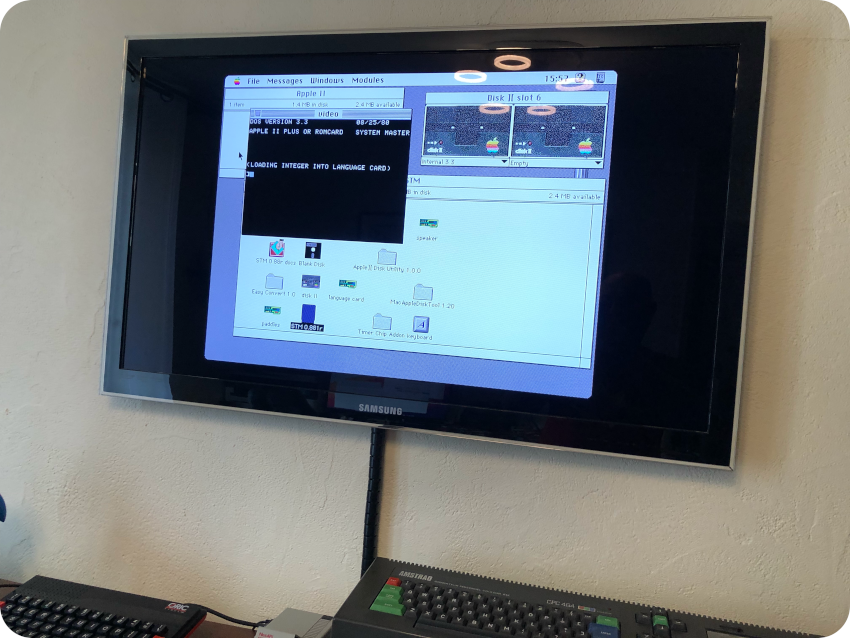
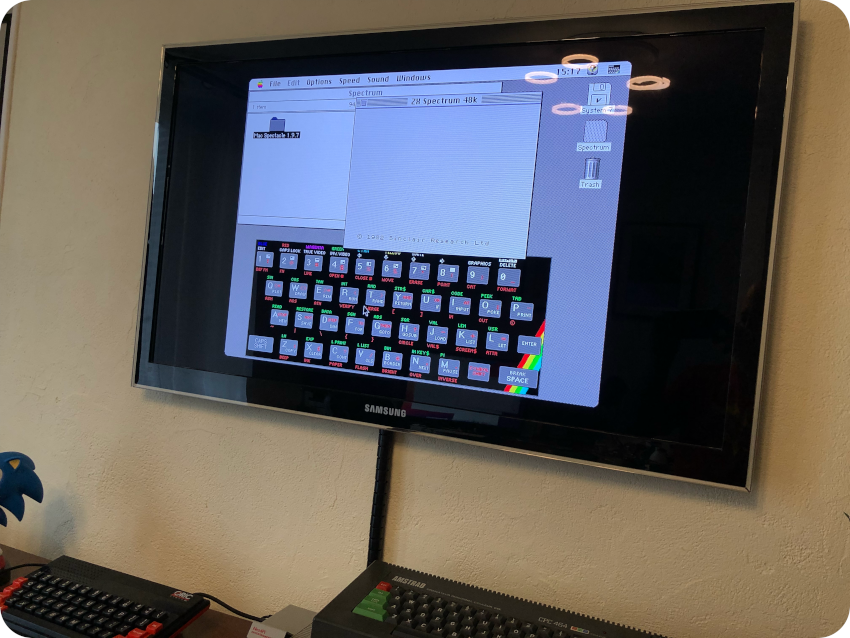
Then, the weird little guy living inside my brain whispered: “Why don’t you try to install old emulators inside a Classic Mac emulator ?“. Yeah, why not ? Here are pictures of this madness:
- Amstrad CPC emulation inside an emulated Mac (via CPC++/68k)
- Apple ][ emulation inside an emulated Mac (via STM)
- Sinclair ZX Spectrum emulation inside an emulated Mac (via Mac Spectacle)
- Commodore C64 emulation inside an emulated Mac (via Commodore 64 Emulator)
Note:
- Pictures were taken before I created the overlay
- Emulators available on the Macintosh Garden: https://macintoshgarden.org/
Let’s end this section with a picture of MacWrite running on RecalBox:
Here is a few links:
- Documentation
- Recalbox (Libretro MinivMac): https://wiki.recalbox.com/en/emulators/computers/macintosh/libretro-minivmac
- ROMs / Software repositories
- Macintosh Garden: https://macintoshgarden.org/
- Macintosh Repository: https://www.macintoshrepository.org/
- Mini vMac Application: https://sites.google.com/site/minivmacapplicationsv6/home
- Dedicated web sites and forums:
- 68kMLA: https://68kmla.org/bb/index.php
- Linux/mac68k: http://www.mac.linux-m68k.org/devel/plushw.php
- System.cfg Forum (16bits topic): https://forum.system-cfg.com/viewforum.php?f=2 (French)
- YouTubers:
- JDW: https://www.youtube.com/c/JDW11
- Branchus Creations: https://www.youtube.com/c/BranchusCreations
- Adrian’s Digital Basement: https://www.youtube.com/c/adriansdigitalbasement
- Ron’s Computer Videos: https://www.youtube.com/user/Tyrantulas
- Mr Lurch’s Things: https://www.youtube.com/c/MrLurchsThings
- Action Retro: https://www.youtube.com/@ActionRetro
Atari 1040 STF
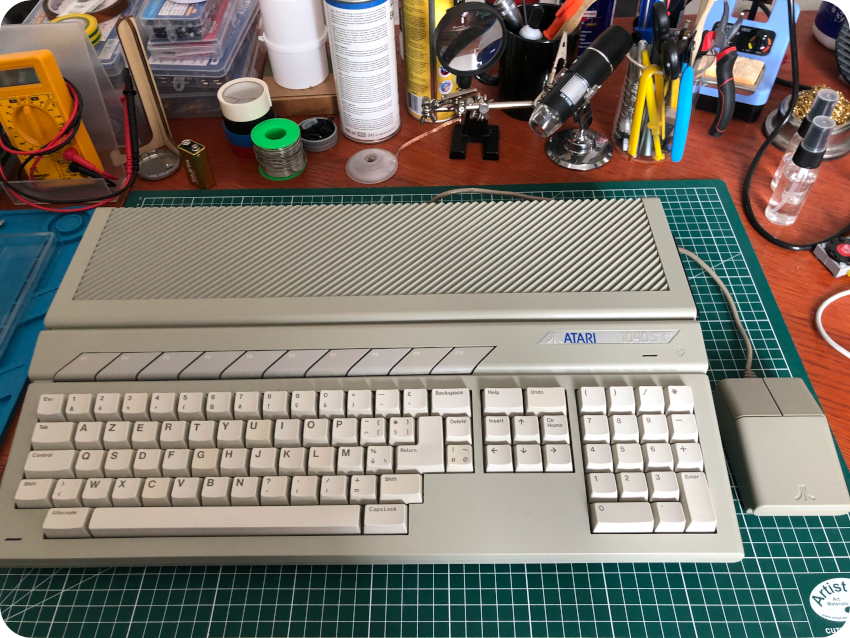
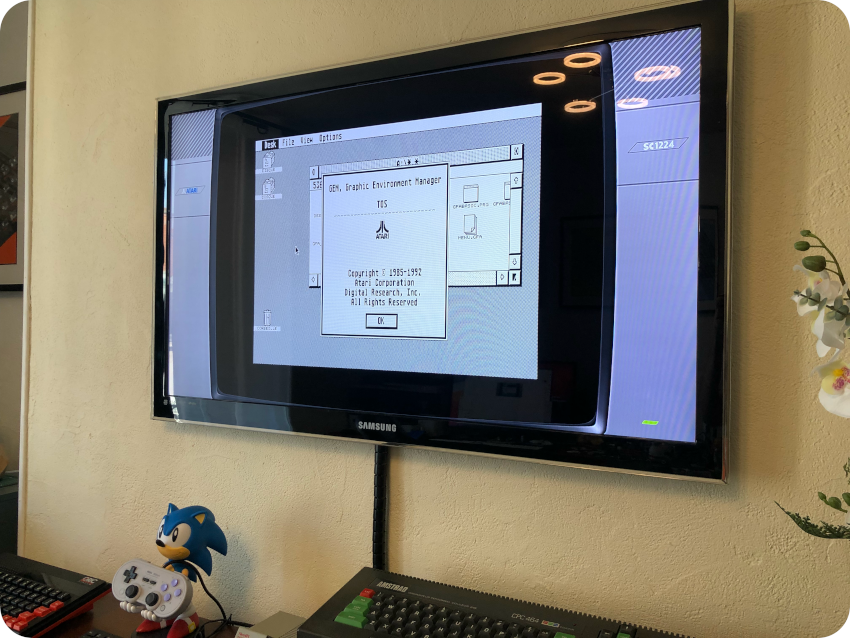
Let’s keep on exploring 16bit systems, with the Atari 1040STF:
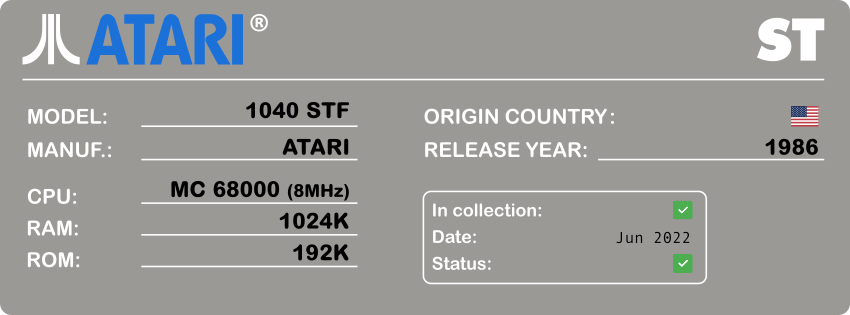
Here is a picture of my own Atari STF, sitting on the bench:
Here is the summary my RecalBox configuration for the Atari ST:
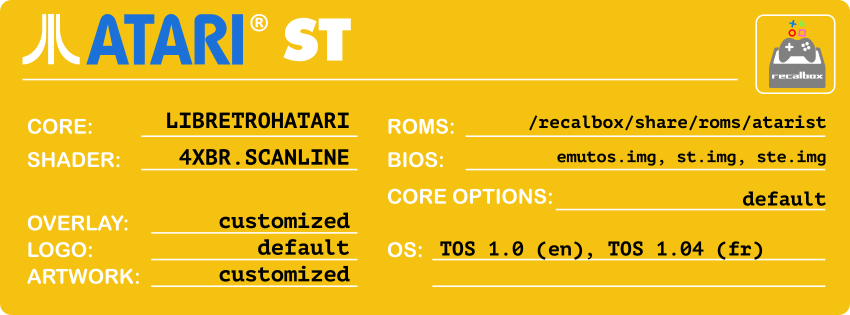
I used the “Libretro Hatari” core, and without any modification to “retroarch-core-options.cfg“:
This core require the following BIOS files (to be dropped into /recalbox/share/bios/atarist)
- emutos.img (mandatory)
- st.img (mandatory)
- ste.img (mandatory)
- falcon.img (optional)
- magaste.img (optional)
- tt.img (optional)
- tos.img (optional)
I tweaked a bit my customized theme artwork, with a new background. Here is the result:
I also tweaked a bit the overlay, simplifying a bit the one provided by RecalBox 9: atarist-overlay.png (to be renamed “atarist.png” and following the usual overlay customization process)
For the Libretro Hatari core to boot various version of TOS, I used two of the TOS disk images I had prepared for my Atari ST (see here for my disquette re-creation process):
- TOS 1.0 (en)
- TOS 1.04 (fr)
I simply dropped the two .dsk files into /recalbox/share/roms/atarist, and labelled them:
- 0 – SYSTEM: TOS 1.0 (EN)
- 0 – SYSTEM: TOS 1.04 (FR)
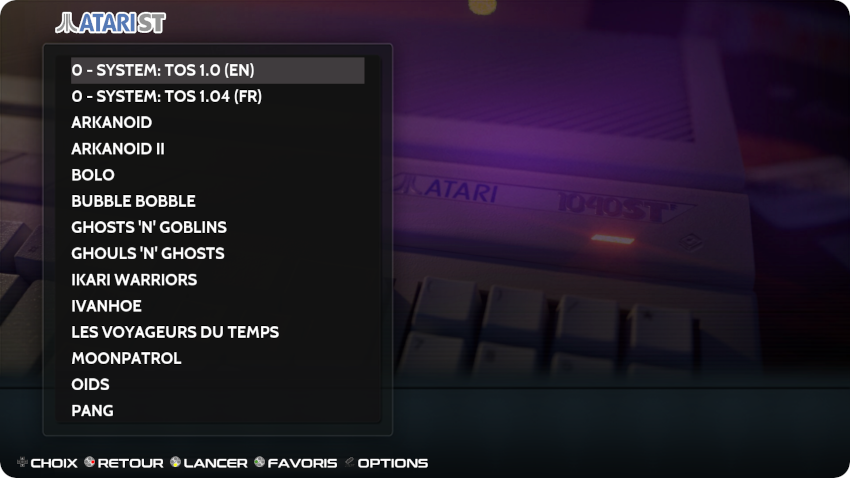
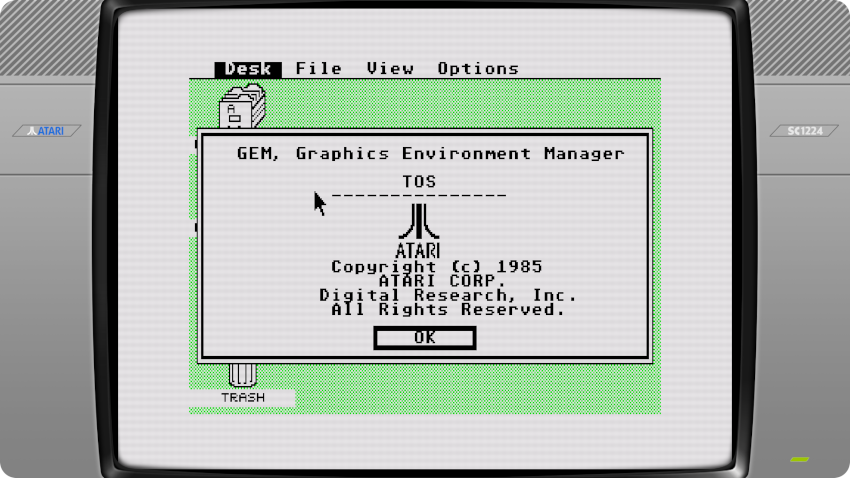
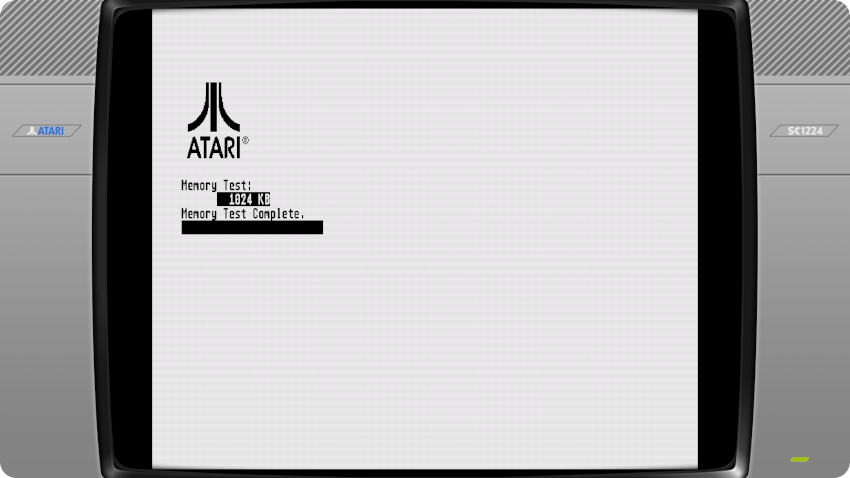
Here are the results:
- TOS 1.0
- TOS 1.04 (FR, Beta, identifying itself as 1.4)
- Bolo (I spend sooo much time playing with it in the late 80’s)
- Prehistorik
[Edited 20/04/2023, adding Falcon compatibility, Monochrome mode, VGA mode and MultiTOS]
Then I though: “what about the monochrome monitor ?” Indeed, that was the configuration I had. Let’s have a look !
Even though I am using Libretro-Hatari, there no core parameter for such settings. Changing hatari.cfg configuration file or trying to override hatari.cfg was also a failure…
Damned.
So, I tried to change Hatari settings “in game“, pressing the “start” button on the gamepad:
From the Hatari main menu, I selected “Atari screen“, then selected “Mono” and hit “Reset machine” + “OK“:
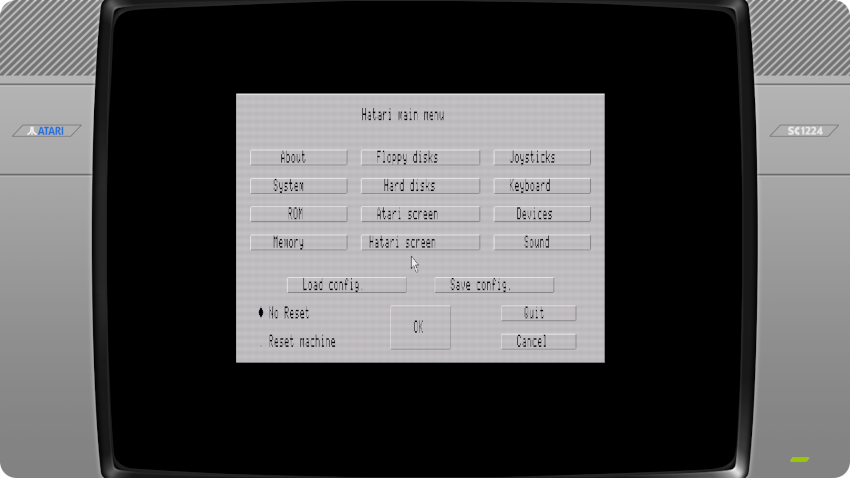
And … well it did not work that well (which is strange, because change to “Mono” works perfectly well when using Hatari as a standalone emulator on my Mac):
Are we stuck color modes ? Well … no so fast !
The (short-lived) Atari Falcon, released in 1992, was the high-end model of the Atari ST line of computers. Among its new features was new high resolution video modes: maybe will I be able to access these video modes from the GEM Desktop using a Falcon instead of a regular Atari ST ?
Let’s try ! Recalbox and Hatari provide ways to select the kind of machine to run: ST, STE, Mega ST or Falcon:
I followed an easy path:
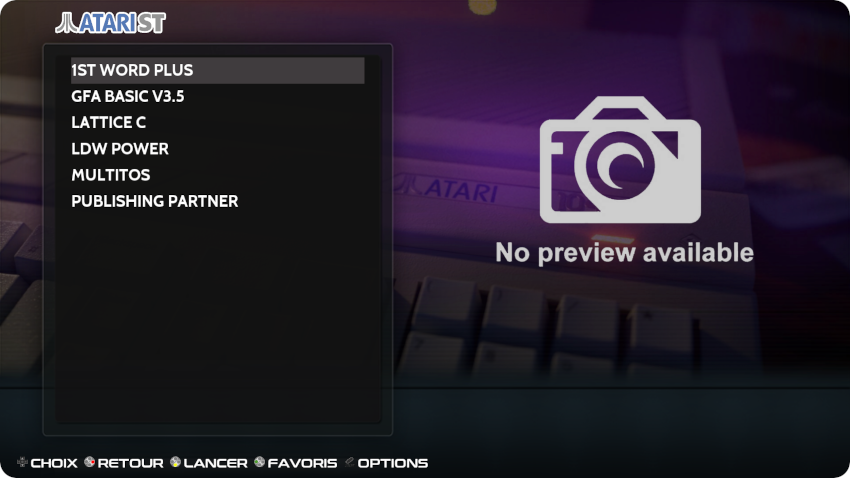
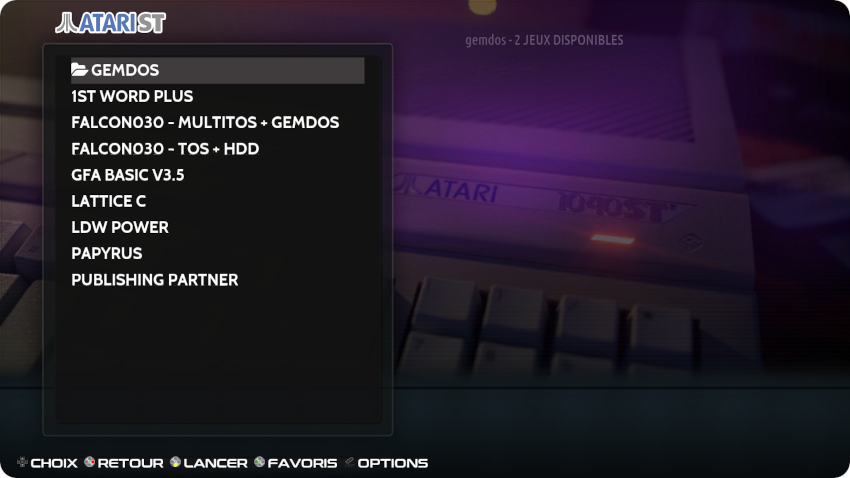
- Created a folder nammed “Falcon” : /recalbox/share/roms/atarist/Falcon
- Dropped a few ROMS into that folder: 1ST Word, GFA Basic 3.5, Lattice C, LDW Power, MultiTOS , etc.
A new “Falcon” folder appeared in the Recalbox selection menu:

For all the ROMs inside the “Falcon” folder, Hatri will emulate a Falcon machine, automagically selecting the proper BIOS file.
Let’s see …
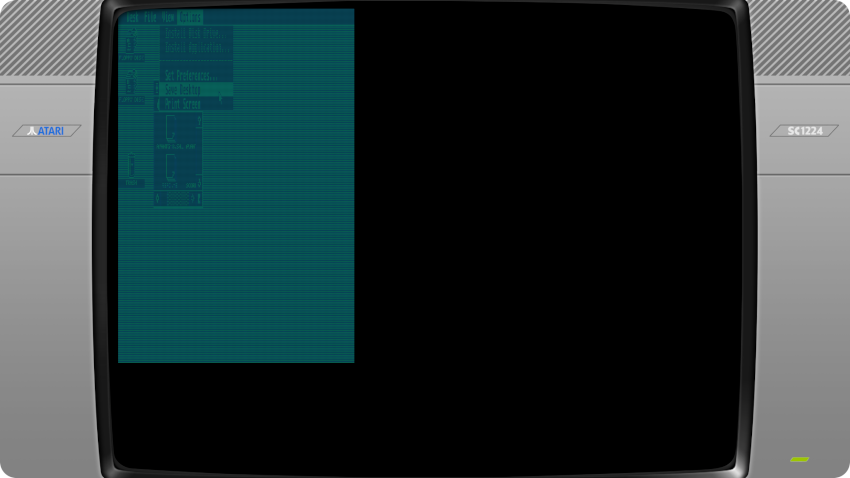
Oh woah ! It booted in what looks like a high-res mode ! But … it launched the GEM Desktop into a tiny, scaled down low resolution color mode:

That been said, the Falcon allows, from the “Option / Set Video …” menu, to select video modes, including “Compatibility Modes”: “ST LOW“, “ST MEDIUM” and … “ST HIGH“:
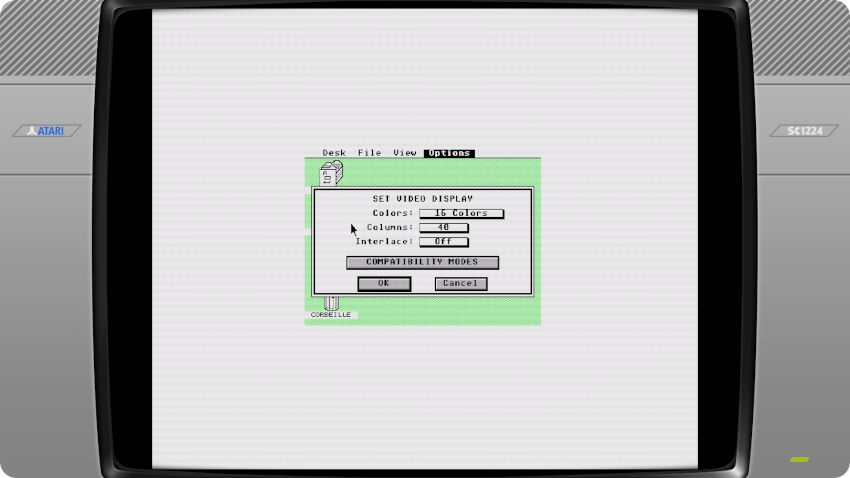
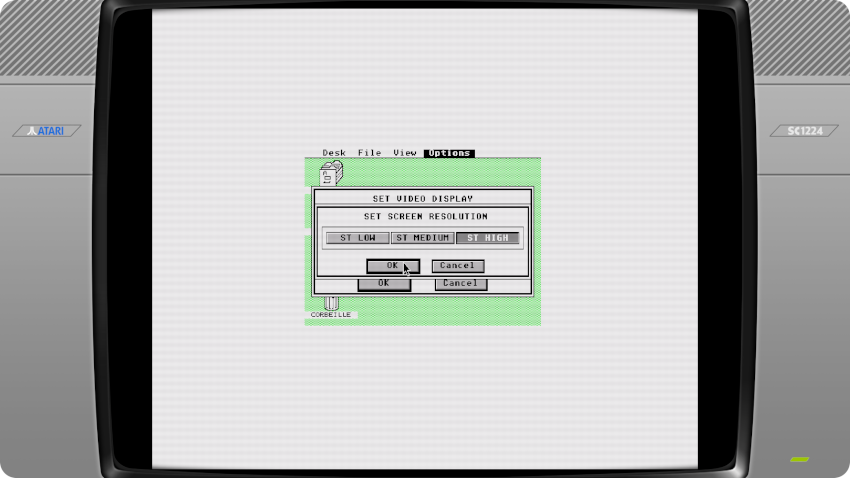
I selected the last option, and … it restarted the GEM Desktop into ST High mode ! (at the proper size)
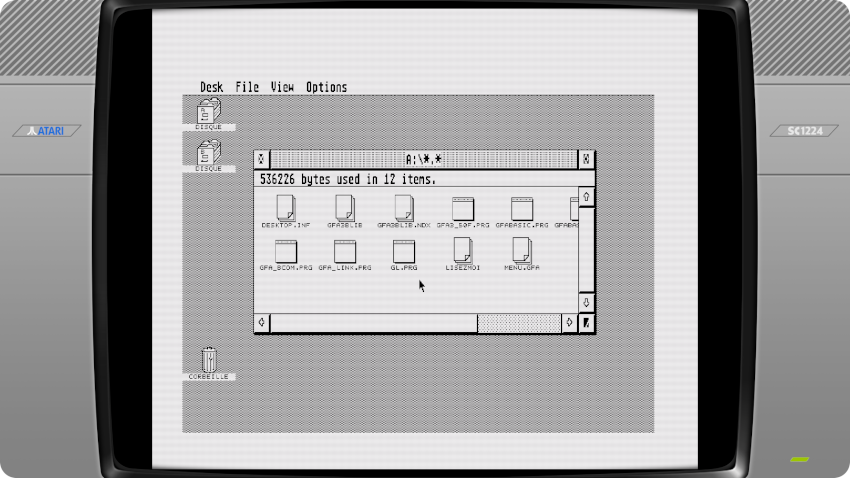
Victory ? Well … almost. Strangely, the screen is slightly shifted down:
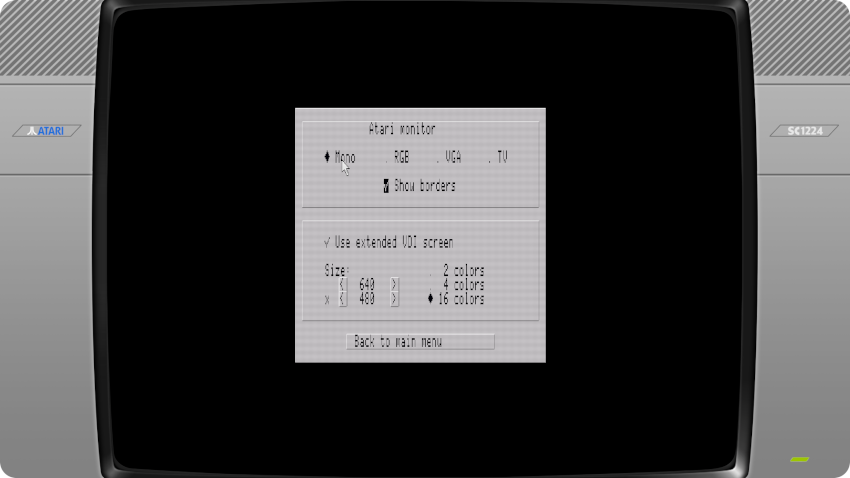
Can you do better than that ? Why not trying the “VGA” mode of Hatari. Let’s pop up the “Hatari main menu” and select “VGA” on the “Atari monitor” panel:
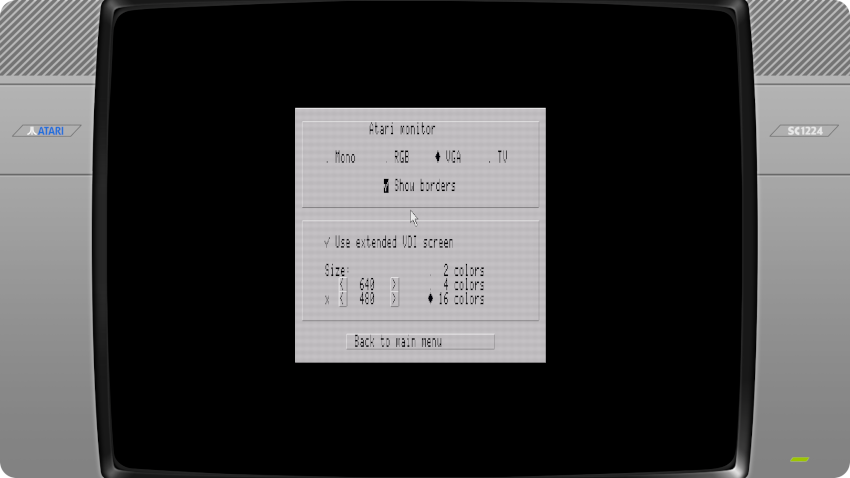
Yes ! And it even displays the proper black border now ! It’s kind of a dirty trick, but it is so cool to be able to run Hatari in monochrome mode with Recalbox !
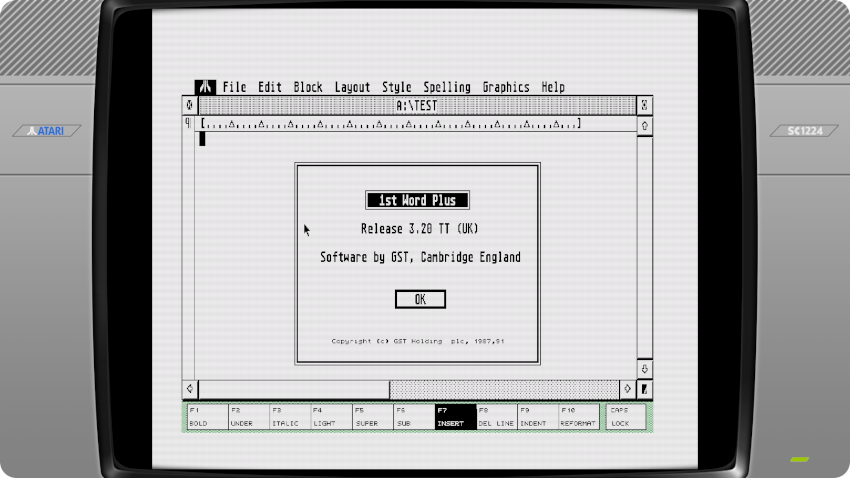
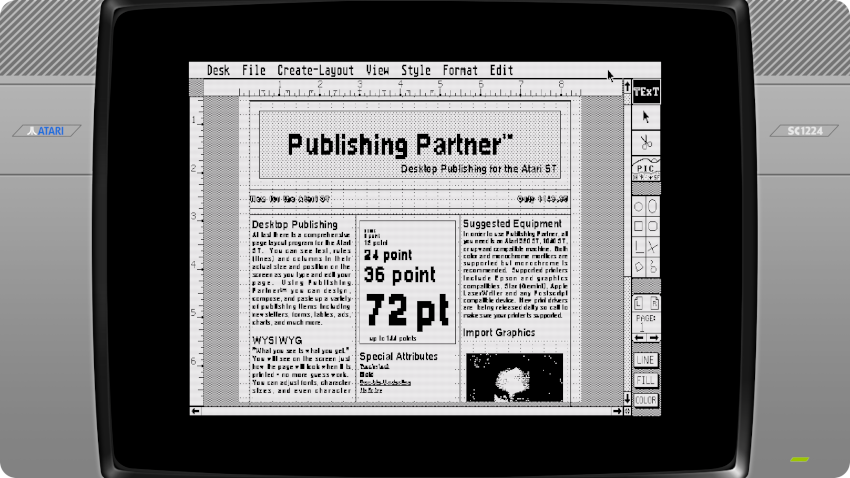
Here are a few screenshots:
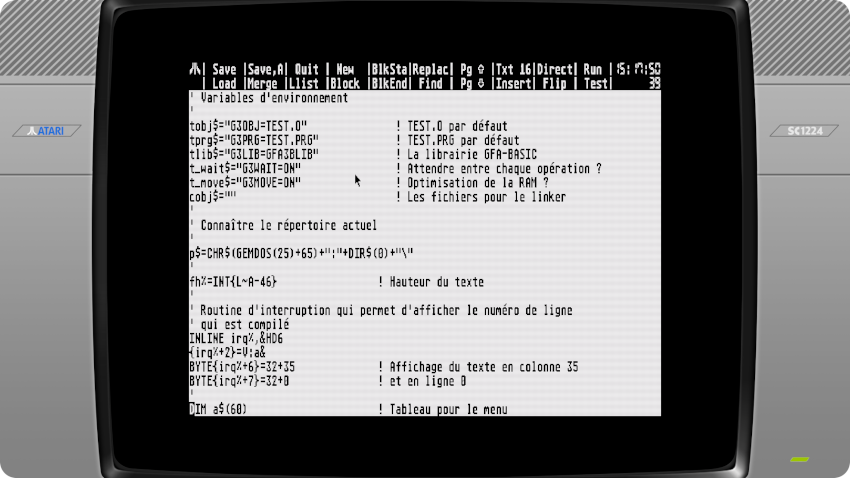
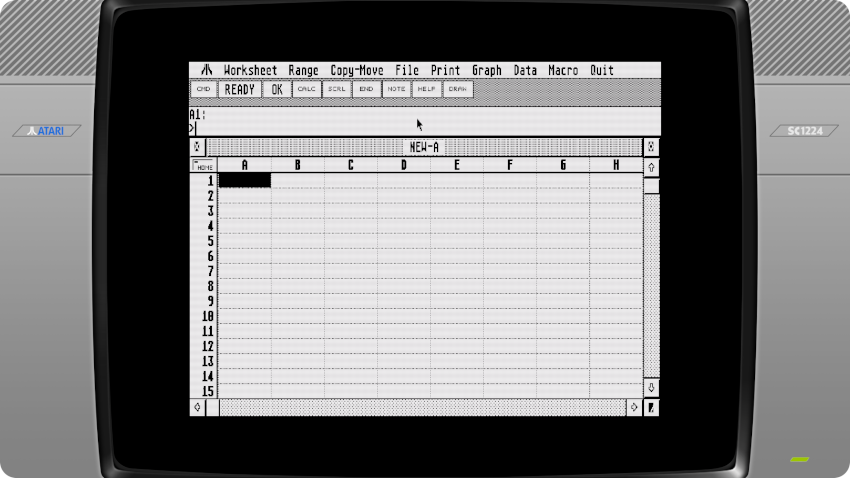
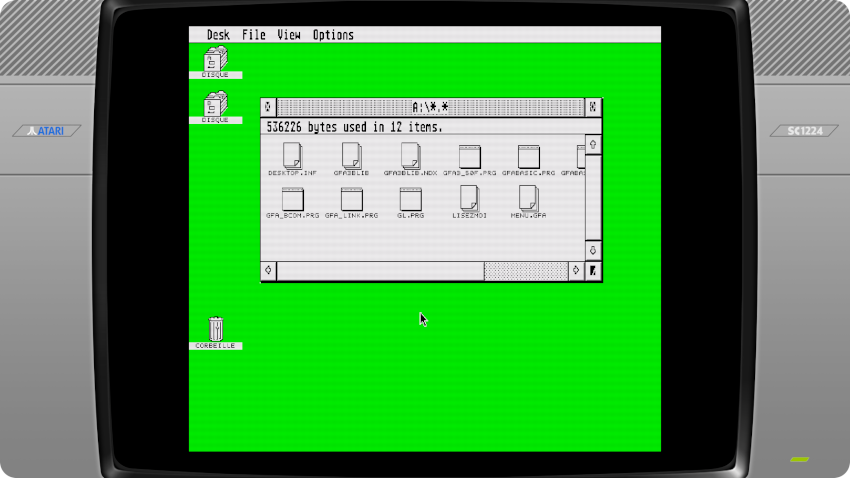
- Publishing Partner
- GFA Basic 3.5
- LDW Power (I had to remove the GDOS to make it work)
- The GEM Desktop (640×480 color mode)
Since Hatari is running in Falcon mode, let’s crank up the memory to 4Mb (via the Hatari main menu) and try MultiTOS:
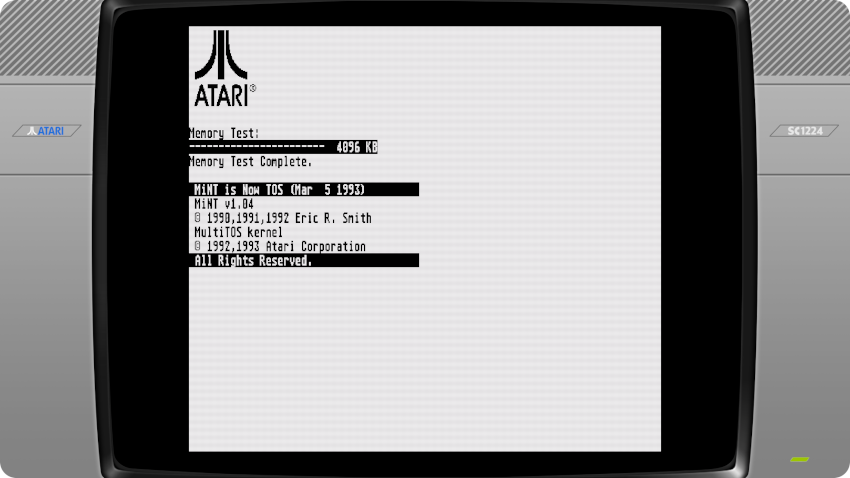
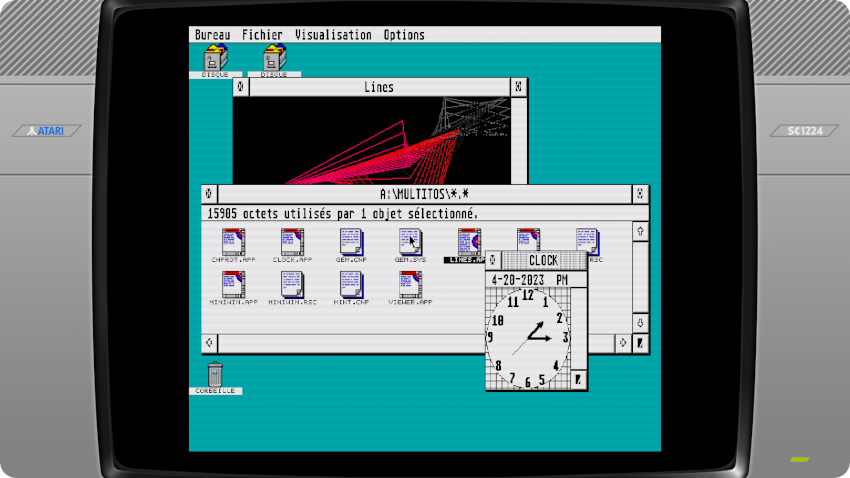
Yeah, multi-tasking ! Not bad at all !
[Edited 26/04/2023, added GEMDOS Drive + HDD image]
Let go a little further and add a GEMDOS drive for the MultiTOS configuration. To do this:
- I gathered Falcon software from here : http://christophe.bray.free.fr/informatique/falcon/archives.
More specifically, I downloaded the .zip archives of the 4 original (French) Falcon030 floppy disks - I uploaded the .zip archives into /recalbox/share/roms/atarist/Falcon
- I converted the .zip archives into .st images. For example, to convert the first floppy disk archive into a .st file:
bash /usr/share/hatari/zip2st.sh disk1_falcon.zip disk1.st - I created a gemdos folder inside /recalbox/share/roms/atarist/Falcon
- I booted via the MultiTOS entry in my Recalbox selection menu
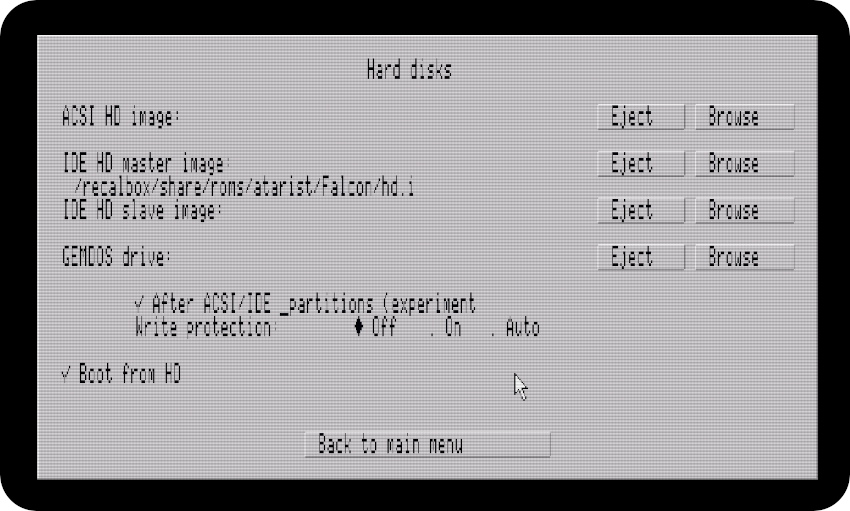
- I launched the Hatari Main Menu (pressing the “start” button), selected the “Hard Disks” sub-menu and added the gemdos folder as a GEMDOS drive:

After choosing the right Monitor and expanding the RAM to 4Mb, I hit the reset button to restart the boot process. Once I had access to the GEM desktop, the GEMDOS drive was accessible (new C: drive), though containing nothing, since the gemdos folder was empty.
I populated the GEMDOS drive from the Falcon030 disk images I downloaded earlier on. To do that, I lauched in session the Hatari Main Menu, selected floppy disk images, then went back to the desktop, copied the content to the C: drive.
I added accessories, utilities and new apps to the GEMDOS drive, then saved the desktop configuration to C:
Here is a screenshot of MultiTOS, with the GEMDOS drive opened, and multitasking with a Calendar app and a Breakout game:

Nice !
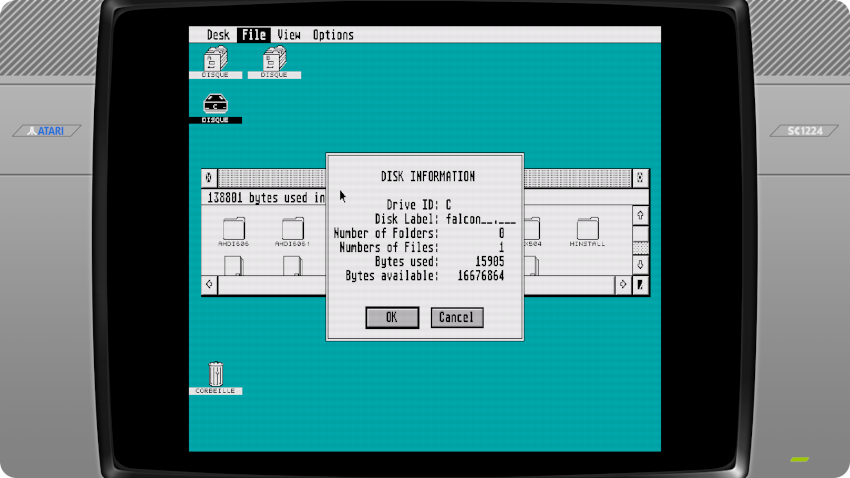
Now, let’s play with a Hard Disk image. Recalbox includes an Hatari script to create Hard Drive images from scratch. I created an empty 16Mb HD image “hd.img” with a partition named “Falcon”:
- bash /usr/share/hatari/atari-hd-image.sh 16 hd.img falcon
I used the first Falcon030 TOS disk image to boot, since it includes AHDI drivers and HDX utils to handle Hard Disk Drives. I launched the Hatari Main Menu, selected the Hard disks sub-menu, and selected the newly created disk image (selecting IDE HD master image, since ACSI emulation does not work in Falcon mode)
Once configured, I hit the “Reset” button from the Hatari Main Menu. It rebooted, and used AHDI 6.06 in the AUTO folder to scan Hard Disk Drives:
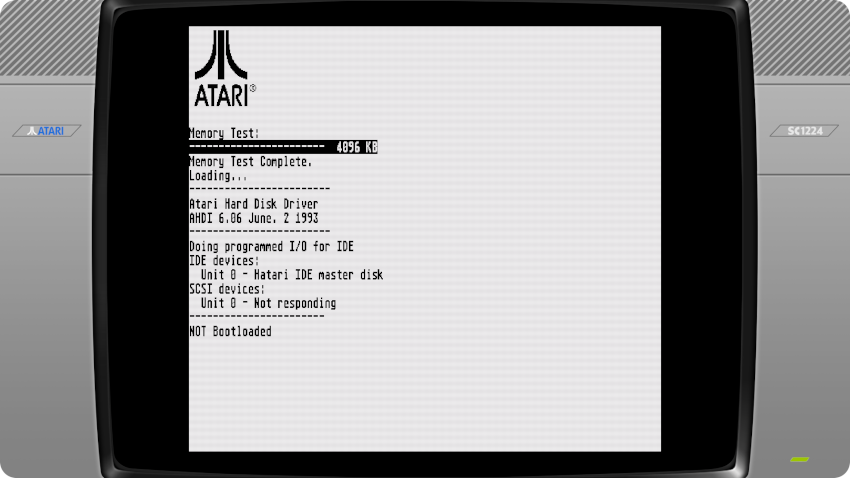
It recognized the “Hatari IDE master” disk image I created. Alas, it would not appear on the GEM Desktop, no matter what I tried: changing AHDI version, using HDX tools, …
Then … I read Hatari documentation (https://hatari.tuxfamily.org/doc/manual.html#IDE_hard_drive_emulation), and found out about Cécile: “Hatari doesn’t currently support partitioning IDE disks with AHDI, but you can do it with Cécile“
I removed the AHDI drivers in the AUTO folder, and replaced it with the Cécile 2.22 ones:
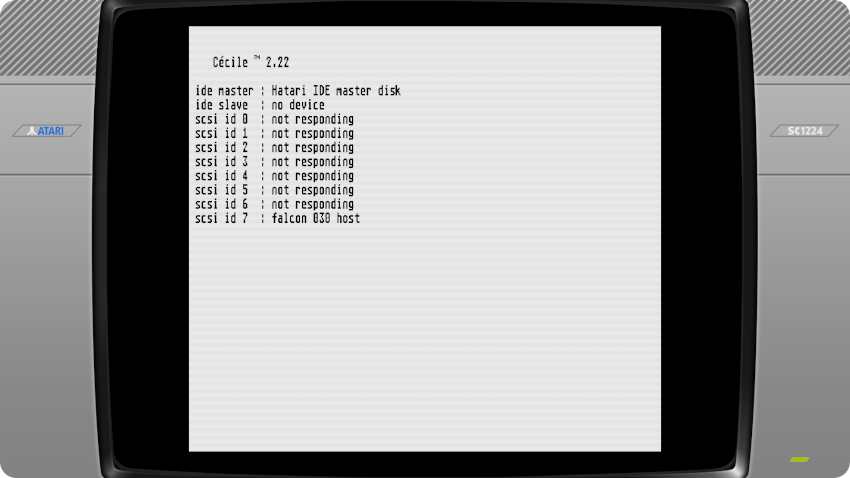
And guess what ? I worked ! Nice !
It was now just a matter of fine tuning and adding new software to the Hard Drive DIsk and testing them:
- Screenshot of the GEM desktop, once customized from a newly installed Control Panel accessory
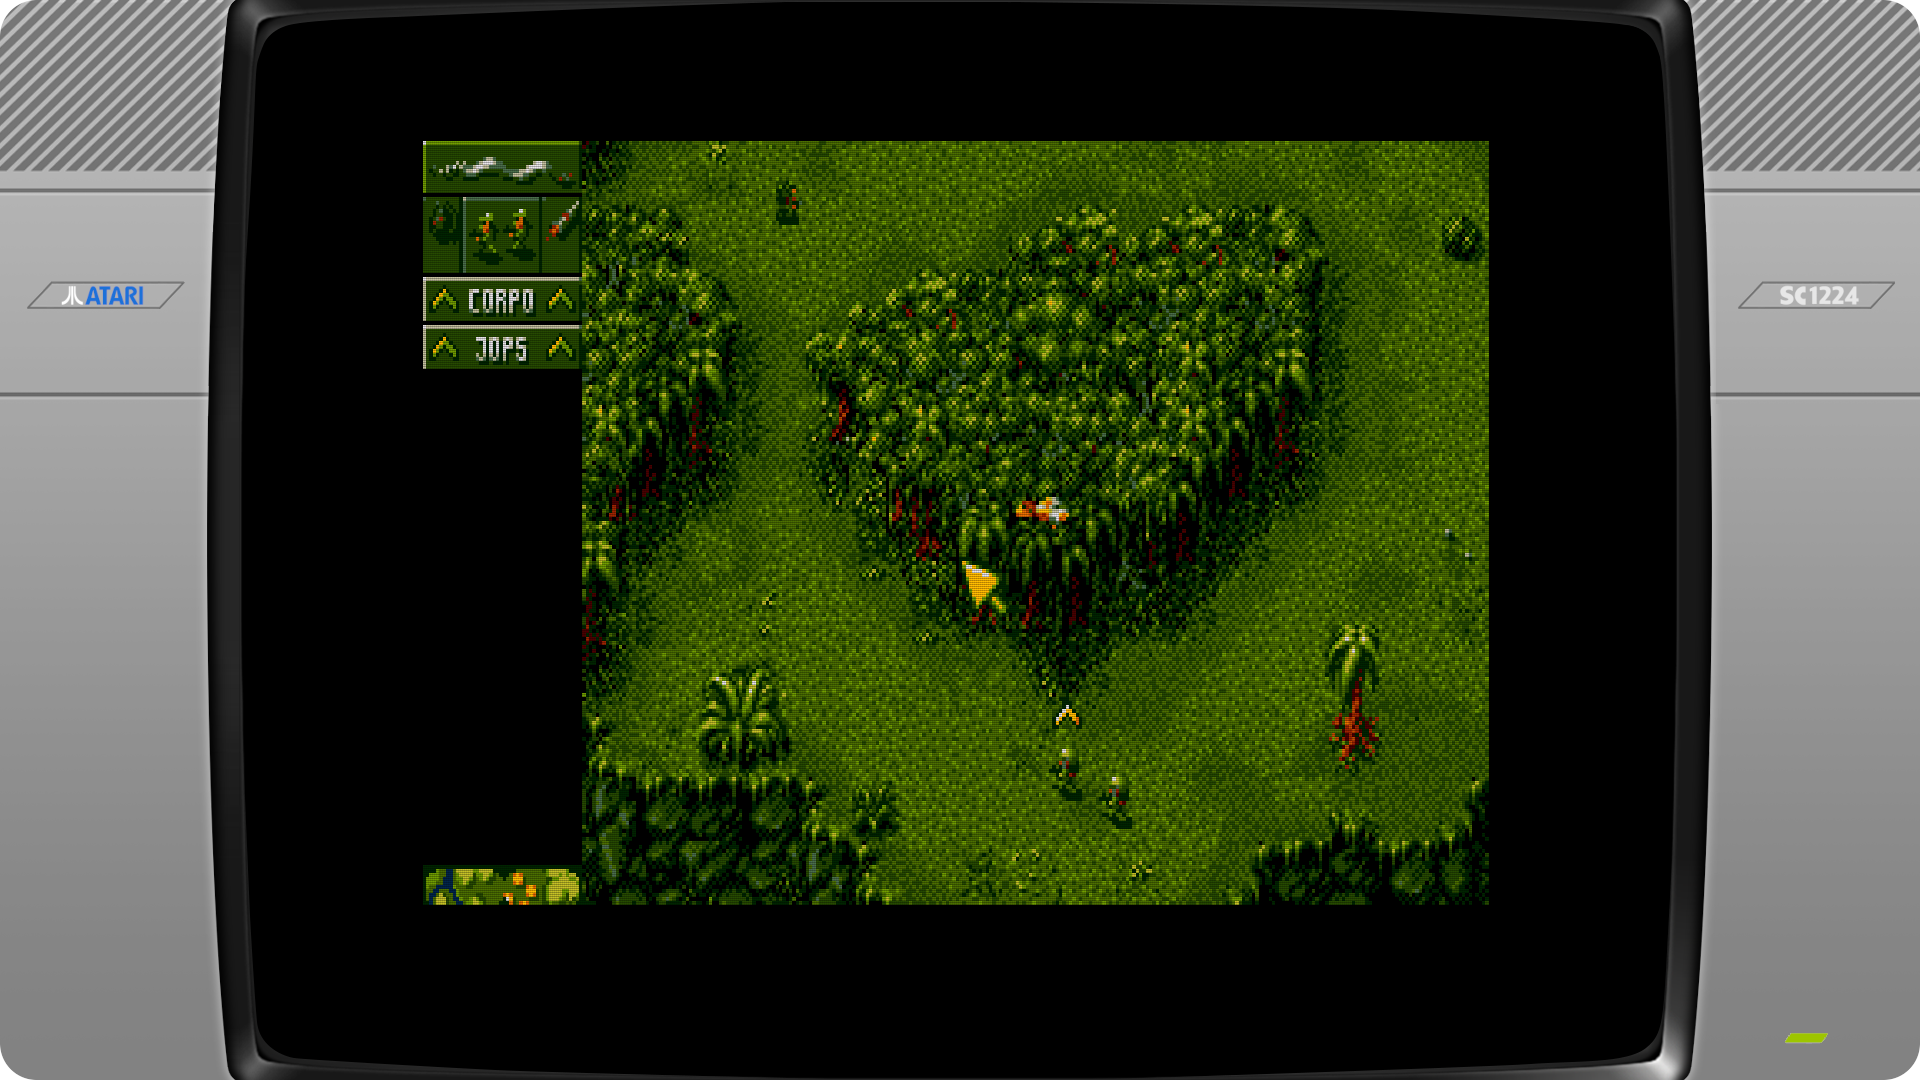
- Screenshot of Cannon Fodder:
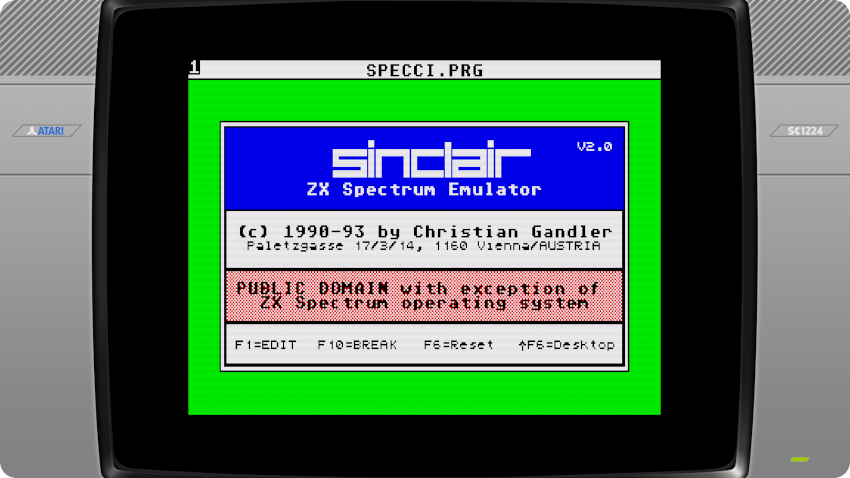
- Screenshots of Specci, a … ZX Spectrum Emulator for Atari ST:
Not bad ! Now I’ve got 2 Falcon configurations to play with:
- One with MultiTOS and a GEMDOS drive
- One with TOS and a HDD drive
Not everything is rosy in Falcon mode though: there are software compatibility issues:
- It seems that one cannot have both the GEMDOS drive and an HDD image. Even when checking the “after ASCI / IDE partition” GEMDOS option, only the GEMDOS drive would be accessible (as C: drive). Not sure it is a bug or a configuration problem. I’ll have to dig a little more on when I’ll have some time.
- “Bolo” bombed (it is a pity, I would have loved to play Bolo in high-res mode, like I did in the days)
- Same for “Le Rédacteur” word processor (not matter which version I tried)
- And TOS 4.92 bombed too … though it was designed for the Falcon !
Nevertheless, let’s celebrate with a few pictures of Hatari on Recalbox running in Falcon high-res mode:

Here is a few links:
- Documentation
- Recalbox (Libretro Hatari): https://wiki.recalbox.com/en/emulators/computers/atari-st/libretro-hatari
- ROMs
- Planet Emulation: https://www.planetemu.net/machine/atari-st
- Atari Mania: http://www.atarimania.com/
- Christophe Bray’s web site (for Falcon related software): http://christophe.bray.free.fr/informatique/falcon/archives/atari_falcon_archives.htm (French)
- Dedicated web sites and forums:
- System.cfg Forum (16bits topic): https://forum.system-cfg.com/viewforum.php?f=2 (French)
- Exxos Forum: https://www.exxosforum.co.uk/forum/index.php
- La Bible Atari: http://www.labibleatari.fr/ (French)
- Atari Forum: https://www.atari-forum.com
- YouTubers:
- ctrl-alt-rees: https://www.youtube.com/c/ctrlaltrees
- Vretrocomputing: https://www.youtube.com/c/Vretrocomputing (French)
- Adrian’s Digital Basement: https://www.youtube.com/c/adriansdigitalbasement
- Mr Luch’s Things: https://www.youtube.com/c/MrLurchsThings
- RMC – The Cave: https://www.youtube.com/c/RMCRetro
- Rodrik Studio: https://www.youtube.com/c/RodrikStudio (French)
- Jan Beta: https://www.youtube.com/c/JanBeta
Matra-Hachette Alice 90
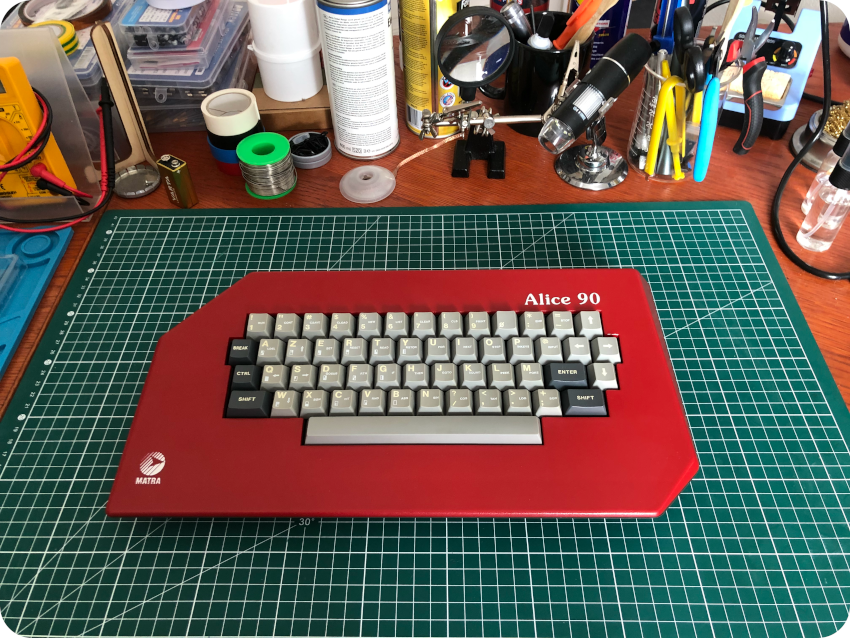
Let’s move on a new vintage computer: the Matra-Hachette Alice 90:
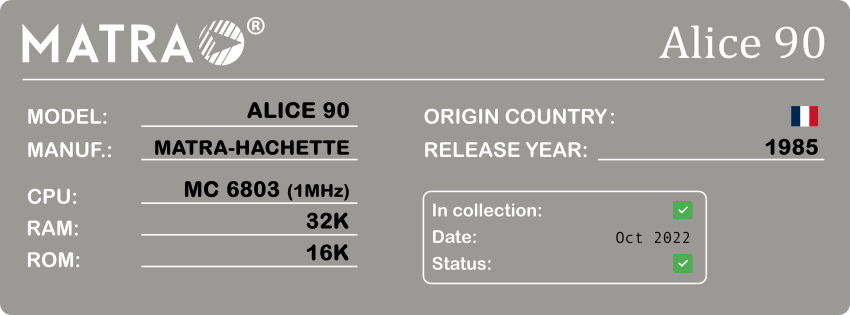
And here is a picture of this cute little computer:
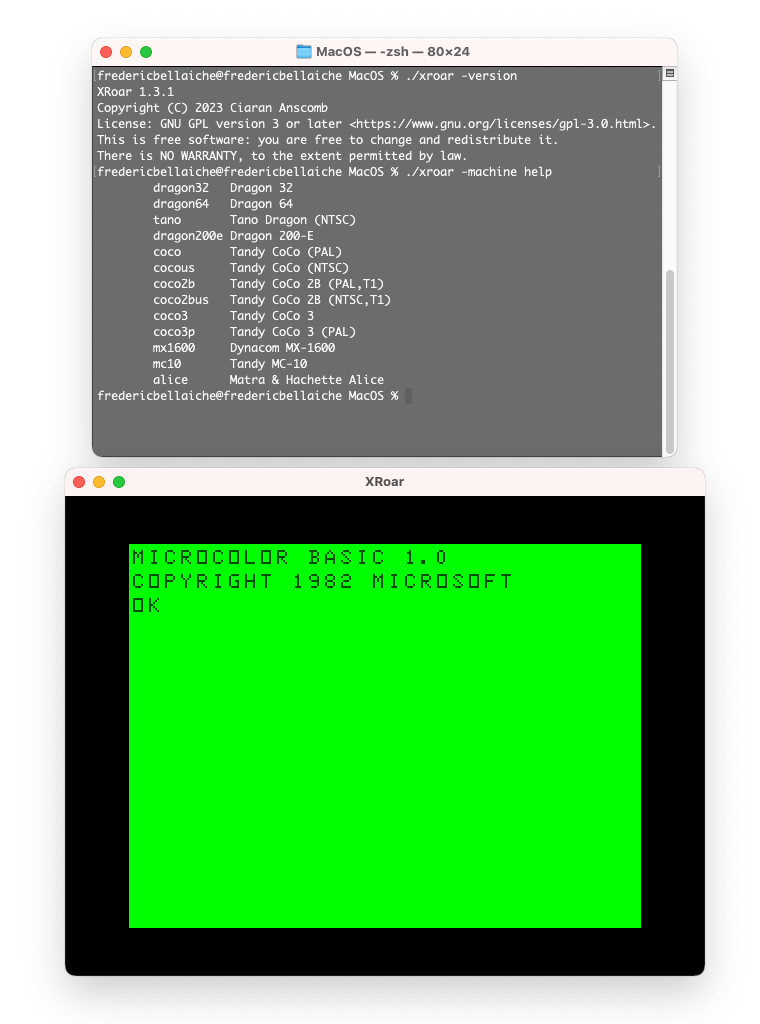
This one is a little odd: the Alice 90 is … a derivative of the Tandy TRS-80 MC-10, built in France by Matra in collaboration with Hachette. And, indeed, RecalBox has a core meant to emulate Tandy computers. This core is not based on Libretro: so, there won’t be nice overlays around the screen, and less options to play with. It is based on XRoar, a Dragon and Tandy 8-bit emulator.
The 1.3.x version of XRoar is able to emulate an Alice computer, and I successfully tried it on my Mac:
RecalBox 9, on the other hand, embeds XRoar 1.0.9, and cannot emulate the Matra-Hachette Alice line of computers:
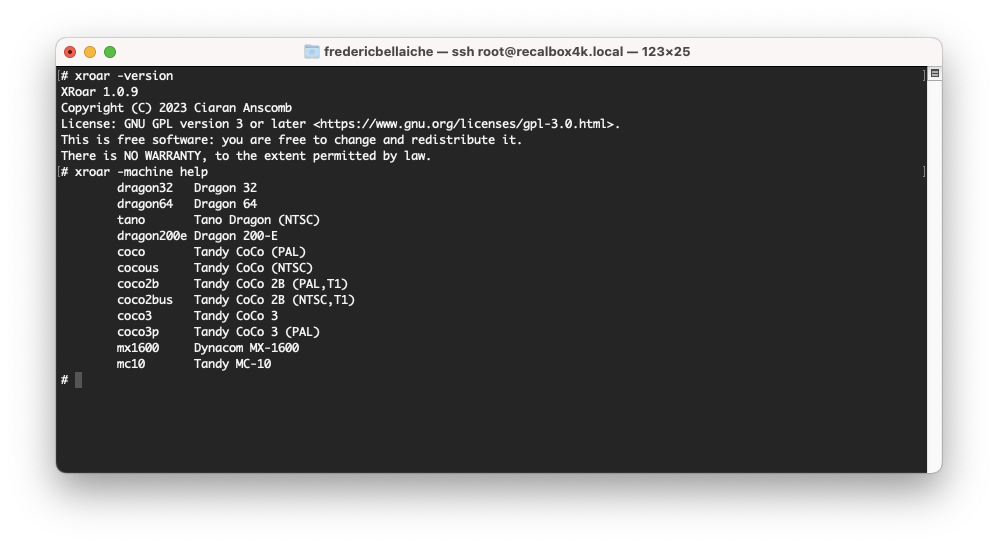 That been said, it does support the Tandy MC-10, which is very close. Let’s give it a try !
RecalBox uses XRoar as a core to run TRS-80 Colo Computers (CoCo’s). It uses the following BIOS files, to be dropped into “/recalbox/share/bios/trs80coco/“:
- bas10.rom (optional)
- bas11.rom (mandatory)
- bas12.rom (optional)
- bas13.rom (mandatory)
- extbas10.rom (mandatory)
- extbas11.rom (mandatory)
- hdbdw3bck.rom (optional)
- mx1600bas.rom (optional)
- alice32.rom (not used)
- alice4k.rom (not used)
This core is not Libretro based, there are not overlays, and, unfortunatly, not much options to select a particular system.
Since there were no artwork for TRS80 in the old theme I use as a basis, I took a picture of my own Alice 90, and created a “Matra” logo. These can be downloaded here:
Here is the result:

To boot into an Operating System, I found out that creating an entry into the game list (gamelist.xml, into /recalbox/share/roms/trs80coco) pointing to a non-existing file (here, the file “boot.cc” is not present in the trs80coco folder) would boot XRoard into its default system (more on why I labelled it “BASIC 1.0” later on):
<game source=”Recalbox” timestamp=”0″>
<path>boot.cc</path>
<genre></genre>
<publisher></publisher>
<developer></developer>
<video></video>
<thumbnail></thumbnail>
<image></image>
<desc></desc>
<ratio>auto</ratio>
<core></core>
<emulator></emulator>
<name>0 – System: Basic 1.0</name>
</game>
Here is the resulting menu selection:
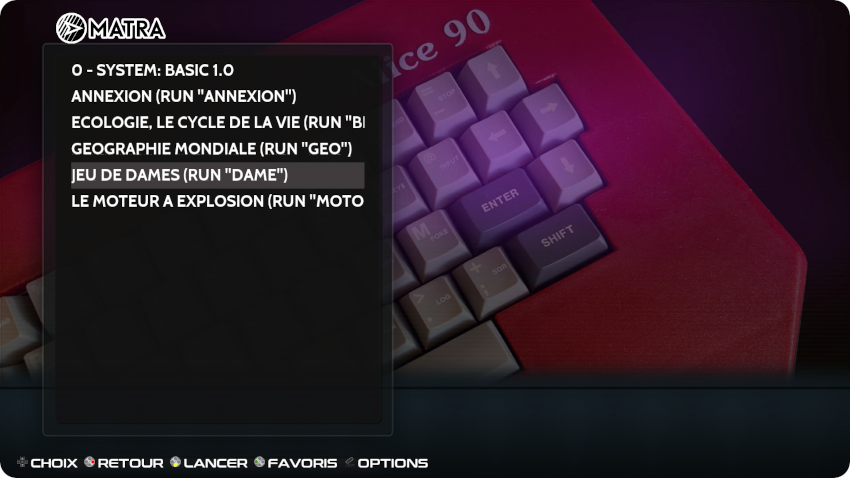
It is a dirty trick, but it works :
I could quite probably also have used an empty disc image. But, since it worked straight away, I was a lazy boy and I did not bother to try.
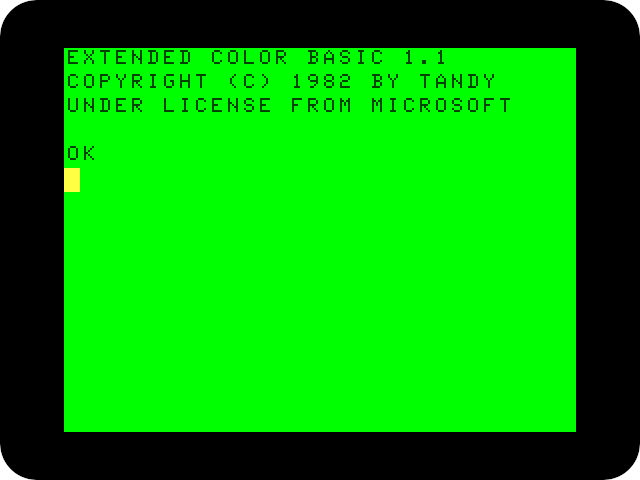
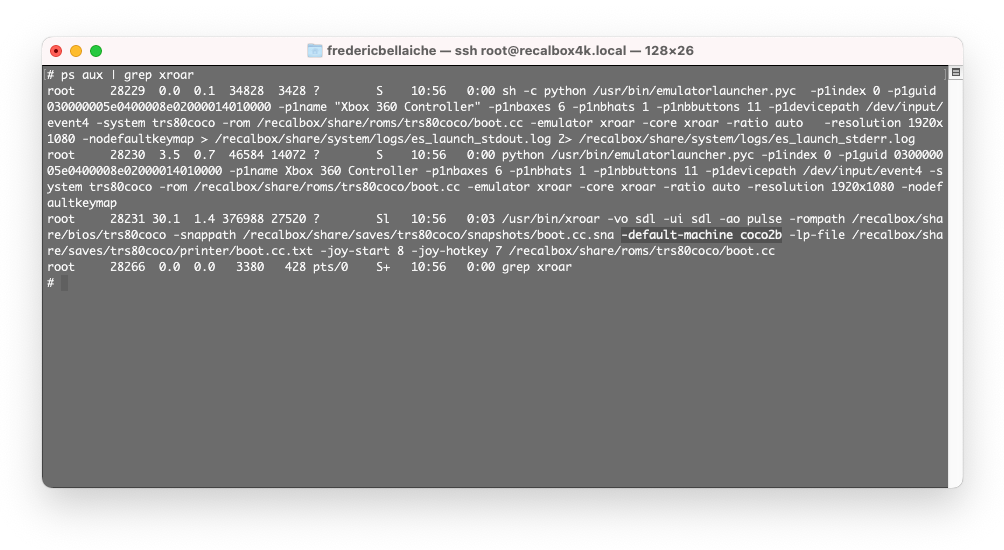
It boots into EXTENDED COLOR BASIC 1.1. Looking as the processes I found out that it defaults on a Coco2b Tandy machine:
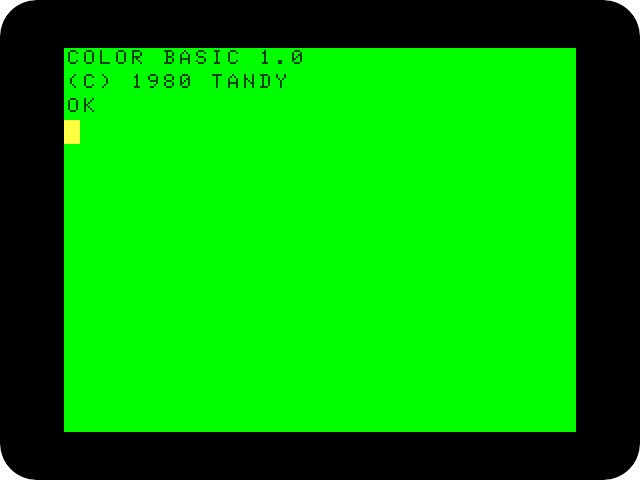
So, it makes sens to boot into EXTENDED COLOR BASIC 1.1. For the fun of it, I tried to move around the extbas11.rom BIOS file, and found out that it would still boot, but using the next usable .rom file. And only leaving bas10.rom, the core booted into COLOR BASIC 1.0:
This is the closest to the Matra-Hachette Alice configuration I could get. Close, but no cigar. Maybe in one of the next releases of RecalBox, XRoar will be bumped to 1.3 and therefore will be able to use Alice BIOS files. In the meantime, it is close enough for what I need.
Note: in the end, I cleaned the mess I did playing around with .rom files and switched back to a normal BIOS set of files. Still, it is nice to know that booting into other Operating Systems than the default one is possible !
Now comes the big question: will it run Matra-Hachette Software ? Well … it depends.
XRoad cannot use .k7 file format. This is unfortunate because my collection of Alice Software comes from the (fantastic) DCAlice software repository and is using the .k7 format. That being said, the .k7 format can be converted into .wav files, that XRoad can actually use. I uploaded the “crocky.wav” file I already had handy and tried it. It loaded the tape (or at lease the first stage of it), but bombed right after:
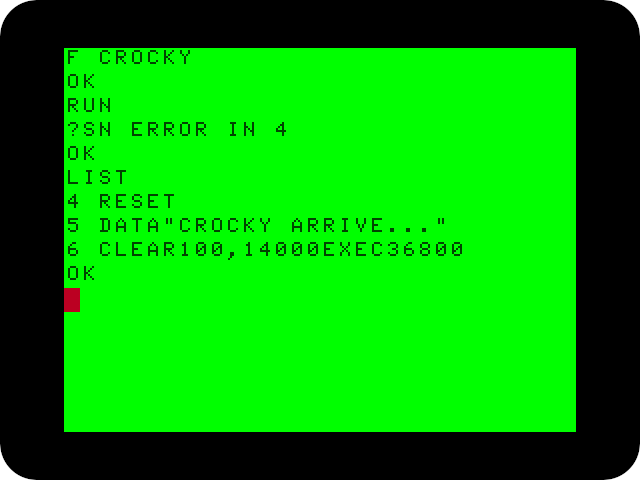
Humm, what a pity…
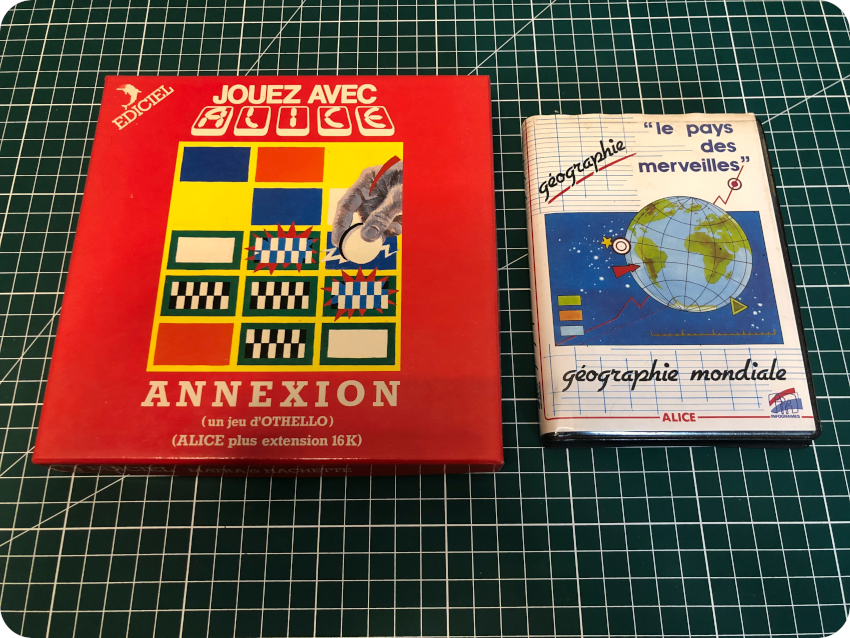
Then I found on the TRS-80 Color Computer Archive a bunch of .dsk files with Alice Software: “Jeu de dames”, “Le moteur à explosion”, “Ecologie, Le cycle de la vie”, “Annexion” and “Géographie Mondiale”.
That was nice because I do have old cassettes of the last two and ran them on actual hardware:
I uploaded the .dsk files into /recalbox/share/roms/trs80coco and tried them all. And it freakin’ worked !
There was nevertheless a little trick: the games wouldn’t auto load / start for some reasons. All I had to do is type-in these at the BASIC prompt:
- RUN “ANNEXION” (to load and run the “Annexion” game)
Same for the other ones : RUN “BIO”, RUN “DAME”, RUN “MOTOR2”, RUN “GEO”…
Here is a screenshot of “Annexion”:

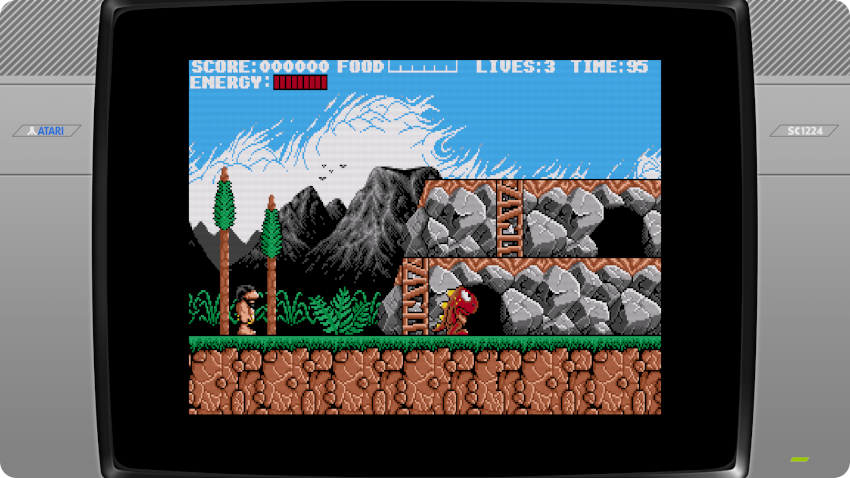
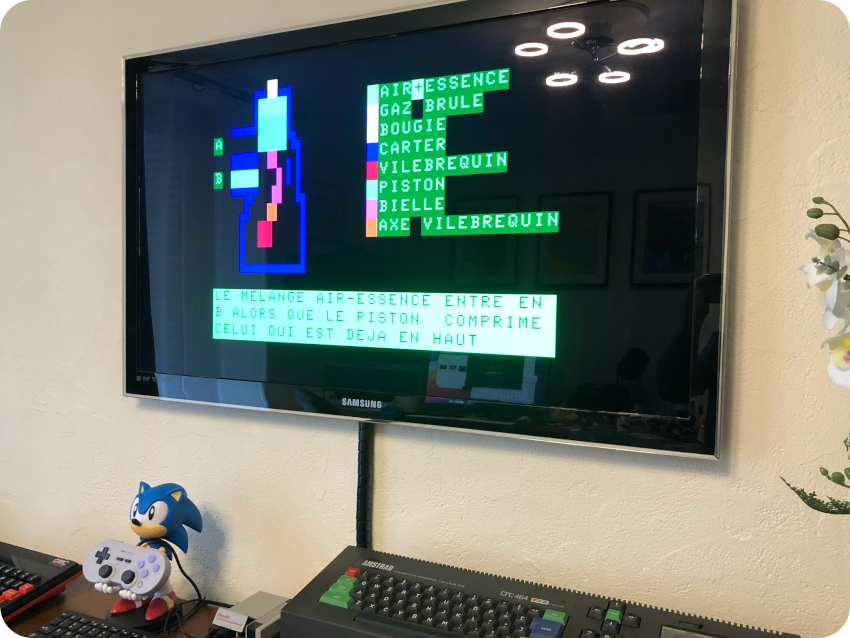
To conclude, here is a picture showing Infogrames’ “Le moteur à explosion” educational software for Alice, running on RecalBox with the XRoar core:
Here is a few links:
- Documentation
- Recalbox (XRoar): https://wiki.recalbox.com/en/emulators/computers/trs-80-coco/xroar
- ROMs
- The TRS-80 Color Computer Archive: https://colorcomputerarchive.com/repo/Disks/
- Dedicated web sites and forums:
- Le [wiki] d’alice: https://alice.system-cfg.com/about.php (French)
- System.cfg Forum (8bits): https://forum.system-cfg.com/viewforum.php?f=1 (French)
- DCAlice: http://alice32.free.fr/emulateur/index.html (French). Also a good source for software.
- YouTubers:
- Adrian’s Digital Basement: https://www.youtube.com/c/adriansdigitalbasement
- GalaMoon Retrogaming: https://www.youtube.com/channel/UCHoSrYaPSHUIMXoXH3bRRbQ (French)
Oric Atmos
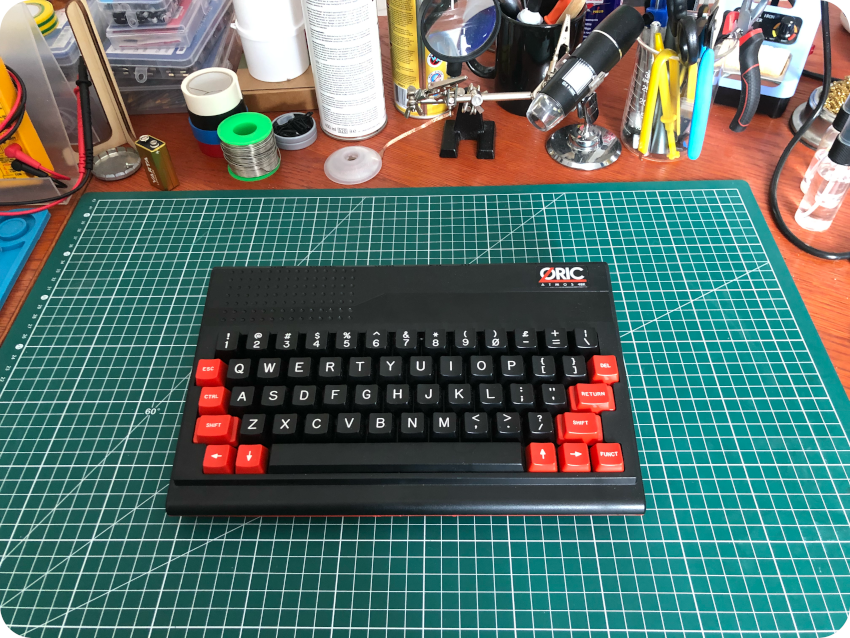
The next vintage computer is the Oric Atmos:
As of today, this is the latest vintage computer I acquired:
Here is the summary my RecalBox configuration for the Oric Atmos:
RecalBox uses Oricutron as a core in order to emulate the Oric Atmos. This is not a Libretro based core, so there is no overlay and little room for configuration within RecalBox.
Its requires the following BIOS files (to be dropped in /recalbox/share/bios/oricutron):
- basic11b.rom (mandatory)
- basic10.rom (mandatory)
- jasmin.rom (mandatory)
- microdis.rom (mandatory)
- pravetzt.rom (mandatory)
- teleass.rom (mandatory)
- hyperbas.rom (mandatory)
- telmon24.rom (mandatory)
- bd500.rom (optional)
- 8dos2.rom (optional)
I didn’t have to tweak anything on the theme I use:
For the core to boot into ORIC EXTENDED BASIC 1.1, i found a disk image of ORIC DOS V 1.3 here:
But the disk auto-started with a menu I didn’t want. So I launched Oricutron on my Mac and booted of this image disk:
I listed the content of the disk, removed protection on files and erased the unnecessary ones, keeping only the “SYSTEM.DOS” file:
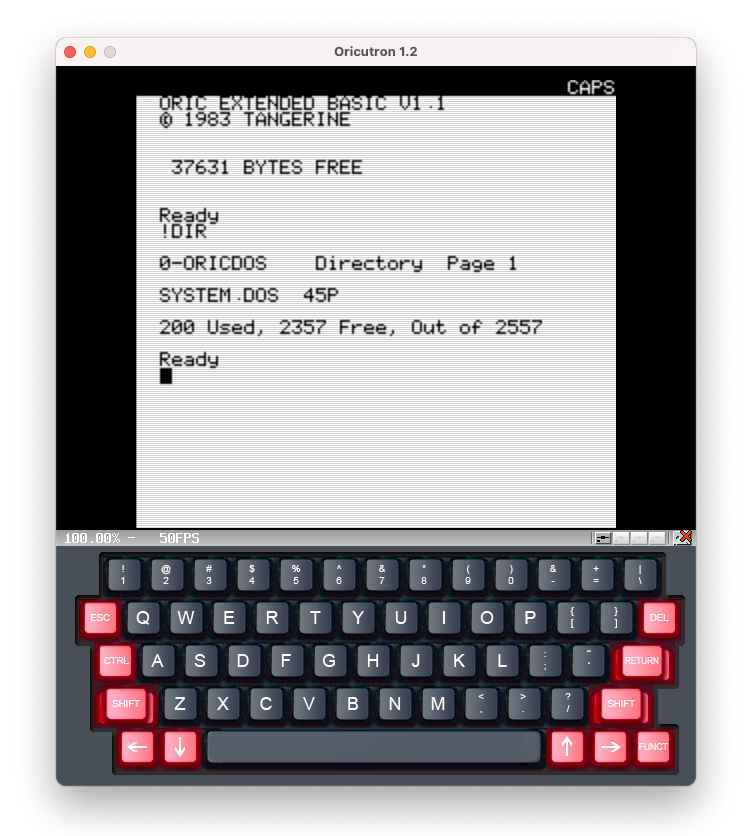
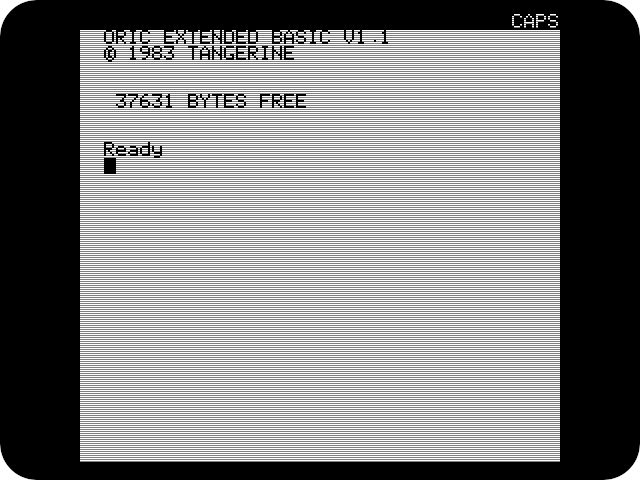
Once done, I uploaded the image disk to /recalbox/share/roms/oricatmos and labelled it “0 – SYSTEM: BASIC 1.1”:
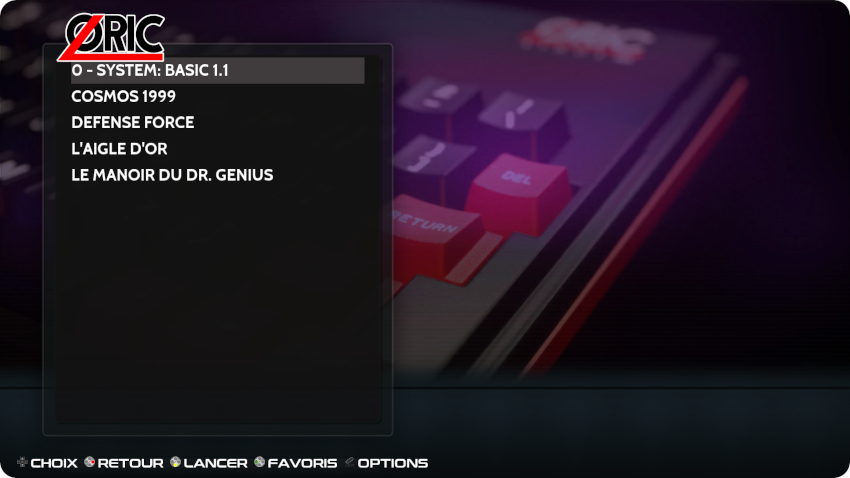
Here is the result:
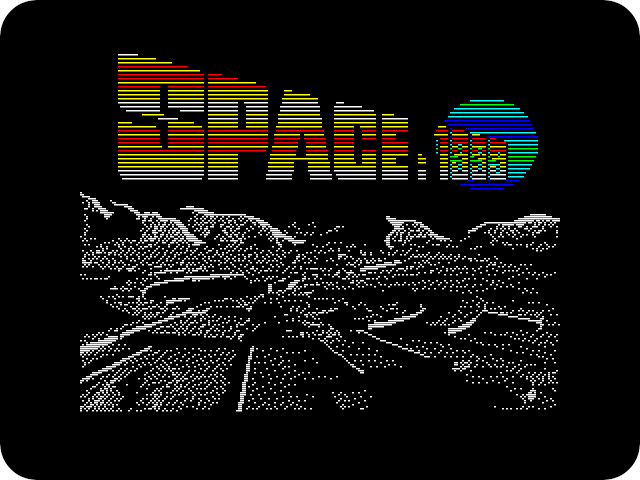
And here is a screenshot of “Space: 1999”
And here is the mandatory “Defence Force” game picture:
Here is a few links:
- Documentation
- Recalbox (Oricutron): https://wiki.recalbox.com/en/emulators/computers/oric-atmos/oricutron
- ROMs
- Planet Emulation: https://www.planetemu.net/machine/oric
- Dedicated web sites and forums:
- System.cfg Forum (8bits): https://forum.system-cfg.com/viewforum.php?f=1 (French)
- Defence Force: https://www.defence-force.org/index.php?page=main
- OSDK: https://osdk.org/index.php?page=main
- Dbug’s blog: https://blog.defence-force.org
- Muso’s ORIC Site: http://www.48katmos.freeuk.com
- The Oric site: https://www.oric.org
- YouTubers:
- Ddbug’s stuff: https://www.youtube.com/@DbugII
- ctrl-alt-rees: https://www.youtube.com/channel/UCe7aGwKsc40TYqDJfjggeKg
- Noel’s Retro Lab: https://www.youtube.com/c/NoelsRetroLab
- GalaMoon Retrogaming: https://www.youtube.com/channel/UCHoSrYaPSHUIMXoXH3bRRbQ (French)
- RetroLab: https://www.youtube.com/@retrolabo
- Re-Tech: https://www.youtube.com/@Re-Tech
Apple II
Let’s move on an try the Apple II:
The Apple II is on my wish list of vintage computer (either a IIc, a II+ or IIe). Up to now, I couldn’t find one at a reasonable price unfortunately…
In the meantime, I can have fun and learn on an emulator. Here is my Recalbox configuration:
I tried two different cores:
- GSPlus: this core is actually meant to emulate an Apple IIGS, which is 95% backward compatible with the Apple II. Indeed, this core was able to run all the Apple II ROMs I tested, sometimes better than LinApple (mouse support seems better for example), sometimes worse. But it does what it is meant to be: it looks and feels like an Apple II GS running Apple II software … so it doesn’t feel quite like an Apple II (at least, the way I remember how it felt 40 years ago)
- LinApple: I finally settled for this core. It was a very subjective choice: it feels closer to an Apple II than GSPlus when it comes to run Apple II software. It has drawbacks: I couldn’t get it to use a 4/3 ratio, thus the display is stretched to 16/9 on my Samsung TV. I could not find a way to modify the default settings, so I could add mouse support (default is “Mouse in slot 4 = 0“, which implies that mouse won’t work). On the other hand, I really like the way you can cycle between the various video modes !
The “LinApple” core is not Libretro-based: there are therefore no nice overlay, and no straightforward way to change settings.
Note: the LinApple core does not require BIOS files.
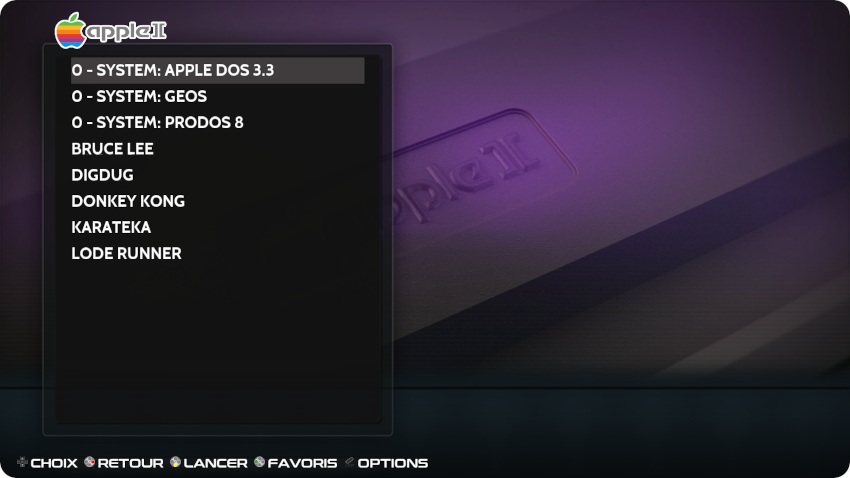
The theme I am using had already a good artwork and logo for the Apple II, here is how it looks:
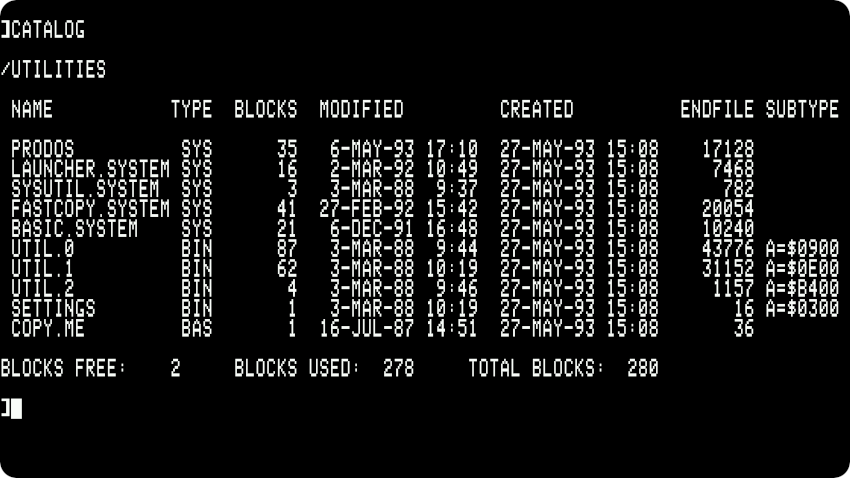
Booting into different Operating was very easy: all I had to do was to find proper .dsk files here:
I downloaded images for:
- Apple DOS 3.3 (labelled “0 – System: APPLE DOS 3.3”)
- ProDos 8 (labelled “0 – System: PRODOS 8”)
- GEOS (labelled “0 – System: GOS”)
Here is a screenshot of Apple DOS 3.3:
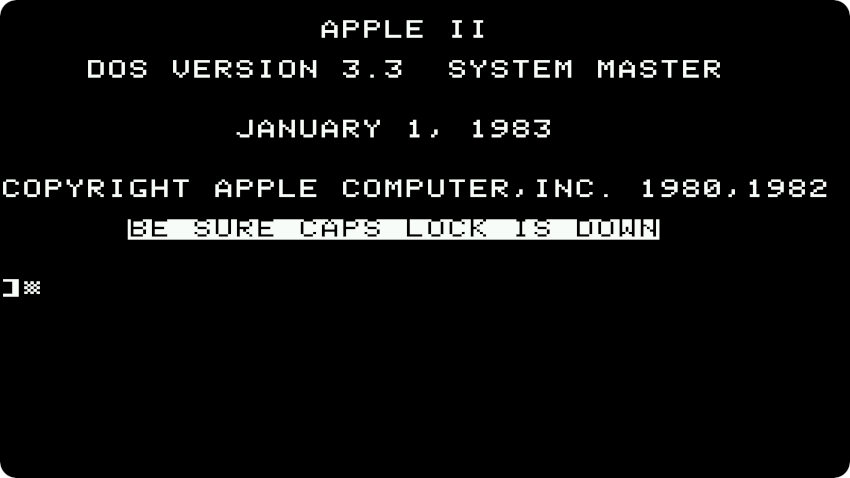
As you can see, the image is stretched (4/3 to 16/9), and there is no scanline / shader. Here how it look using the “GSPlus” core:
- The image is not stretched
- Shader + scanline configuration are applied
- But it feels like a IIGS running DOS 3.3 (because … it is)
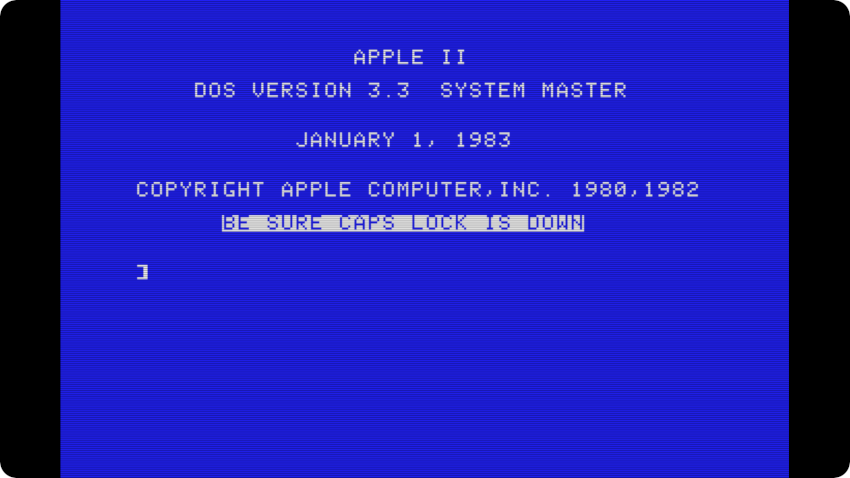
Of course, I can always change the TV settings to force a 4/3 ratio, which looks better (though slightly cropped on the left for some reasons):
I tried various methods to set LinApple options, including overriding RecalBox core and global configurations, with no luck. This was a little expected with this kind of “standalone” core. Forcing to 4/3 has to be done manually on my old Samsung TV, so … until I found a way to change LinApple settings, I guess I’ll have to cope with a stretched display.
Here a screenshot of LinApple running ProDOS 8 (in 80-column mode, using PR#3 command):
One of the nice features of LinApple is the ability to cycle between video modes by pressing the F9 key (Color Standard, Color Text Optimized, Color TV, Color Half-Shift, Monochrome Amber, Monochrome Green, Monochrome White). Here is how it looks in green-monochrome display mode:
This feature can be extremely useful. Here is a screenshot of LinApple running GEOS:
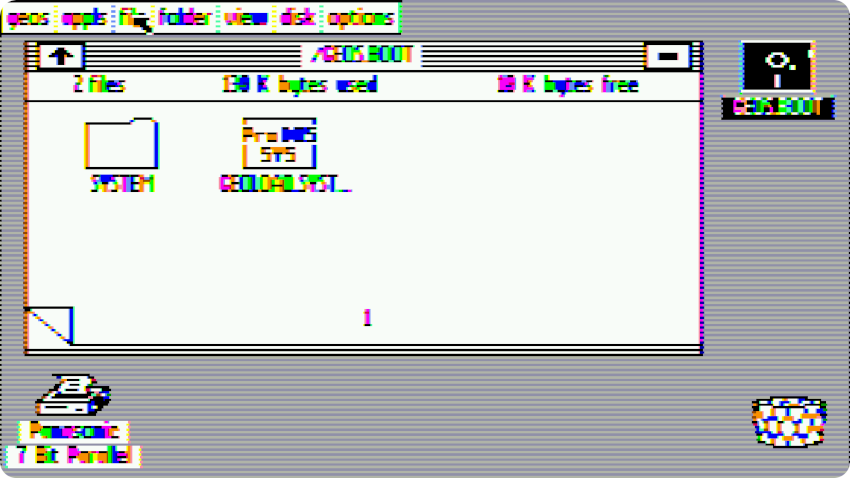
Because of the way Apple II computers are handling color graphics, it is almost impossible to use with the default LinApple settings. But, thanks to the video mode switching feature of this emulator, here is how it looks in Amber Monochrome mode (pressing F9 a couple of times to reach the desired video mode):
So much better ! And amber monochrome is so early 80’s !! I love it !!!
The remaining problem is … that there is no mouse support (unless I find a way to set the proper LineApple settings). Using the GSPlus core to run GEOS solves the mouse problem, but add some other problems:
- it defaults on color mode, so the display is mangled (but uses a correct 4/3 ratio),
- for some reasons, it is really, really slow (which is a bit strange, since the other ROMs I tested were running really fast on GSPlus)
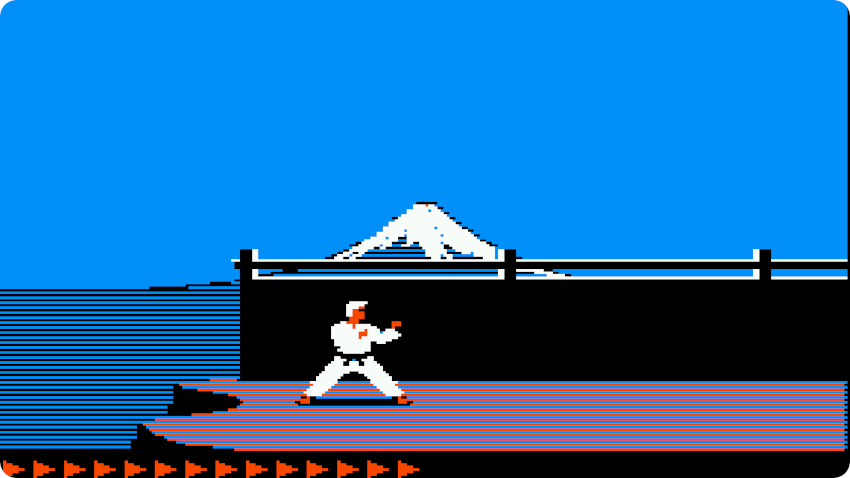
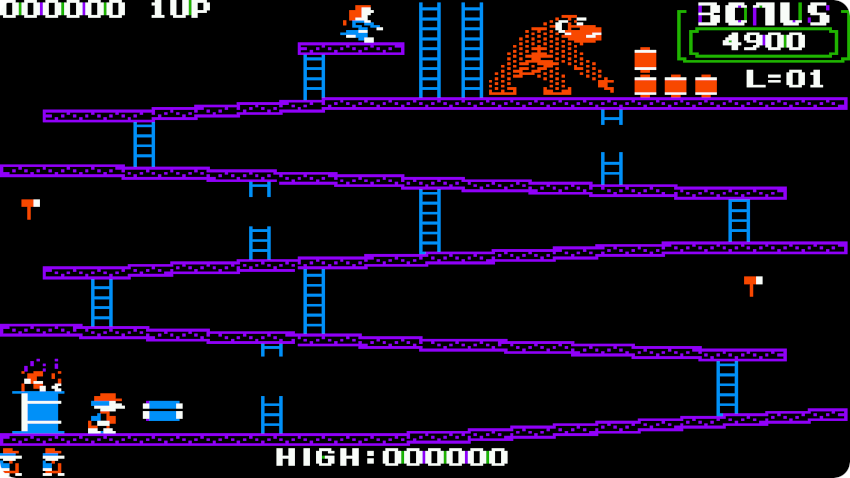
Here are a few other screenshots in color mode:
- “Karateka”
- “Donkey Kong”
And here is how “Lode Runner” looks:
Here is a few links:
- Documentation
- Recalbox (LinApple): https://wiki.recalbox.com/fr/emulators/computers/apple-2/linapple
- ROMs
- apple2.org.za: https://mirrors.apple2.org.za/ftp.apple.asimov.net/images/
- YouTubers:
- Adrian’s Digital Basement: https://www.youtube.com/c/adriansdigitalbasement
- Mr Luch’s Things: https://www.youtube.com/c/MrLurchsThings
- RMC – The Cave: https://www.youtube.com/c/RMCRetro
- The Retro Channel: https://www.youtube.com/@TheRetroChannel
Apple IIGS
Let’s move on, and try the Apple II’s little brother : the Apple IIGS
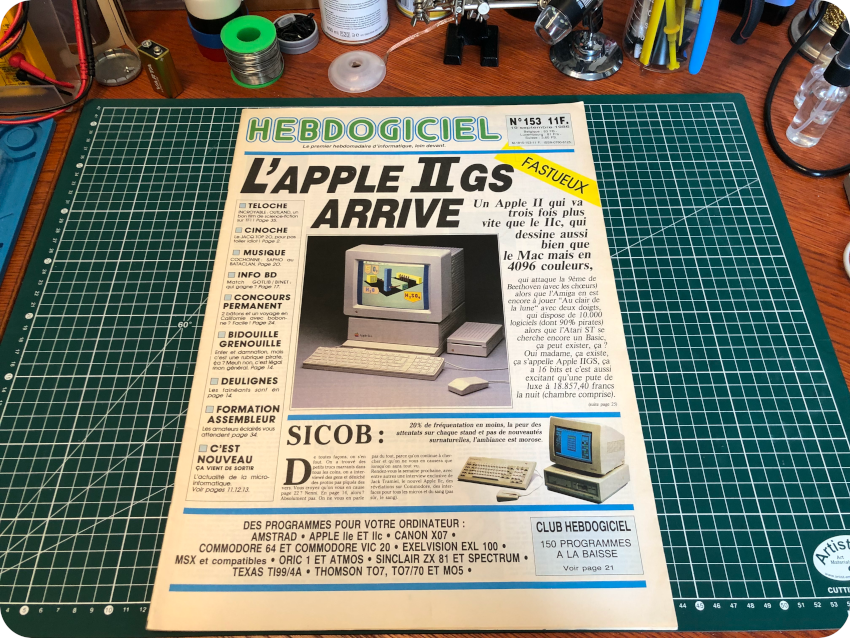
This is a computer I have been interested in since it was announced way back in 1986 (see below the cover of the Hebdogiciel French computer magazine “The Apple II GS is coming“), but I never used one.
However, it is not yet on my wish list of computers to acquire. Maybe testing it through an emulator will change my mind…
Here is a summary of my RecalBox configuration for the Apple IIGS:
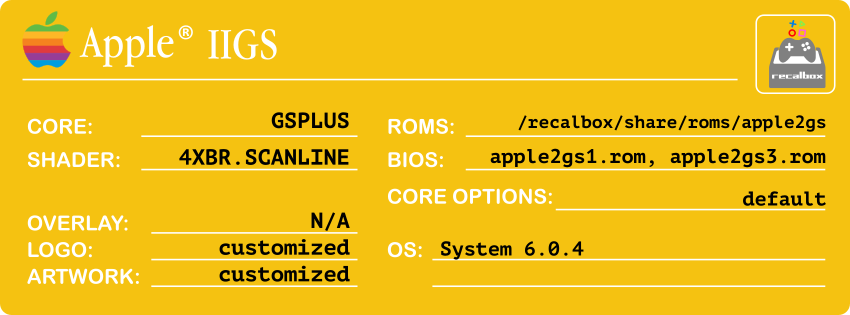
I used the “GSPlus” core that I tried for Apple II emulation. This is not a Libretro based core, so there is no overlay and little room for specific settings.
Its requires the following BIOS files (to be dropped in /recalbox/share/bios):
- apple2gs1.rom (mandatory)
- apple2gs3.rom (mandatory)
The theme I am using had no artwork nor logo for the Apple II GS, so I found a nice artwork and create a new logo:
- Artwork: apple2gs.jpg
- Logo: apple2gs.png
Here is how it looks:
Booting into GS/OS System 6.0.4 was rather simple. It was a matter of collecting an image disk from there;
I uploaded it to /recalbox/share/roms/apple2gs and labelle it “0 – SYSTEM: 6.0.4”:

Here is a screenshot of the core running GS/OS 6.0.4:
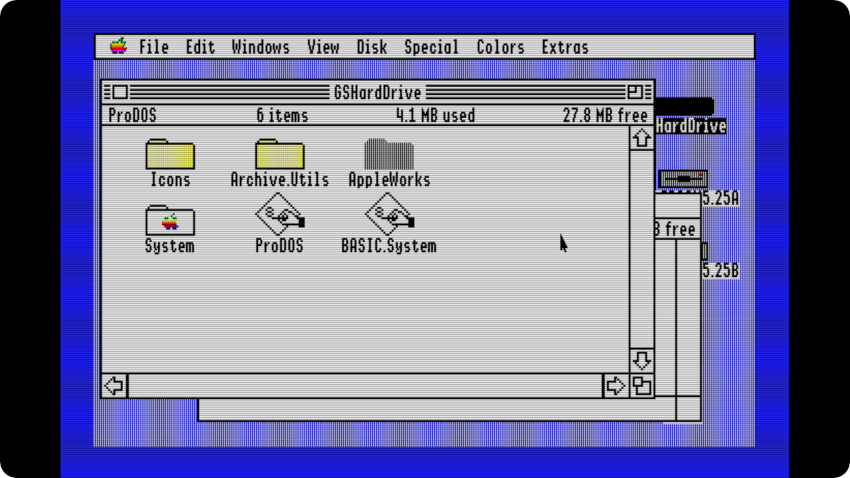
It really runs nice and smoothly ! It was the same for other ROMs. Here are a few other screenshots
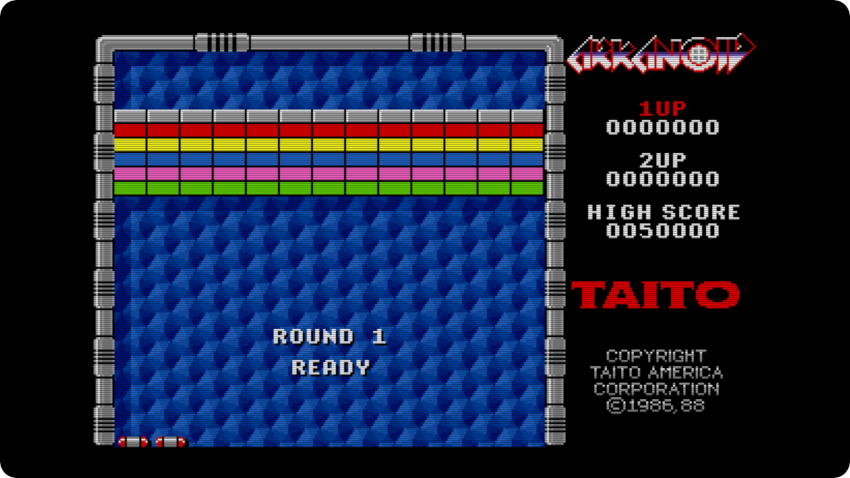
- Arkanoid for Apple IIGS:
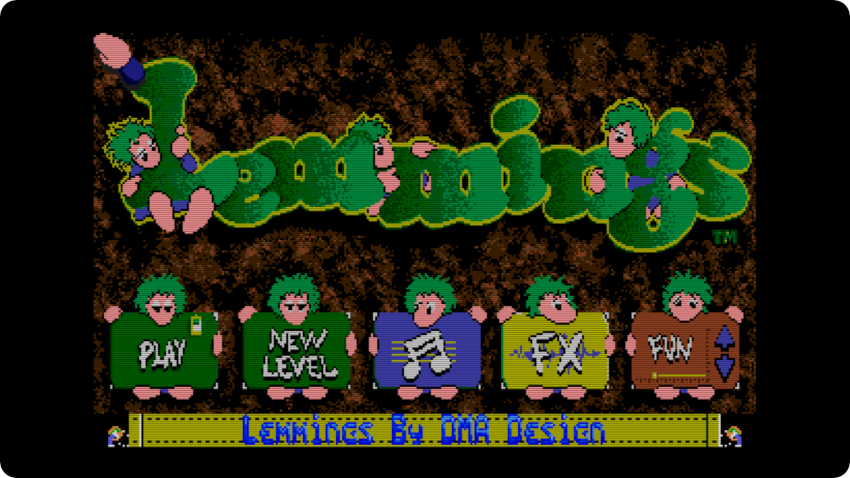
- Lemmings for Apple IIGS:
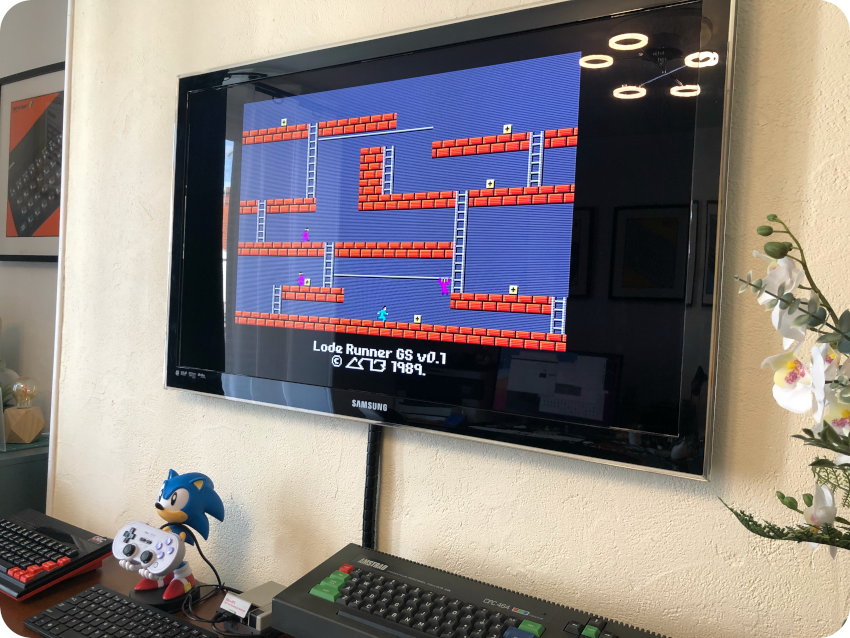
And here is a picture of Lode Runner for IIGS:
Here is a few links:
- Documentation
- Recalbox (GSPlus): https://wiki.recalbox.com/fr/emulators/computers/apple-2-gs/gsplus
- ROMs
- apple2.org.za (OS): https://mirrors.apple2.org.za/ftp.apple.asimov.net/images/gs/os/gsos/
- apple2.org.za (games): https://mirrors.apple2.org.za/ftp.apple.asimov.net/images/gs/games/
- YouTubers:
- Adrian’s Digital Basement: https://www.youtube.com/c/adriansdigitalbasement
- Action Retro: https://www.youtube.com/@ActionRetro
- Mr Luch’s Things: https://www.youtube.com/c/MrLurchsThings
Commodore 64
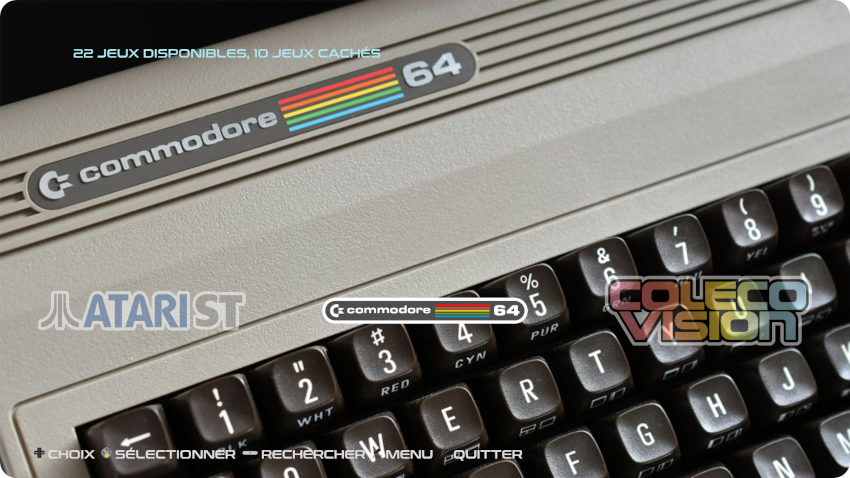
Let’s have a look at the mythical Commodore 64:
This is a vintage computer high on my wish list. I have a few leads, hopefully I will soon get my hands on one of them ! In the meantime, since this is a computer I never had the chance to real use, let’s try it in an emulator ! Here is my RecalBox configuration:
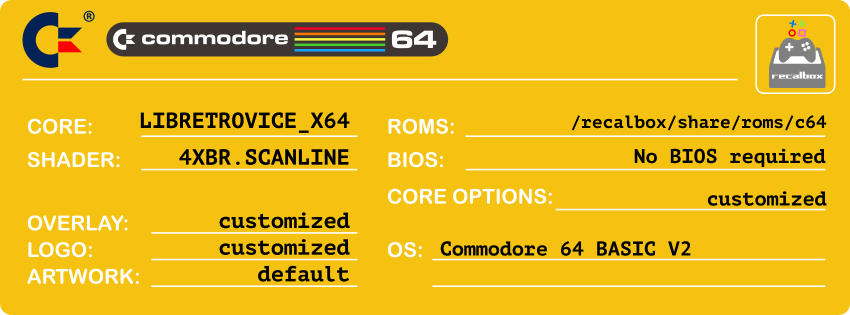
I selected the “Libretro VICE_X64” core. It is Libretro-based, meaning that it could customized the overlay and easily tweak core options.
The are no mandatory BIOS files needed, but there are a few optional ones, mostly to use JiffyDOS, to be dropped into /recalbox/share/bios/vice:
- JiffyDOS_C64.bin
- JiffyDOS_C128.bin
- JiffyDOS_C1541-II.bin
- JiffyDOS_1571_repl310654.bin
- JiffyDOS_1581.bin
Concerning the core options, I only changed one parameter:
- vice_drive_true_emulation = “disabled”: this speeds up loading time from .d64 (floppy disks), at the cost of minor incompatibilities (I did not run into while testing games)
I kepts the default artwork, but tweaked a little bit the C64 logo from the theme I use:
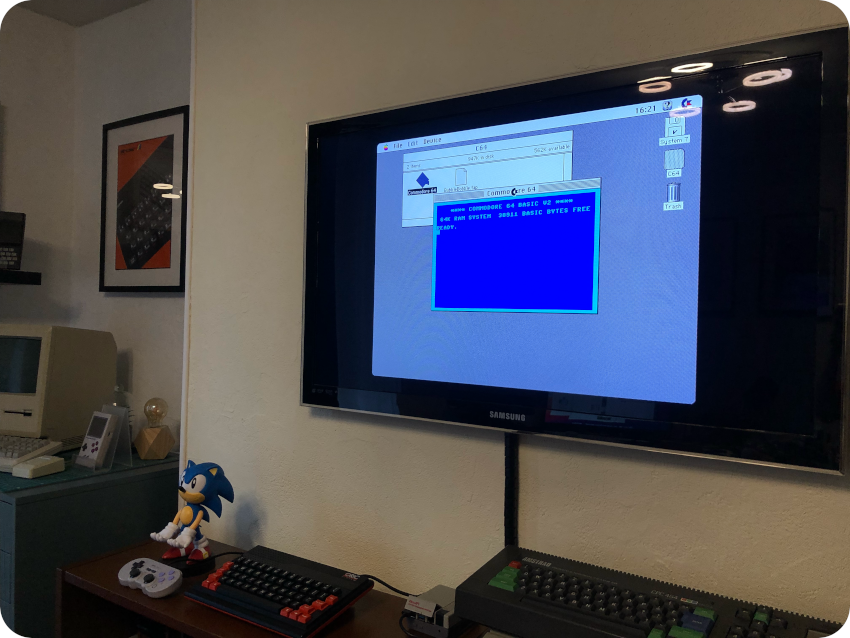
Here is how it looks:
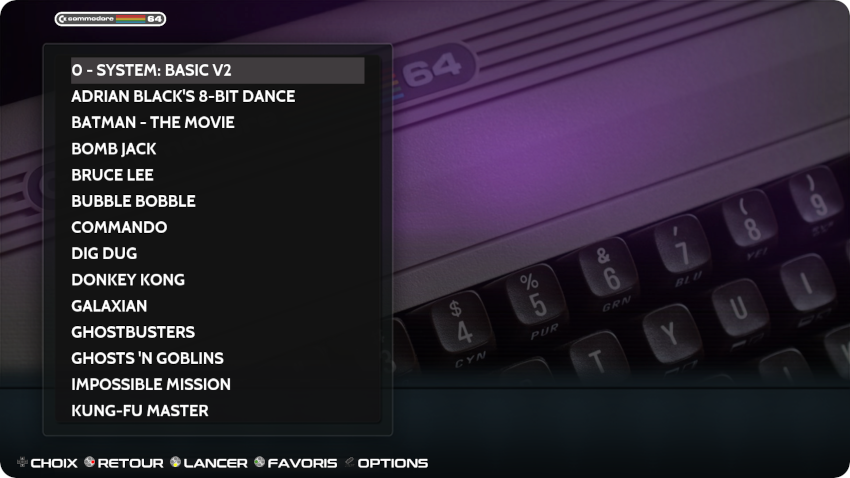
To boot into Commodore 64 BASIC V2, all I have to do was creating an entry in gamelist.xml (in /recalbox/share/roms/c64) pointing to a non-existing image disk (same dirty trick I used for the Matra-Hachette Alice). I labelled the entry “0 – SYSTEM: BASIC V2”:
I created a new overlay for the C64 that can be downloaded here (to be used using the overlay override process seen before, in /recalbox/share/overlays/c64): c64.png
Here is how it looks where using Commodore 64 BASIC V2:

Here are a few other screenshots:
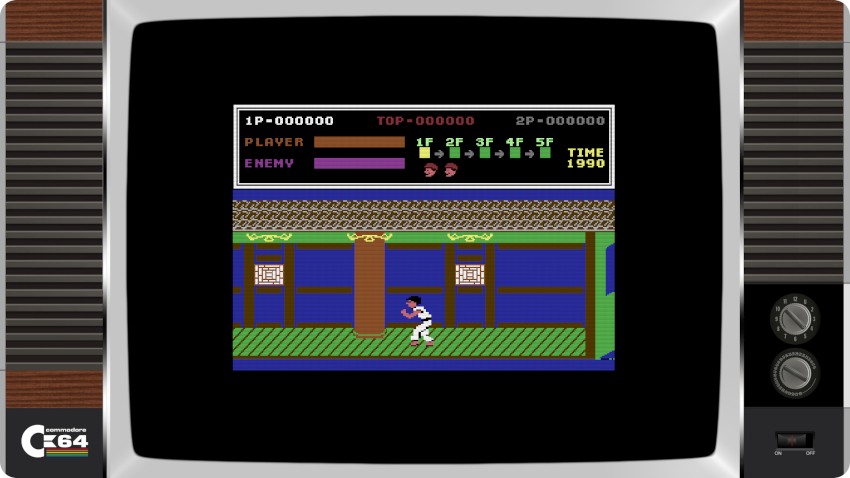
- Kung Fu Master:
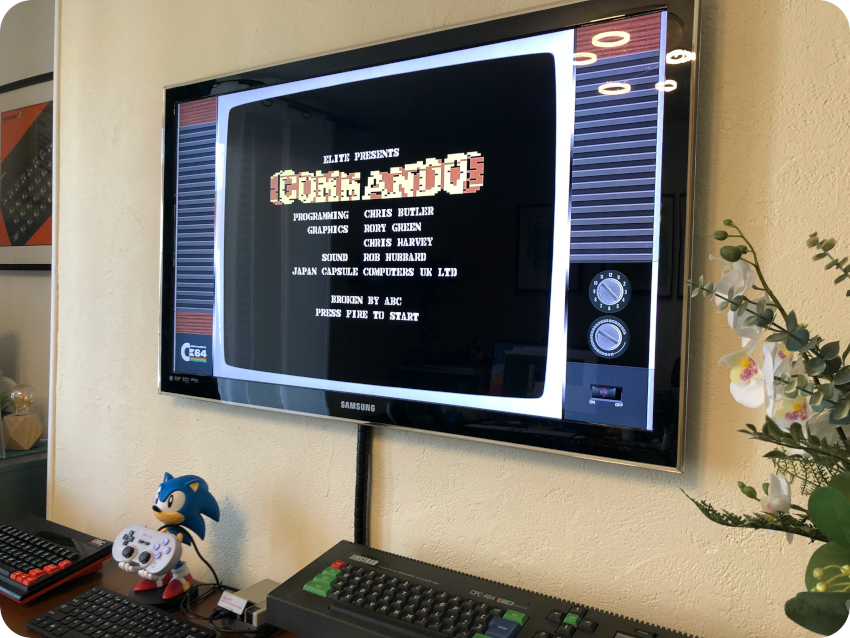
And here is a picture of the core running Commando:
Here is a few links:
- Documentation
- Recalbox (VICE_X64): https://wiki.recalbox.com/fr/emulators/computers/commodore-64/libretro-vice_x64
- ROMs
- Planet Emulation: https://www.planetemu.net/machine/commodore-64
- Edge Emulation: https://edgeemu.net/browse-c64-B.htm
- YouTubers:
- Adrian’s Digital Basement: https://www.youtube.com/c/adriansdigitalbasement
- The Retro Channel: https://www.youtube.com/@TheRetroChannel
- Jan Beta: https://www.youtube.com/c/JanBeta
- RMC – The Cave: https://www.youtube.com/c/RMCRetro
- Mr Luch’s Things: https://www.youtube.com/c/MrLurchsThings
- Retro is the new black: https://www.youtube.com/@RetroWK
- Mark Fixes Stuff: https://www.youtube.com/c/markfixesstuff
Amiga 500
Let’s continue with another vintage computer from Commodore: the Amiga 500:
This one is also on my wish list of computers to acquirer (and I have a few leads). I was an Atari ST fan … so I did not have one myself, but had a few friends who owned one. That been said, I am not that familiar with its system, so it is great to be able to emulate one before getting a real Amiga. Here is a summary of my RecalBox configuration:

There are several possible cores: Amiberry, Libretro PUAE and Libretro UAE4ARM. I tried all of them, and finally settled for UAE4ARM, because it is Libretro-based (thus, gives me latitude for overlays and settings), but most of all, because it gave me the best results when using Workbench 1.3.
Two BIOS files are mandatory (to be dropped into /recalbox/share/bios)
- kick34005.A500 (mandatory)
- kick40063.A600 (mandatory)
I tweaked the following parameters:
- uae4arm_model = “A500”: to emulate an Amiga 500
- uae4arm_resolution = “768×270”: to set higher resolution (nice with Workbench)
- uae4arm_floppy_speed = “800”: to speed up floppy access
- uae4arm_leds_on_screen = “off”: to turn off the LEDs indicators
I also tweaked the default artwork and logo of the theme:
- Artwork: amiga600.jpg
- Logo: amiga600.png
Here is the result:
To boot into Workbench, all I had to do is download a disk image from here: http://amigaga.chez-alice.fr/amigaos/download/index.htm
I upload the image to /recalbox/share/roms/amiga600 and labelled it “0 – SYSTEM: WORKBENCH 1.3”:
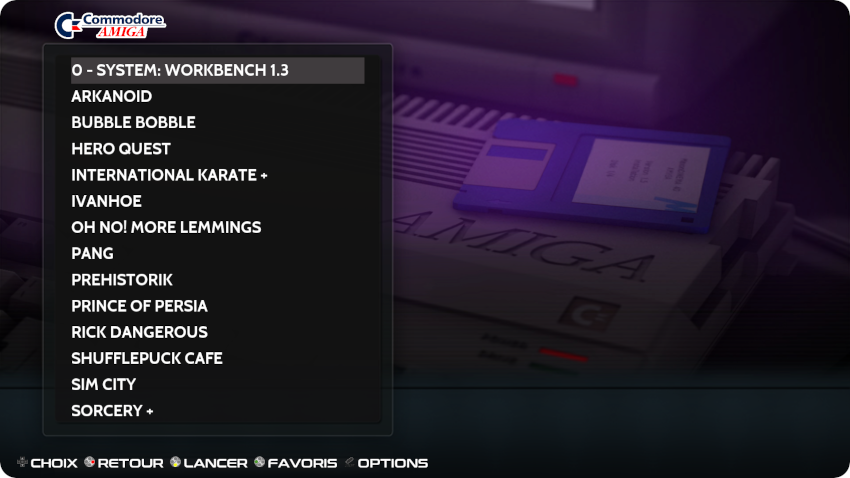
I created a new overlay for the Amiga that can be downloaded here (to be used using the overlay override process seen before, in /recalbox/share/overlays/amiga600):
- amiga600-overlay-2.png (to be renamed amiga600.png)
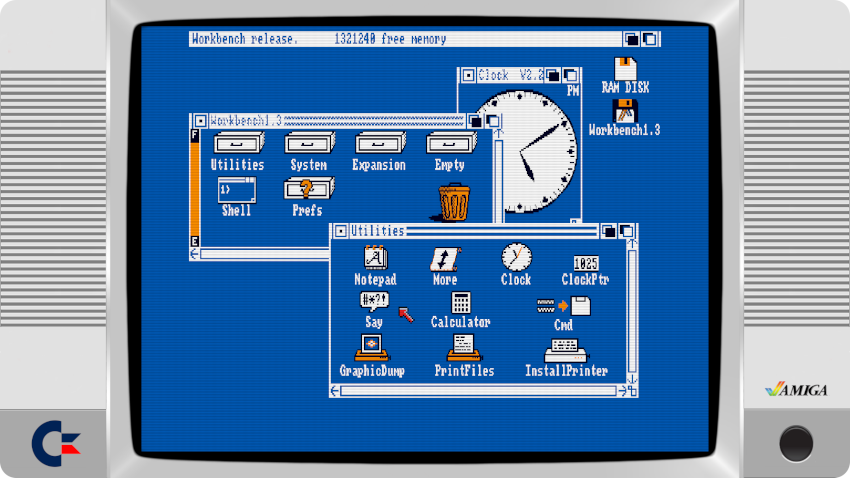
Here is a screenshot with the core running Workbench 1.3:
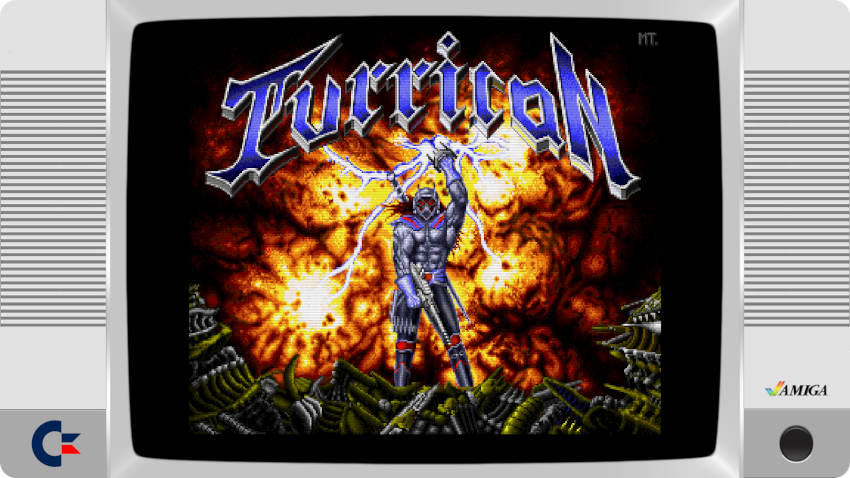
Here is another one with Turrican:
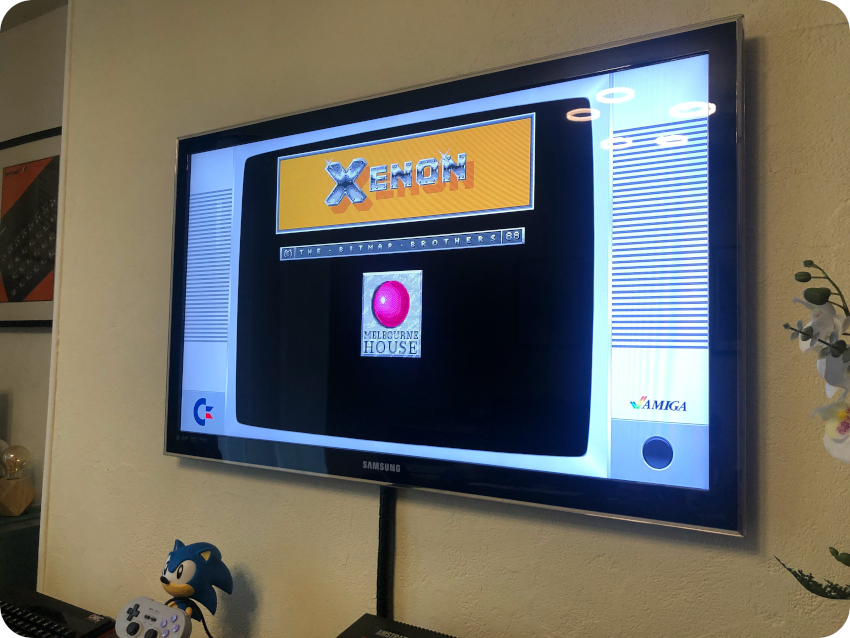
And finally, a picture with Xenon:
Here is a few links:
- Documentation
- Recalbox (UAE4ARM): https://wiki.recalbox.com/fr/emulators/computers/amiga-600/libretro-uae4arm
- ROMs
- Planet Emulation: https://www.planetemu.net/machine/amiga
- Edge Emulation: https://edgeemu.net/browse-amiga-num.htm
- YouTubers:
- Adrian’s Digital Basement: https://www.youtube.com/c/adriansdigitalbasement
- Jan Beta: https://www.youtube.com/c/JanBeta
- RMC – The Cave: https://www.youtube.com/c/RMCRetro
- Retro is the new black: https://www.youtube.com/@RetroWK
- GalaMoon Retrogaming: https://www.youtube.com/channel/UCHoSrYaPSHUIMXoXH3bRRbQ (French)
- Rodrik Studio: https://www.youtube.com/c/RodrikStudio (French)
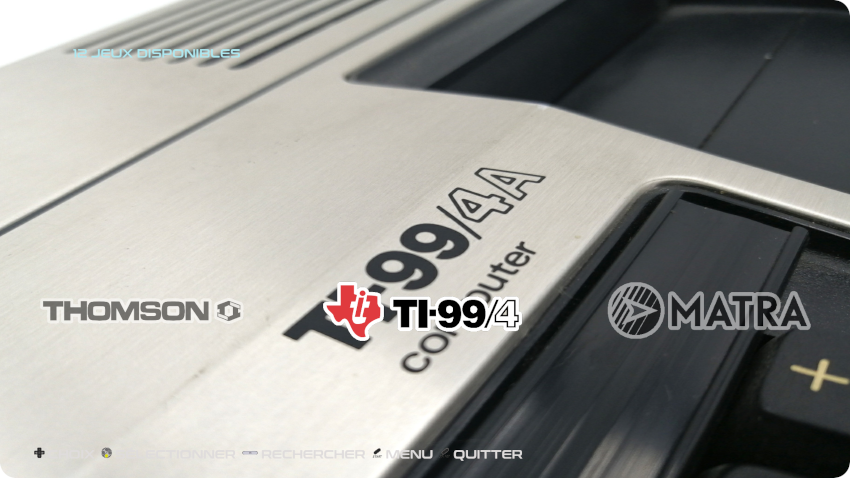
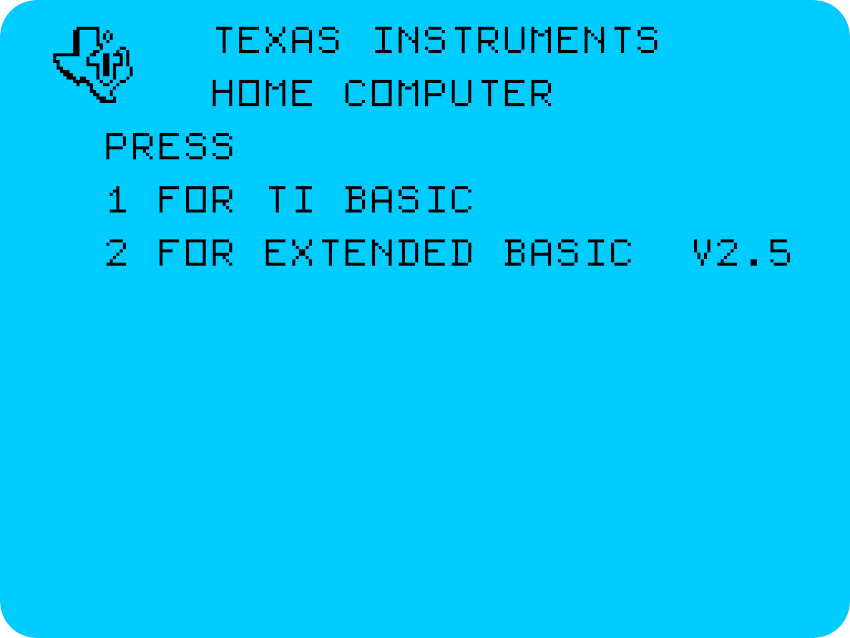
TI99/4A
And now … something completely different : the Texas Instruments TI-99/4A
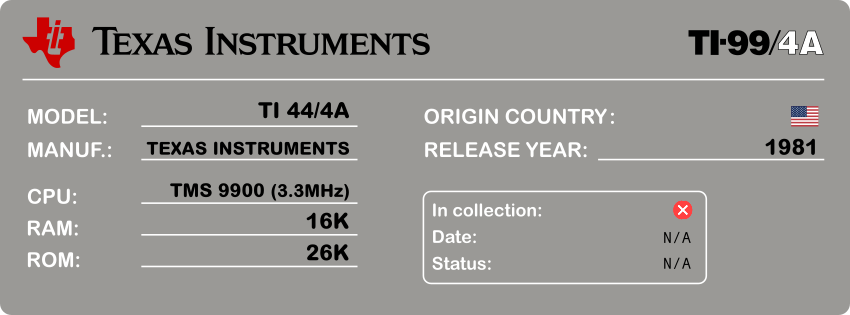
This is one of the earliest computers I have encountered. I didn’t own one, by my older cousin Patrick did, and, as a 10 years old kid, I was impressed (especially by the speech synthesis features). It is on my wish list (and I have also a few leads, crossing fingers). Here is my RecalBox configuration:
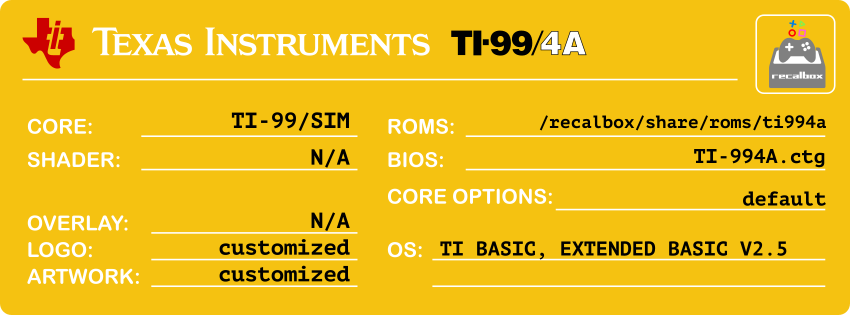
The TI-99/SIM core is not a Libretro-based (no overlays, little room for straighforward configuration tweaks) but works really well. It required the following BIOS files:
- TI-994A.ctg (mandatory)
- spchrom.bin (optional, for speech synthesis)
- ti-disk.ctg (optional, DOS)
I selected an artwork and created a logo for the theme. Here is how it looks:
TI-99/SIM only uses .ctg ROMS, which are not so easy to find. Fortunately, I found this treasure trove with 129 cartridge images:
Amongst these cartridges was one named “xb25.ctg” which is the image of this cartdrige:
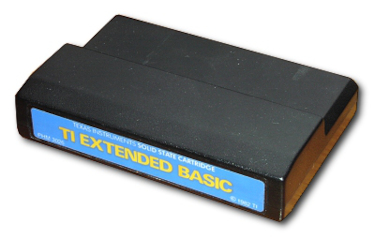
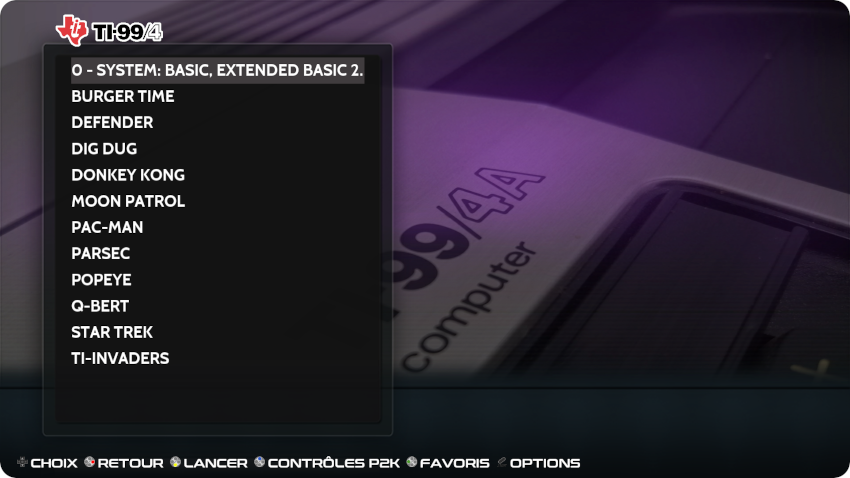
It includes both the TI BASIC and the EXTENDED BASIC V2.5. I dropped the image intor /recalbox/share/roms/ti994a and labelled it “0 – SYSTEM: BASIC, EXTENDED BASIC 2.5”:
Just like the LinApple, TI-99/SIM runs fullscreen, meaning that the 4/3 original display is stretched on a 16/9 screen:
Being a standalone core, there is no obvisous way to fix this (at least, I couldn’t find one). Of course, it is always possible to manually change to a 4/3 ratio via the Samsung TV settings:
Appart from this, the TI-99/SIM core runs perfectly well. Here are a few screenshots:
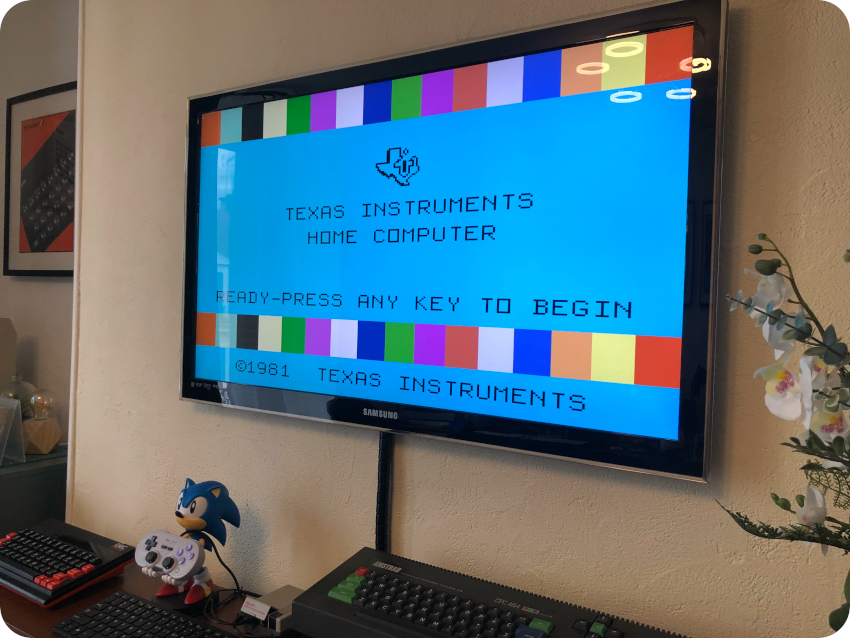
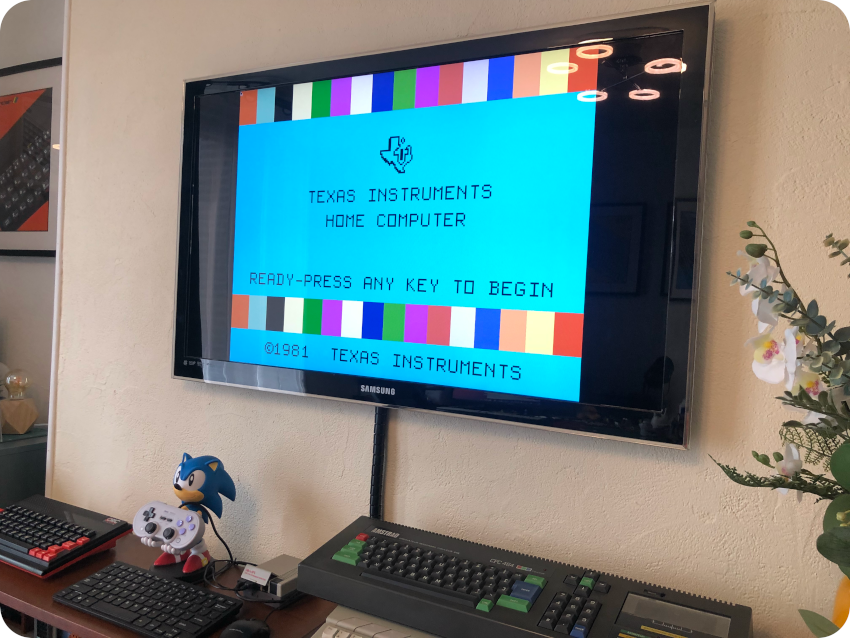
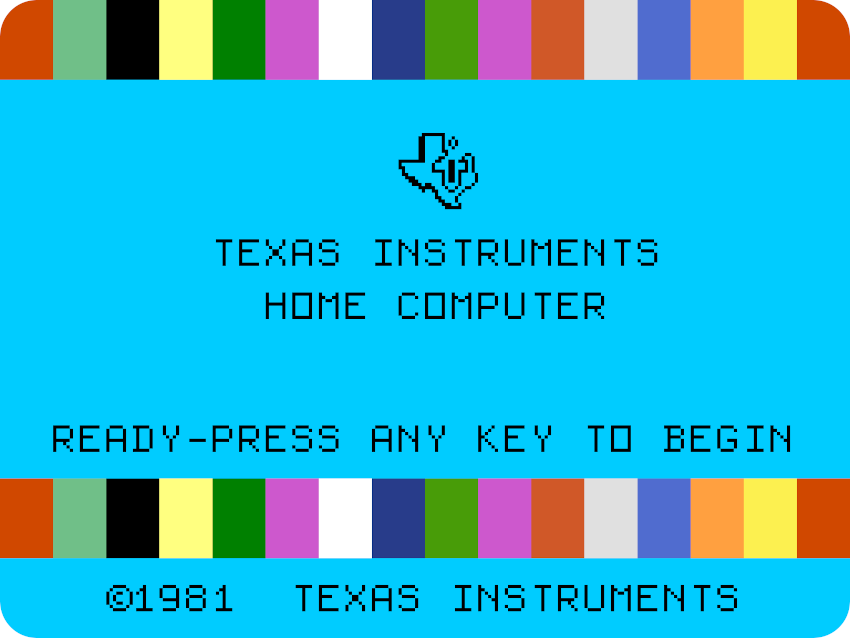
- The welcome screen:
- The menu for the TI Extended BASIC cartridge:
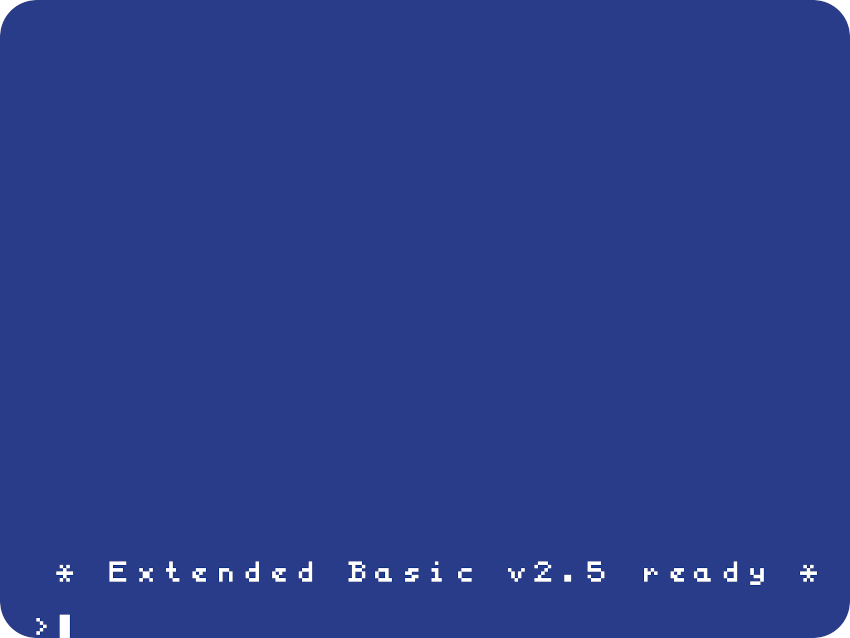
- The Extended BASIC 2.5
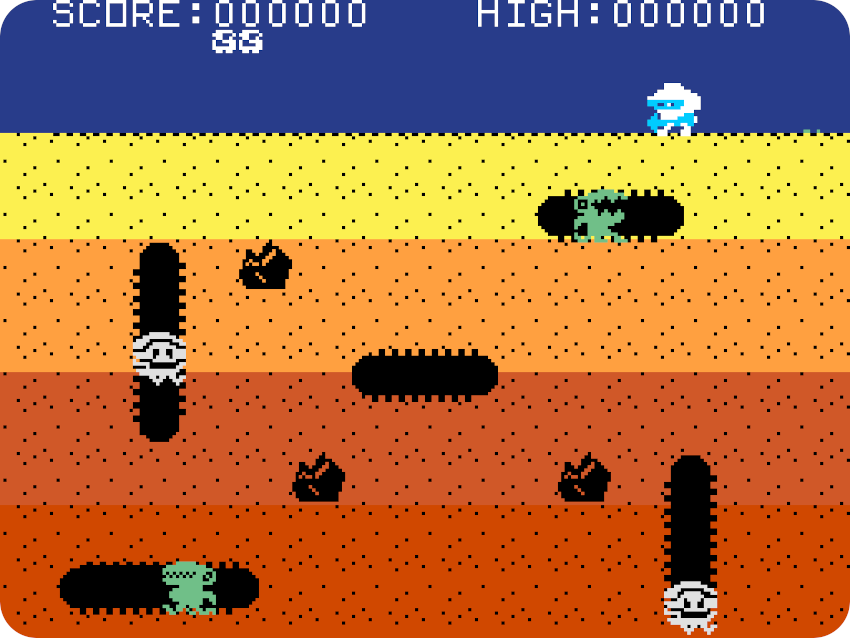
- Dig-Dug
- Parsec

I must say it is pretty impressive when compared to other 1981 computers !
To conclude this part on the TI99/4A, here is a picture of Burger Time.
Here is a few links:
- Documentation
- Recalbox (TI-99/SIM): https://wiki.recalbox.com/fr/emulators/computers/ti-99-4a/ti-99-sim
- ROMs
- 99er.net: http://www.99er.net/download2/index.php?act=view&id=254
- Edge Emulation: https://edgeemu.net/browse-amiga-num.htm
- YouTubers:
- Adrian’s Digital Basement: https://www.youtube.com/c/adriansdigitalbasement
- Mr Luch’s Things: https://www.youtube.com/c/MrLurchsThings
- GalaMoon Retrogaming: https://www.youtube.com/channel/UCHoSrYaPSHUIMXoXH3bRRbQ (French)
- Noel’s Retro Lab: https://www.youtube.com/c/NoelsRetroLab
MSX
MSX was a line of standardized home 8-bit computers. It was initially conceived in the early 80’s by Microsoft and the Japanese company ASCII Corporation. They were manufactured by quite a bit of companies, from Japan (NEC, Panasonic, Canon, Casio, Yamaha, Pioneer, Sanyo, Fujitsu, JVC, Sony, Toshiba, Mitsubishi, Sharp, Kyocera, …), Korea (Daewoo, Goldstar, Yeno, …), Netherlands (Philips), France (Radiola), Brazil (Gradiente Electrônica), … Therefore, there was a lot of MSX models available. For the sake of it, let’s focus on the Philips VG 8020:
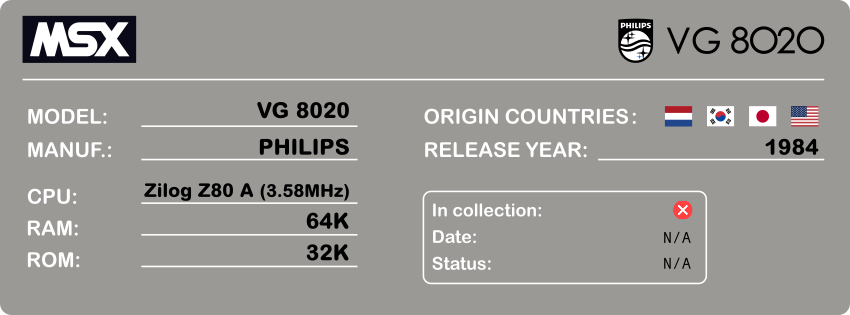
I did not own an MSX at the time, and, if memory serves, I don’t think any of my friends had one either. Of course, there were MSX computers everywhere in stores. But, at least in France, it wasn’t a huge success, probably because of the Amstrad CPC, which took over the market at the time.
Here is my configuration for RecalBox:
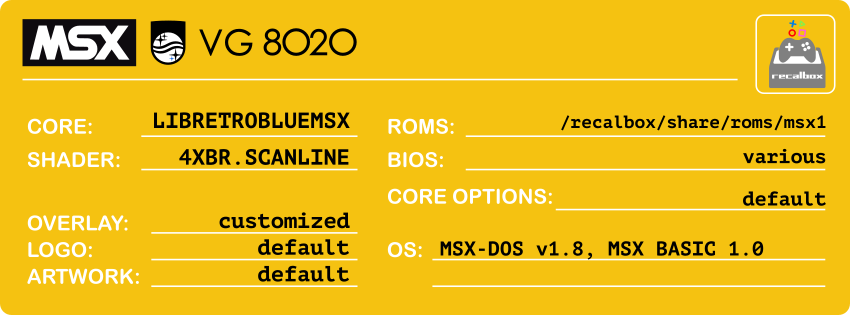
There are differents cores available in RecalBox for MSX emulation. I settled for blueMSX, with gave me the best results. It requires quite a bit of BIOS files, since it supports the many variations of the MSX standards / manufacturers. I recommand getting BIOS files from here and dropping the Machines folder into /recalbox/share/bios.
Since I am not very familar with the MSX line of computers, I didn’t tweak the core options.
Nor did I changed the default artwork, which was pretty nice:
To boot into MSX-DOS, I downloaded the MSX-DOS 1.8 (COMMAND 1.12) image disk here:
I uploaded it to /recalbox/share/roms/msx1 and labelled it “0 – SYSTEM: MSX-DOS V1.8”:

I slightly tweaked the overlay, available here: msx1.png
Here is a screenshot of MSX-DOS:
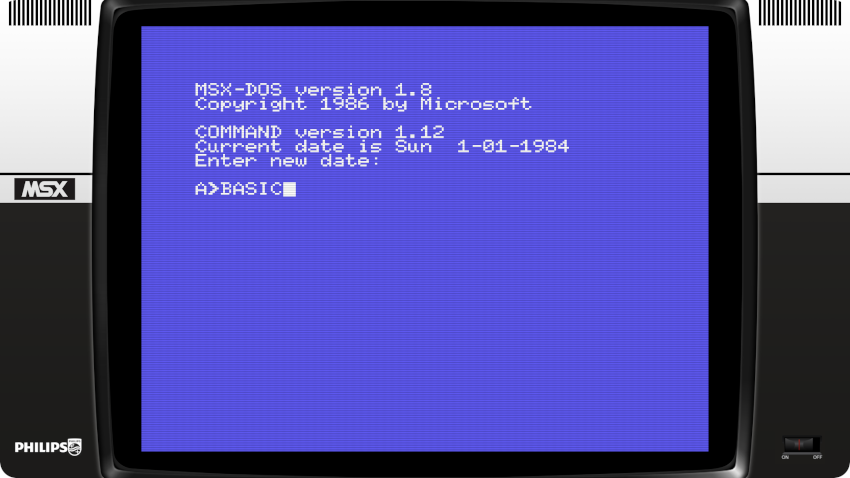
To launch MSX BASIC, juste type in “BASIC” at the prompt:
Here are a few other screenshots:
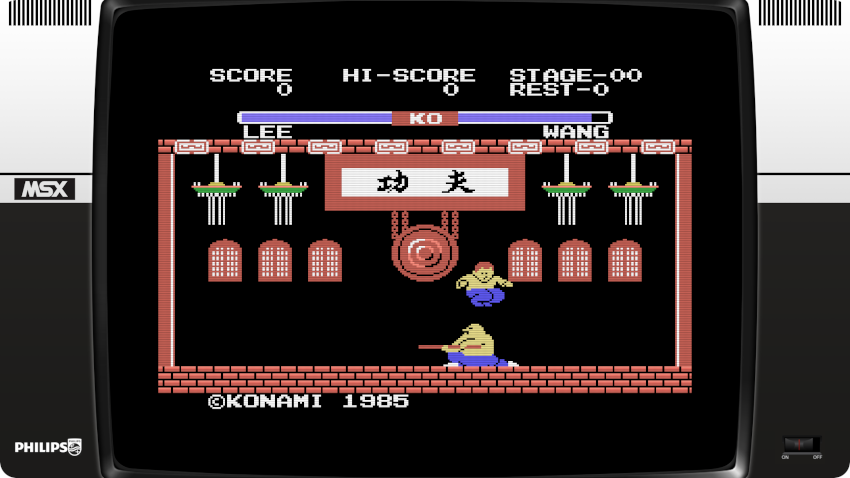
- Yie Ar Kung Fu
- Pac-Man

And, to conclude, here is a picture of Ghostbusters:

Note: I failed at installing SymbOS for MSX (http://symbos.de/download.htm), maybe I’ll give it a try again sometimes later.
Here is a few links:
- Documentation
- Recalbox (blueMSX): https://wiki.recalbox.com/fr/emulators/computers/msx-1/libretro-bluemsx
- ROMs
- Planet Emulation: https://www.planetemu.net/machine/msx-1-2
- msx.org: https://www.msx.org/downloads
- YouTubers:
- Adrian’s Digital Basement: https://www.youtube.com/c/adriansdigitalbasement
- Mr Luch’s Things: https://www.youtube.com/c/MrLurchsThings
- Noel’s Retro Lab: https://www.youtube.com/c/NoelsRetroLab
- Jan Beta: https://www.youtube.com/c/JanBeta
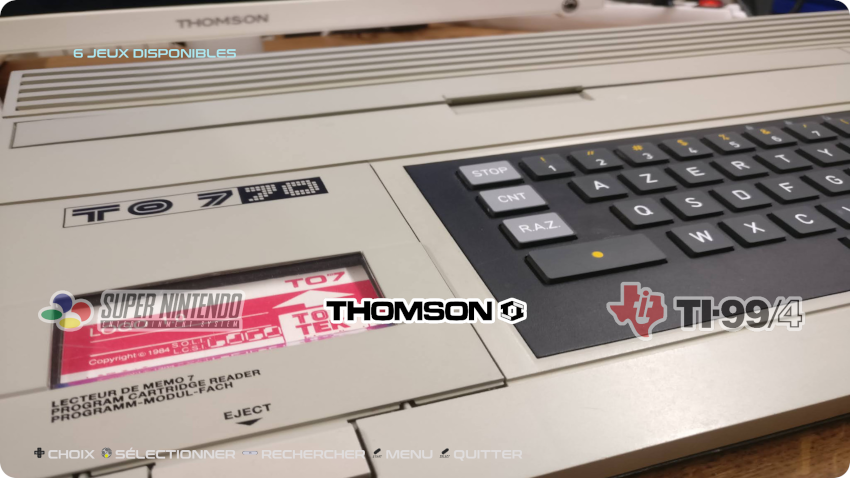
Thomson TO7
Let’s move on to a French line of 8-bits computers by Thomson. They were designed between 1982 and 1987 and marketed mainly in France. This line of computers is made up of two distinct series
- TO: “Télé-Ordinateur” Thomson 9000, TO7, TO7/70, TO8, TO9, TO9+
- MO: “Micro-Ordinateur” MO5, MO5E, MO5NR, MO6
Most of Thomson’s success is linked to the choice of the French government to equip schools with these models (“Informatique Pour Tous” plan).
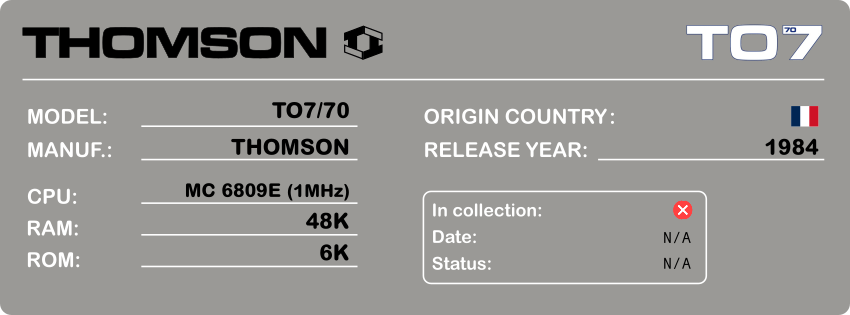
Not all schools were equipped though … and mine wasn’t. It’s a pity, because “nanoréseau” educational network features would probably have more than interested me. That been said, I had a neighbour friend that owned a TO7/70 computer, and, dare I say, I wasn’t impressed at all when compared to my Amstrad CPC. For about half the price of a TO7/70, my CPC kicked its butt so hard ! At least to my eyes at the time.
Maybe getting my hands on an emulated TO7/70 will reconcile me with it:
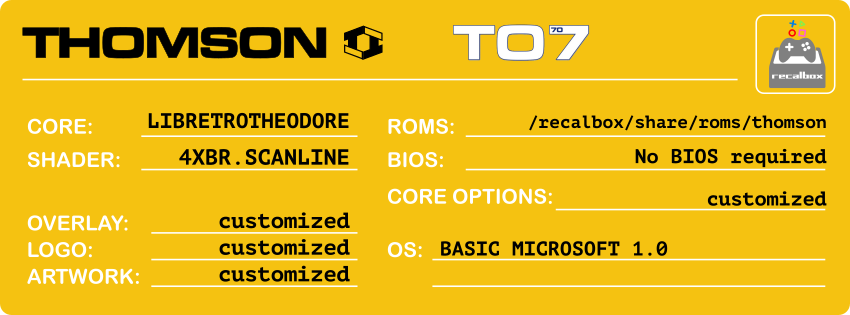
The Theodore core is Libretro-based, and easy to customized. It doesn’t need any BIOS file. I tweaked one core option:
- theodore_rom = “TO7/70”: to force the emulator into the TO7/70 mode
I added an new artwork and created a new logo for the theme:
Here is the result:
To boot directly into the welcome screen, I created an empty disk image with DCFDUTIL, available here: http://dcmoto.free.fr/emulateur/index.html
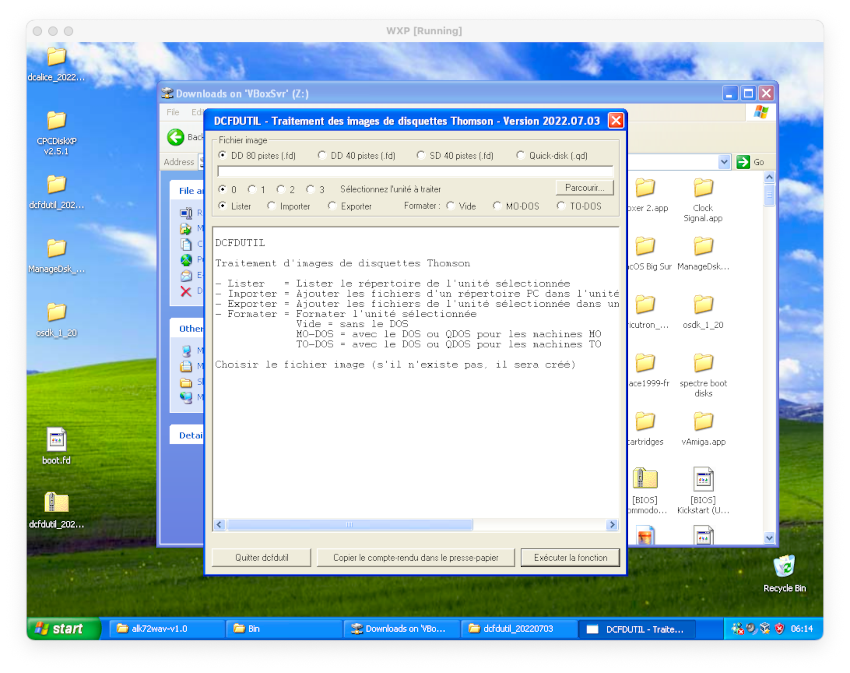
I uploaded the image disk to /recalbox/share/roms/thomson and labelled it “0 – SYSTEM: TO7/70”:
I created a new overlay, available here: thomson.png
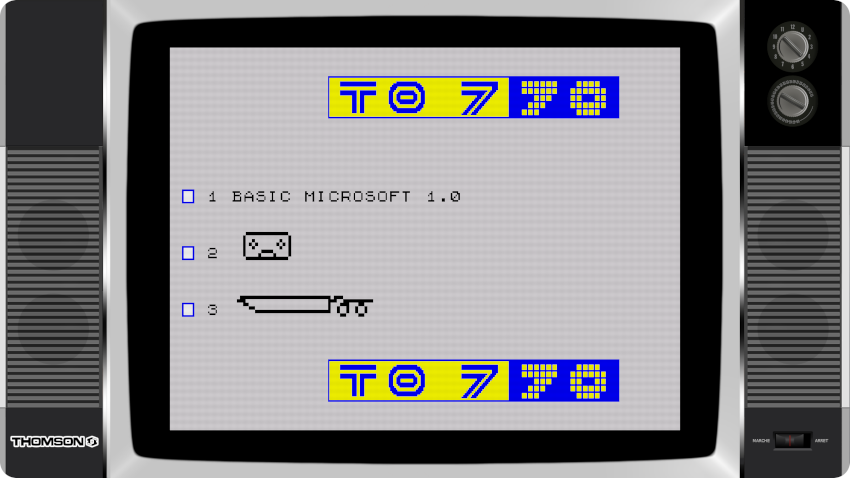
Here is the result with the welcome screen of the TO7/70:
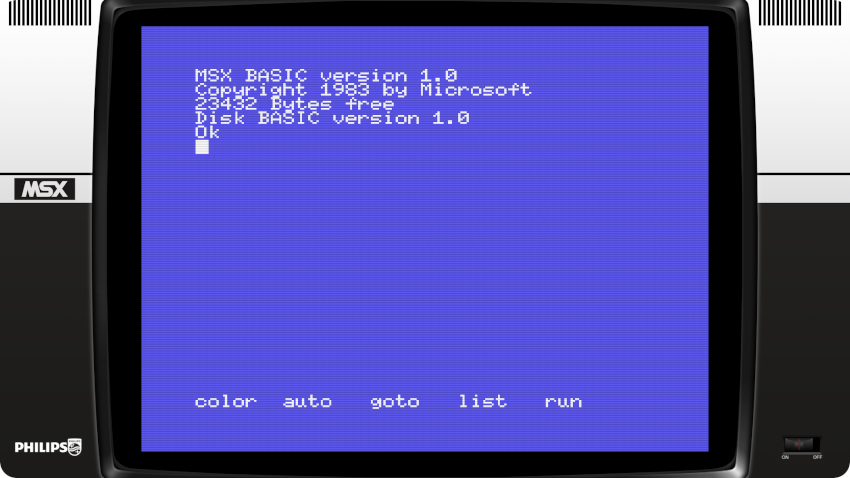
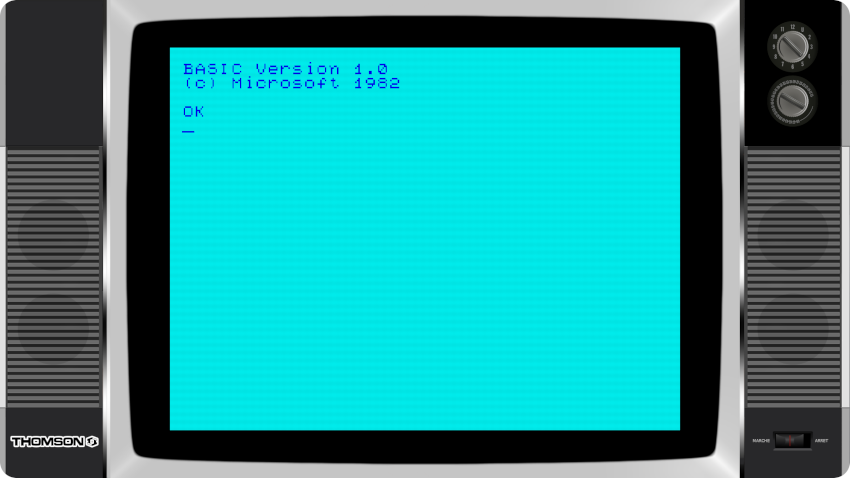
Here is a screenshot when selecting “BASIC MICROSOFT 1.0” in the menu:
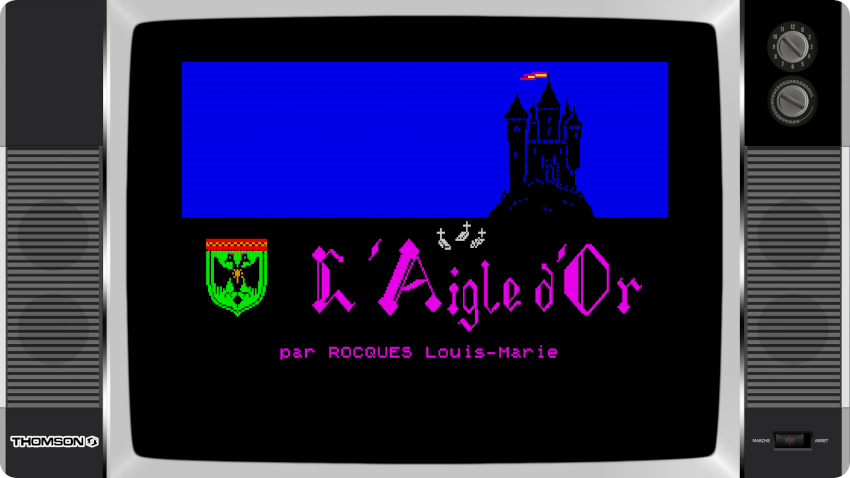
And here is a screenshot of “L’Aigle d’Or”:
To end this section on Thomson’s MO/TO computers, here is a picture of Arkanoid on the TO7/70 core:
Here is a few links:
- Documentation
- Recalbox (Theodore): https://wiki.recalbox.com/fr/emulators/computers/thomson-mo-to/libretro-theodore
- ROMs
- Planet Emulation: https://www.planetemu.net/machine/to7
- Dedicated web sites and forums:
- System.cfg Forum (8bits): https://forum.system-cfg.com/viewforum.php?f=1 (French)
- DCMoto: http://dcmoto.free.fr/index.html (French). Also a good source for software.
- YouTubers:
- GalaMoon Retrogaming: https://www.youtube.com/channel/UCHoSrYaPSHUIMXoXH3bRRbQ (French)
- Rodrik Studio: https://www.youtube.com/c/RodrikStudio (French)
Atari 800
Let’s try another set of 8-bit computers. The Atari 8-bit familiy was introduced in 1979 with the Atari 400 and the Atari 800:
This series was upgraded with the Atari 1200XL, Atari 800XL & Atari 600XL, and later on, during the Tramiel era, with the Atari 65XE, Atari 130XE, Atari 800XE or the XEGS console.
I did not own an Atari 8-bit machine myself, but the 600XL was popular in France. I must say, I did not know much – nor care much – about the Atari 800 until I watched Adrian Black’s and Mr Lurch’s videos. They changed my mind about this heavily shelded little fellow. It seems the Atari 800 is practically unobtainium here these days, so let’s give it a try virtually:
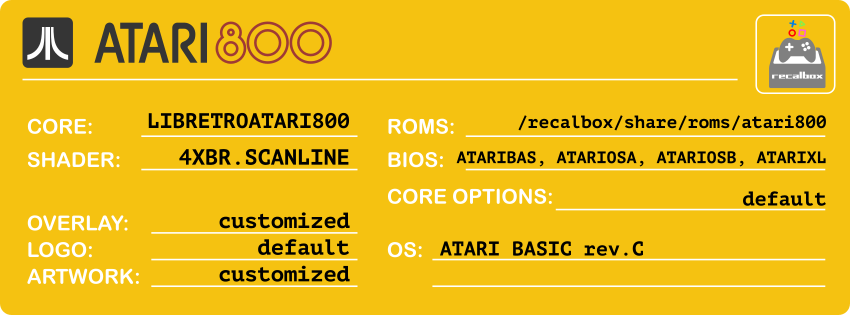
The Atari800 core is Libretro-based and easyly configured (though it did not change its default configuration). It needs the following BIOS files, to be dropped into /recalbox/share/bios:
- ATARIXL.ROM (mandatory)
- ATARIBAS.ROM (mandatory)
- ATARIOSA.ROM (mandatory)
- ATARIOSB.ROM (mandatory)
- ATARIXL.ROM (mandatory)
I updated the Atari artwork from the theme I use, and kept its nice logo. The artwork can be downloaded here:
Here is the result:
To boot into the Atari BASIC, all I had to do is download a image ROM here:
It corresponds to this Atari 800 cartridge:
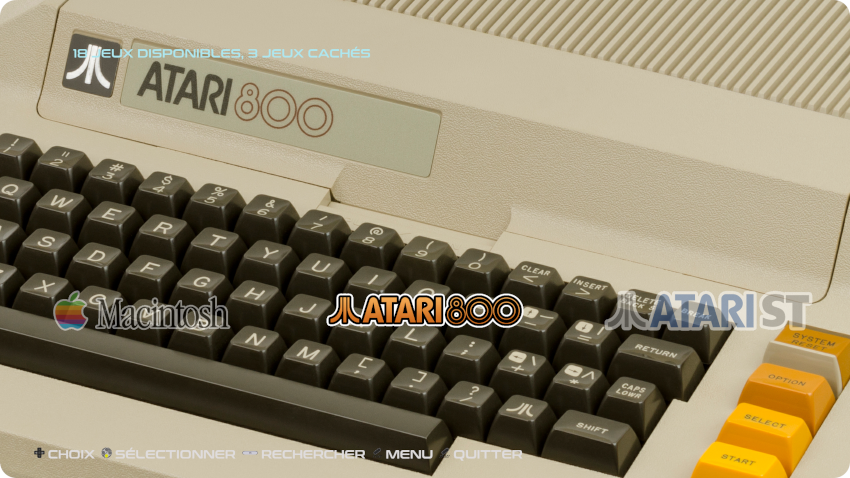
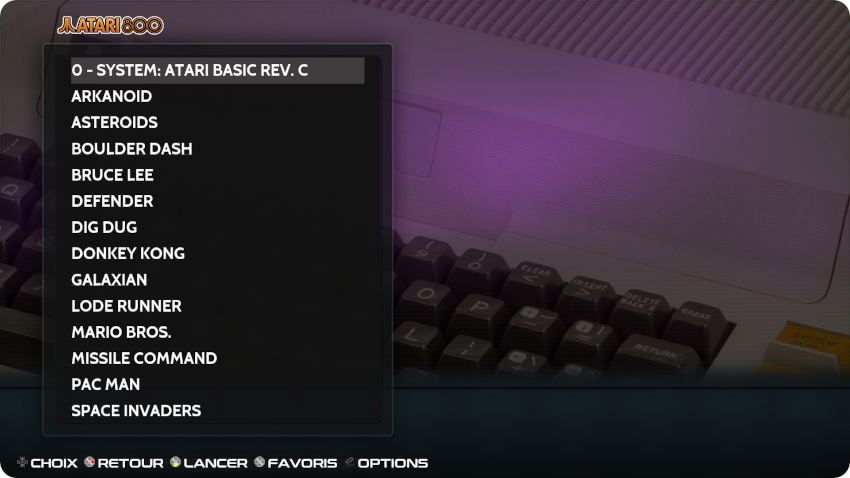
I uploaded the image into /recalbox/share/roms/atari800 and labelled it “0 – SYSTEM: ATARI BASIC REV.C”:
I created a customized overlay, available here: atari800.png
Here is the result with the core running the Atari BASIC REV.C:
Here are a few other screenshots:
- Pac-Man
- Galaxian
- Star-Wars

Let’s finish this section with a picture of Donkey Kong on the Atari 800:
Here is a few links:
- Documentation
- Recalbox (Atari800): https://wiki.recalbox.com/fr/emulators/computers/atari-800/libretro-atari800
- Dedicated web sites and forums:
- System.cfg Forum (8bits): https://forum.system-cfg.com/viewforum.php?f=1 (French)
- Atari Wiki: https://atariwiki.org/wiki/Wiki.jsp?page=Main
- ROMs
- YouTubers:
- Adrian’s Digital Basement: https://www.youtube.com/c/adriansdigitalbasement
- Mr Luch’s Things: https://www.youtube.com/c/MrLurchsThings
- RMC – The Cave: https://www.youtube.com/c/RMCRetro
IBM PC
Let’s conclude this long post … with a last but long section on PC/DOS emulation.
DOS gaming has been available on RecalBox for a long time, based on Dosbox. Since the 9.0 release, RecalBox is also bundeling Dosbox Pure, wich means that is can now also run Windows-based game. Nice ! Actually, it is Dosbox Pure and the support of Classic Macintoshes with MinivMac that triggered for me this vintage computer emulation madness !
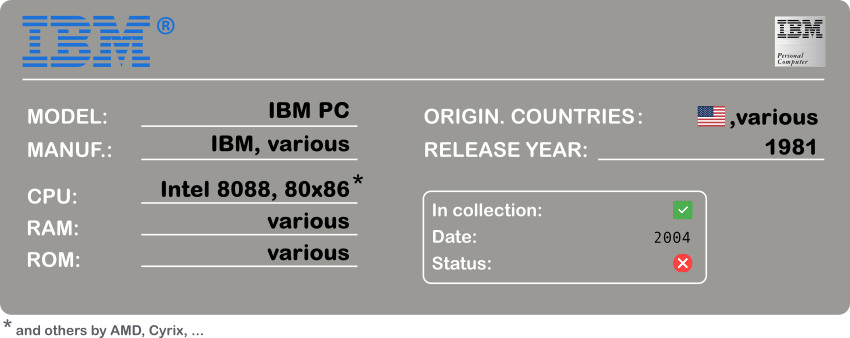
Of course, I owned PC compatible machines, mostly laptops, home-made desktop computers and a home made server for self hosting. I started to drop MS Windows for Unix-like OS in the late 90’s on most of these my machines, and lived happily ever after.
Nowadays, I use only Macintoshes and Raspberry Pi-based computers. This is a picture of an ASUS dual-Xeon motherboard from 2004, that was at the heart of the last home-made PC I built :

Here is a summary of my RecalBox configuration:
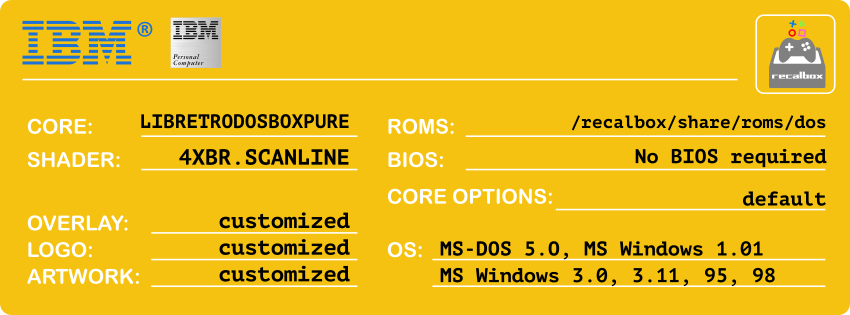
I used the Dosbox Pure core, which is Libretro-based. This core is easy to customize, though I did not change its default parameters for now. It doesn’t need any BIOS file.
I tweaked the default artwok and logo from the RecalBox theme I use:
Here is the result:

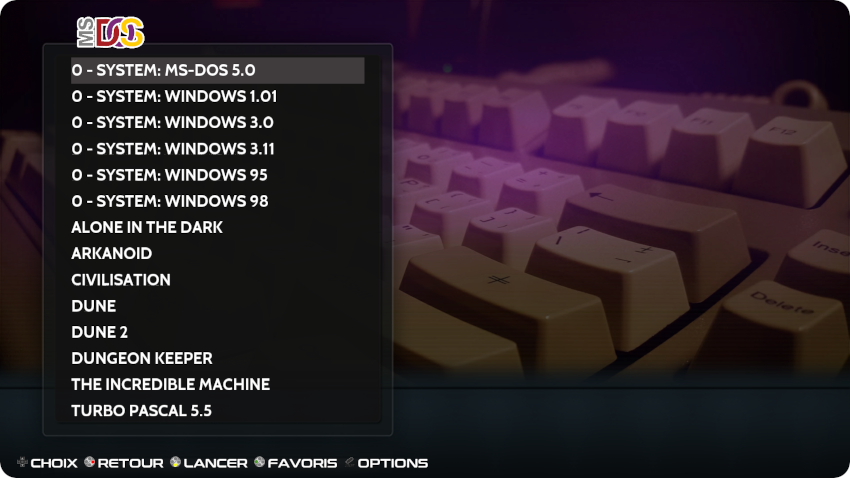
I tried to install as much possible Operating Systems as I could:
Note: make sure you hold the corresponding licence keys before any of these installations.
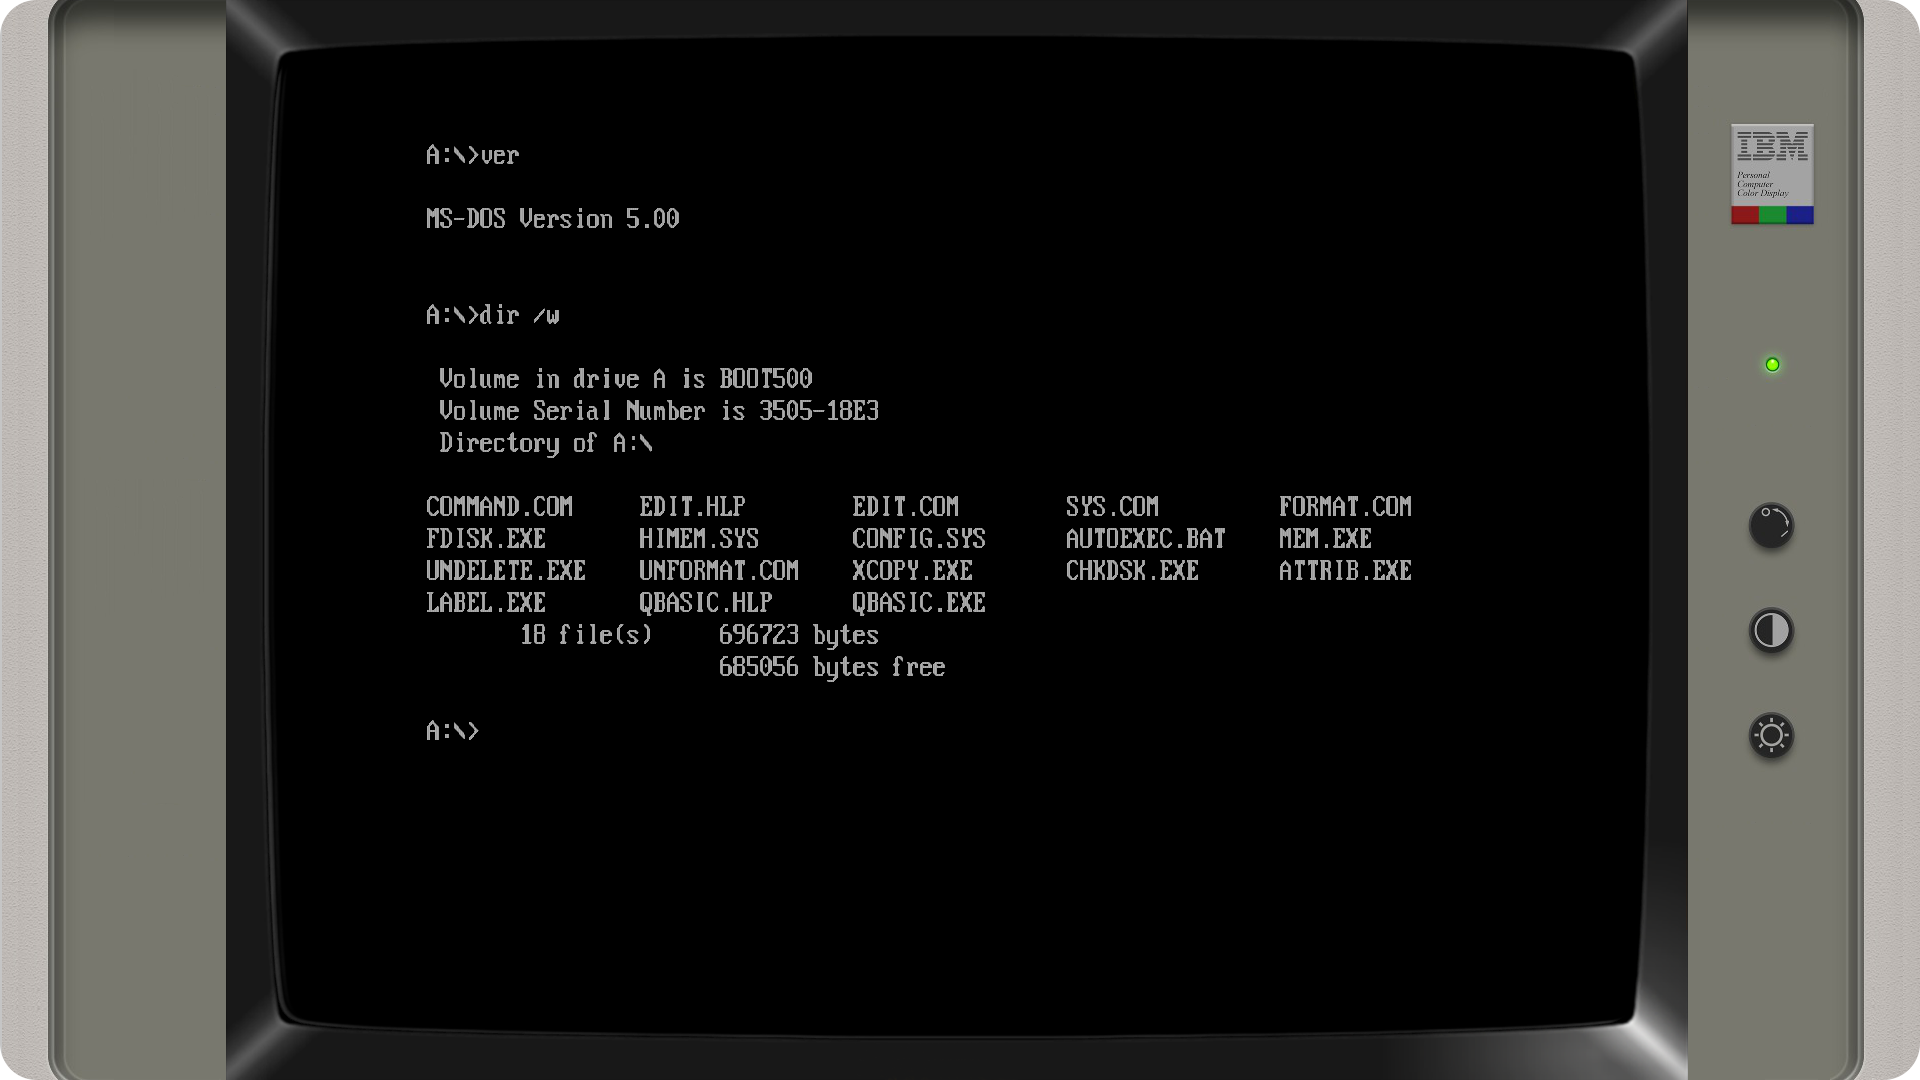
- MS-DOS 5.0
By default, DosBOX Pure provides a DOS 5.0-compatible “cocoon” for the software it runs. Nevertheless, I wanted be able to boot straight into MS-DOS 5.0 from a boot disk. This was quite easy. I grabbed a bootable from the Internet Archive:
I created a dos5.zip archive file and added the boot disk image, then uploaded the .zip file to /recalbox/share/rom/bios. and labelled it “0 – SYSTEM: MS-DOS 5.0”.
I also created a custom overlay, available here: dos.png
Here is the result:
- MS Windows 1.01
To boot into MS Windows 1.01, I downloaded an image floppy from the Internet Archive:
I followed the same procedure I used for MS-DOS: creating a windows1.zip archive, adding the bootable floppy image and uploaded the .zip file to /recalbox/share/rom/dos. I labelled this image “0 – SYSTEM: WINDOWS 1.01”.
Here is the result:
The overlay I created wasn’t suited for the EGA display mode this image uses. So, I tweaked it a bit and created this new overlay:
To override the default configuration and use this particular overlay for that specific image, I did the following:
- create a “windows1.zip.cfg” file into /recalbox/share/overlays/dos, with the following content:
input_overlay = “/recalbox/share/overlays/dos/windows1_overlay.cfg”
input_overlay_enable = “true”
input_overlay_opacity = “1.0”
input_overlay_hide_in_menu = “true” - create a “windows1_overlay.cf” file into /recalbox/share/overlays/dos, with the following content:
overlays = 1
overlay0_overlay = dos-ega.png
overlay0_full_screen = true
overlay0_descs = 0 - drop the “dos-ega.png” overlay .png file into /recalbox/share/overlays/dos
Here is the result:
Better, but not perfect (still a bit cropped). But … oh man, I had no recollection of how bad Windows 1.0 was. And … I stopped right there !
- MS Windows 2.x
I failed miserably at installing MS WIndows 2.x. I tried a plain vanilla version, as well as the 286 and the 386 versions. The installation went well for all of them. But, each time, it froze after the boot Window logo, with random characters appearing.
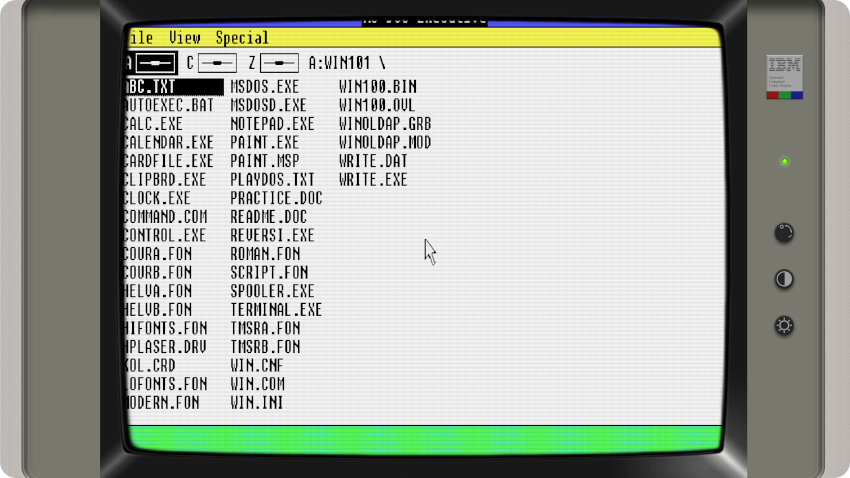
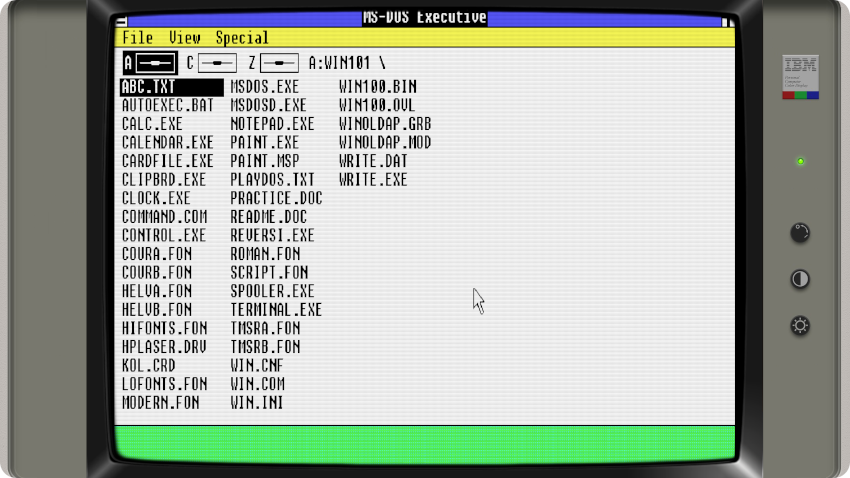
- MS Windows 3.0
After the failure of Windows 2.x, I went the easy way. I found a MS Windows 3.0 hard drive image on the Internet Archive:
I proceeded as usual: creating a windows30.zip archive, adding the image, uploading the .zip file to /recalbox/share/rom/dos. Easy peasy !
- MS Windows 3.11
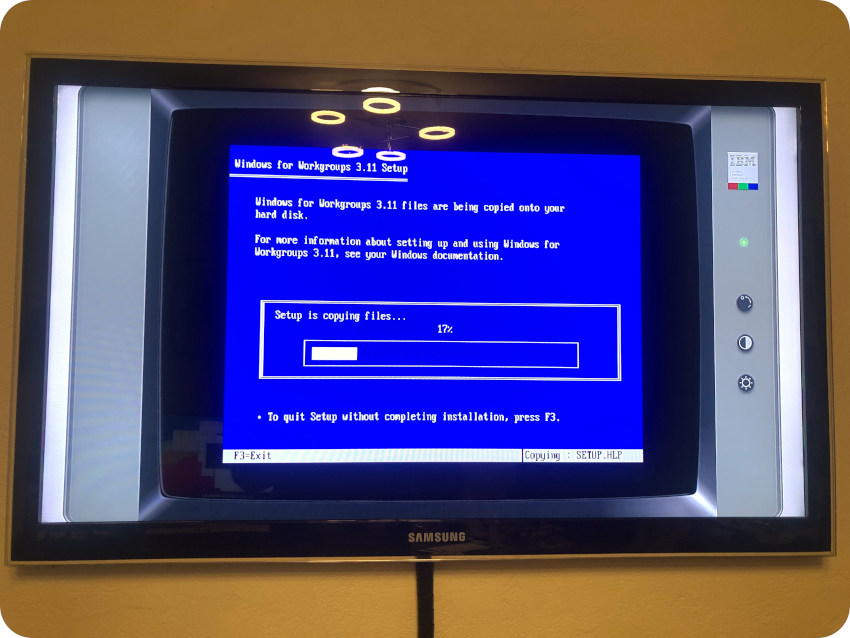
For Windows 3.11, I decided to proceed to a more usual installation. I couldn’t not find a bootable .iso, only a collection of floppy images, like it was back in the days:
I followed this procedure:
- I downloaded the archive from WinWorld
- Unzipped the archive
- Mounted each of the floppy images that were inside the archive
- Created a windows311 folder
- Copied the content of each mounter floppy image into the windows311 folder
- Zipped the windows311 folder into windows311.zip
- Uploaded windows311.zip into /recalbox/share/roms/dos and labelled it “0 – SYSTEM: WINDOWS 3.11”
I clicked on the “0 – SYSTEM: WINDOWS 3.11”, then selected the “SETUP.EXE” program to start the installation process:
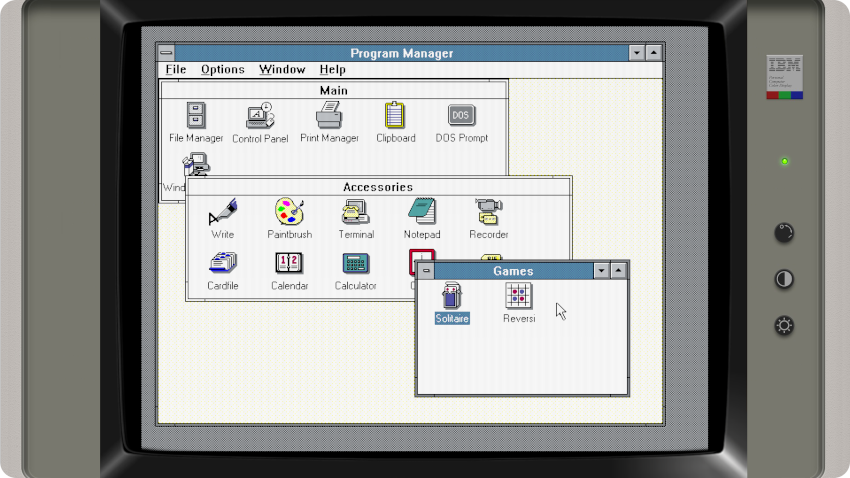
I completed each step (skipping the network configuration) until the end of the setup, then rebooted and selected the newly created “AUTOEXEC.BAT” file to launch Windows 3.11.
I was welcome by the boot screen, alas the Program Manager window was empty (no group icons). From the “File” menu of the Program Manager, I was able to explore the disk, and launch “NOTEPAD.EXE” on PROGRAM.INI, Its [GROUPS] entries appeared to be corrupted (as reported in the old KB “Q85960: Group Icons Missing After Windows 3.1 Installation“).
Once fixed by hand with proper values, I restarted Windows. Et voilà !

How nice ! Fancy a game of Solitaire ?
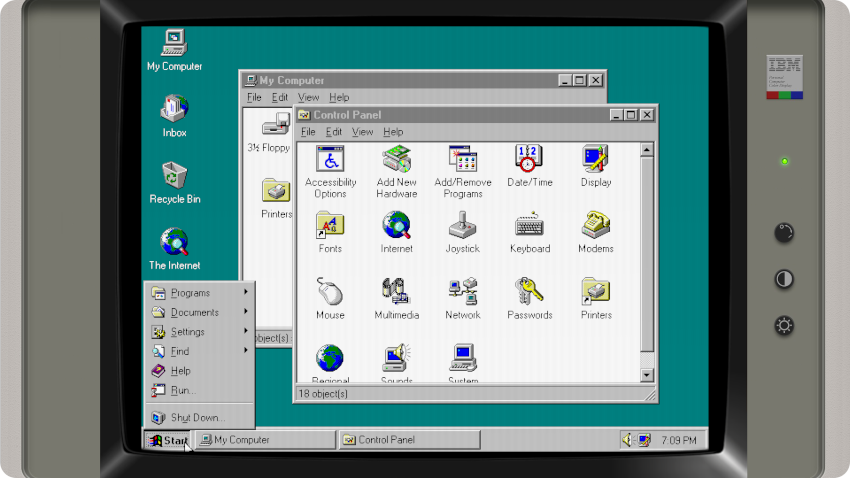
- MS Windows 95
Time to install Windows 95 ! For this, I downloaded an ISO image and a boot floppy disk (required if the ISO is not bootable):
- https://winworldpc.com/product/windows-95/osr-2
- https://winworldpc.com/product/microsoft-windows-boot-disk/95-osr2x
[Edited 19/04/2023 to add the boot floppy disk, thanks to @SteamPirate for the remark]
I followed the now usual procedure:
- Create a windows95.zip archive
- Add both images to windows95.zip
- Upload windows95.zip to /recalbox/share/roms/dos
- Label it “0 – SYSTEM: WINDOWS 95” and click to start the installation
The DosBox Pure Start Menu automounts the ISO image and proposes to Boot from it to install a new Operating System:
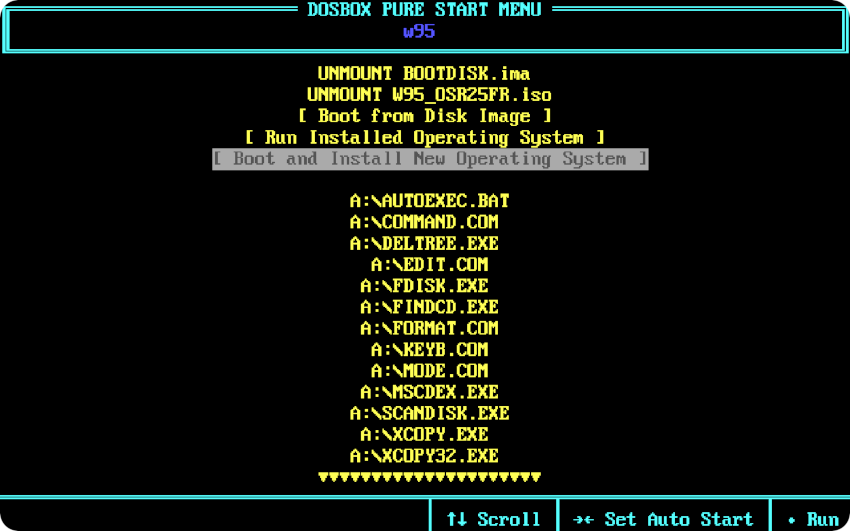
[ Screenshot taken from the Recalbox Wiki ]
From this menu, it proposes to create a new hard disk image, which will be created into /recalbox/share/bios, in my case “/recalbox/share/bios/windows95.img“:
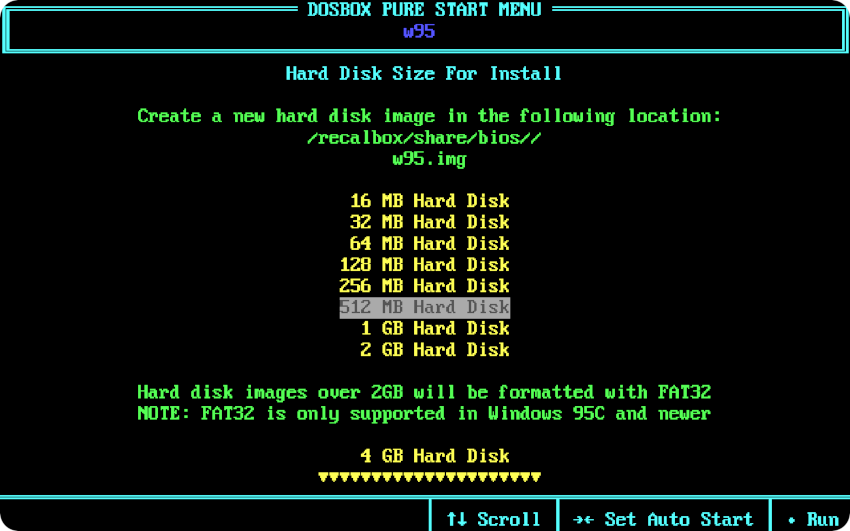
[ Screenshot taken from the Recalbox Wiki ]
Once created, it boots off the ISO image, and starts the setup process:


There we go ! Very, very nice !
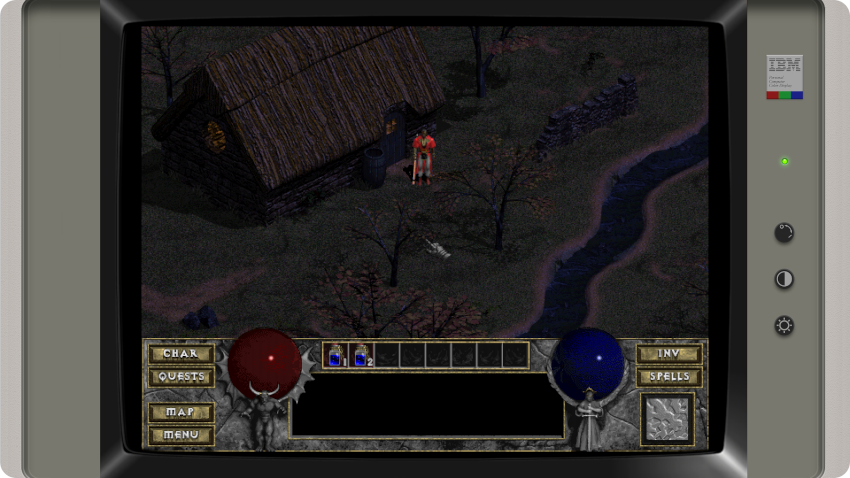
I must say the whole process was really smooth ! The Operating System is really stable. Thus, I went forward and installed a few Windows 95 games:
- Diablo II
- Civilization II
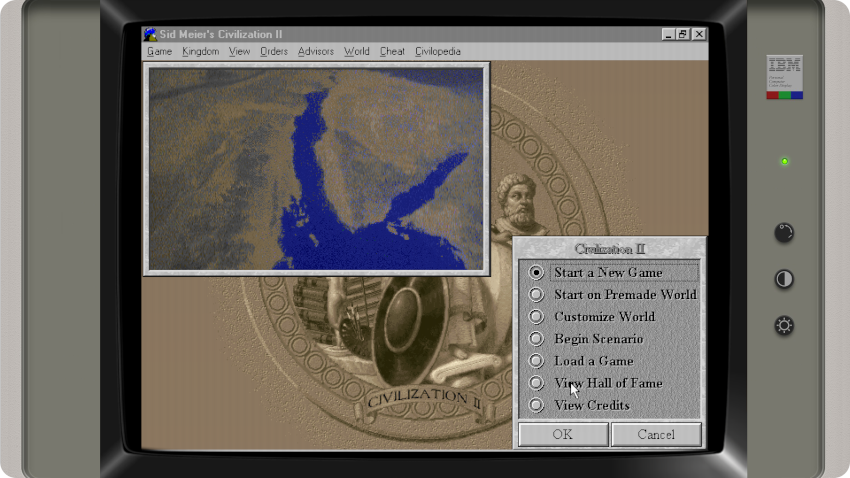
Really, really nice !
- MS Windows 98
Let’s move on and install MS Windows 98. I went straight to WinWorld and grabbed a bootable ISO:
I followed the exact same procedure as Windows 95. But, Windows 98 being what it is, it was a bumpy ride, with many, many crashes (and curse words) !


A tried different versions: First Edition, Second Edition, OEM, Retail, … In the end, installing the simplest possible configuration, without network support, I managed to finish the installation and get a (somewhat) stable system

Note: if, like me, you proceeded to numerous installations, even if you deleted the /recalbox/share/bios/windows98.img file, you would end with multiple references of your tries in the Dosbox Pure Start Menu:
- WINDOWS98,
- WINDOWS98(2),
- WINDOWS98(3), …
If you want to clear the menu, invoque the RetroArch menu pressing [hot key] + [B]:
In the RetroArch menu, select: “Audio Options > MIDI Output > Scan System Directory“:

This will clean the cache, leaving only the actual entries.
- Games
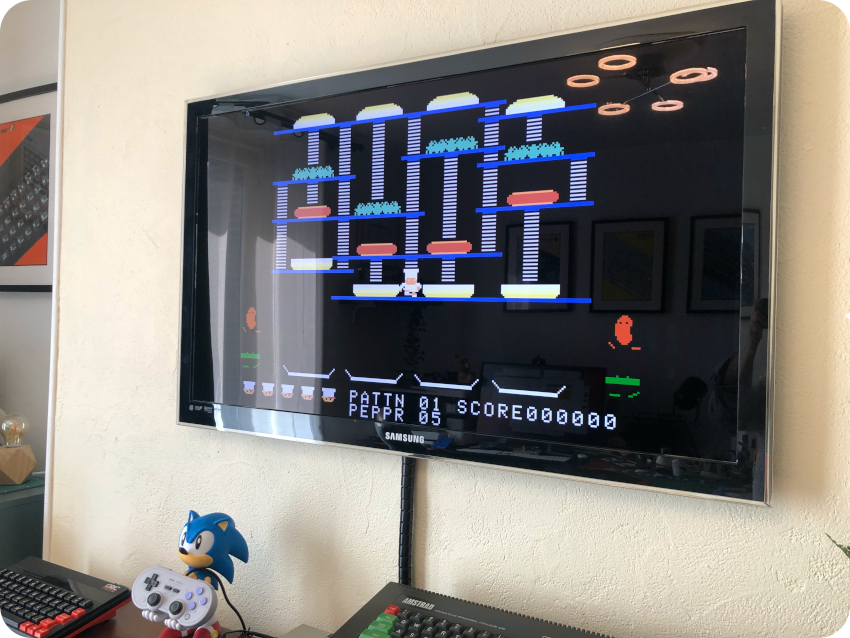
I had a few games that were working nicely with Dosbox. Making them work with Dosbox Pure was as simple as replacing each game folder with a zip archive of the said folders. Here is a few screenshots:
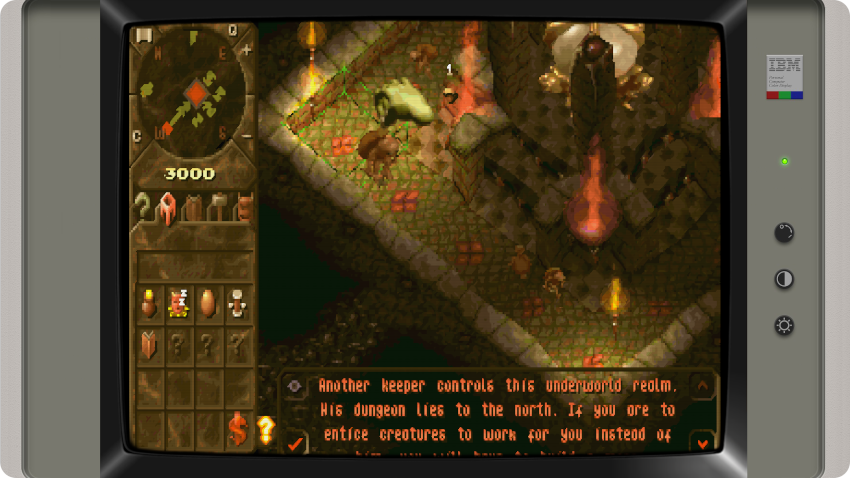
- Dungeon Keeper (I love that game !)
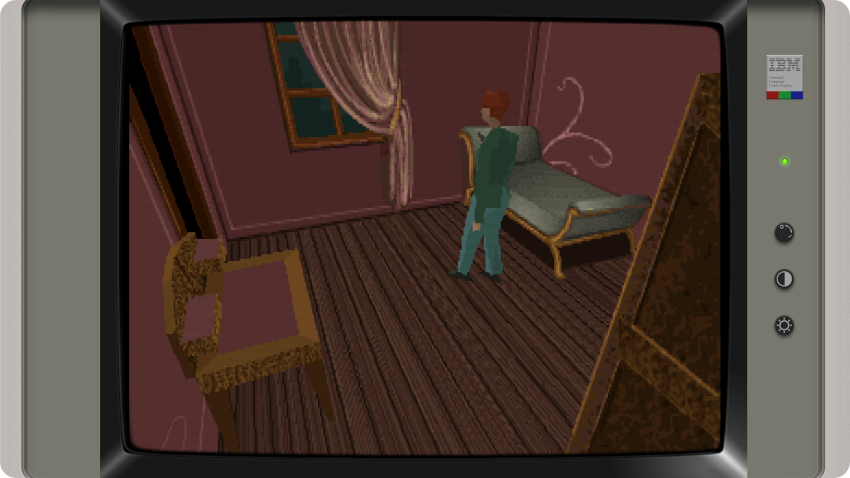
- Alone In the Dark
- The Incredible Machine (loved that one too !)
- Dune
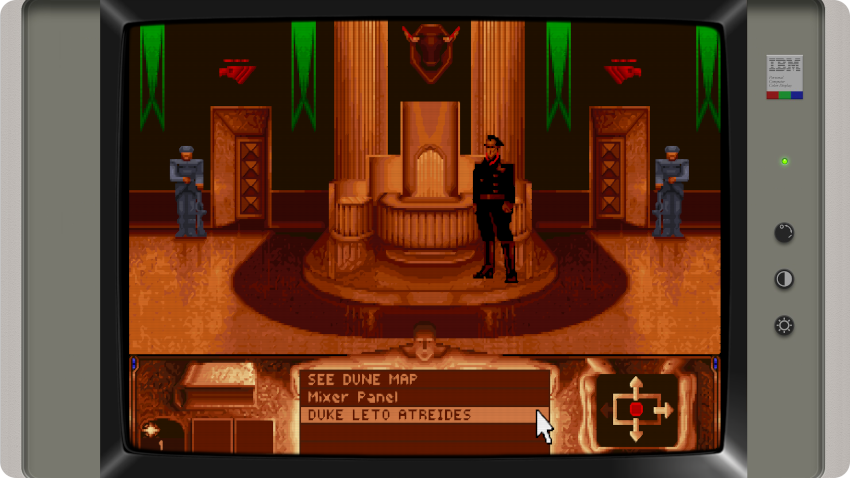
- Dune II

- Other
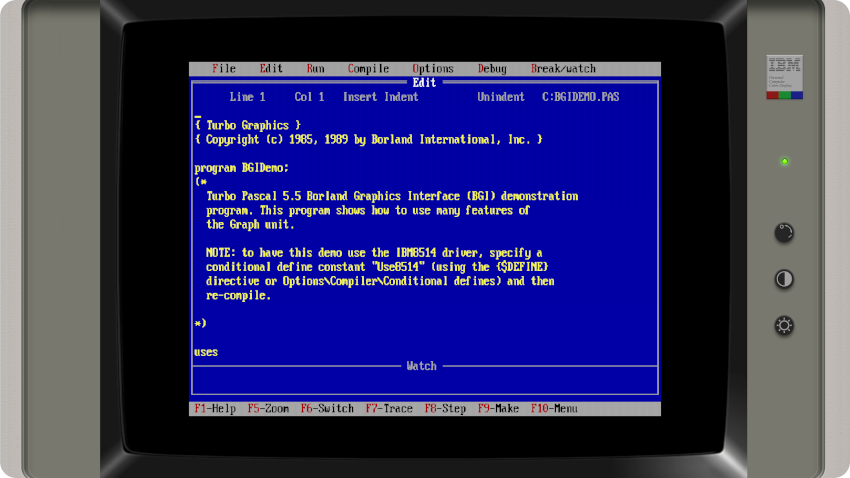
I installed Turbo Pascal 5.5. Because … why not ?
I think it is now safe to conclude this long long blog post:
Here is a few links:
- Documentation
- Recalbox (Dosbox Pure): https://wiki.recalbox.com/fr/emulators/computers/dos/libretro-dosbox-pure
- ROMs
- The Internet Archive: https://archive.org
- WinWorld: https://winworldpc.com
- Abandonware France: https://www.abandonware-france.org/ (french)
- My Abandonware: https://www.myabandonware.com/browse/platform/dos/
- All boot disks: https://www.allbootdisks.com/download/dos.html
- YouTubers:
- LGR: https://www.youtube.com/@LGR
- Adrian’s Digital Basement: https://www.youtube.com/c/adriansdigitalbasement
- RMC – The Cave: https://www.youtube.com/c/RMCRetro
- Rodrik Studio: https://www.youtube.com/c/RodrikStudio (French)
- This Does Not Compute: https://www.youtube.com/@ThisDoesNotCompute