It’s been over 5 months since my last vintage computer acquisition. In the meantime, I had a lot of fun with RecalBox 9, emulating tons of oldies. But now, we are back to hardware (not that there is anything wrong with emulators).
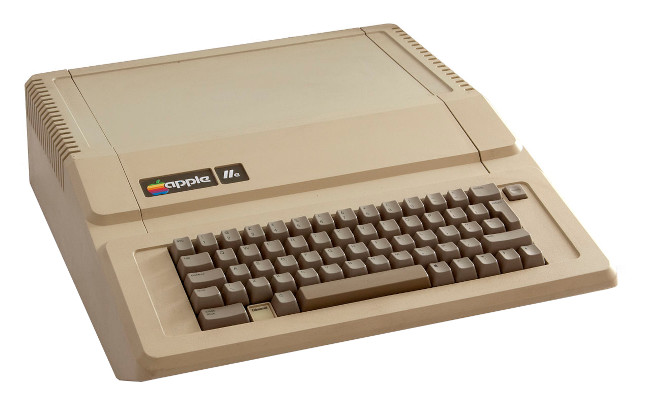
I have been hunting for various vintage computers and accessories. A few leads, but no luck. Most of them were widely overpriced. Then, I came across an Apple IIc offer. A pricey offer, but not insane, the price being justified by the sum of goodies it came with. I am now the proud owner of an Apple IIc !!
![]()
Since this was my very first Apple IIc, I wanted to try many things. This is quite a long blog post, so I have prepared a table of contents to jump right into the sections you prefer and skip the ones you don’t care for:
- Introduction
- Sourcing an Apple IIc
- Unboxing
- First tests
- Opening up the Apple IIc
- Cleaning the enclosure
- The keyboard
- The main PCB
- The internal voltage converter
- The floppy disk drive
- Second round of tests
- The Apple IIc mouse
- The power brick
- Sunbrighting the enclosure (part I)
- Video outputs and video modes
- Le Chat Mauve (RGB SCART adapter)
- Software
- Creating a null modem cable and using ADTPro
- Further testings
- Sunbrighting the enclosure (part II)
- Opening the Apple IIc monitor
- The monitor enclosure (part I)
- Servicing the monitor
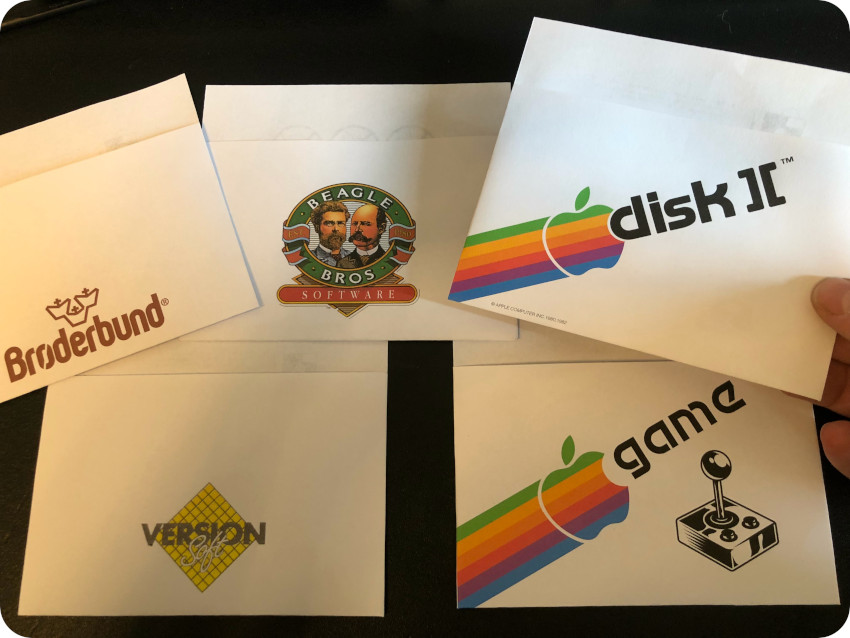
- Labels and sleeves for floppy disks
- Using a null modem to get access to the Internet
- The monitor enclosure (part II)
- Books and guides
- Wrapping things up
- Next steps
- Acknowledgments and links
Note: keep in mind that I went back and forth from one subject / task to another. The order of this table of contents is sometimes not the real chronological order, but it makes (hopefully) more sense this way for the reader.
Introduction
As you may know, I am a sucker for Apple devices. Still, I bought my first one very late, in 2003 if memory serves (a PowerBook G4). The first Apple computer I ever touched was an Apple II+, almost 40 years ago, at school. At the time, these computers were mythical !
The Apple II series of computers holds a significant place in the history of personal computing. The Apple II series was introduced in April 1977 as the successor to the original Apple I:
This line of computers included the following machines: Apple II, Apple II Plus, Apple IIe, Apple IIc, Apple IIc Plus and the Apple IIGS.
The Apple II was originally designed by Steve Wozniak. Featuring a microprocessor, a keyboard, and a built-in BASIC programming language, the Apple II was one of the very first personal computers. It was an huge success, popular in both educational and business settings, contributing to the growth of the personal computer market.
The first Apple II computers went on sale on June 1977, with a MOS Technology 6502 microprocessor running at 1.023 MHz, 4 KB of RAM, an audio cassette interface and the Integer BASIC programming language built into ROM. An external 5+1⁄4-inch floppy disk drive (called Disk II), attached via a controller card that plugged into one of the computer’s expansion slots (usually slot 6), could also be used for data storage [based on Wikipedia]:
Over the years, Apple introduced several enhancements to the Apple II series. The Apple II Plus, released in 1979, featured more memory (16 KB, 32 KB or 48 KB of main RAM, expandable to 64 KB):
After the success of the first Apple II in the United States, Apple expanded its market to include Europe and the Far East, with the Apple II Europlus (Europe) and the Apple II J-Plus (Japan). In these models, Apple made the necessary hardware, software and firmware changes in order to comply with standards outside of the US and Canada. The power supply was modified to accept the local voltage, and in the European model the video output signal was changed from color NTSC to monochrome PAL by changing some jumpers on the motherboard. An extra video card (which only worked in slot 7) was needed for color PAL graphics, since the simple tricks used to generate a pseudo-NTSC signal with minimal hardware did not carry over to the more complex PAL system [based on Wikipedia].
The Apple IIe was introduced in 1983. One of the most notable improvements of the Apple IIe is the addition of a full ASCII character set and keyboard. The most important addition is the ability to input and display lower-case letters. The machine came standard with 64 KB RAM and could be easily doubled to 128 KB RAM:
In March 1985, the company replaced the original machine with a new revision called the Enhanced Apple IIe. In January 1987 came the final revision of the Apple IIe line, often referred to as the Platinum, due to the color change of its case to the light-grey color scheme. Changes to this revision were mostly cosmetic to modernize the look of the machine. Besides the color change, there was a new keyboard layout with built-in numeric keypad.
The Apple IIc, launched in 1984, was a “portable” version of the computer, featuring a built-in disk drive and a compact design. It introduced Apple’s Snow White design language:
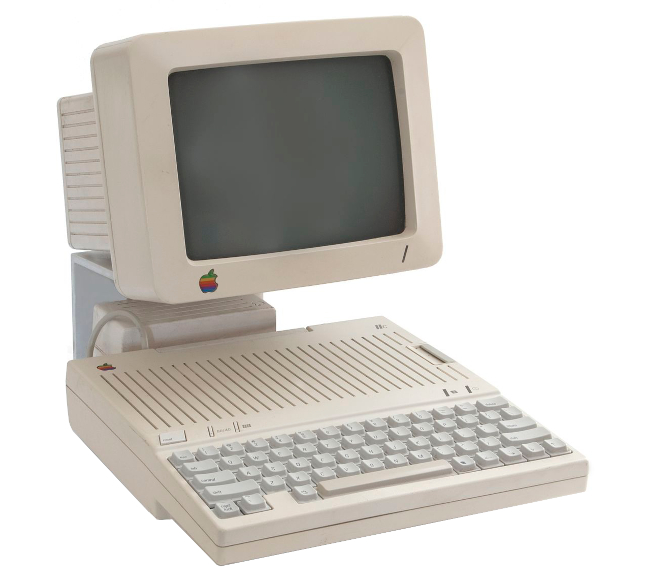
Technically the Apple IIc was an Apple IIe in a smaller case, more portable and easier to use, but also less expandable. The IIc used the CMOS-based 65C02 microprocessor which added 27 new instructions to the 6502
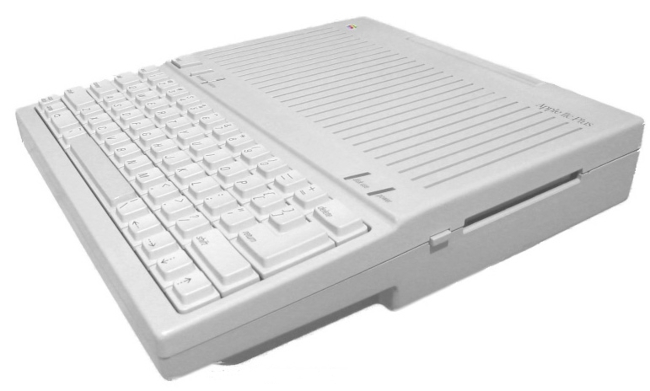
The Apple IIc Plus was introduced in 1988 and served as an upgrade to the original Apple IIc. The Apple IIc Plus featured several improvements and enhancements over its predecessor. Notable enhancements were a faster 65C02 processor running at 4MHz and the addition of a built-in 3.5-inch floppy disk drive, replacing the 5.25-inch disk drive of the Apple IIc:
Despite these enhancements, the Apple IIc Plus had a relatively short lifespan. It was discontinued in 1990.
The Apple IIGS, introduced in 1986, was the most powerful model of the Apple II series. It offered advanced features like a 16-bit 65C816 processor, improved graphics and sound capabilities. While featuring a Macintosh look and feel, and resolution and color similar to the Amiga and Atari ST, it remains compatible with earlier Apple II models. The “GS” in the name stands for “Graphics and Sound”, referring to its enhanced multimedia hardware, especially its state-of-the-art audio.
Despite its technological advancements, the Apple IIGS faced internal competition from Apple’s own Macintosh line.
In 1993, Apple officially discontinued the Apple II series, marking the end of an era for the influential line of personal computers.
Sourcing an Apple IIc
I have been looking for an Apple IIc for a long time. More than a year actually. As retro computing becomes more popular, prices are badly hiking, especially for Apple products…
About a month ago, I found a new offer on LeBonCoin web site. Though a bit pricey – this is the highest price I paid for a vintage computer up to now -, it was (almost) reasonable considering the amount of hardware, software and books packed:
- An Apple IIc computer in good conditions (though yellowed), along with its (working) power supply
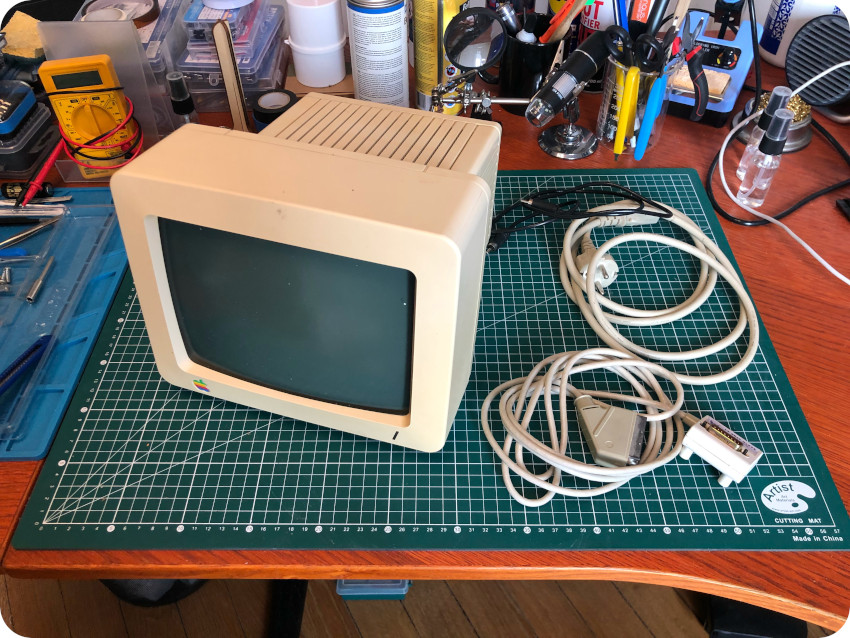
- A Apple 9″ green monochrome CRT display in good conditions (though very yellowed), packed in its original box and a composite video cable
- An Apple A2L4015 mouse in almost mint conditions
- A “Le Chat Mauve” RGB SCART cable
- A set of 7 books / guides
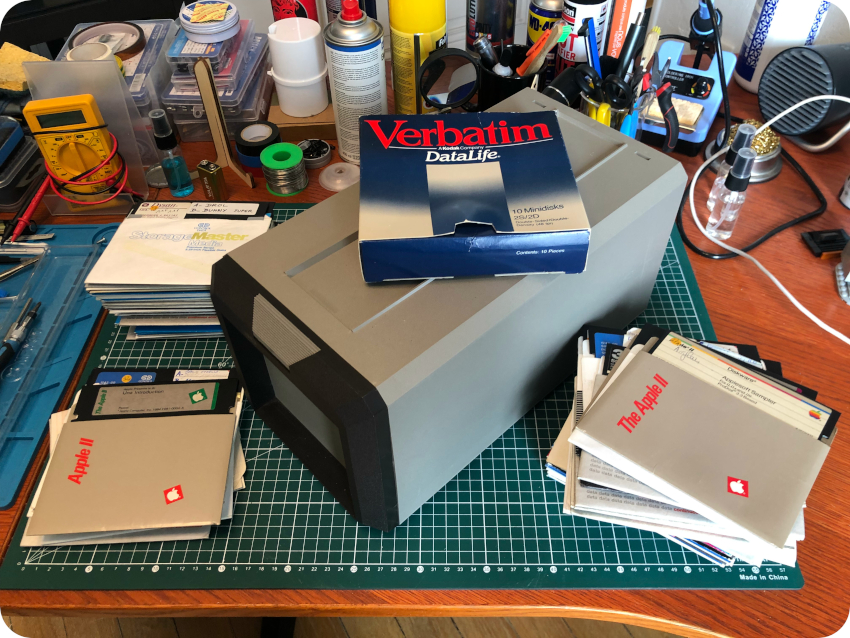
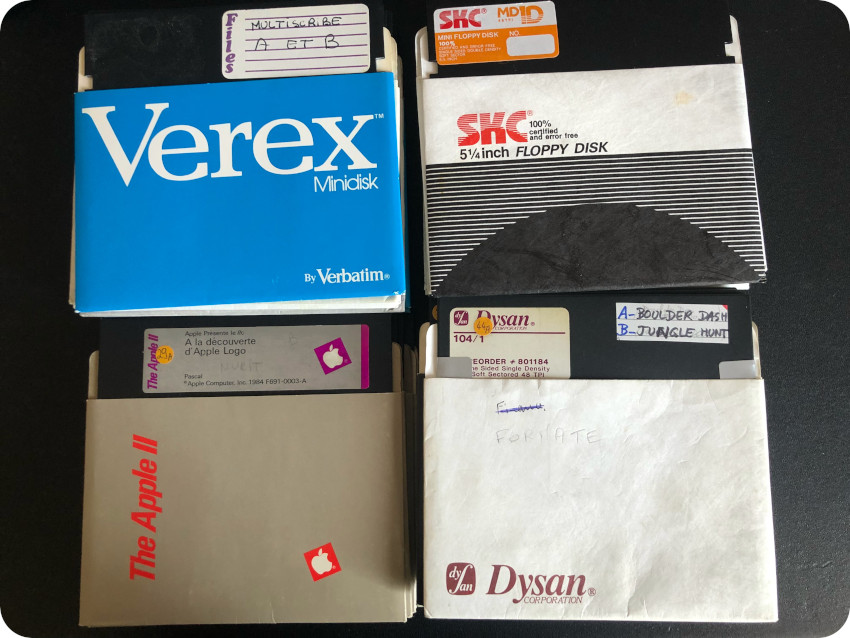
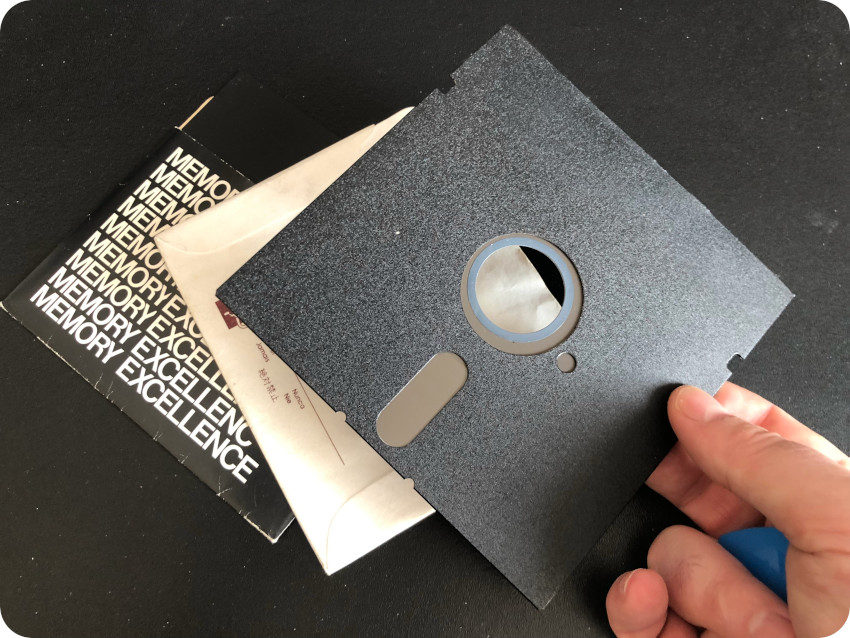
- Over 100 used 5+1⁄4-inch floppy diskettes in their storage box with various games and software, including original Apple diskettes in their sleeves
- A pack of 7 unused Verbatim 5+1⁄4-inch floppy diskettes in its original box
A nice late birthday gift ! The deal was done, and the package was sent the day after.
Alas, the day after, the package was shipped back to the sender. Was it some kind of scam ?
I contacted the seller, who was very nice and sorry: the package was 15cm too wide. He repacked things, and sent them back, using the same transporter (Mondial Relay). About 3 days later, the package arrived at the nearest delivery hub (Saint-Priest), a couple of Km from where I live. And two days later … it was shipped back to the sender, with no explanation. Damn it !
I contacted back the seller a few days later, as he texted me that he picked up the returned package. Nothing was broken. We agreed on another transporter (Colissimo), a little more expensive, but safer. A few days later, the package arrived !
Lesson learned: no more Mondial Relay.
Unboxing
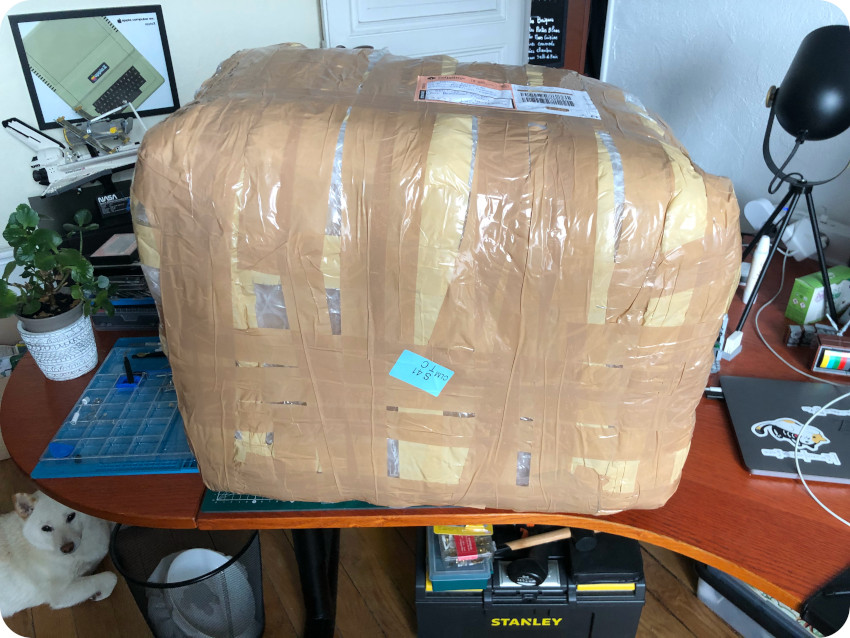
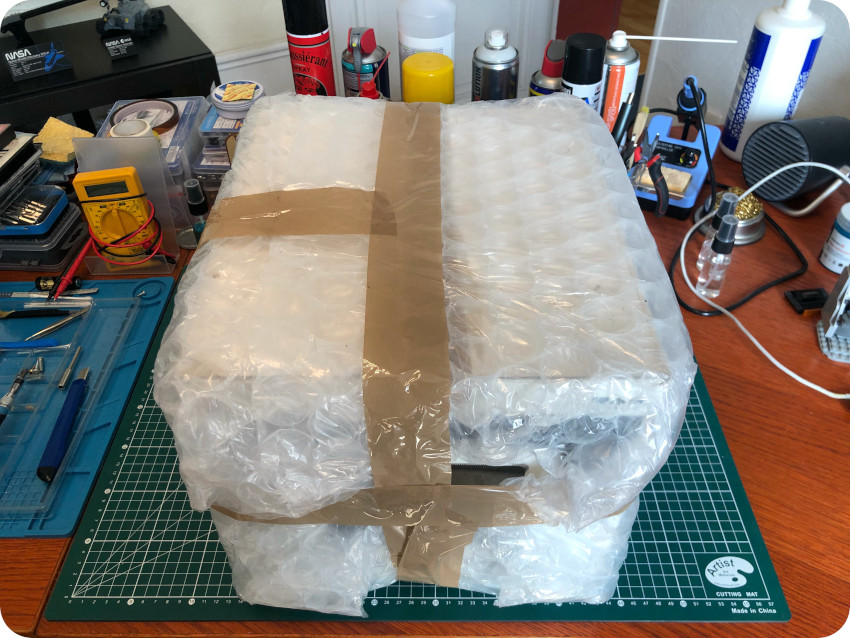
And indeed, that was a BIG package. I am always worried about postal packages, especially when it includes fragile parts like a CRT. And since this package traveled back and forth a lot, I was VERY worried.
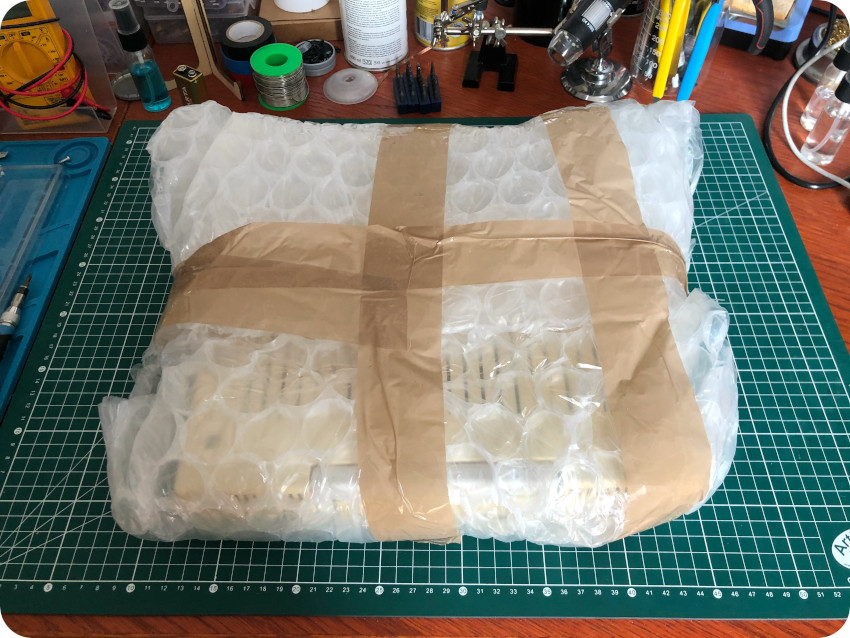
But it was very, very well packed, including bubble wrap around and inside the main package:
I started unboxing the package, layer after layer, under the supervision of my beloved Tsukiko:

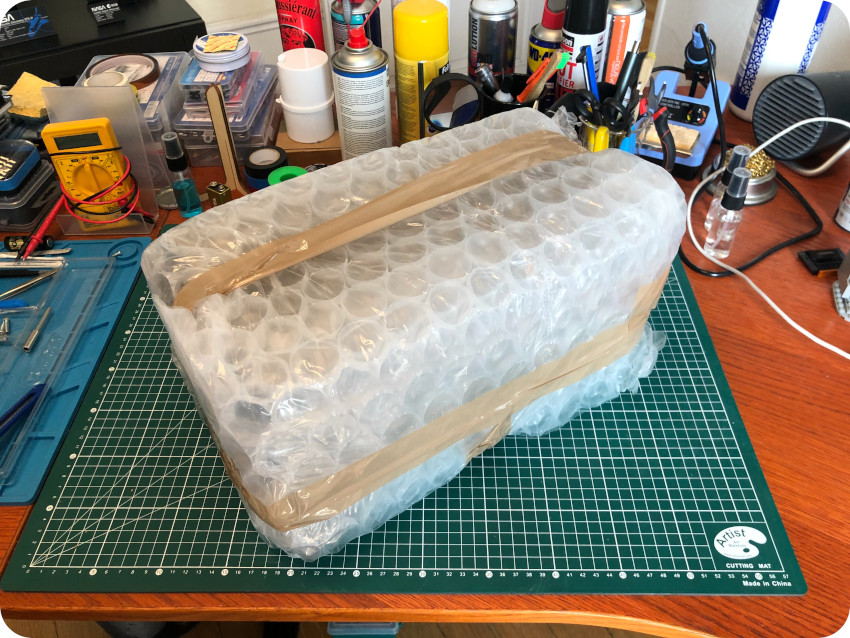
Inside the main package was … a first inner package, than included books, the mouse, power cables and the Apple IIc protected by a new layer of bubble wrap:
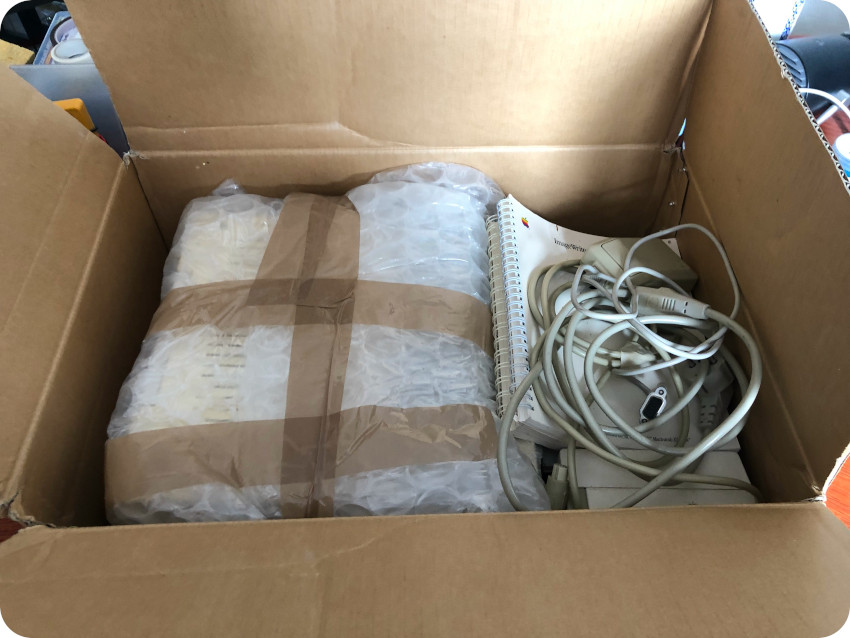
Here is the content of this first inner package:
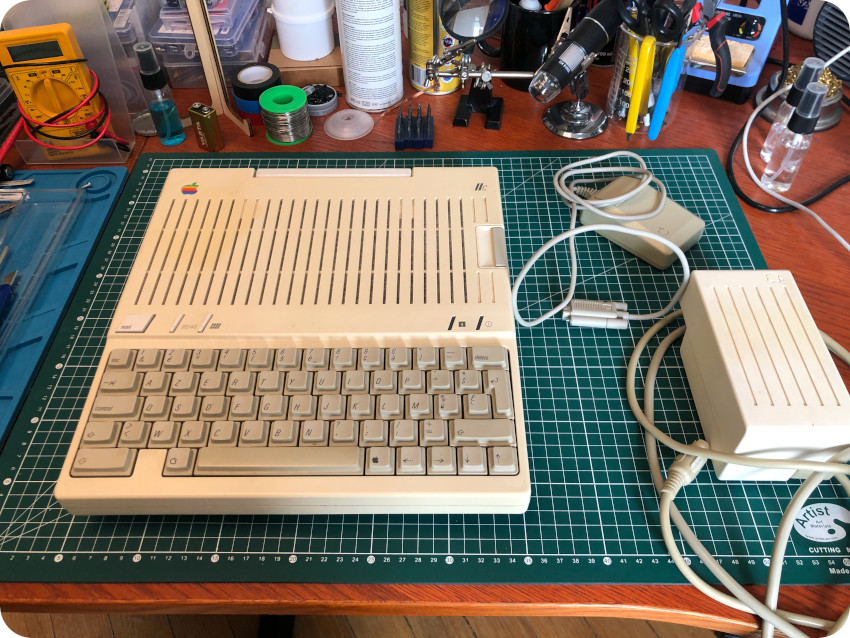
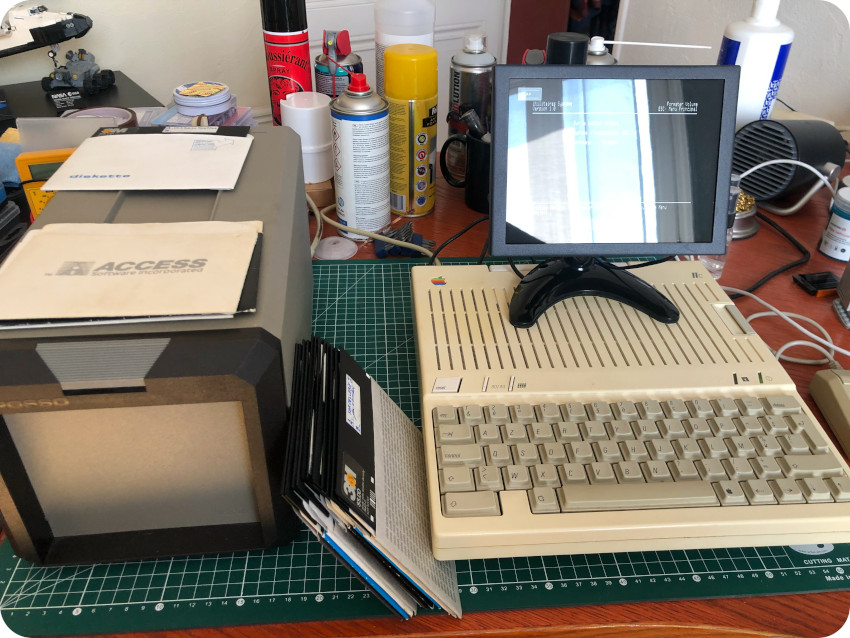
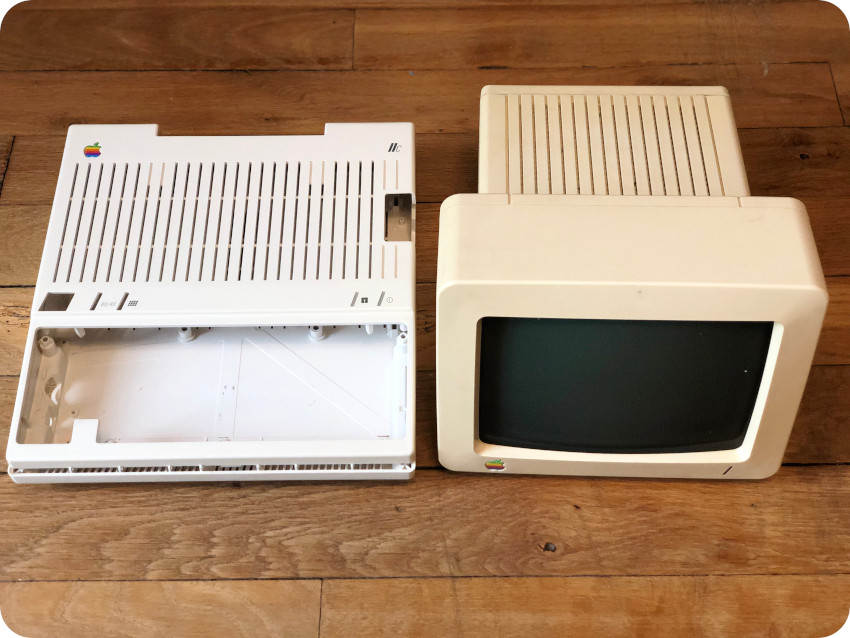
- The Apple IIc, it’s power brick and a mouse. The computer itself is in good conditions, though a bit dirty, very yellowed (especially on the back), with a small yellow / orange stain on the top-left. The power brick is in good conditions (I tested the voltages), only needing a good cleaning. The mouse is almost in mint conditions.
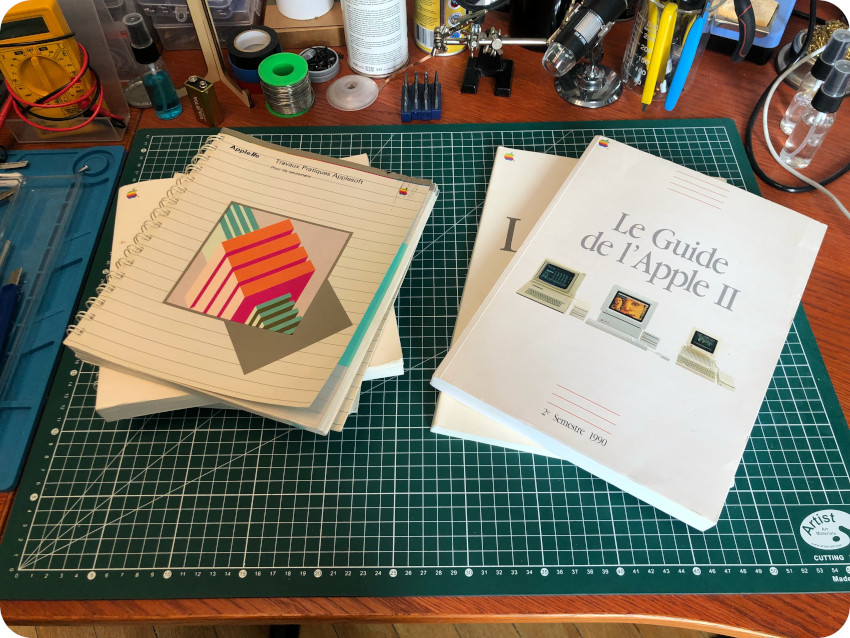
- Seven books and guides that appears to be in overall good conditions:
Here is the second inner package, for the Apple 9″ CRT, also bubble wrapped:
It is inside it’s original box, in good conditions for a 40 years old one, including Styrofoams in perfect conditions:

The CRT monitor is a bit dirty, and very yellowed. Almost orange, but otherwise in good conditions, at least externally. It was sent with its power cord, a black RCA cable and a “Le Chat Mauve” SCART adapter (in good external conditions, though I will have to re-glue its sticker):
And, last but not least, the third inner package, also bubbled wrapped, for the floppy disks:
I counted over a 100 diskettes, in fair conditions. Some are original Apple diskettes, most are home-made copies of various software. The lot also included 7 unused Verbatim floppies, in its original box. I will have to test all these, which will take quite some time !
First tests
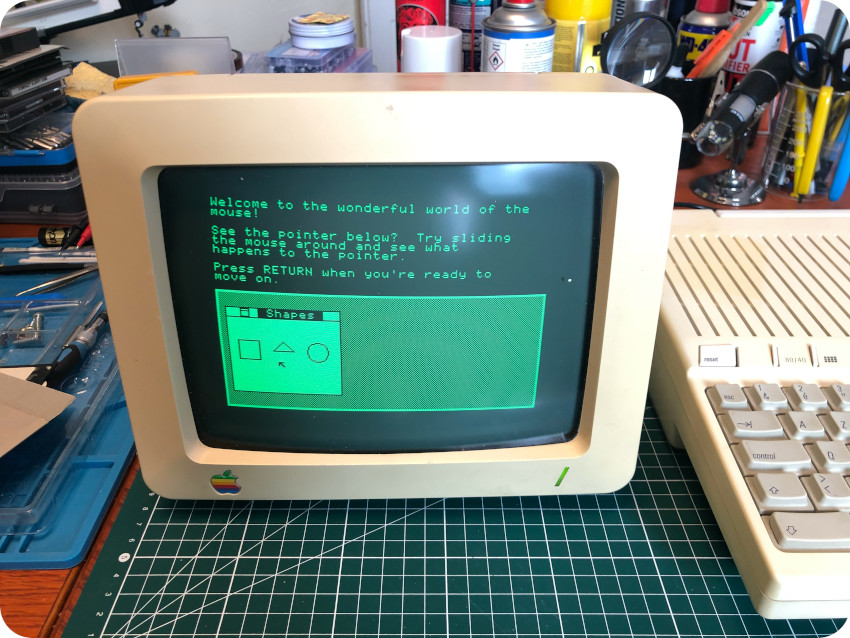
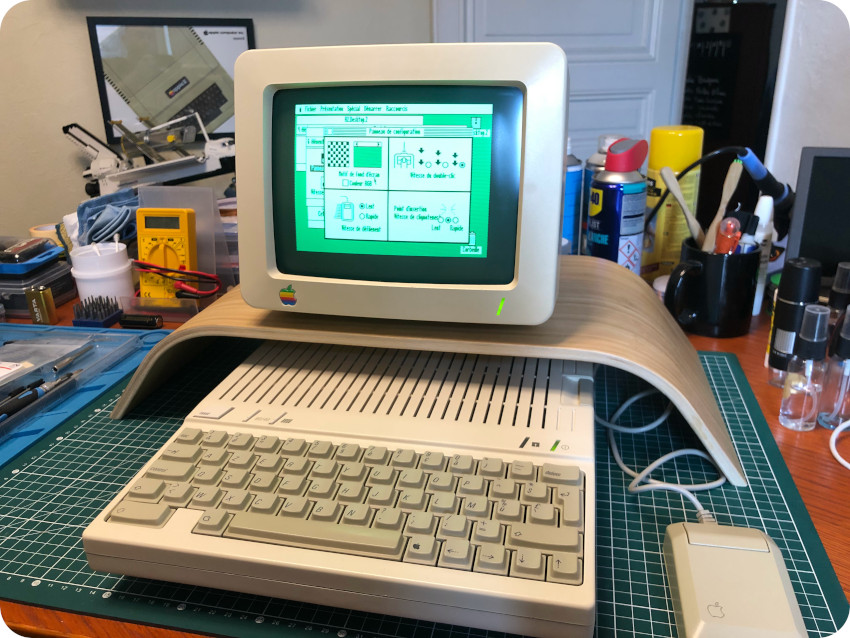
After testing the power brick voltages (that were fine), I decided to make sure everything was in order. I plugged-in the CRT power cord, then the Apple IIc power brick. I hooked up the CRT to the computer video out connector, and grabbed a first diskette at random (MousePaint). I turned the CRT on (no magic smoke), then the Apple IIc.
Bingo ! It started booting from the floppy disk right away:
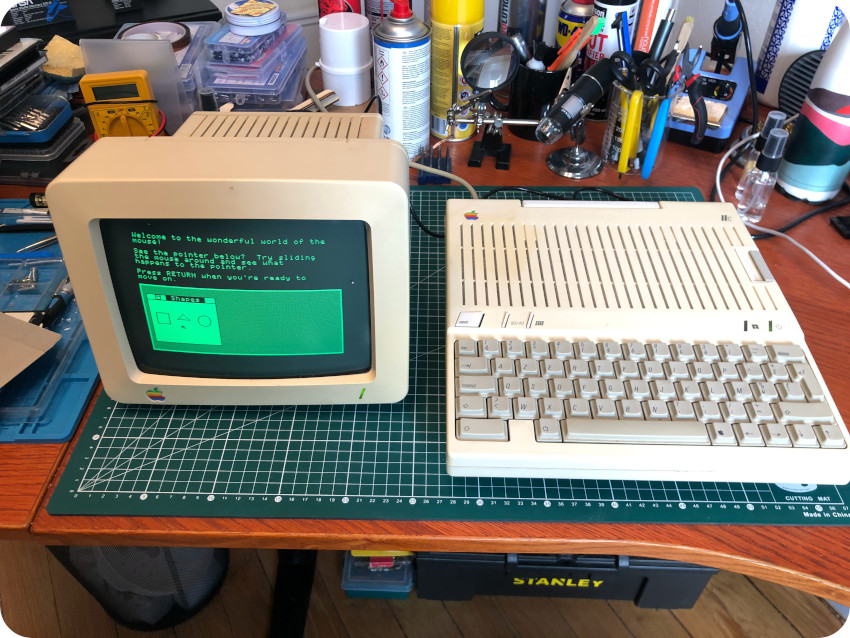
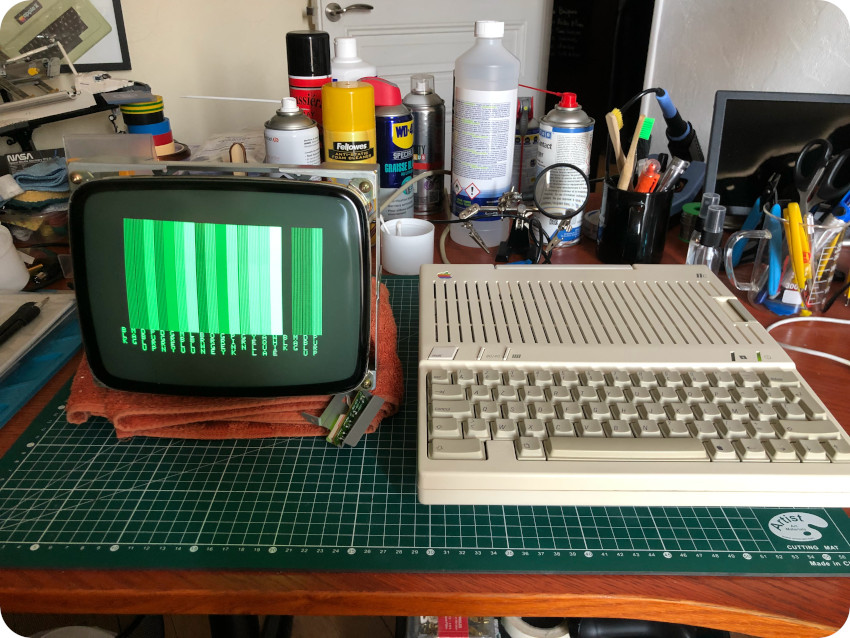
The CRT is also working. Knobs and pots are working fine. Brightness and sharpness are petty good. But the image is crooked (and/or distorted), I will have to figure out what is going on there:
Being the most fragile part, I put the CRT aside for further testings. I used my little color LCD monitor (which manages VGA, Composite, NTSC, PAL, but lacks HDMI and SCART) to run a few more tests:
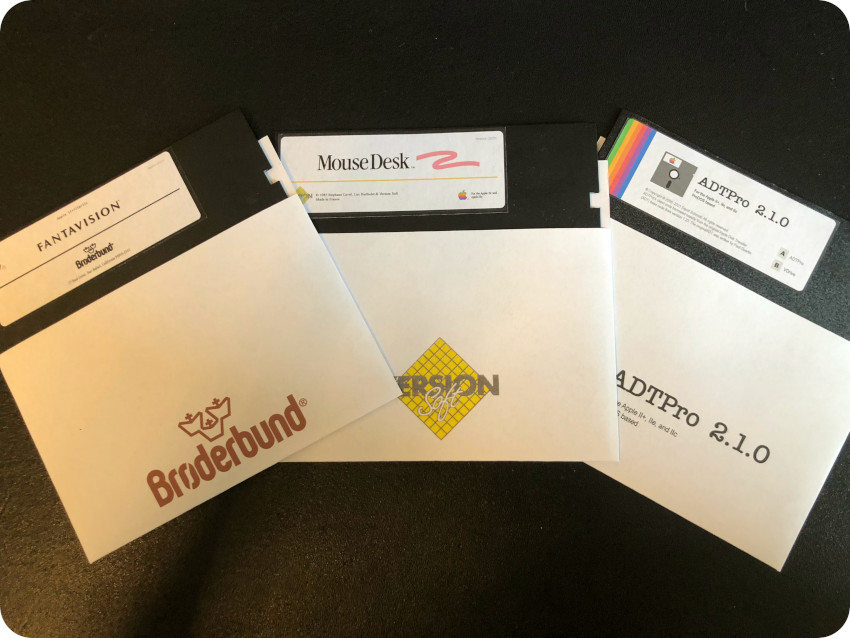
- Here is a picture, running Fantavision (from Broderbund)
- Here is another picture, running (pun intended) Lode Runner, also from Broderbund, stored on the other side of the same floppy disk:
- As a final round of tests, I booted from the Apple “System Utilities” disk and checked a few disks:
So far, so good ! I thanked the seller for how well things were packaged.
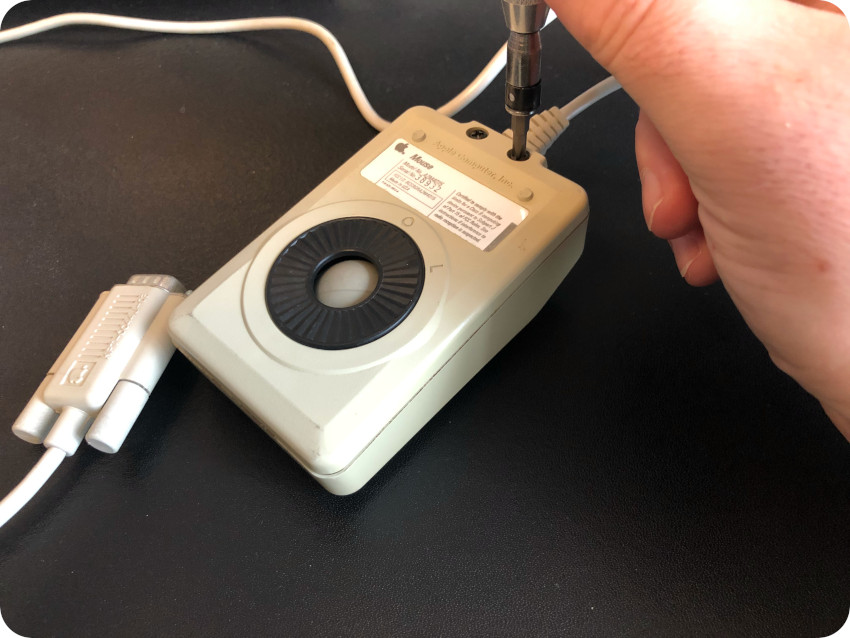
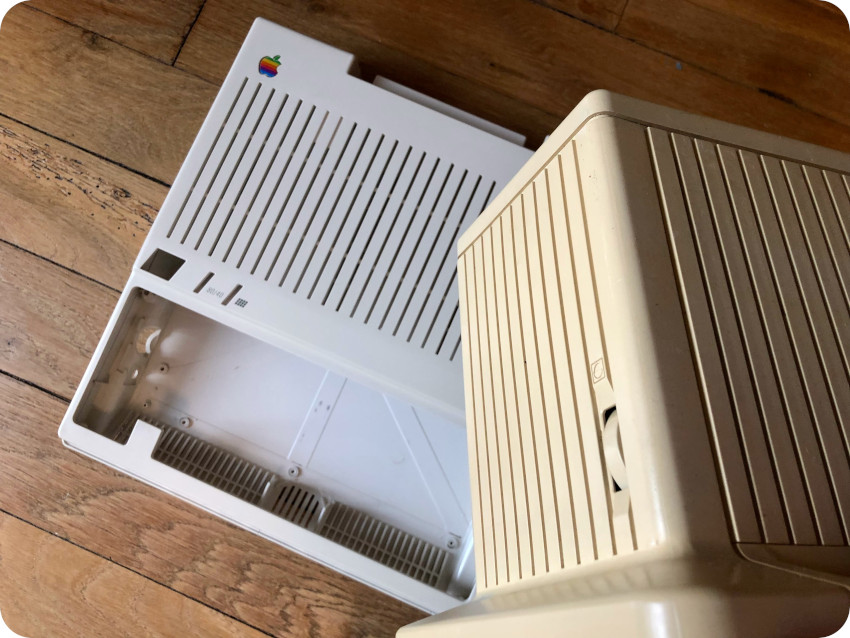
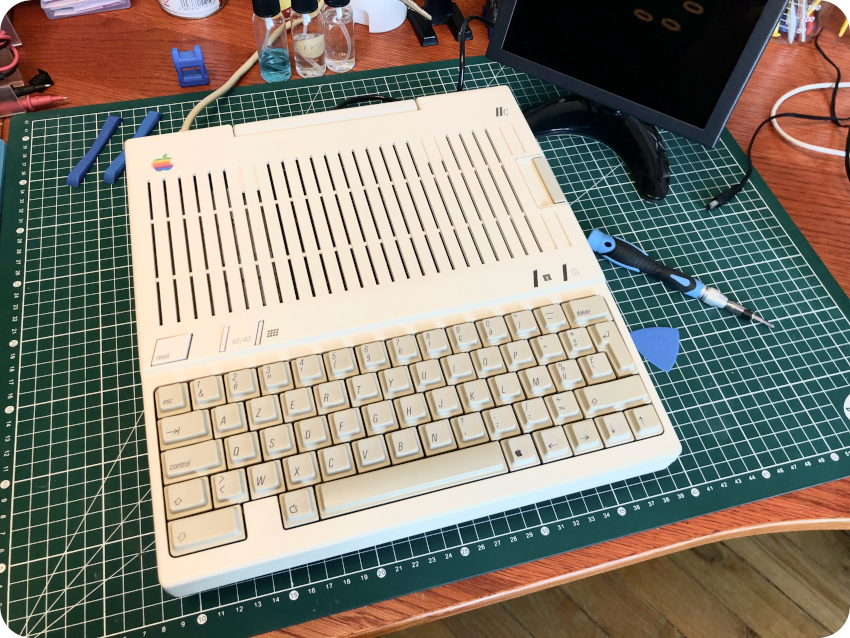
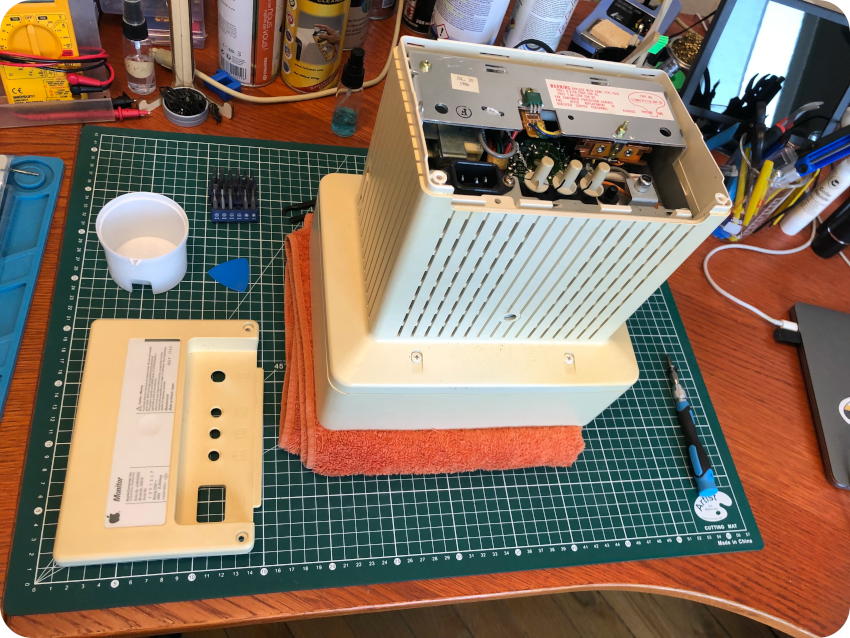
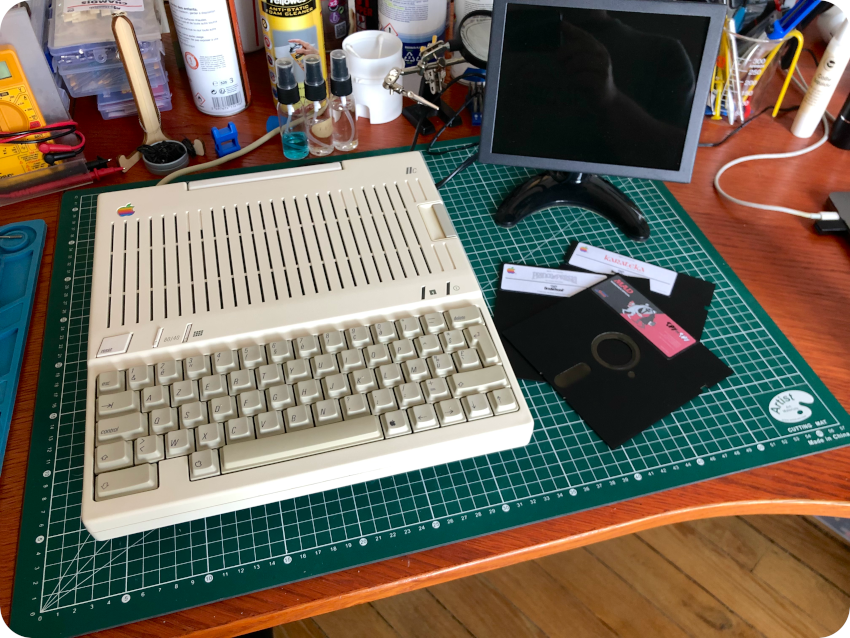
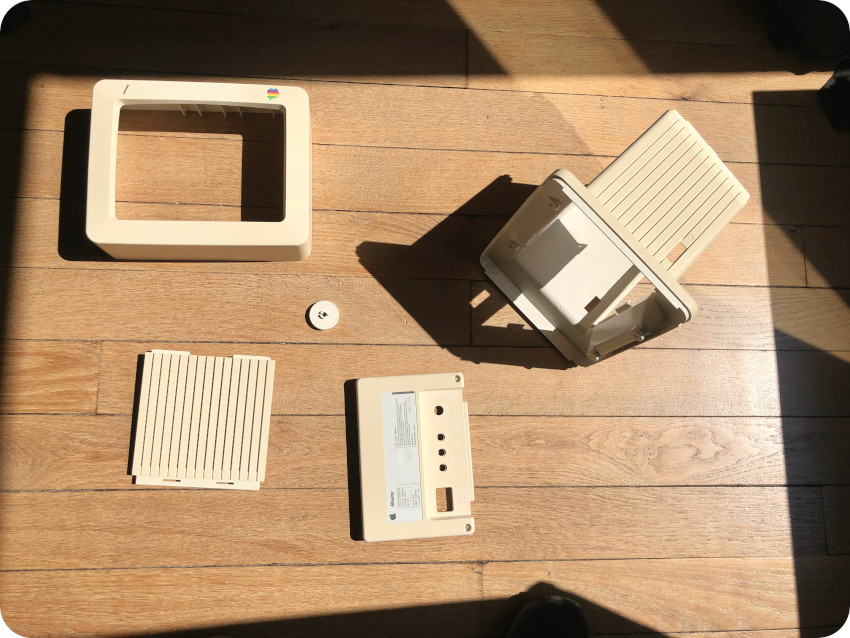
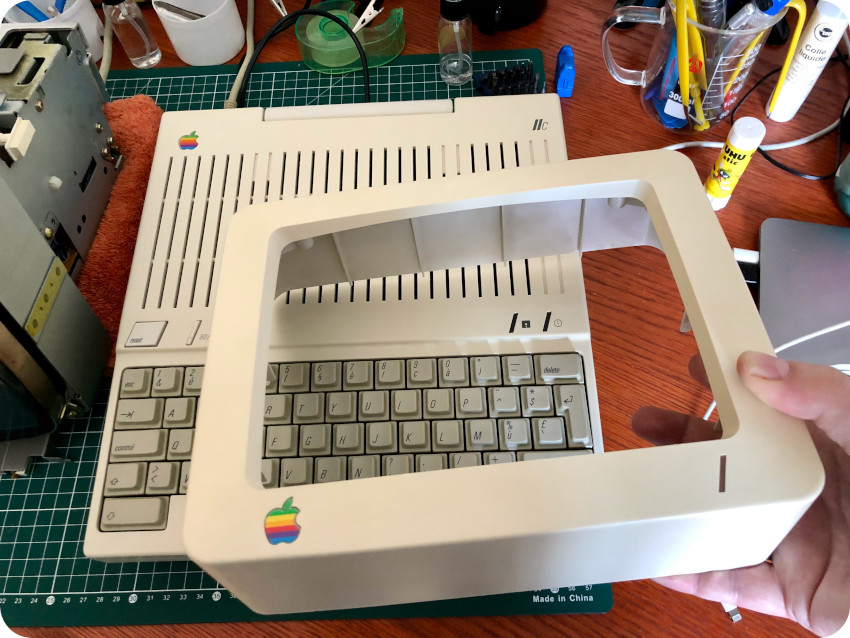
Opening up the Apple IIc
Opening up an Apple IIc is not an easy task, when compared to other computers of this era, like an Oric Atmos or an Amstrad CPC464. Today, Apple devices are known to be very tricky (if not impossible without damage) to open. In the 80’s, though not as difficult, Apple’s compact design for the IIc nevertheless involves a bit of pain, and a lot of swearing.
Opening up a 40 years old computer is a delicate procedure. Old plastic cases tend to become brittle as time goes. I am very careful to only use specifically designed tools for this. I like to use this set of prying and opening tools from ifixit.com (other equivalent tools would do fine, of course)
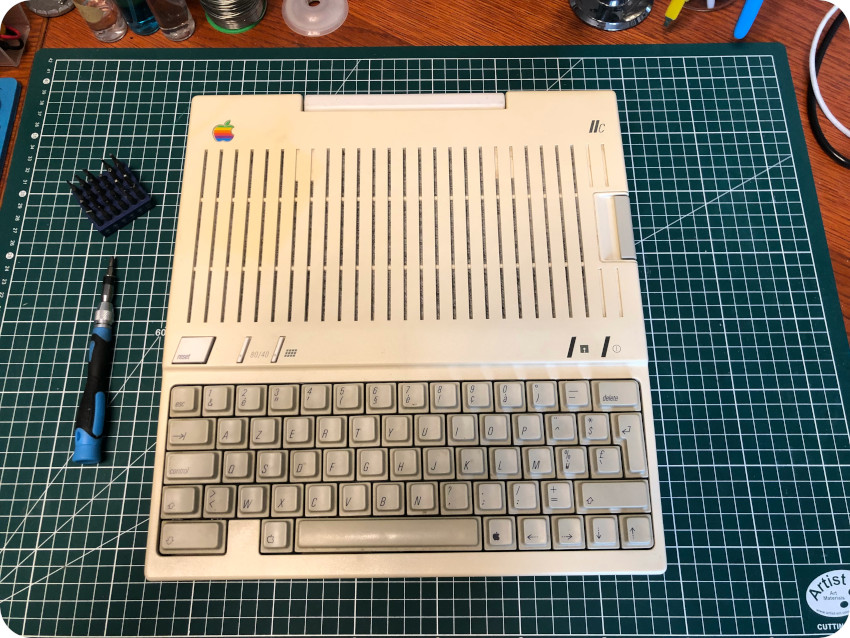
Let’s flip the computer :
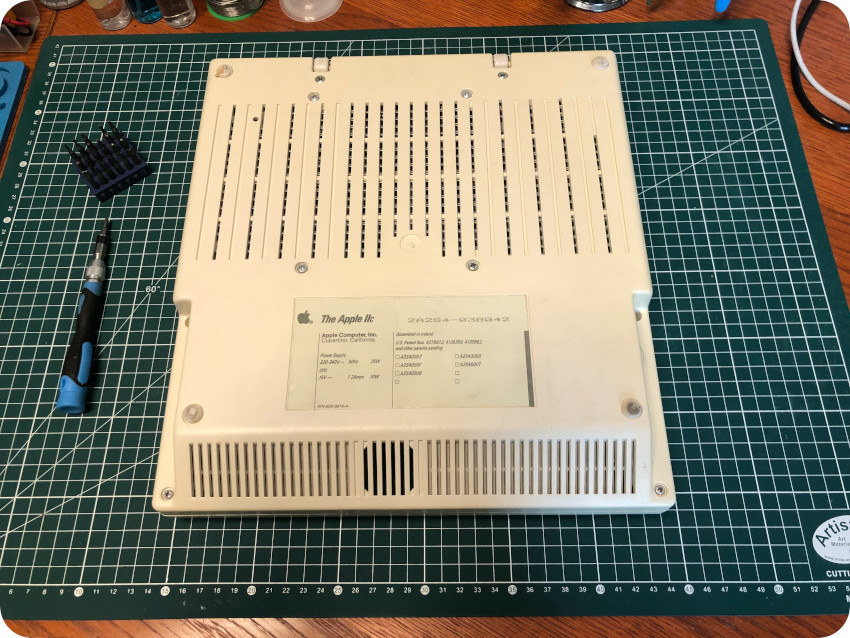
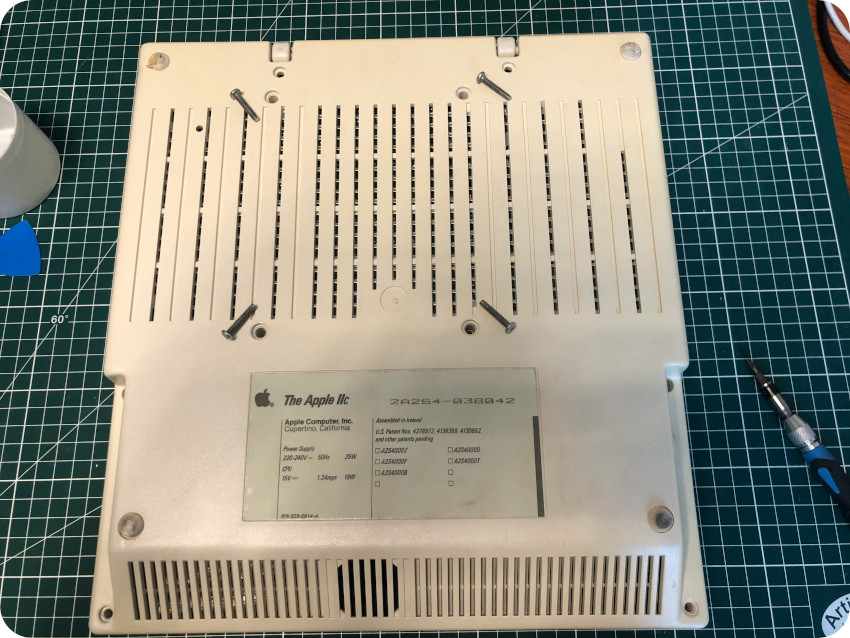
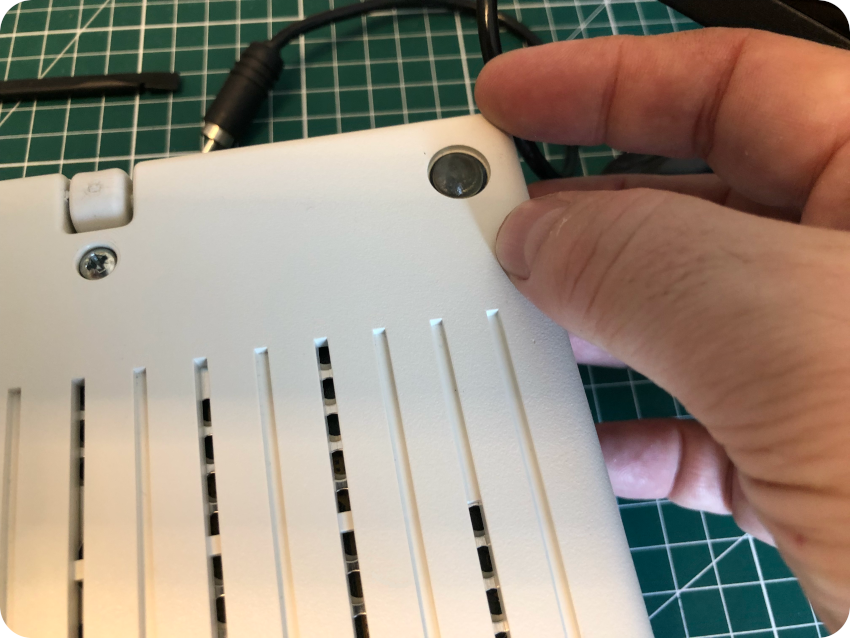
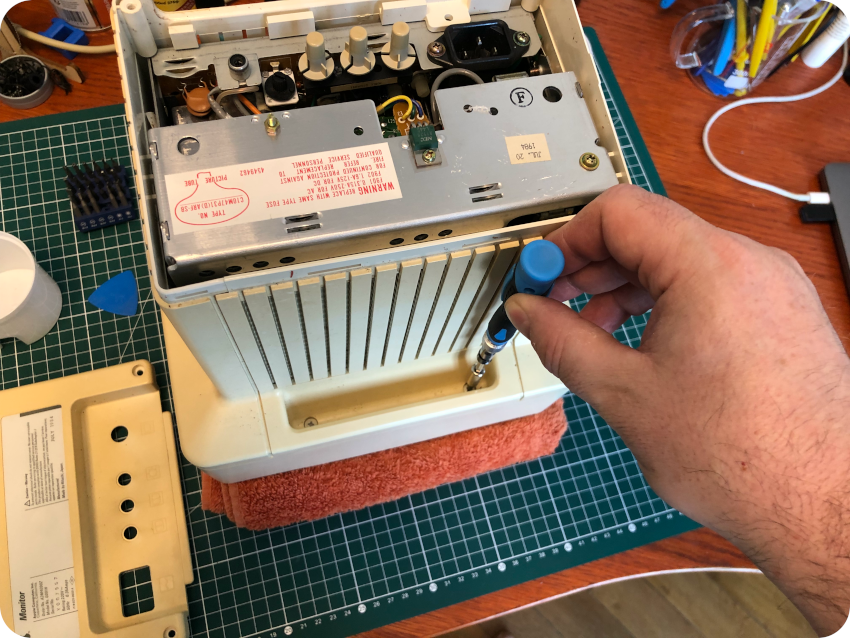
First, remove the outermost screws (4 long, 2 short):
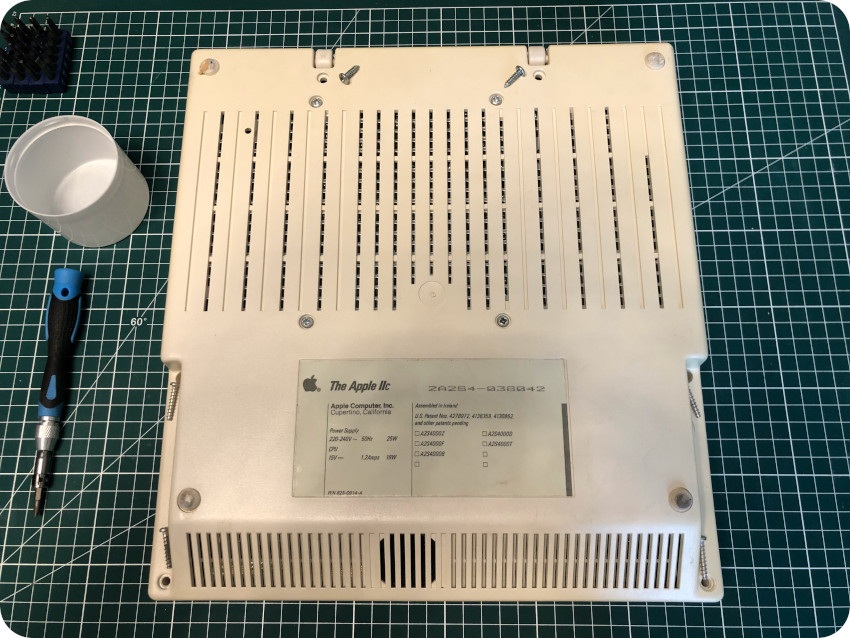
Then, remove the four (long) innermost screws:
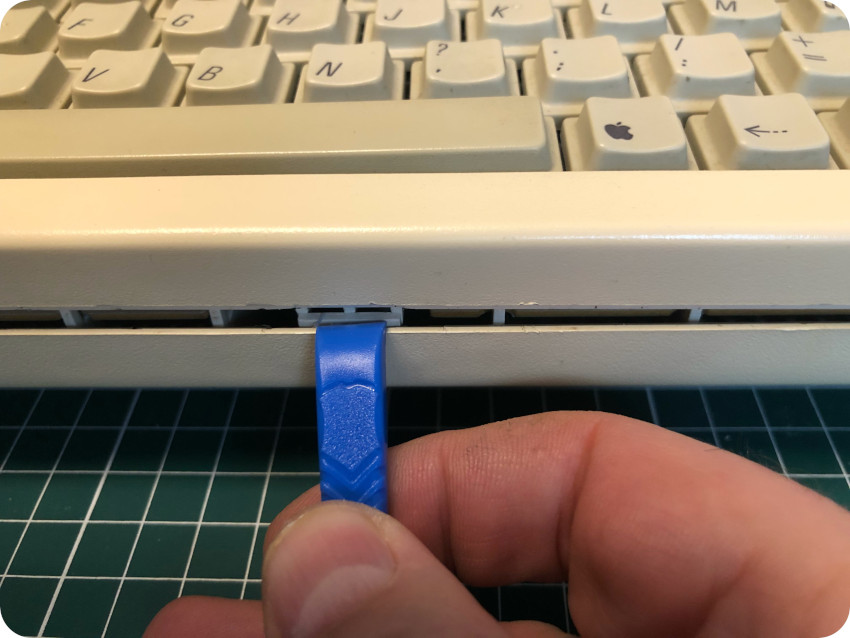
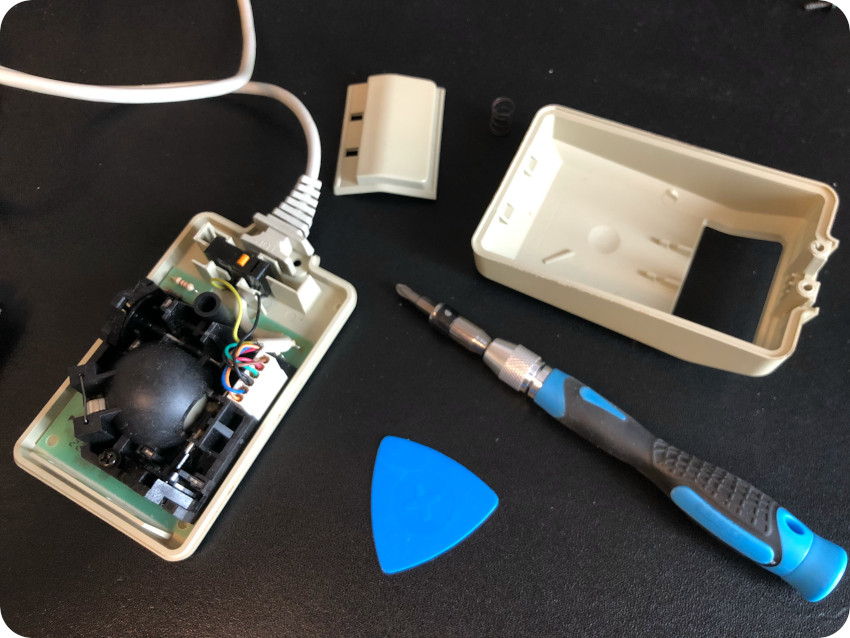
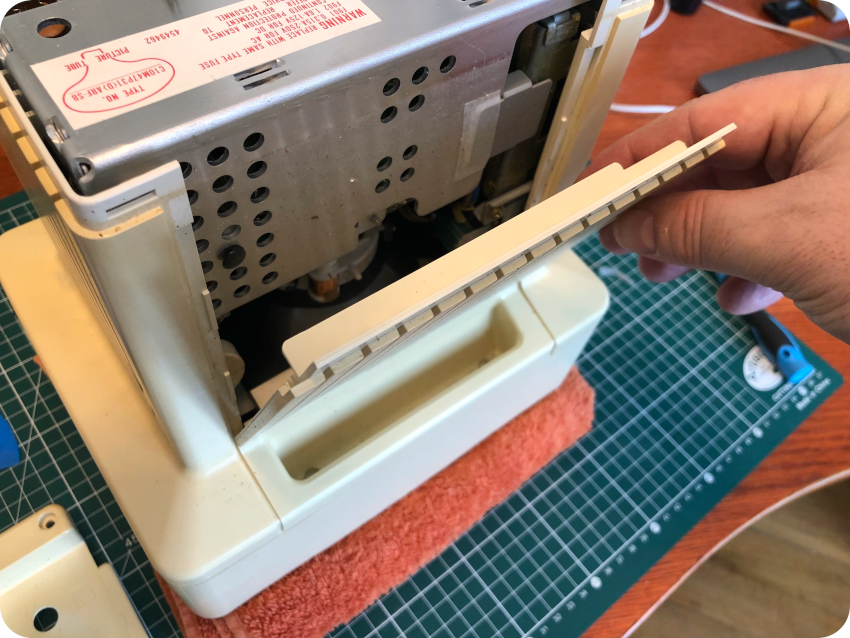
Flip back the enclosure and grab a plastic opening tool. Let’s start with the front. There is an inner plastic clip holding the top case. It is located right it the middle. Push it with a plastic opening tool. If you don’t push it, the case won’t open or may break trying. Be very gentle, do not use a flat screw driver, like I saw on a video that made my want to cry. It would leave marks (there are already some faint marks on mine). The top case will start to open, but do not crack it open just yet: there are two other clips, located on each side of the floppy disk drive.
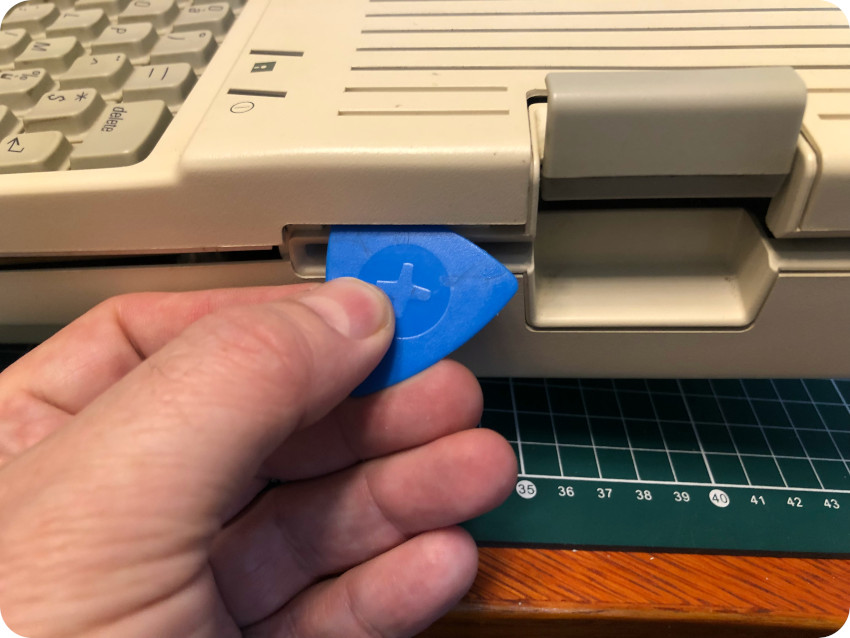
This time, I used an opening pick (a guitar pick would do the trick also). Locate the clips on the left and the right sides of the floppy disk drive, and use the opening pick as a lever. Be very gentle:
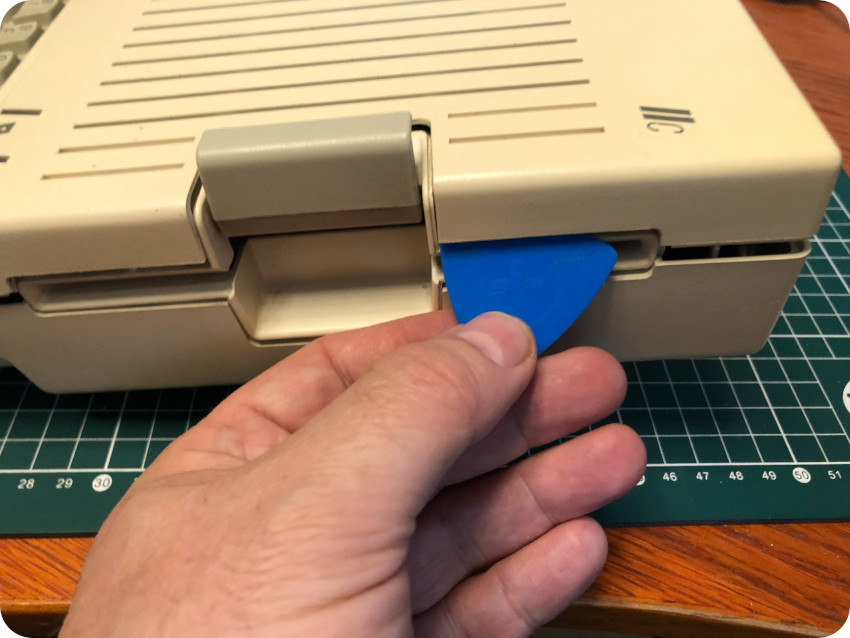
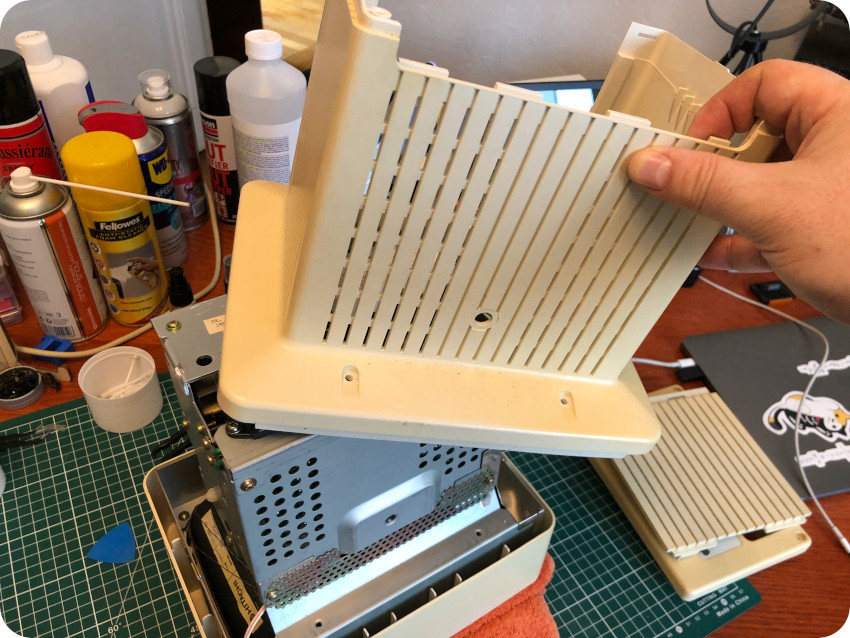
The top enclosure should be now easy to remove. There are remaining clips on the back of the case, but they should be easily released, just pushing the top case from the front.
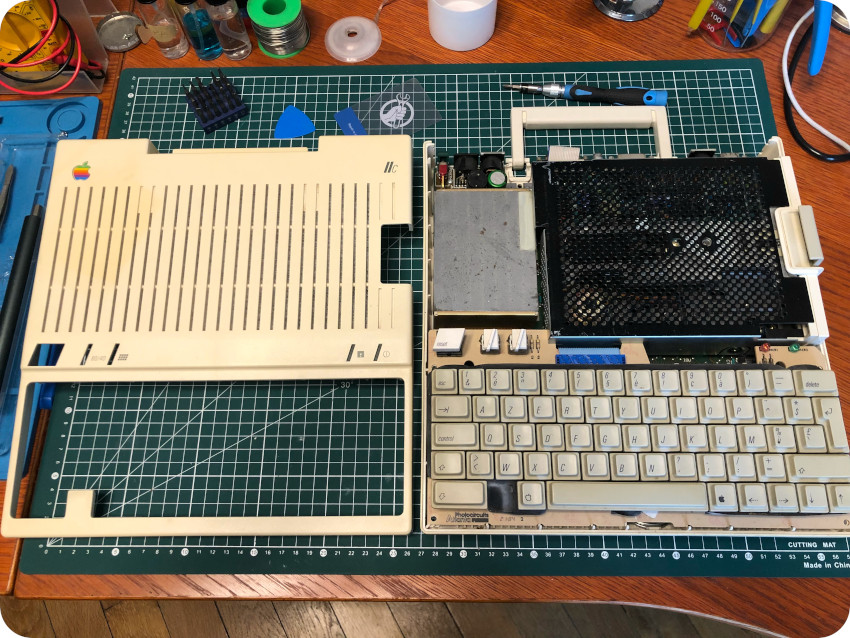
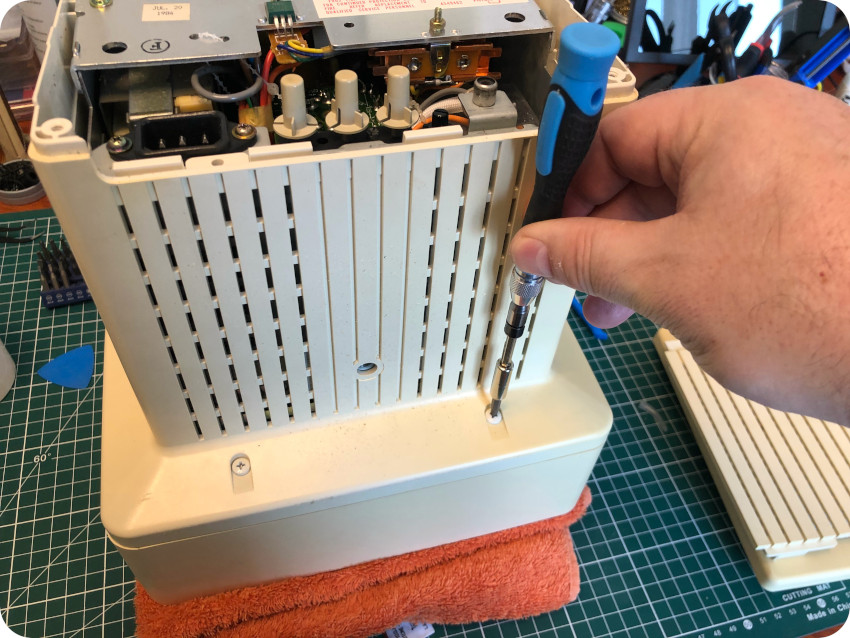
The most difficult part is done ! Let’s move on and flip the floppy disk drive on the side:
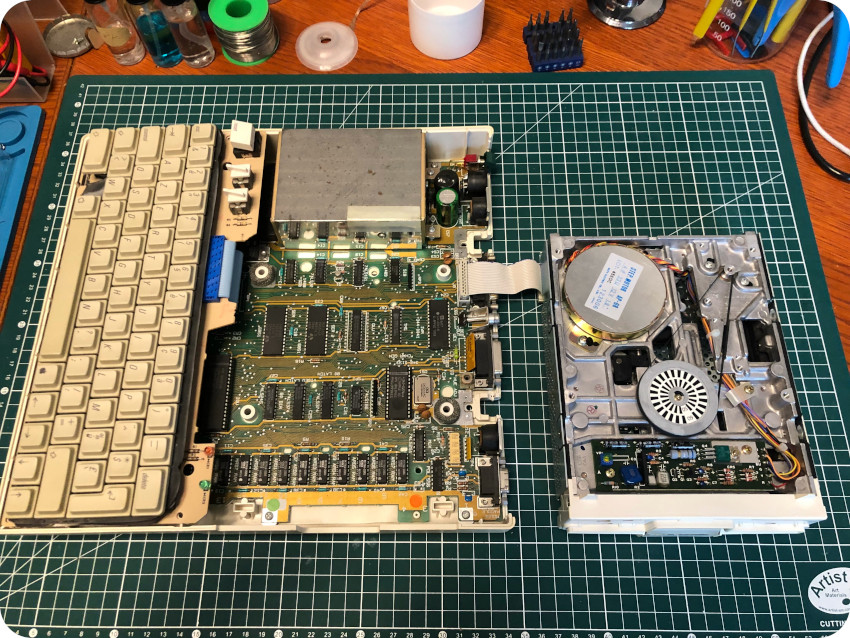
You can easily disconnect it from the motherboard:
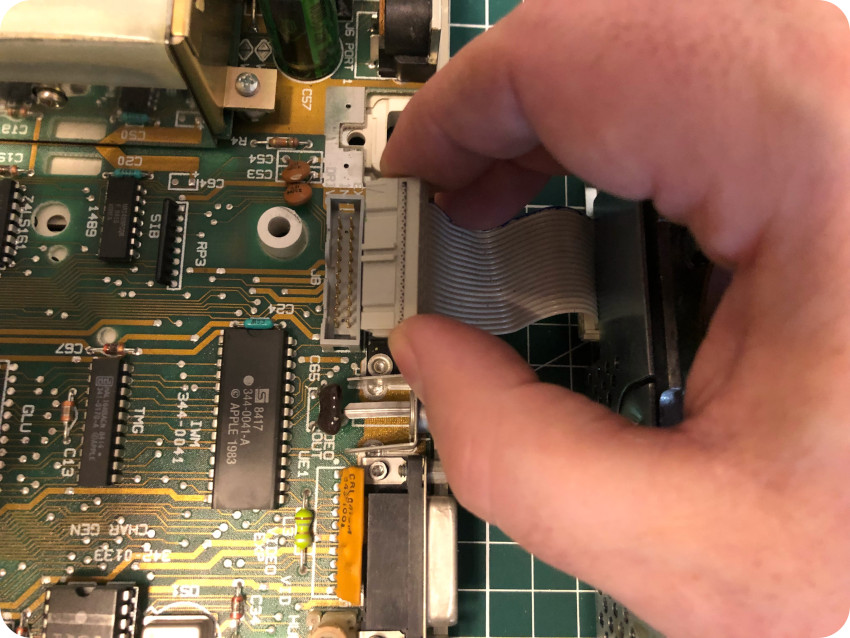
Let’s do the same with the keyboard. First, let’s lift the keyboard to get access to the connector:

Then disconnect the flat ribbon cable from the PCB:
Now, let’s unscrew the motherboard from the bottom case:
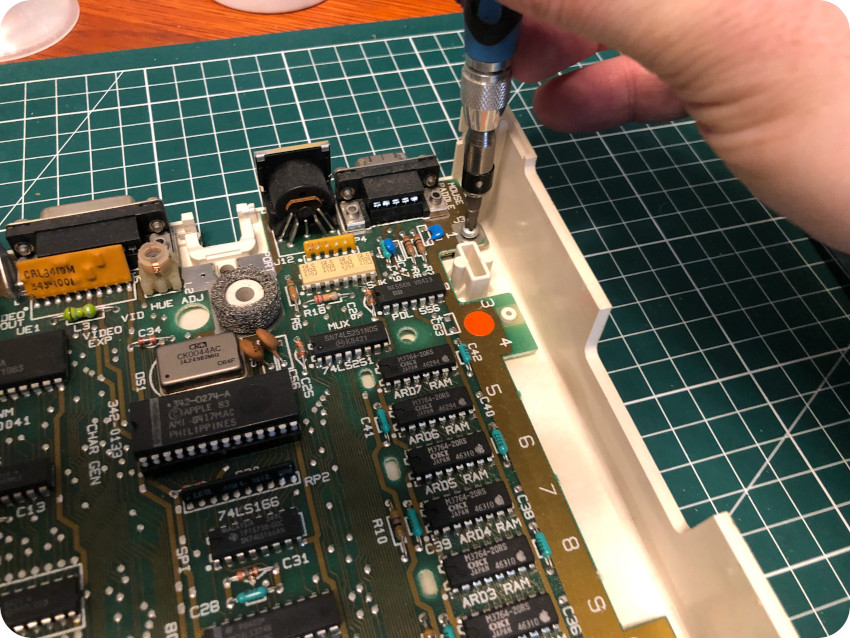
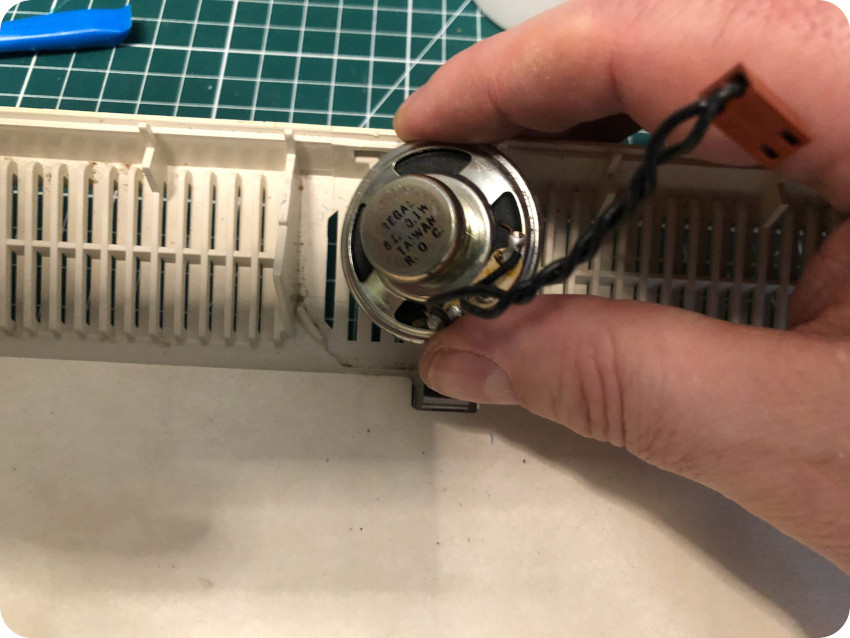
Then unplug the speaker from the motherboard:
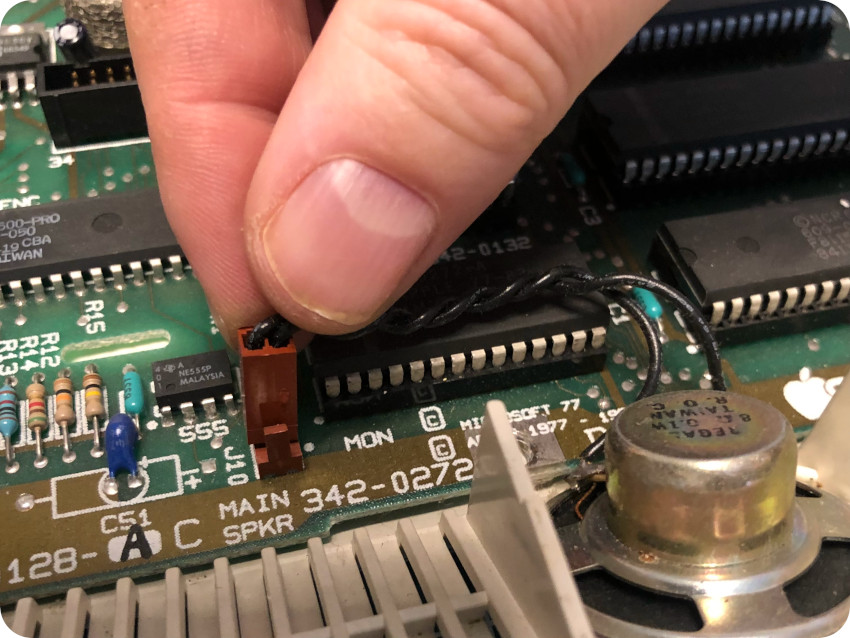
And carefully remove the speaker itself from the case:
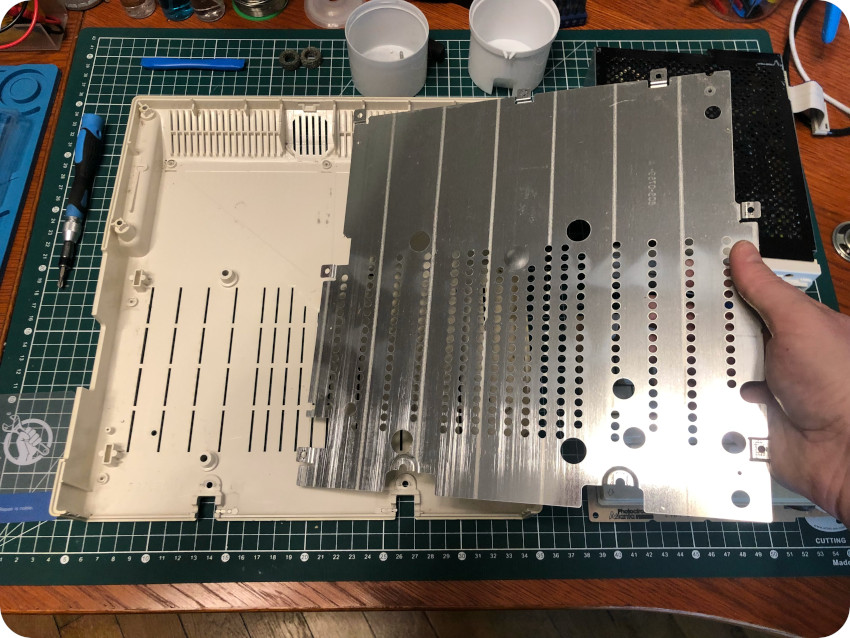
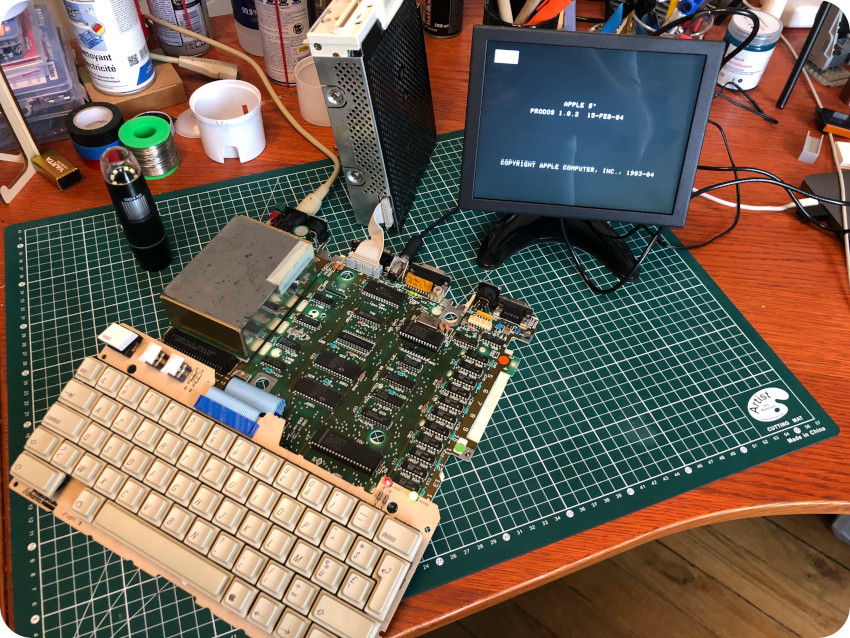
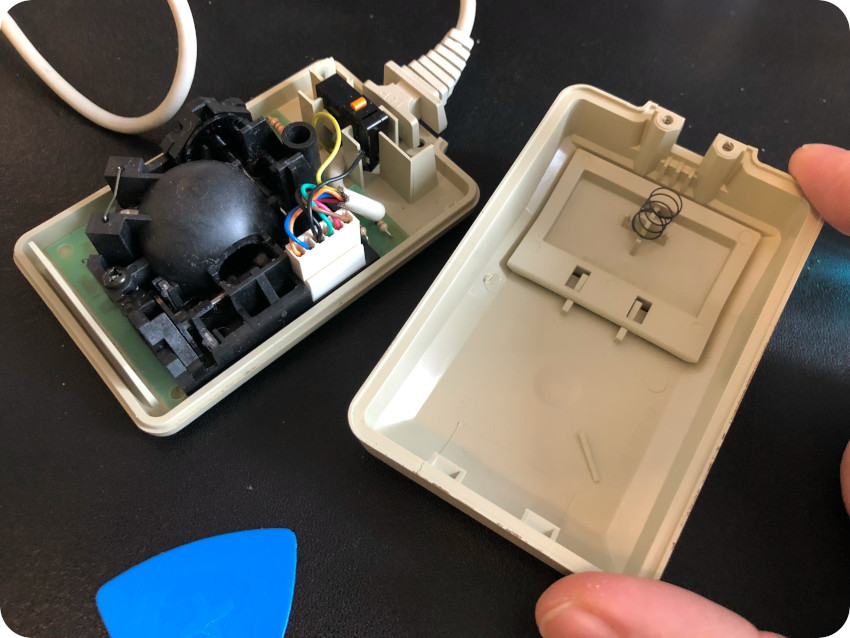
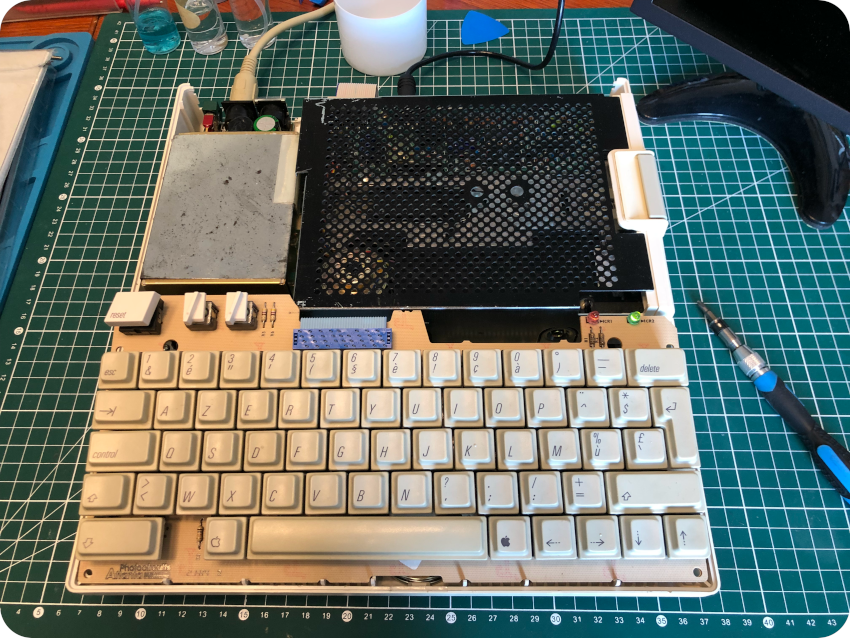
The motherboard can now be removed from the bottom part of the case:

Let’s remove the protective cardboard lying underneath the PCB:
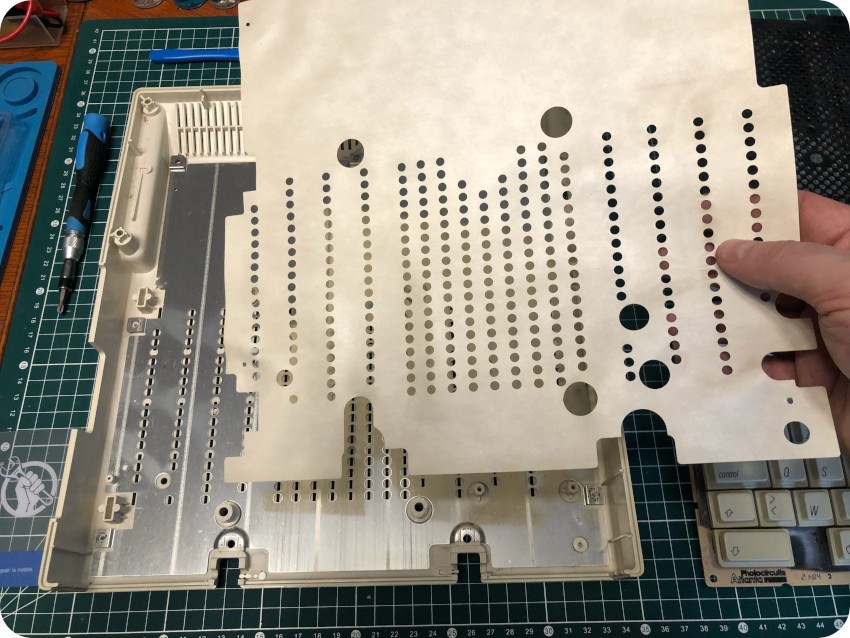
And finally, let’s remove the protective metal shield:
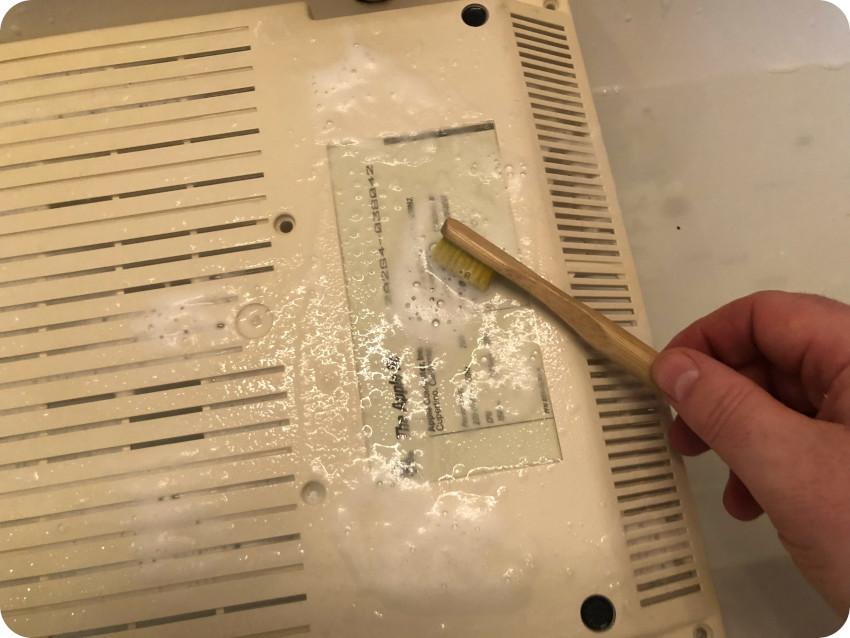
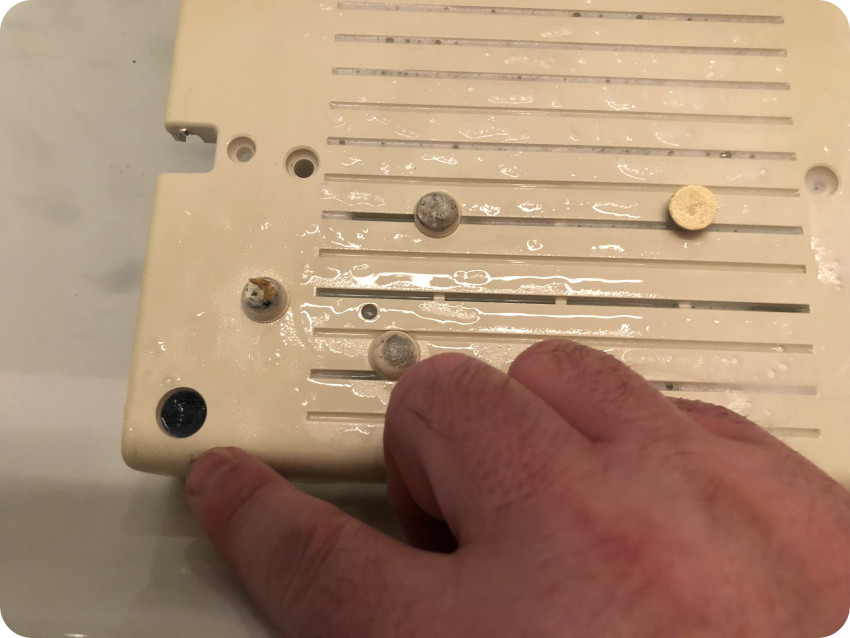
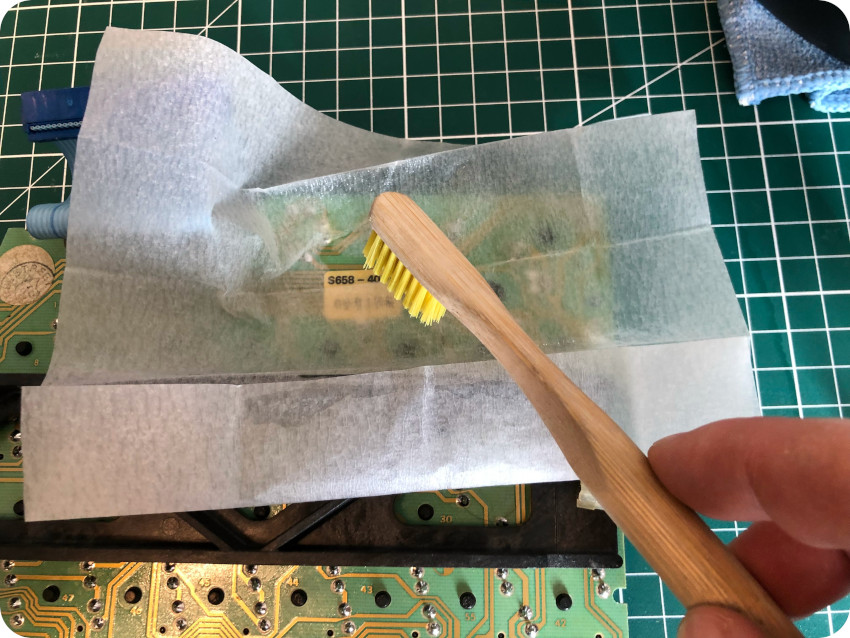
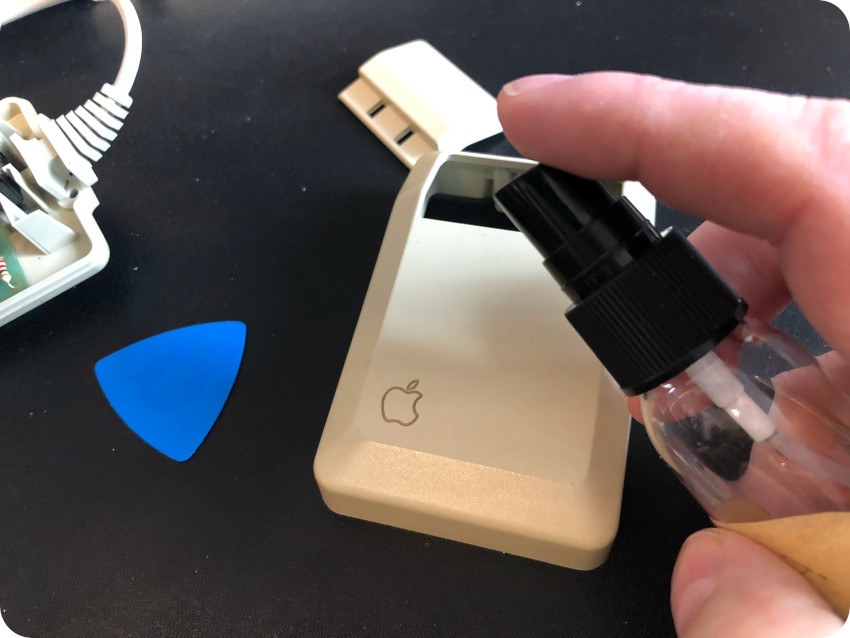
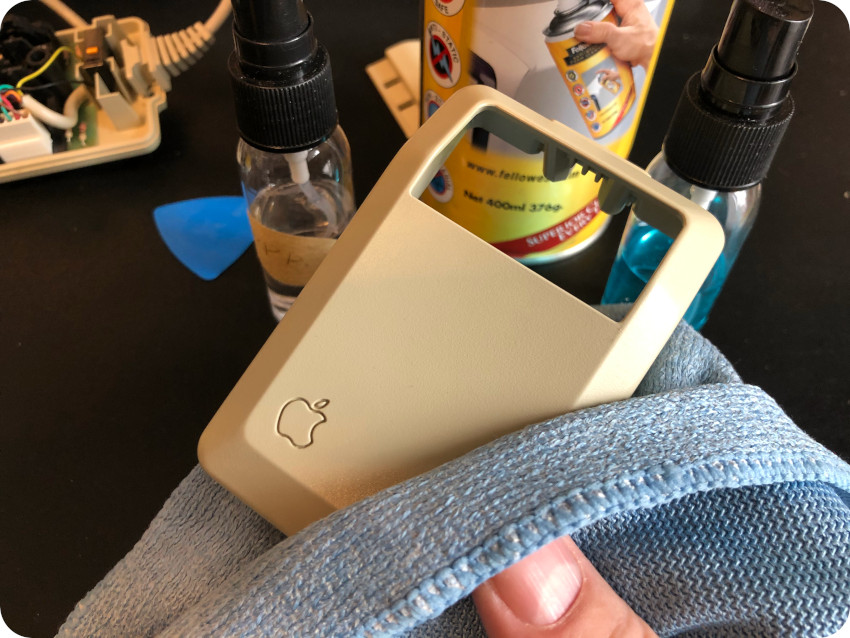
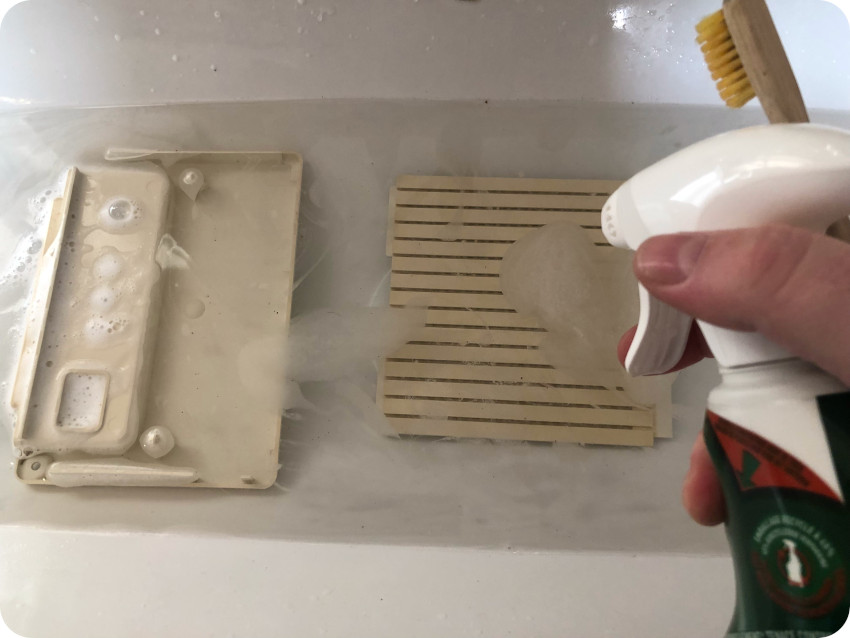
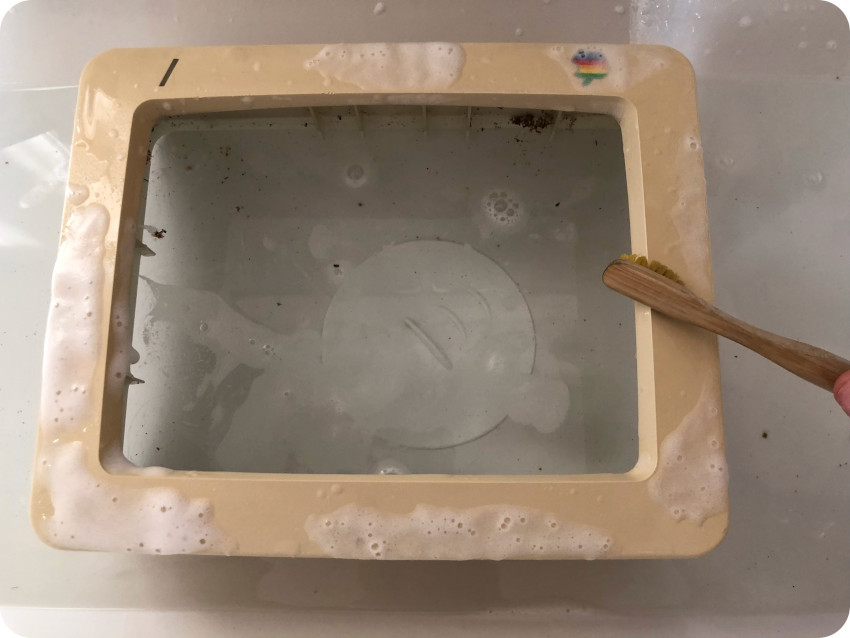
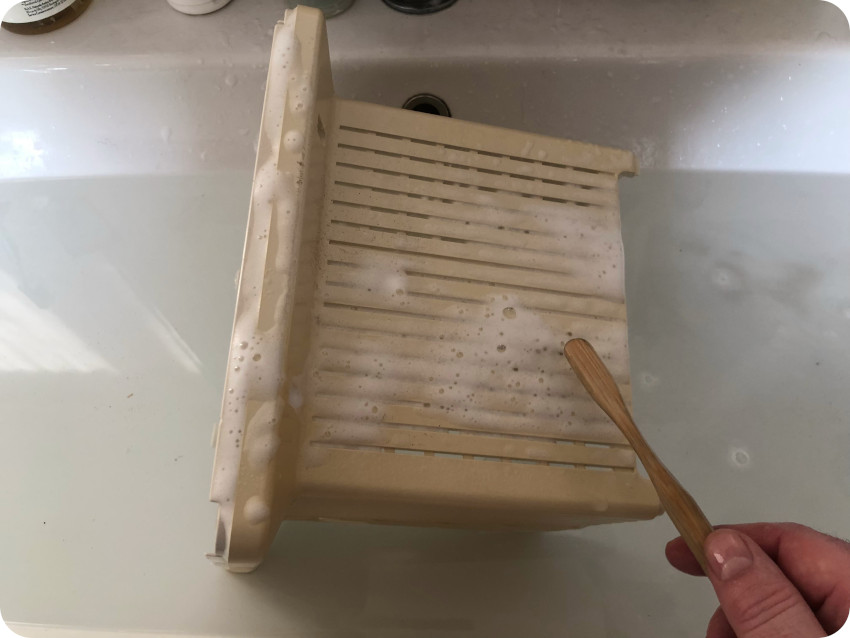
Cleaning the enclosure
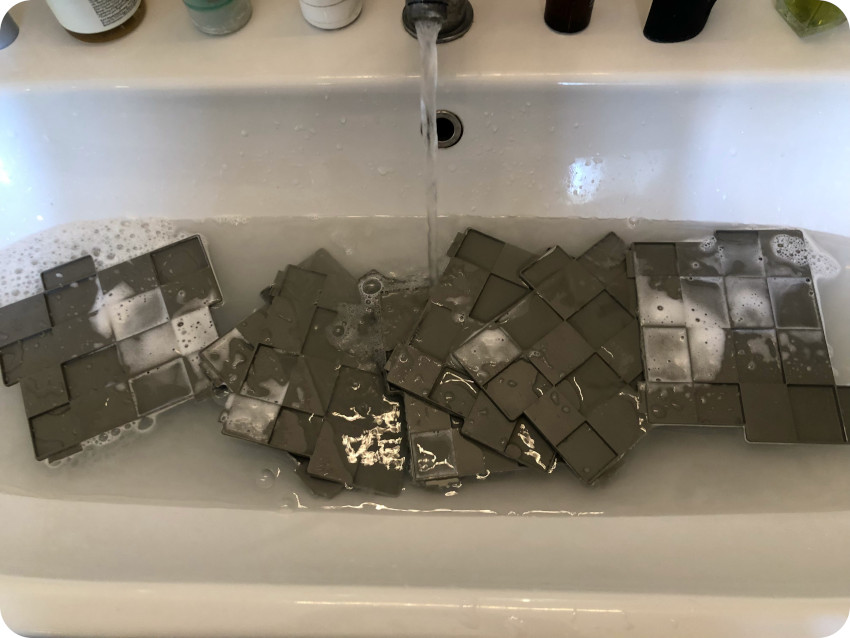
Time for a good bath ! Both parts of the enclosure soaked into warm soapy water:
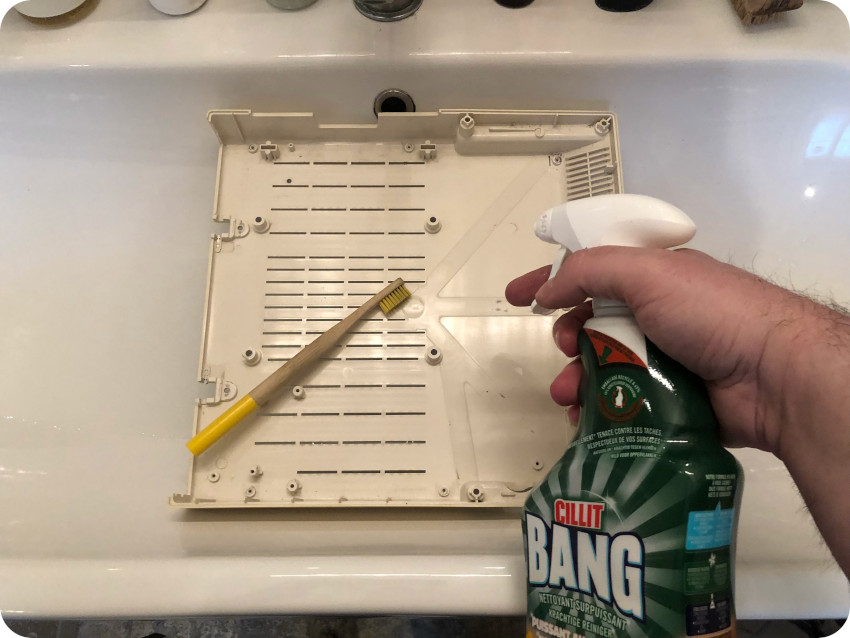
Then they were up to a good scrubbing with the help of a toothbrush:
During the cleaning process, I removed the rubber feet, which were very sticky and almost decomposing. I will replace them with new ones later on:
Once dried with a soft microfiber cloth, I finished the cleaning process spraying Isopropyl Alcohol.
I started the sunbrighting process right away. But … more on that later.
The keyboard
Let’s take care of the keyboard. It is a bit dirty, but frankly, I have seen much, much worse. Some of the keys (T, B, Control, …) are a bit stuck and doesn’t “sound” right, like if there were dust or rust stuck in the mechanisms.
Overall, the keyboard feels bit “mushy“.
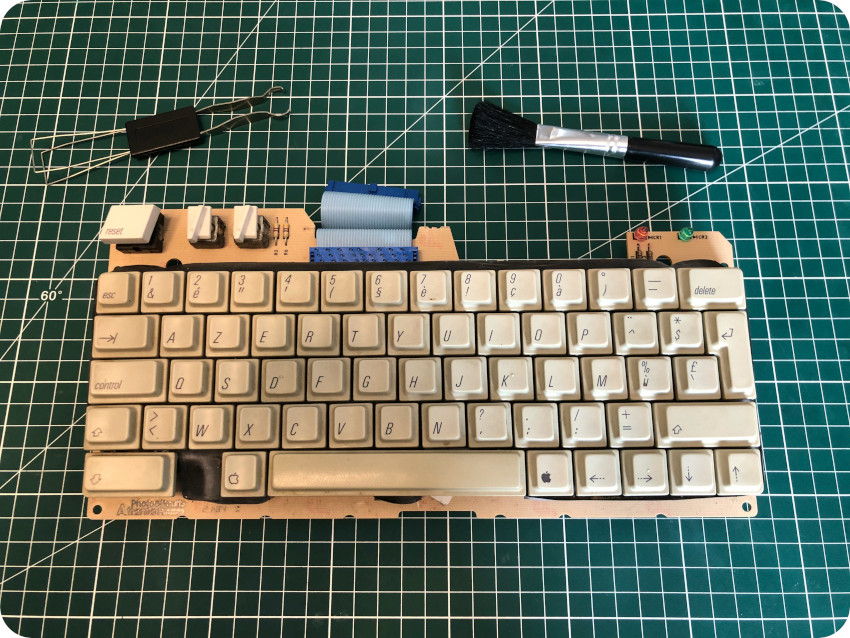
Let’s flip the keyboard for a first visual inspection:

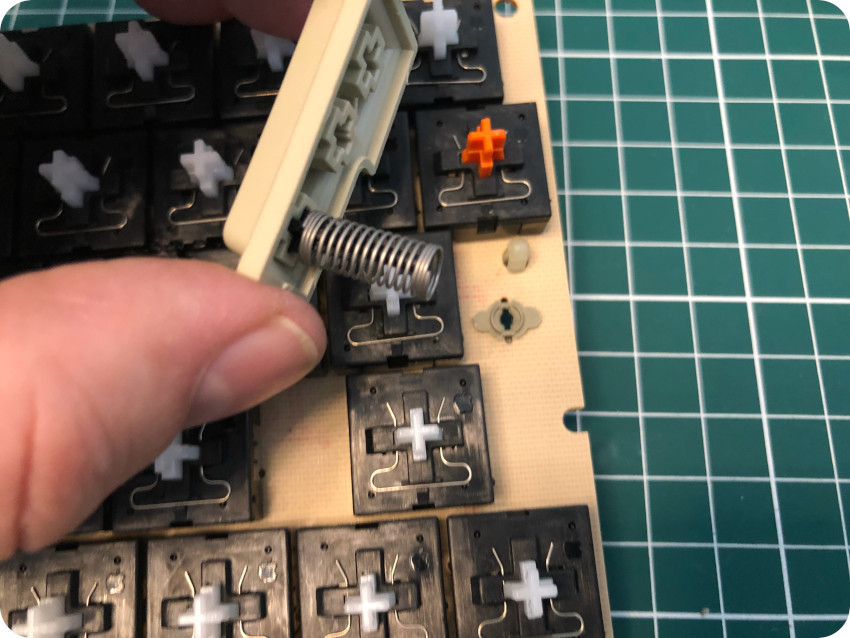
I started removing the keys with my key-cap puller:
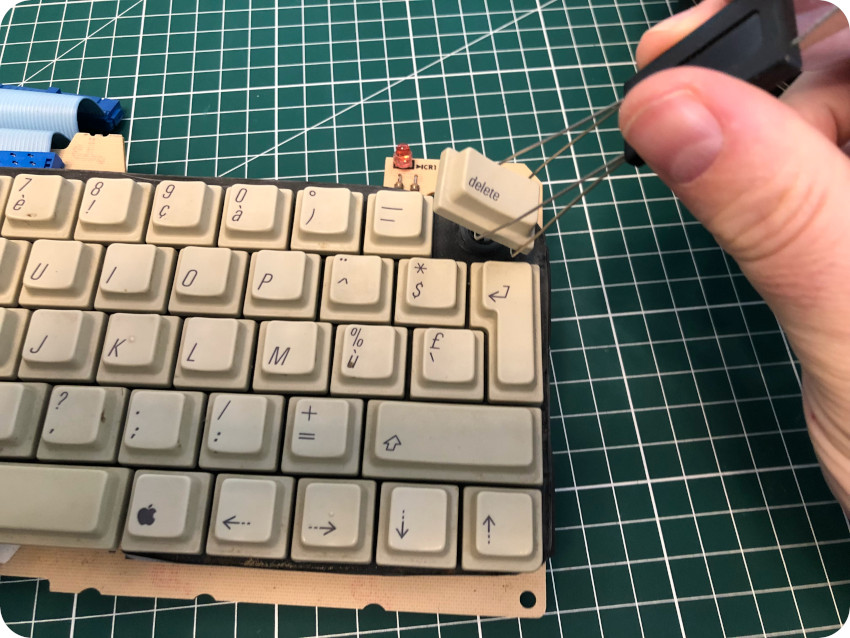
Pay attention to the “Return” key, which is the only one using a spring:
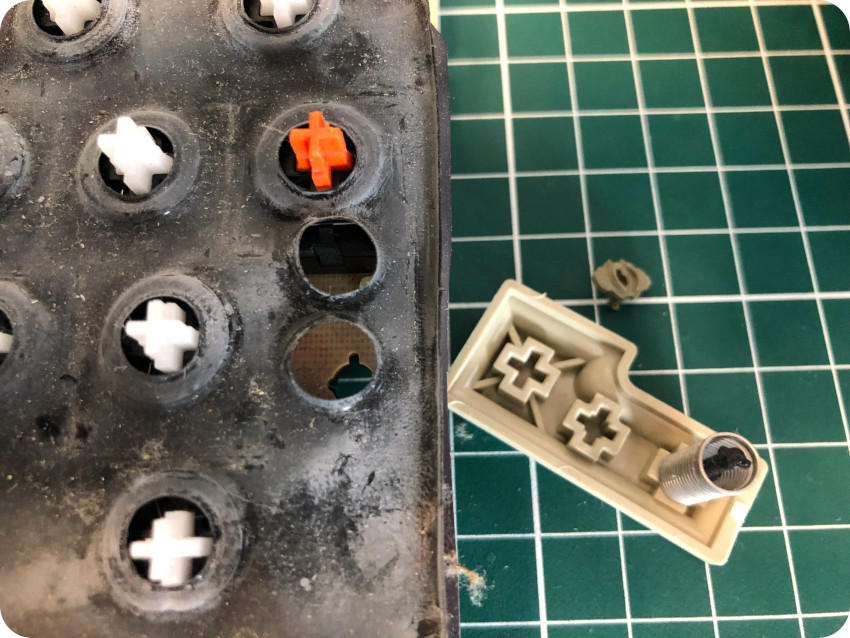
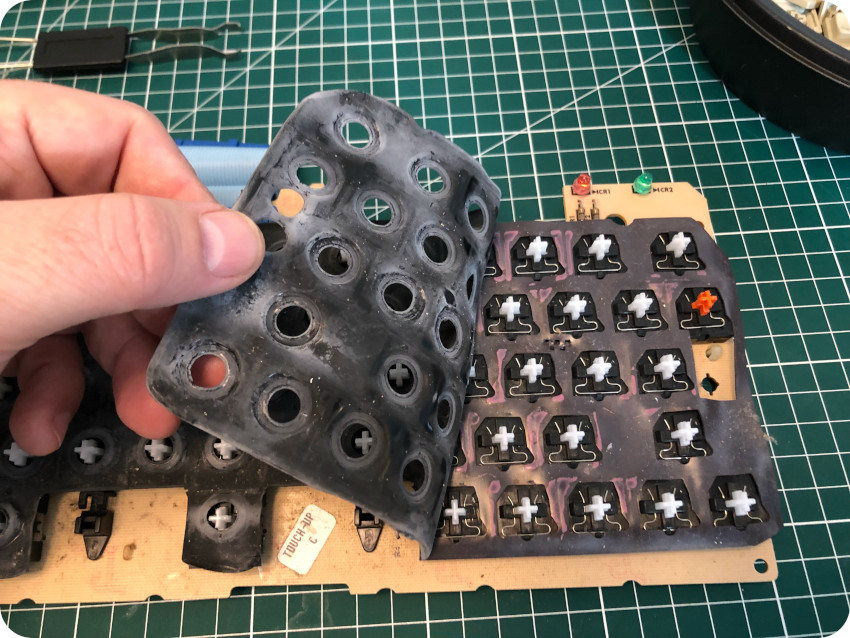
All the keys are now removed. There is a protective black plastic membrane underneath the keys. With time, its texture changes and … it tends to decompose. This is what give the keyboard this “mushy” feeling.
I decided to completely remove and trash the membrane (in the end, it actually decompose into 3 or 4 parts while I was examining it), as well as the second protective plastic layer sitting under the membrane:
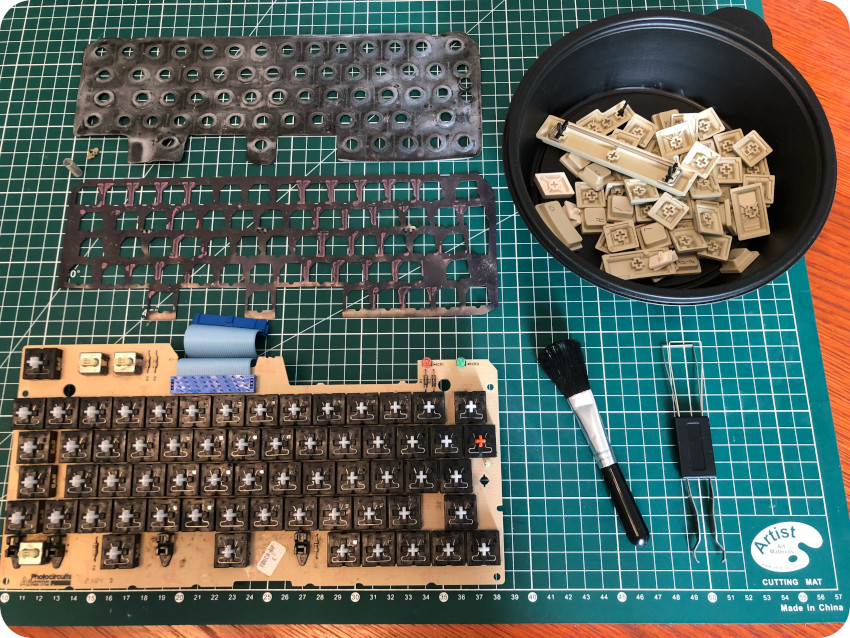
The key mechanisms won’t be protected any more, but the keyboard will “feel” much better. I guess, I will take great care not spilling soda on the keyboard !
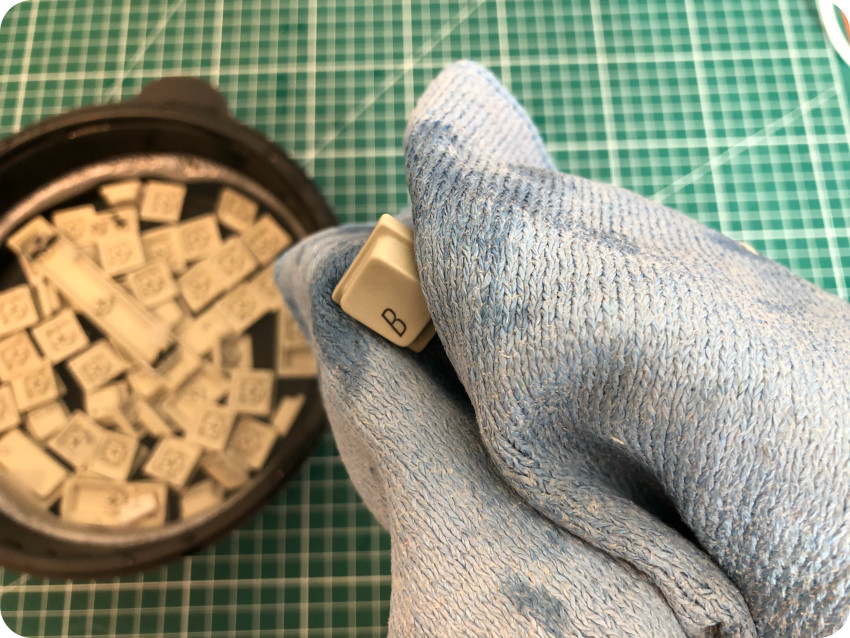
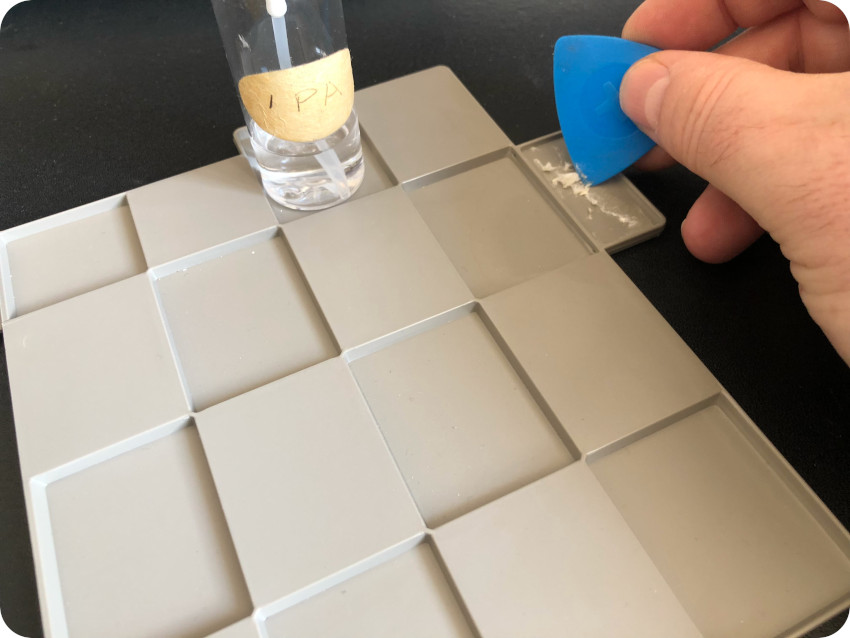
Meanwhile, the key caps took a warm soapy bath:
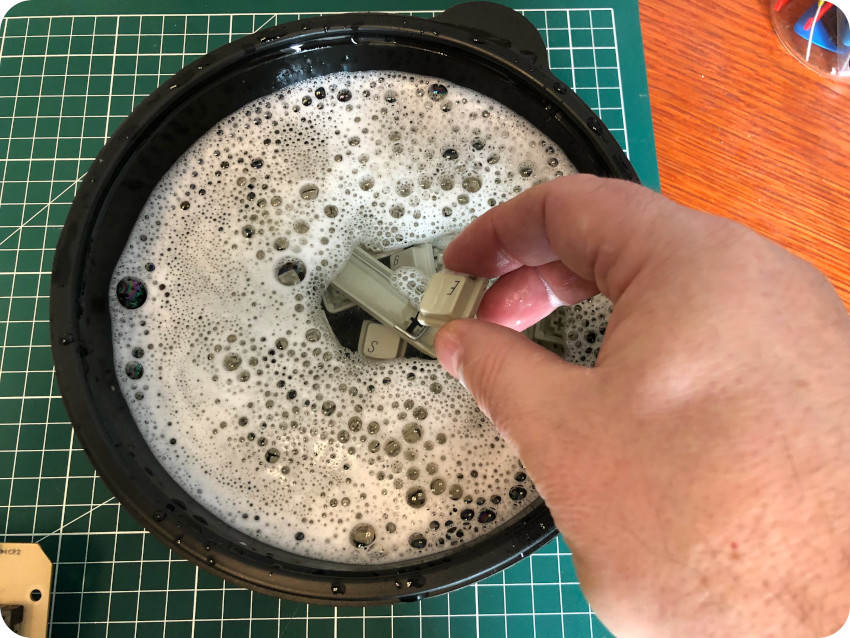
I cleaned keys one by one with a microfiber cloth, then sprayed IPA on them:
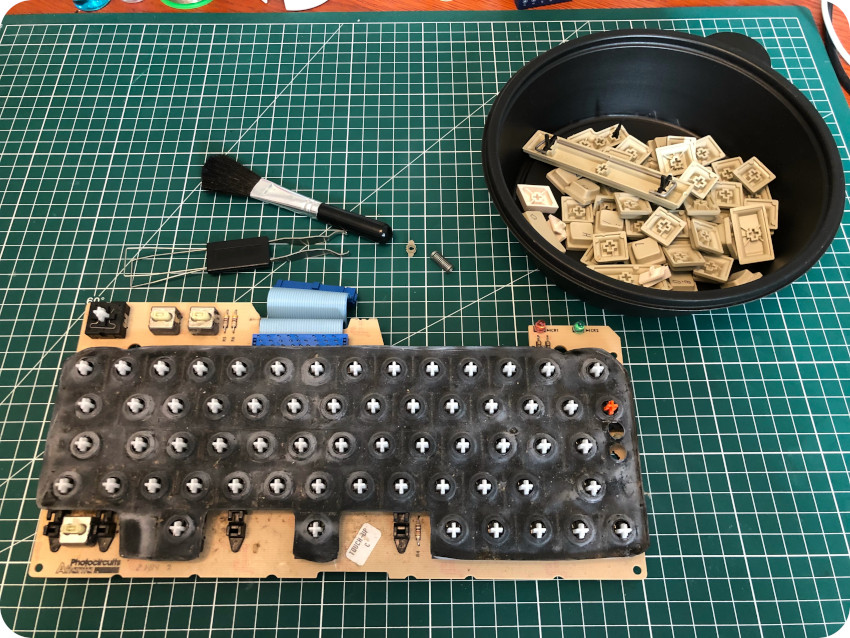
I started removing chunks of dust on the keyboard:
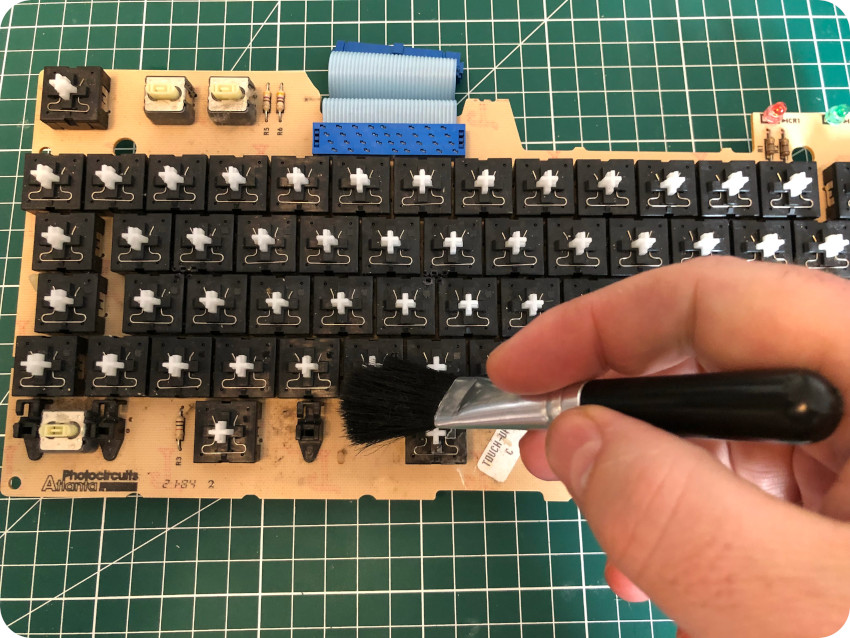
Then I used compressed air:
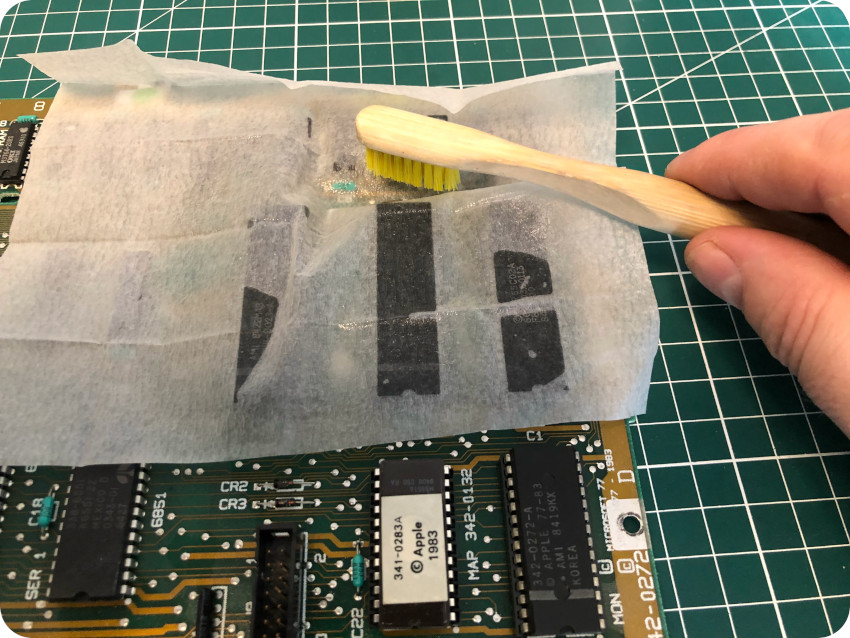
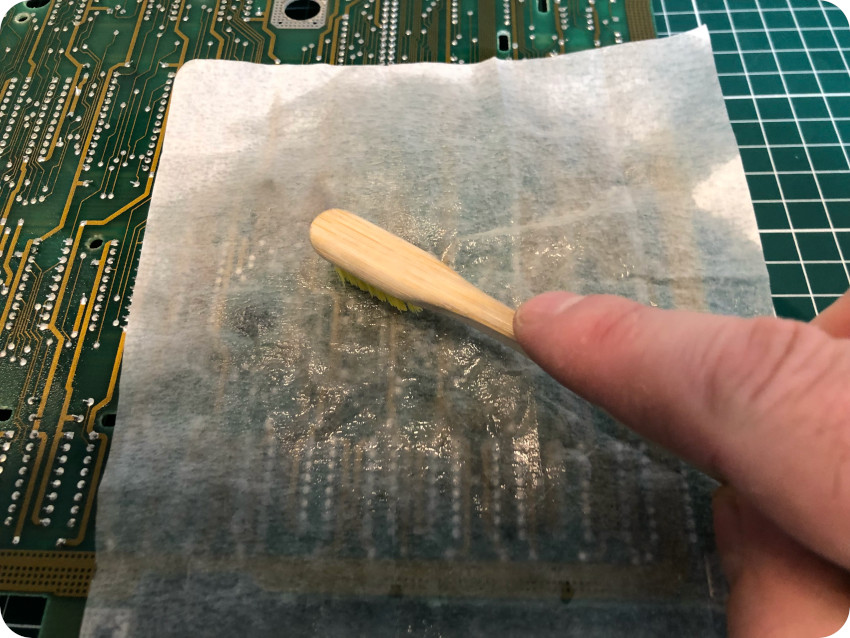
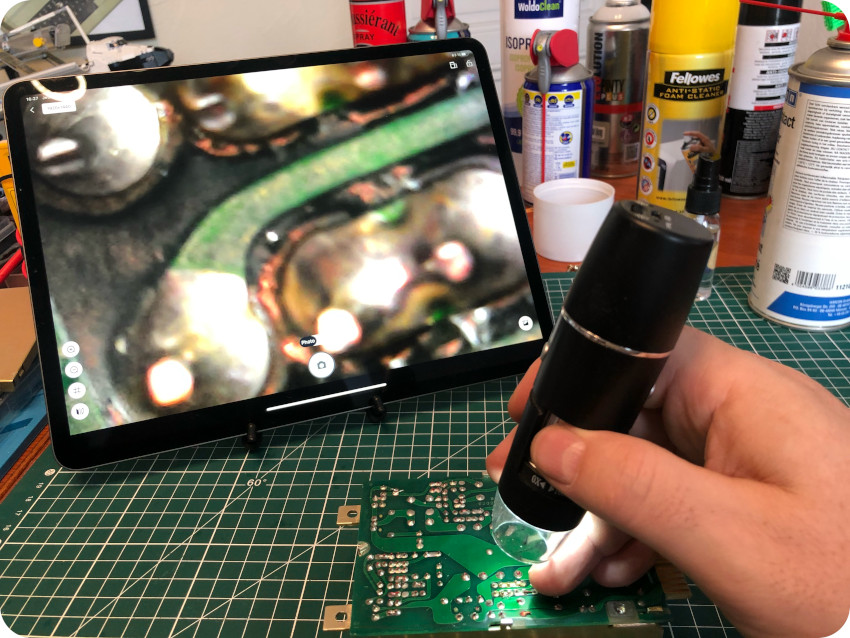
I flipped the keyboard to clean it’s PCB and followed my usual process: glass cleaning towels soaked in IPA and a toothbrush:
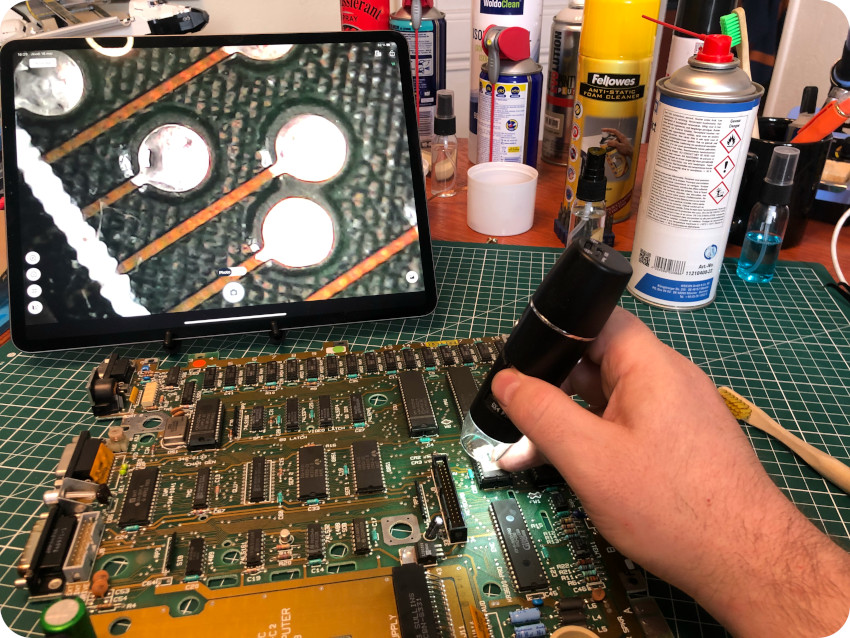
Then I used my portable WiFi-enabled microscope to inspect the PCB, looking for cracks, bad traces or bad solder joints:
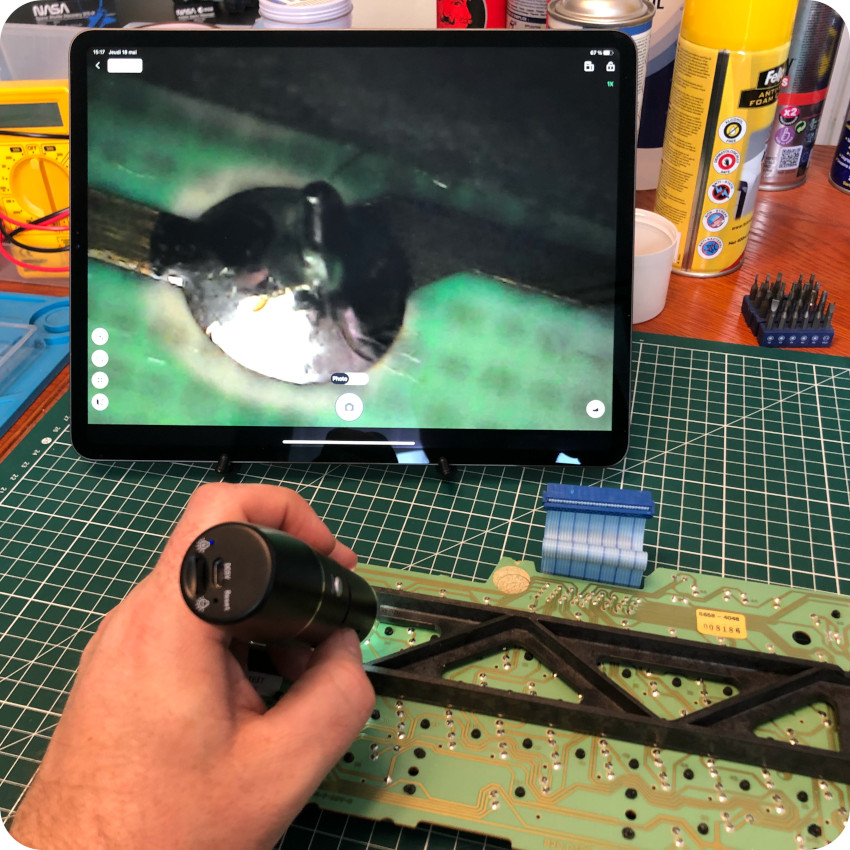
Everything was fine, so I finished the cleaning process, spraying IPA on the other side of the keyboard:
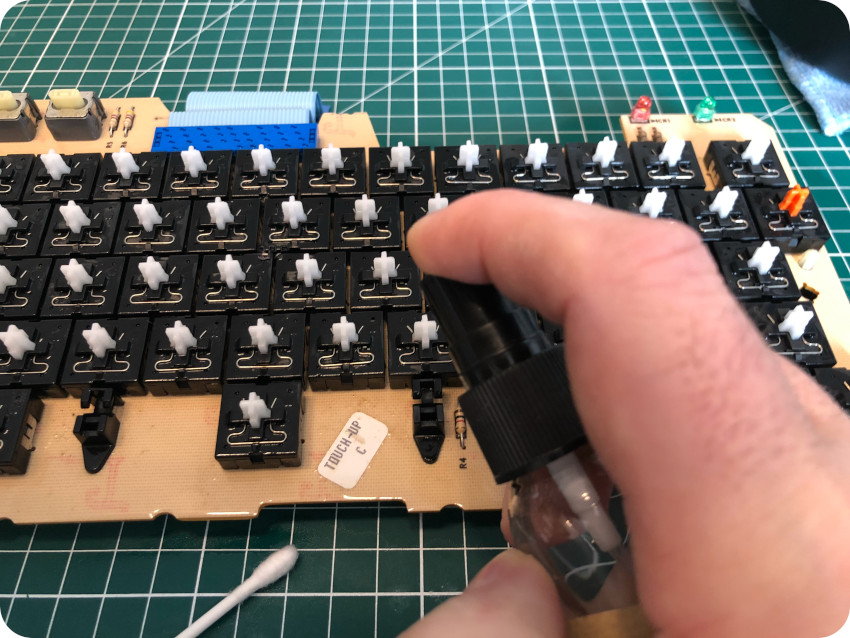
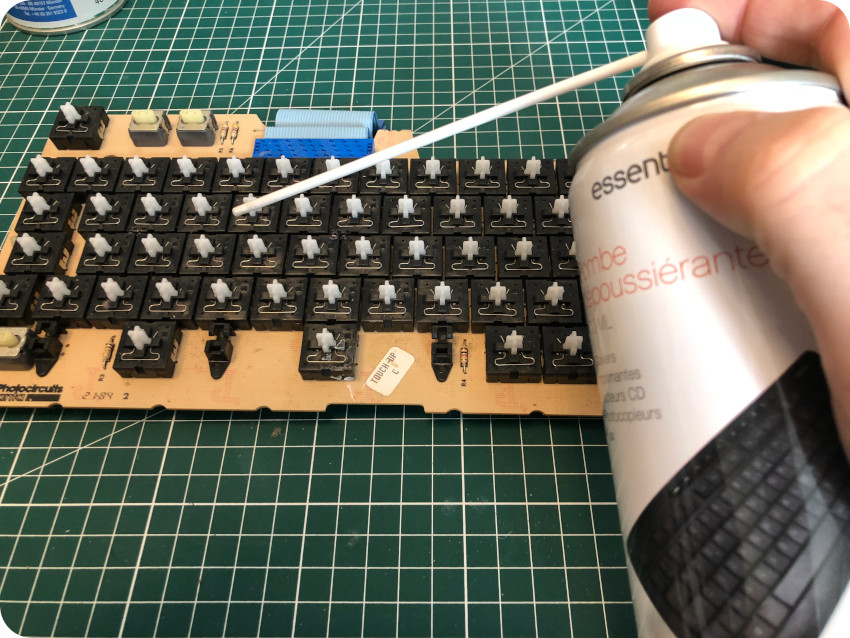
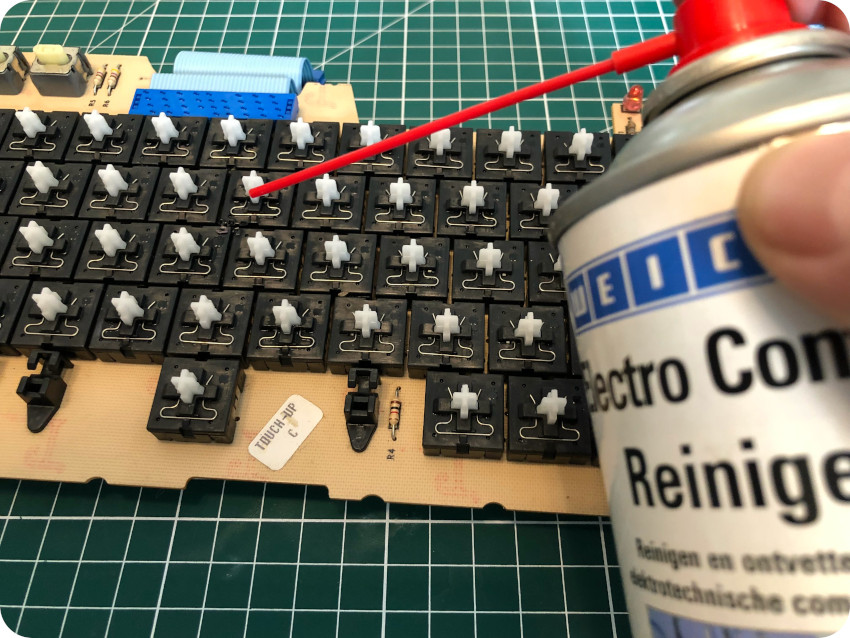
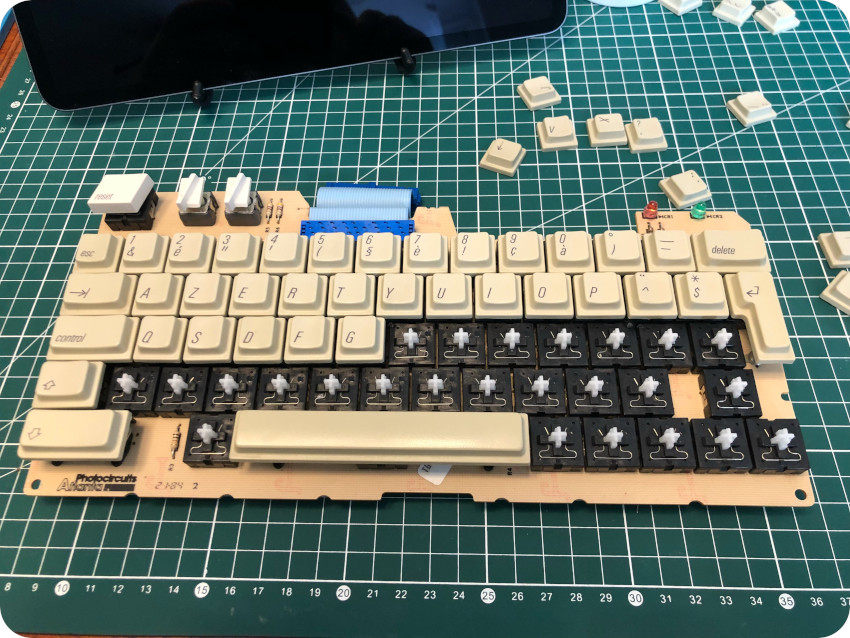
Then I sprayed contact cleaner on each key mechanism, pushing the plunger and spraying until everything’s smooth. It took a while, but it was worth the efforts. None of the keys are stuck. This keyboard feels really nice !
Then I put back the keys, starting with the “Return” key and it spring (don’t forget to put this gray plastic thing that holds the black plunger with spring):
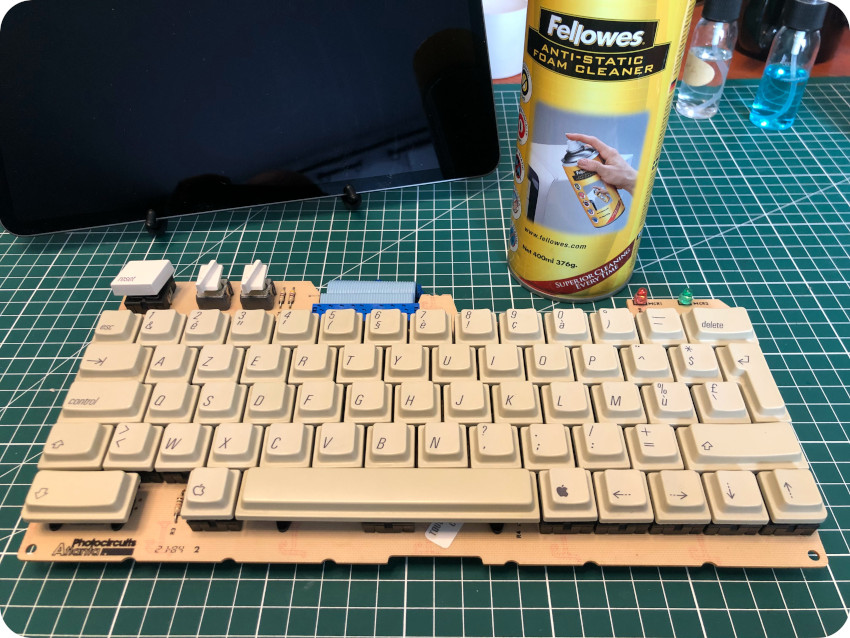
I finished the process spraying anti-static foam cleaner on the keyboard. It is clean, smells fresh, and feels really pleasant !
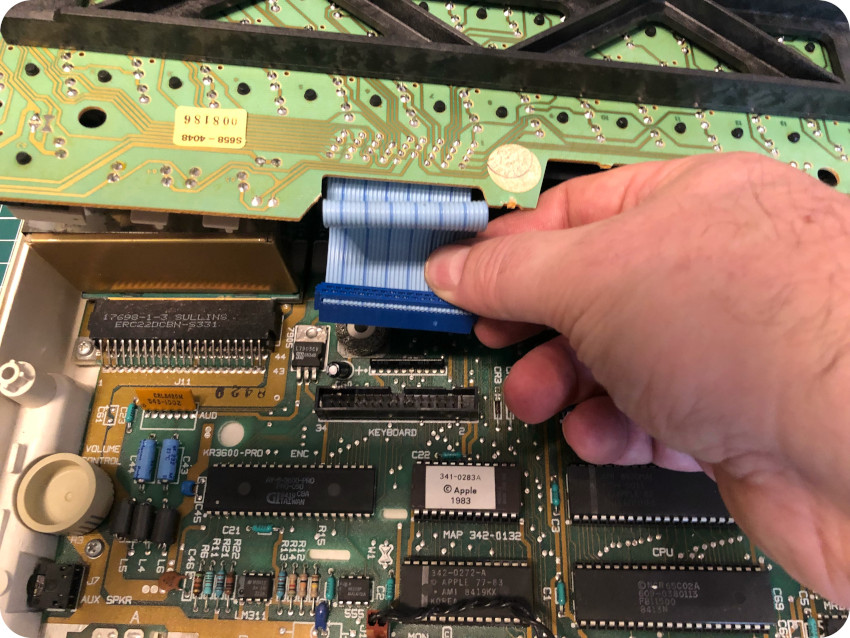
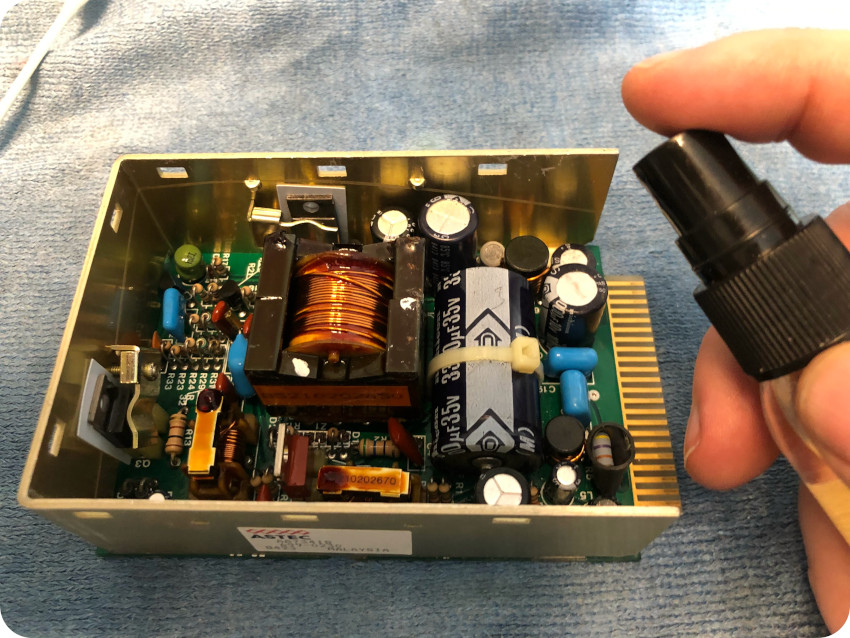
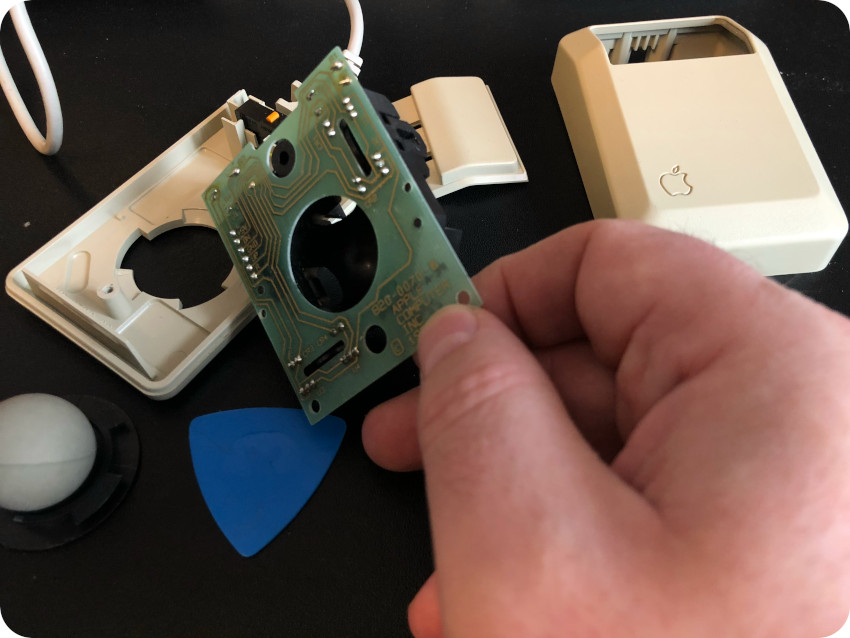
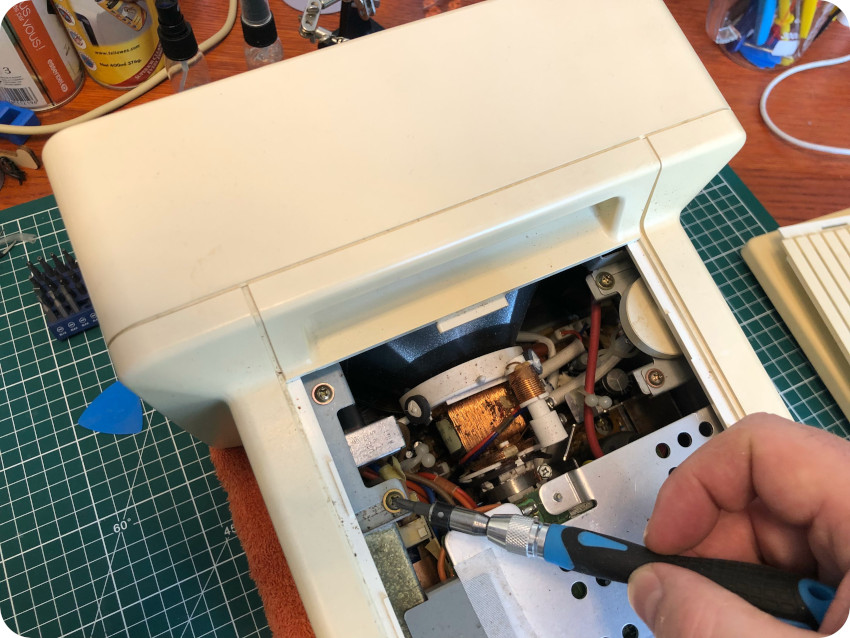
The main PCB
Time to work on the motherboard. First, I took apart the internal converter. Spraying contact cleaner helped a lot:

Then I started the cleaning process with IPA:
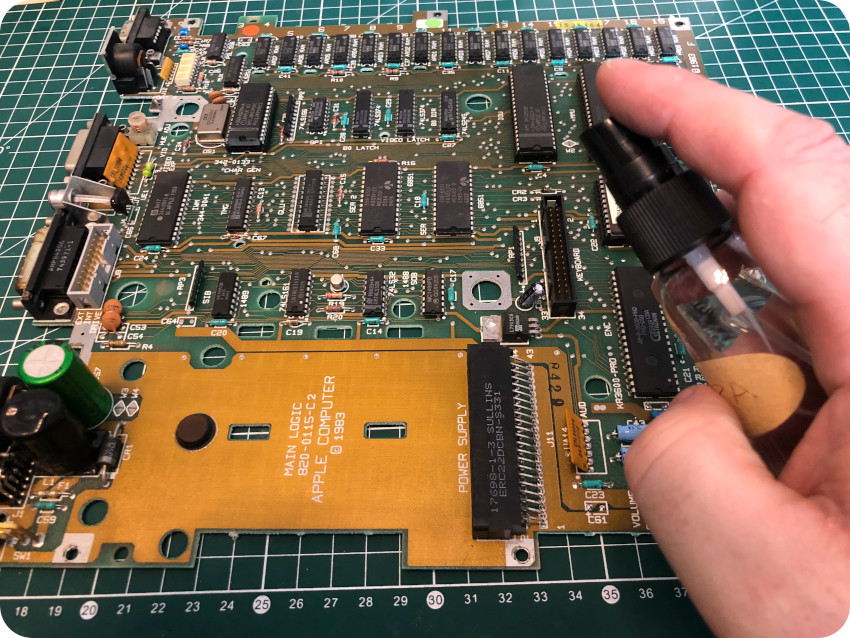
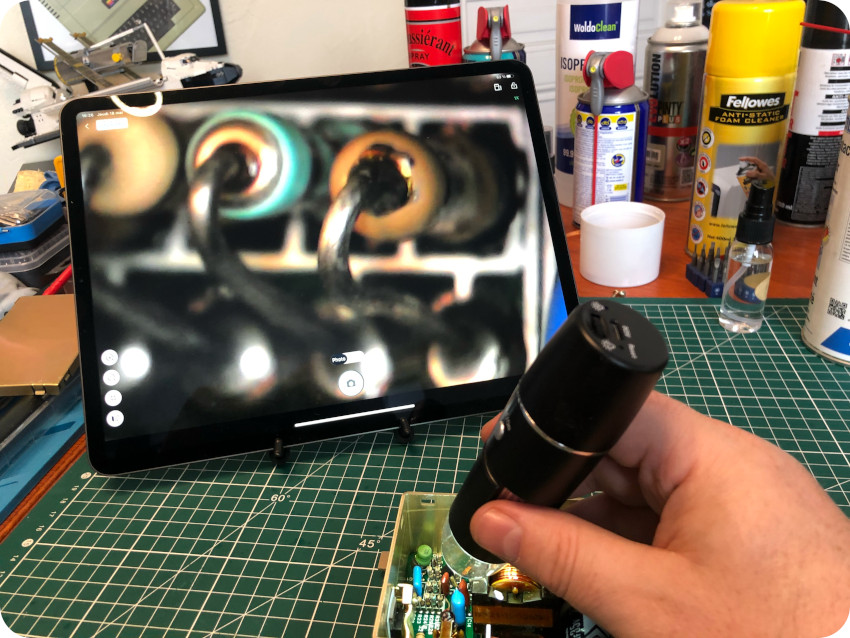
Then, as usual, I used a glass cleaning towel soaked in IPA, for both sides of the motherboard:
Then, I inspected both sides with under the microscope. All electrolytic caps looked good, but I had to flow fresh solder on a couple of solder joints that looked a bit suspicious:
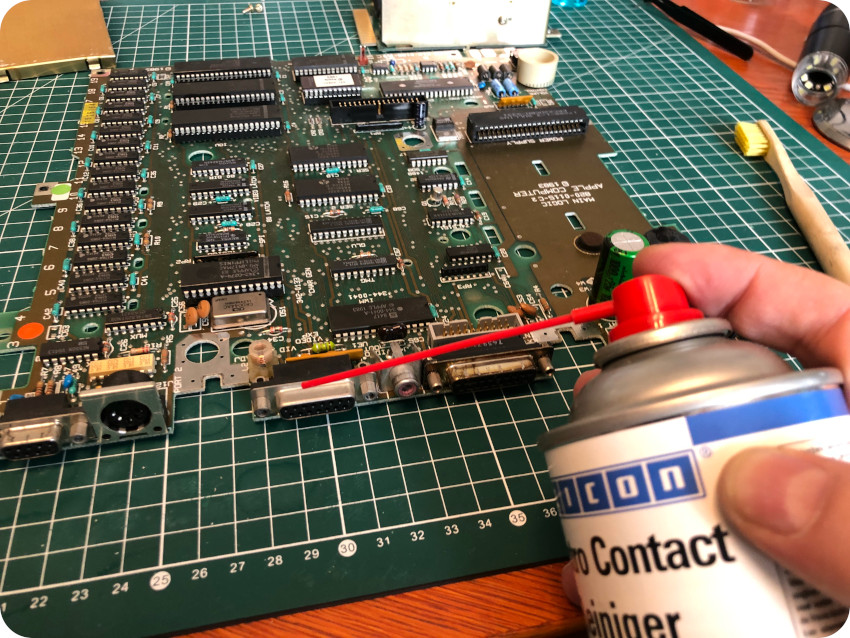
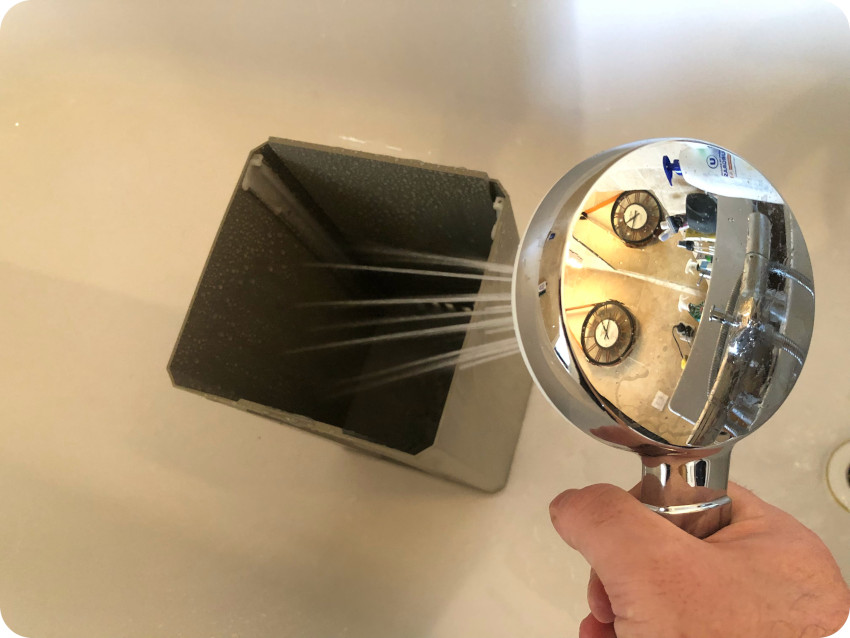
Once done, I sprayed contact cleaner on all internal and external connectors. Then, I treated the external floppy drive connector (which was a bit rusty) with WD-40:
Let’s take a closer look at the motherboard !
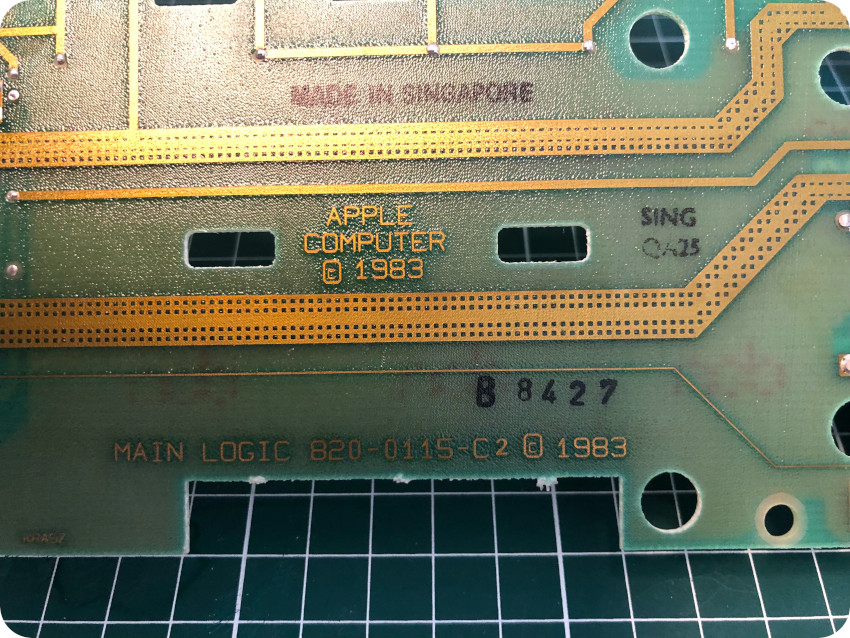
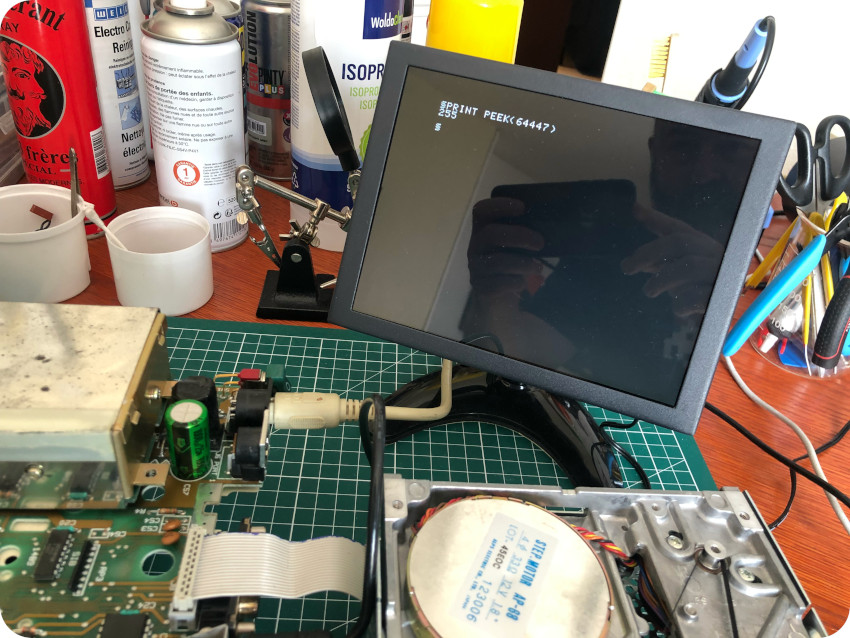
The motherboard in my Apple IIc is a 820-0115-C2 board. The IC’s date-codes are from late 83, early 84, so this is a early version of the Apple IIc.
It is confirmed by getting the ROM version using PRINT PEEK(64447):
- ROM 255 (04/1984 to 11/1985):
Here are the main components of the Apple IIc motherboard (information collected from applelogic.org and “Apple IIc Reference Manual, Volume 1”):
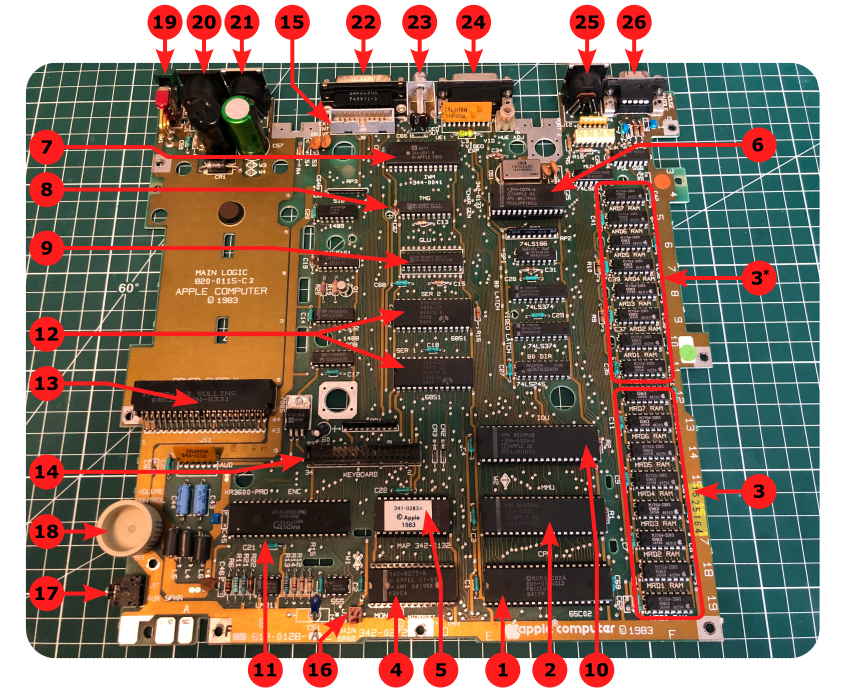
- Microprocessor: the Apple IIc uses a 65C02 8-bit microprocessor clocked at 1.023MHz. The one used here was manufactured by NCR. The 65C02 is an enhanced MOS 6502, with (almost) backwards compatibility and 27 additional instructions. It was implemented with CMOS technology, which brought lower power usage.
- MMU: the Memory Management Unit (MMU) contains most of the logic that controls memory addressing in the Apple IIc.
- RAM: the Apple IIc comes with 128KB of RAM, split into (3) main and (3*) auxiliary. This Apple IIc uses OKI DRAM chips (which are better than MT chips that tend to fail).
- ROM: the 16K 8-bit ROM including the Monitor, Applesoft BASIC and enhanced video firmware.
- Keyboard ROM: the keyboard map ROM.
- Character ROM: the character generator ROM used for character sets for the video display.
- IWM: the Integrated Woz Machine (IWM) is a single-chip version of the Apple Disk II controller card.
- TMG: the TiMing Generator (TMG) generates all the system and I/O clock and timing signals (from the 14.25MHz oscillator)
- GLU: the General Logic Unit (GLU) is a single-ship version of the miscellaneous logic required for the system.
- IOU: the Input Output Unit (IOU) contains most of the logic that controls the built-in input and output features of the Apple IIc
- Keyboard Encoder: the keyboard is scanned by this IC (AY-5-3600 by General Instrument). It generates matrix value for the Keyboard ROM.
- Serial I/O: the Apple IIc uses two 6551 ACIA (Asynchronous Communications Interface Adapter) chips for serial I/O.
- Internal voltage converter connector: the internal converter in the Apple IIc is modular, and is attached to the PCB via this internal connector. The Apple IIc uses a switching-type internal voltage converter and provides electrical power for the built-in electronics plus and external disk drive.
- Internal keyboard connector: internal connector for the keyboard.
- Internal Disk Drive connector: internal connector for the internal disk drive.
- Internal speaker connector: connector for the internal speaker.
- Phone jack: 3.5mm audio mini-jack.
- Volume knob: volume control knob.
- Power switch: on / off switch.
- Power supply connector: the external PSU is attached to the internal converter by means of a 7-pin DIN connector.
- Serial port 1 (printer): DIN-5 connector for serial I/O (usually for printers)
- External Disk Drive connector: 19-pin D-type connector for connecting a second disk drive.
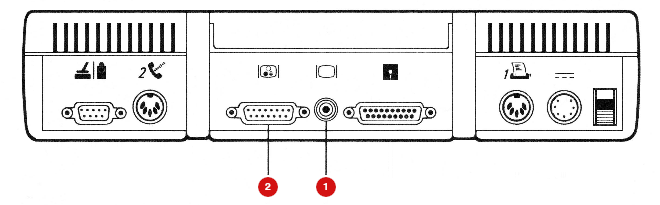
- Composite Video connector: RCA jack for a video monitor.
- Video expansion connector: the back panel of the Apple IIc had a DB-15 connector for video interfaces. It is typically used by the “Le Chat Mauve” cable to connect an Apple IIc to a color TV using a SCART connector.
- Serial port 2 (modem): DIN-5 connector for serial I/O (usually for modems)
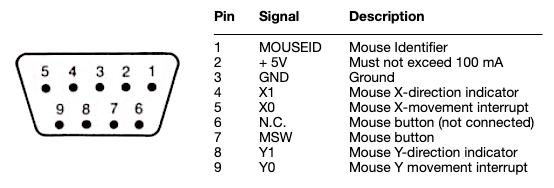
- Mouse / Joystick connector: the Apple IIc uses a DB-9 connector for analog joysticks. It is also used for the Apple IIc mouse.
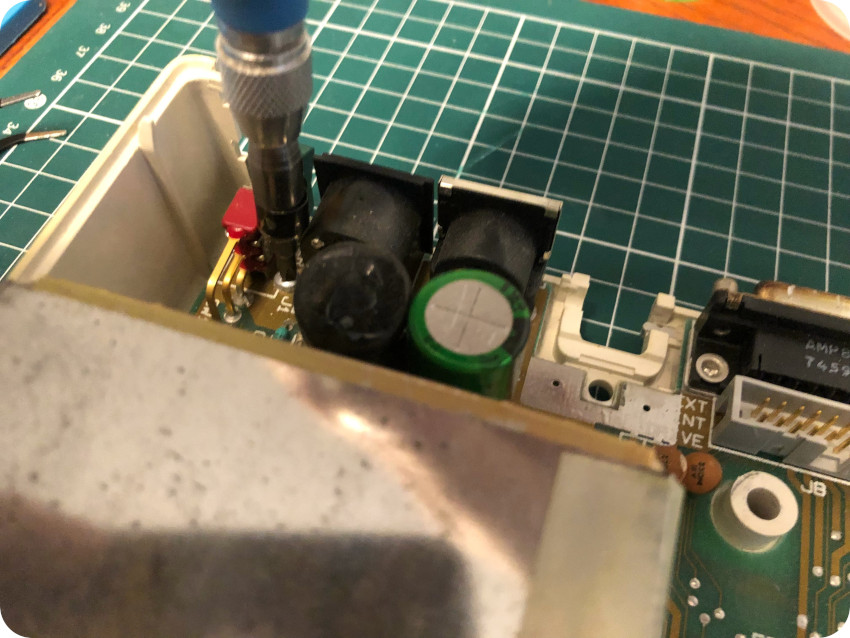
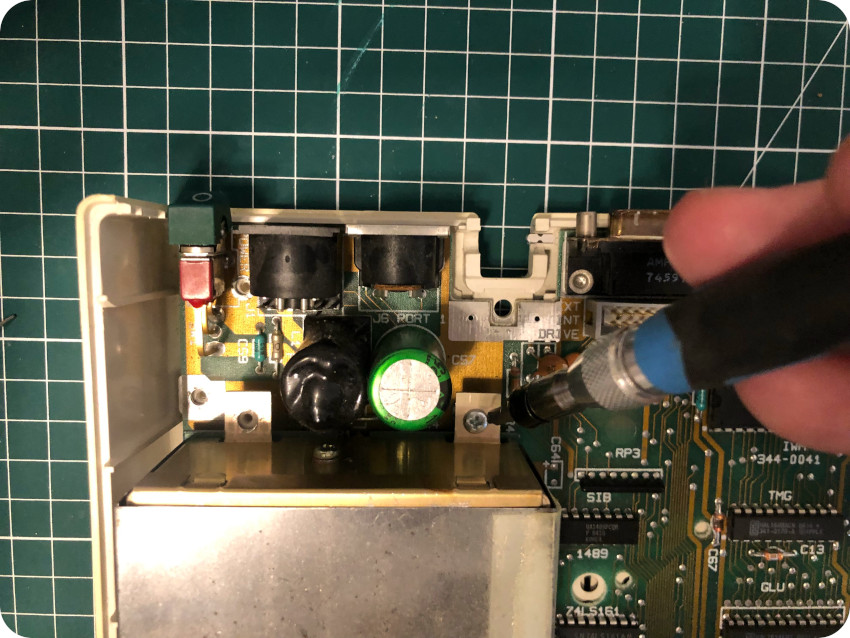
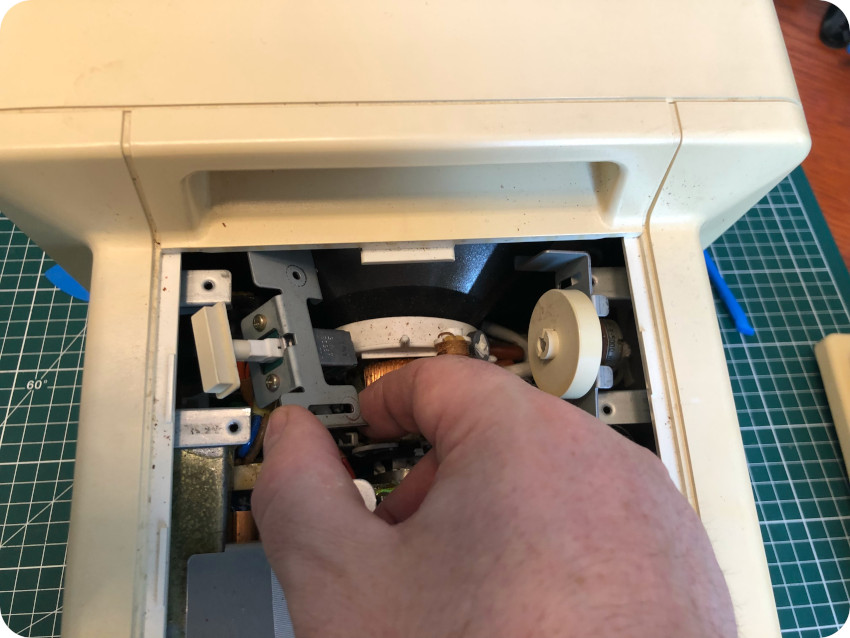
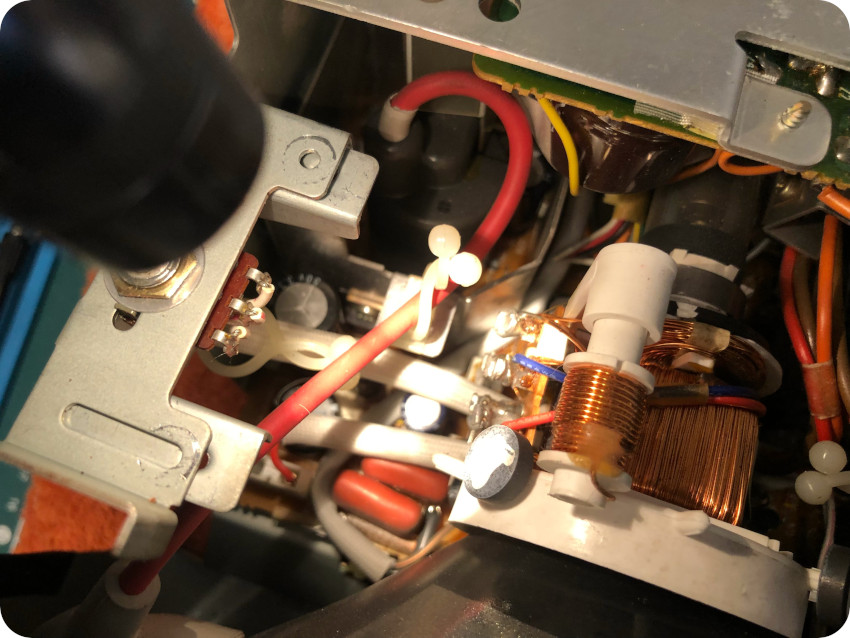
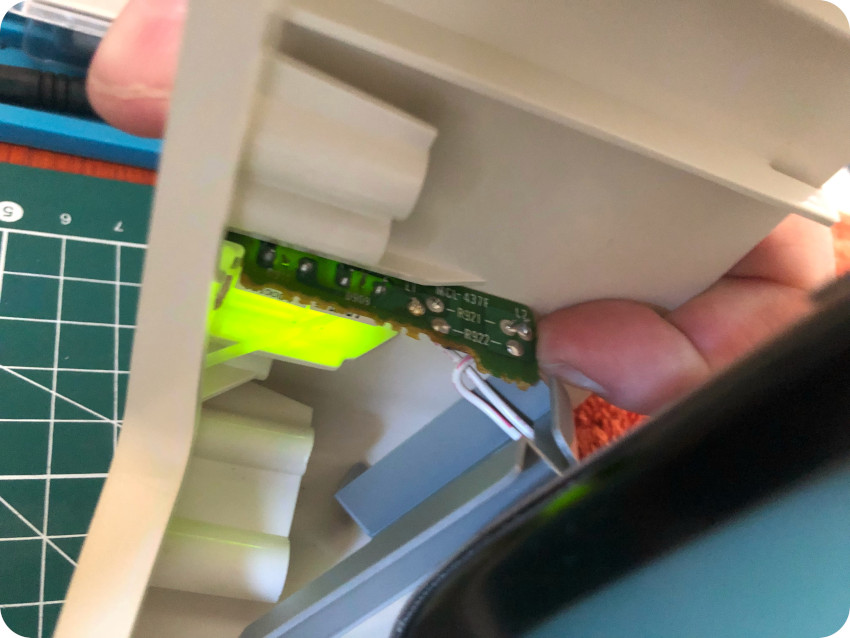
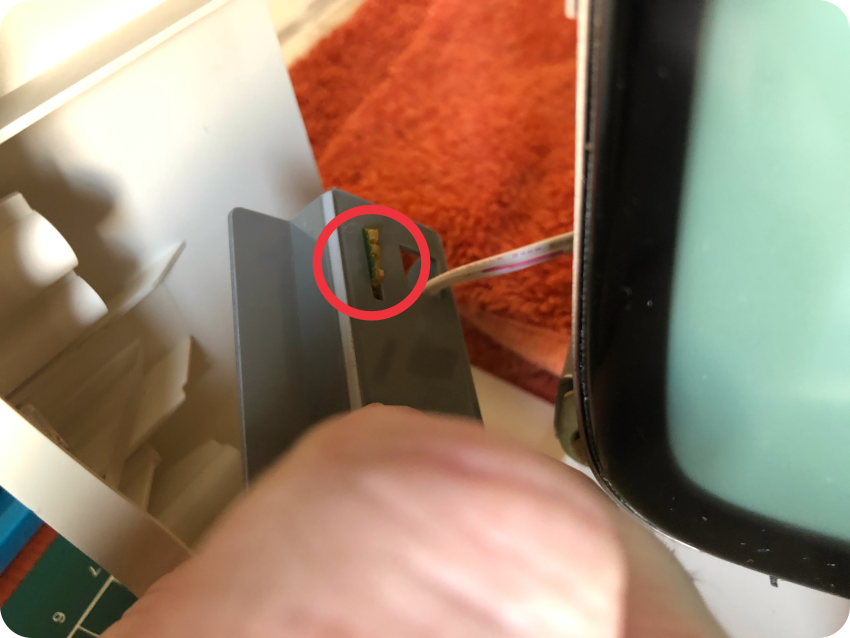
The internal voltage converter
Let’s take care of the internal voltage converter:
Though it was really clean, I spray IPA on the components and cleaning the PCB:
Then I inspected the converter under the microscope, looking for bulged caps, cut traces or bad caps:
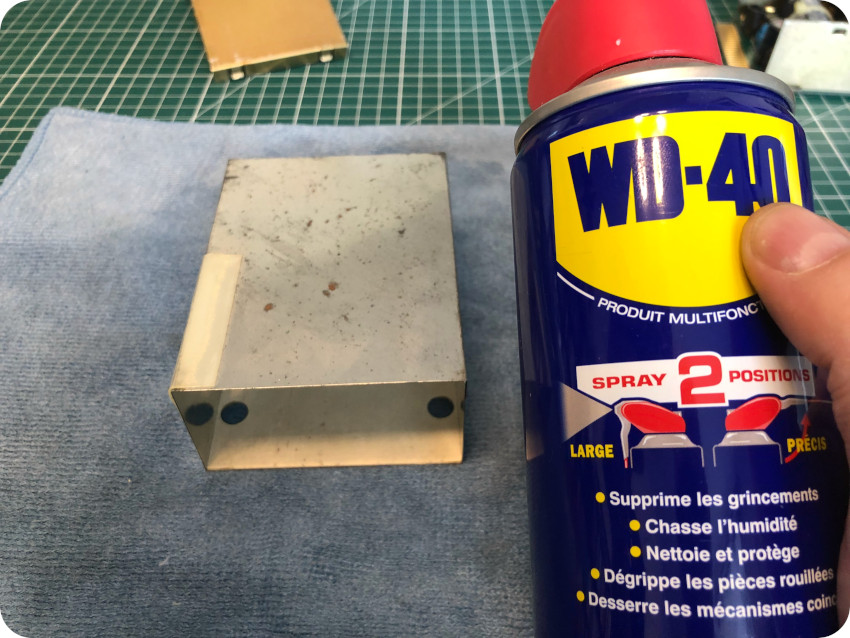
Everything looked fine. I treated the external protective shield with WD-40 and re-assembled back the internal voltage converter:
The internal converter in the Apple lIc operates on from 9 to 20 volts DC as provided by the external power supply. The basic specifications of the internal converter are listed in the following table. Minus 5 volts is derived from the 12 volts provided by the voltage converter [from “Apple IIc Reference Manual, Volume I”]:
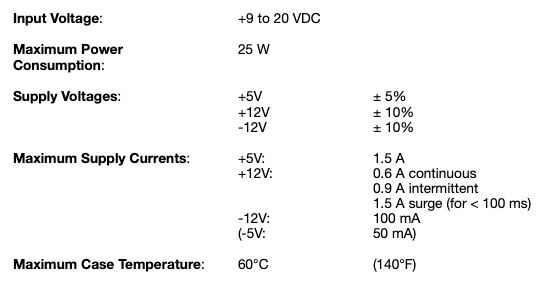
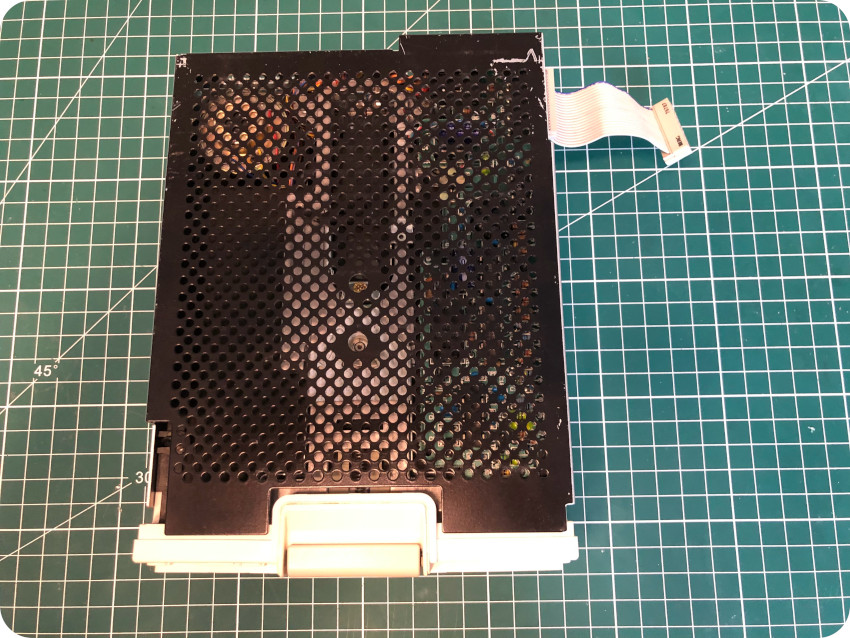
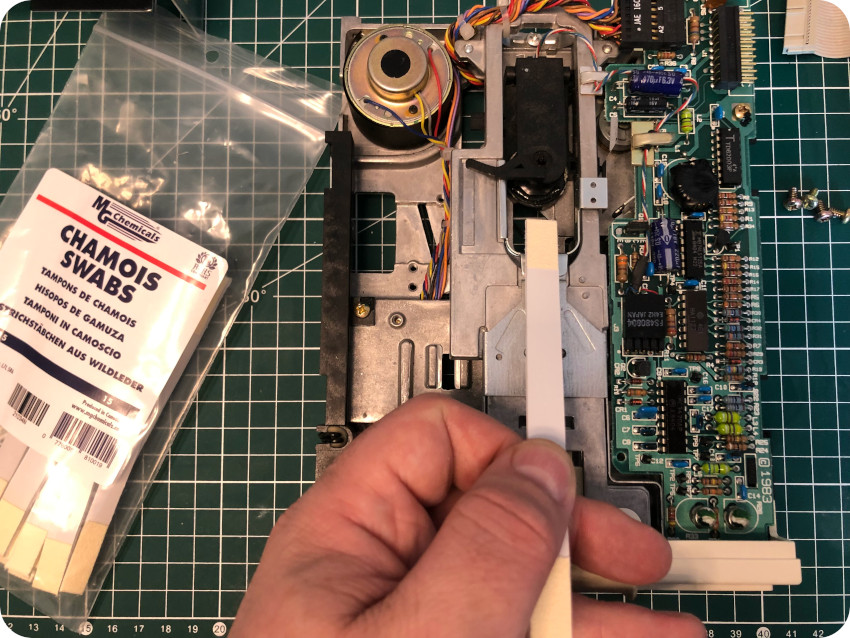
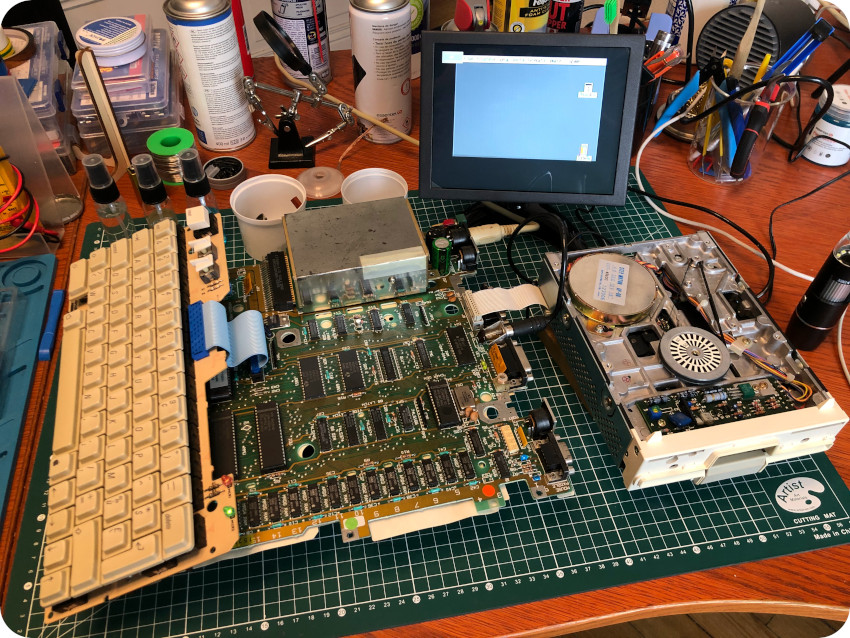
The Floppy Disk Drive
Servicing the floppy disk drive was easy:
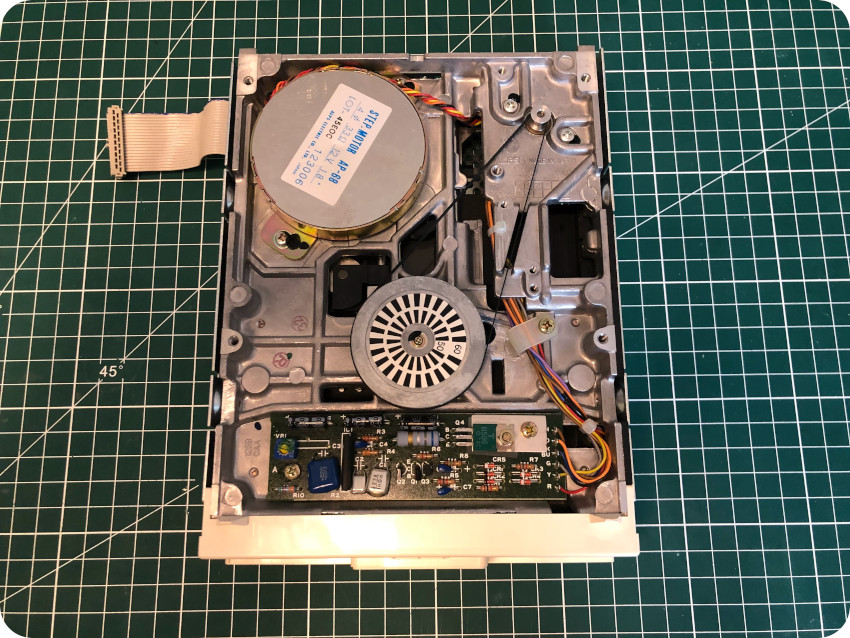
To access the internals of the floppy disk drive only requires removing 4 screws:
I cleaned the PCB with Isopropyl Alcohol, then cleaned the head with a chamois swab:
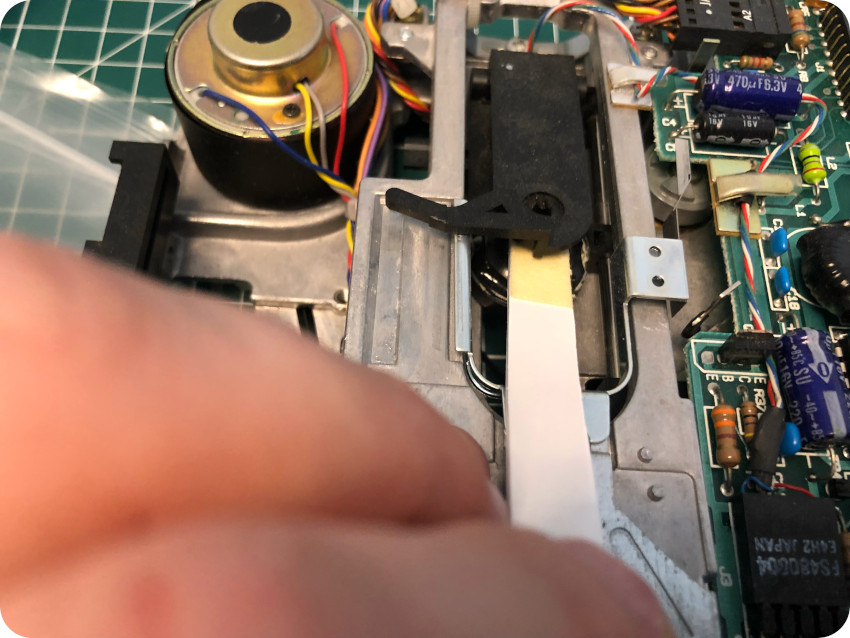
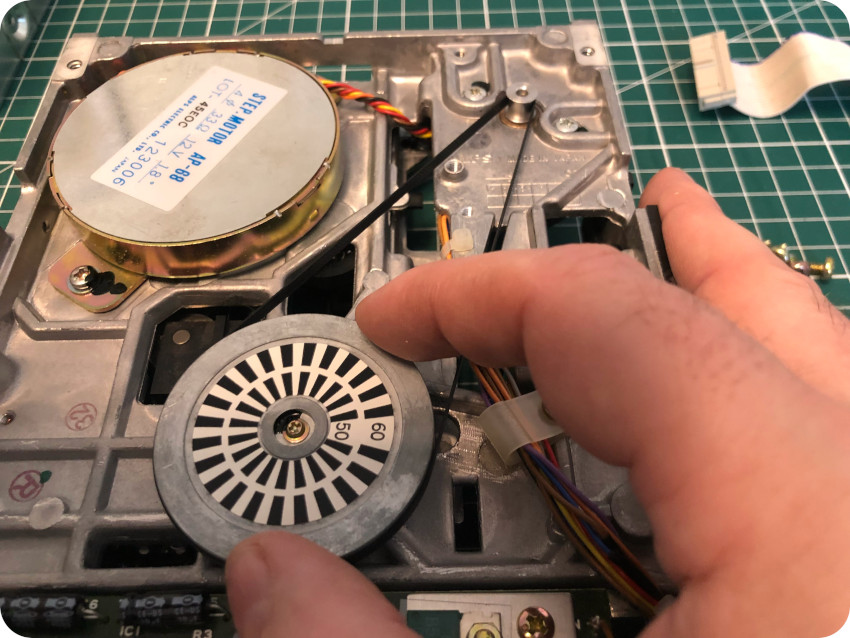
I used a dash white lithium grease to lubricate the moving parts. I flipped once again the floppy disk drive, to inspect the belt, which was in excellent conditions:
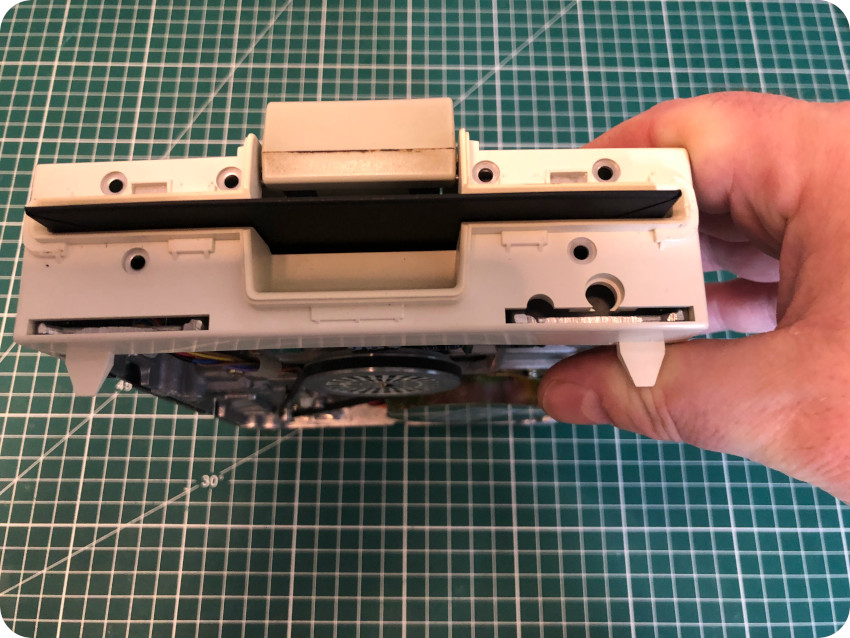
Finally, I took care of the front bezel, which needs a good clean:
Second round of tests
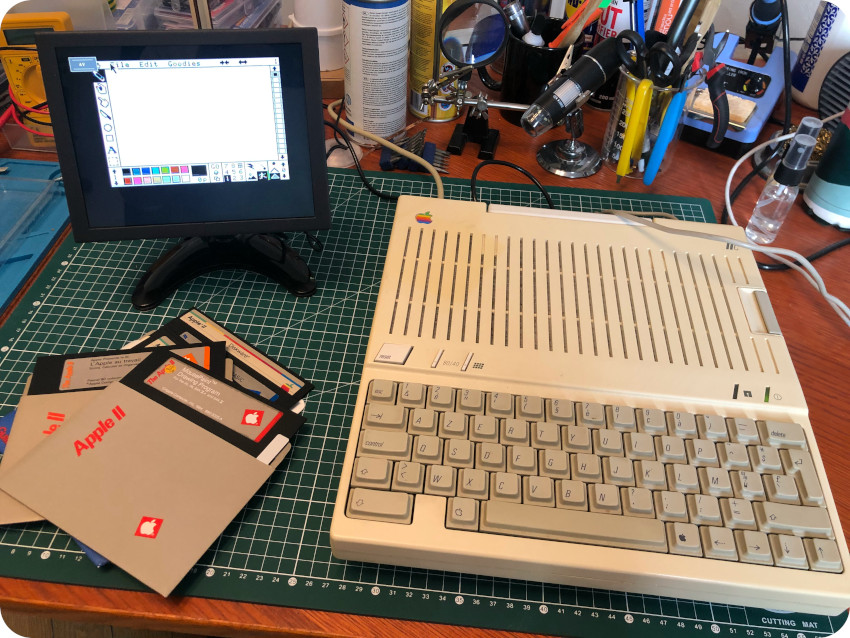
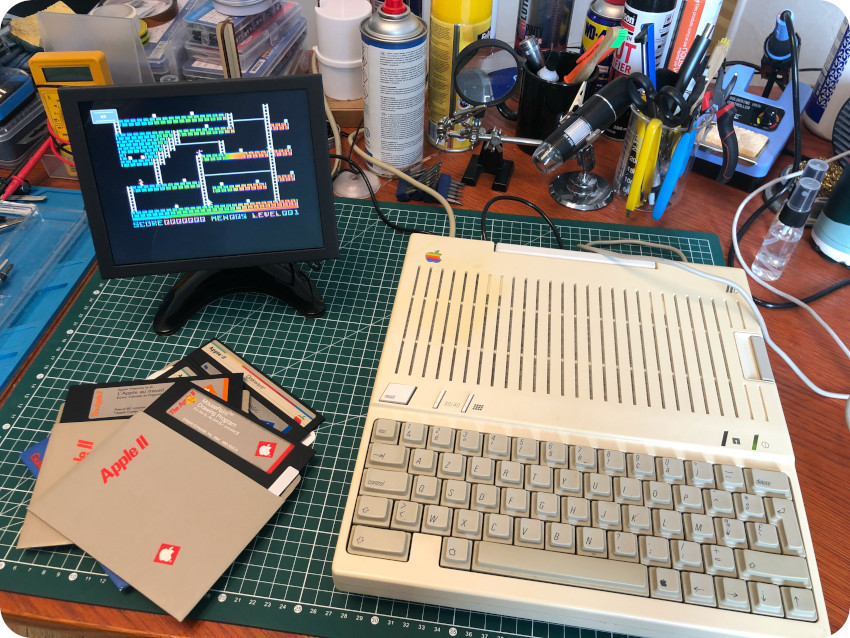
Let’s put back everything (except the case) for a second round of tests, now that the PSU, the motherboard and the disk drive have been serviced. I booted the Apple II with a ProDOS 1.0.2 floppy disk:

Then I tried MouseDesk:
Everything looks good so far ! The disk drive sounds much better now that the head has been cleaned and the moving parts greased. Good !
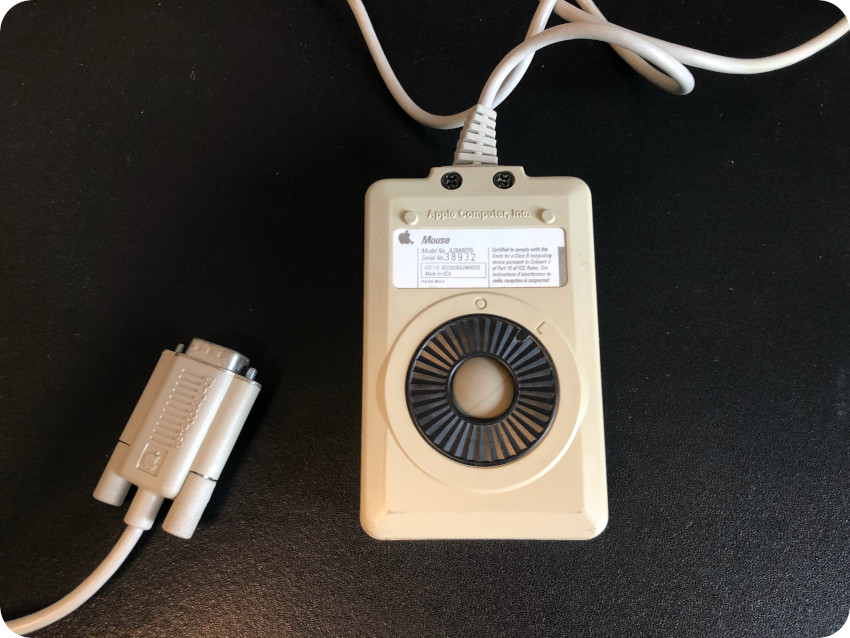
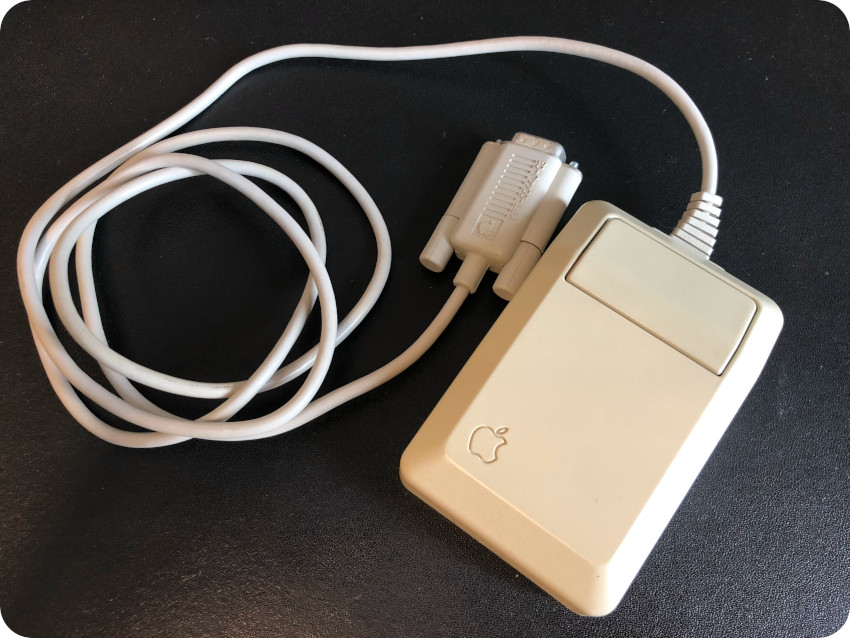
The Apple IIc mouse
The mouse was in excellent conditions. Servicing it was just a matter of a bit of cleaning:
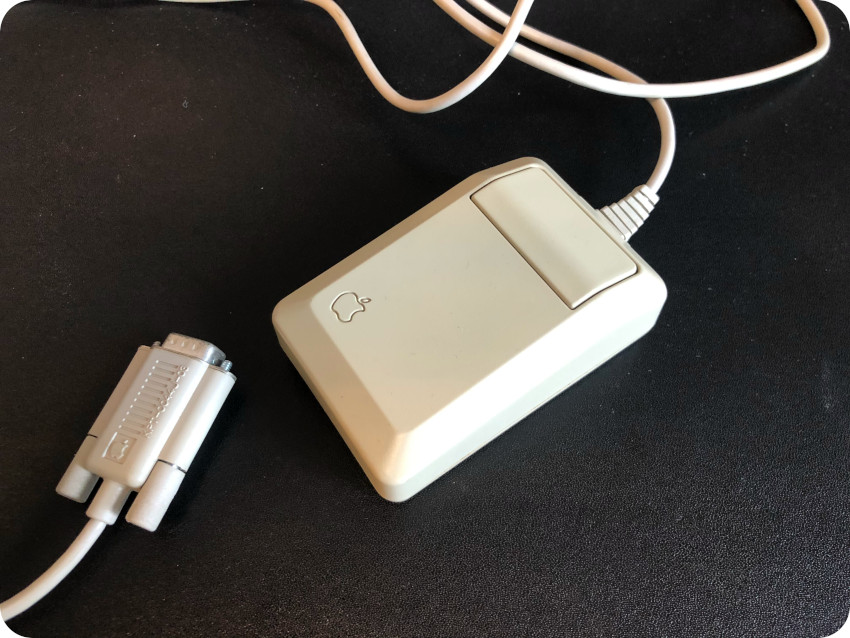
This is the A2M4015 mouse, introduced by Apple in April 1984. It originally packaged for the Apple IIc, but was compatible across all platforms. The IIc mouse had a slightly modified shape than the Macintosh’s design and was uniformly the same color:
Opening the mouse is rather easy: only two screws need to be removed (beware of the spring nevertheless)
Once opened, one screw has to be removed to detach the mouse PCB:

I started the cleaning process, with IPA, window cleaner, anti-static foam and a micro-fiber cloth:
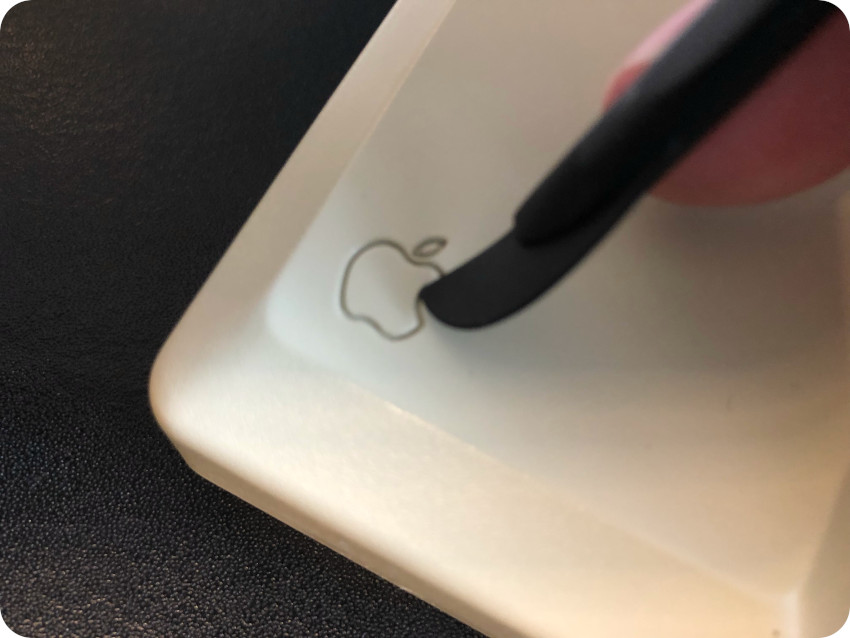
I used a plastic tool to remove gunk stuck inside the Apple logo, and a magic eraser to remove a few scuff marks underneath the mouse:
I dusted the PCB with compressed air, and cleaned it up with IPA. Then I reassembled the mouse:
I cleaned the ball with window cleaner and a soft cloth, then cleaned the rotating rollers with IPA:
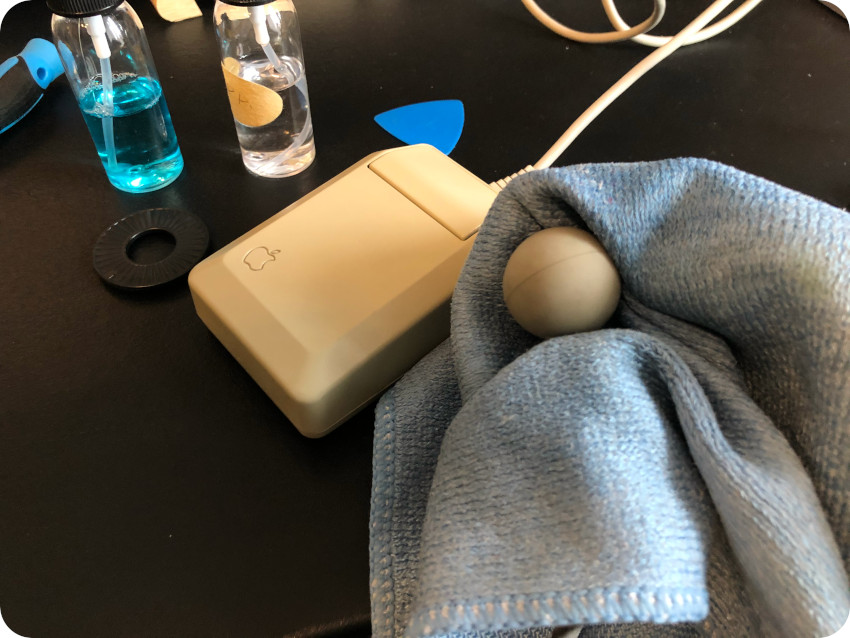
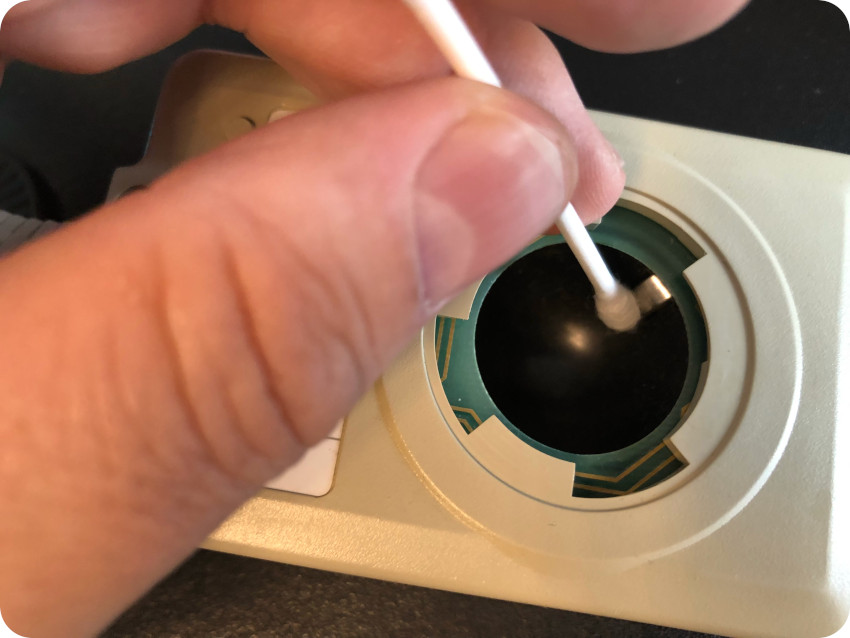
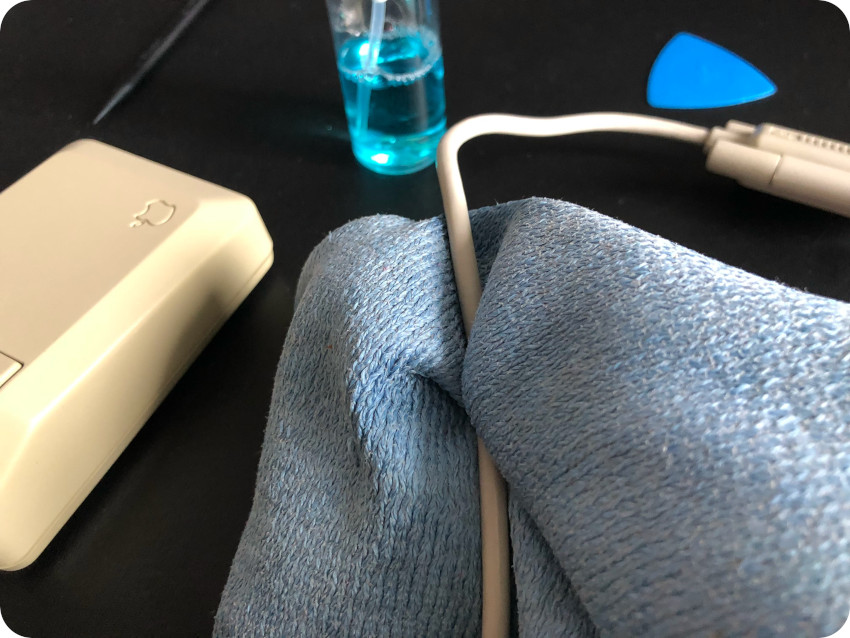
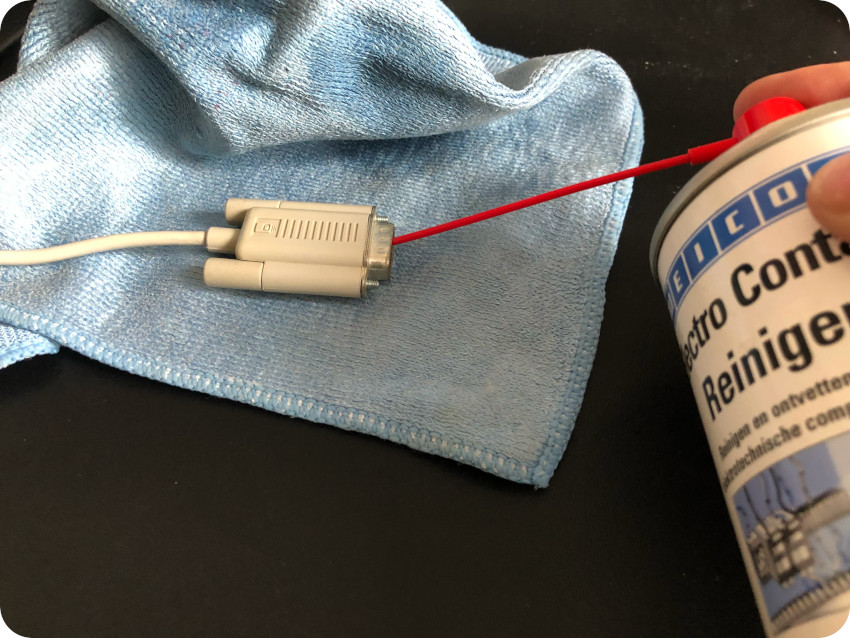
Then I cleaned the cable and sprayed contact cleaner inside de DB-9 connector:
There we go, a cleaned and perfectly working Apple IIc mouse !
Here is the pinout of the DB-9 mouse connector [from “Apple IIc Reference Manual, Volume I”]:
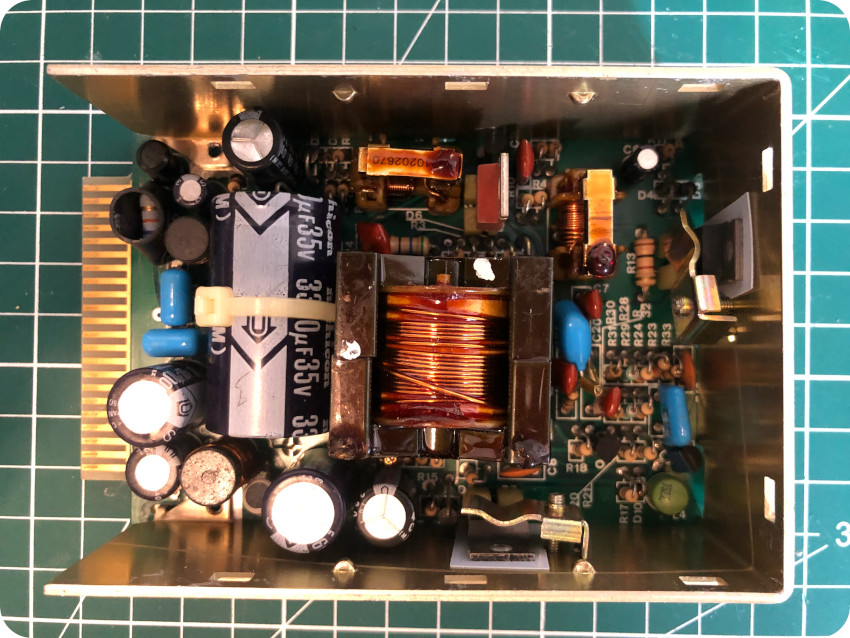
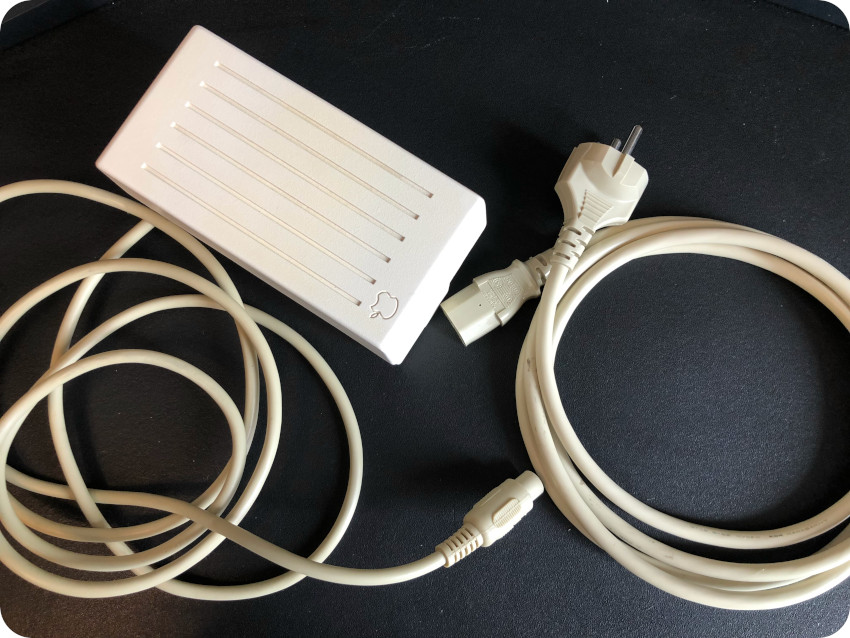
The Power Brick
The external power supply is attached to the internal voltage converter by means of a DIN-7 connector. Its basic specifications are listed in the following table [from “Apple IIc Reference Manual, Volume II, Appendix G, Europe / 50Hz”]:
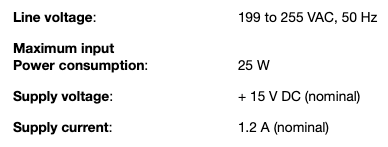
Here is the pinout of the power supply DIN-7 connector [from “Apple IIc Reference Manual, Volume I”]:
This power brick is ultrasonic-welded. It is not possible, as far as I know, to open it without an axle and thus, without damaging the casing. Since it is outputting the correct voltage, I won’t go into the trouble on opening it and I certainly don’t want do damage it.
So I did a minimal service routine, cleaning the casing and cables.


I started with a magic eraser to remove the scuff marks, then I followed my usual routine: IPA, window cleaner & soap, anti-static foam and a soft micro-fiber cloth:
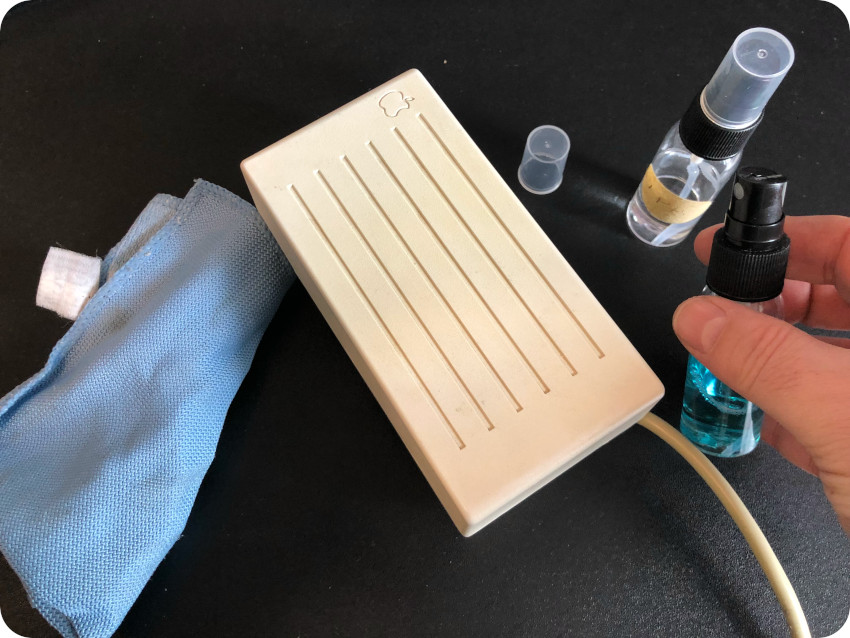
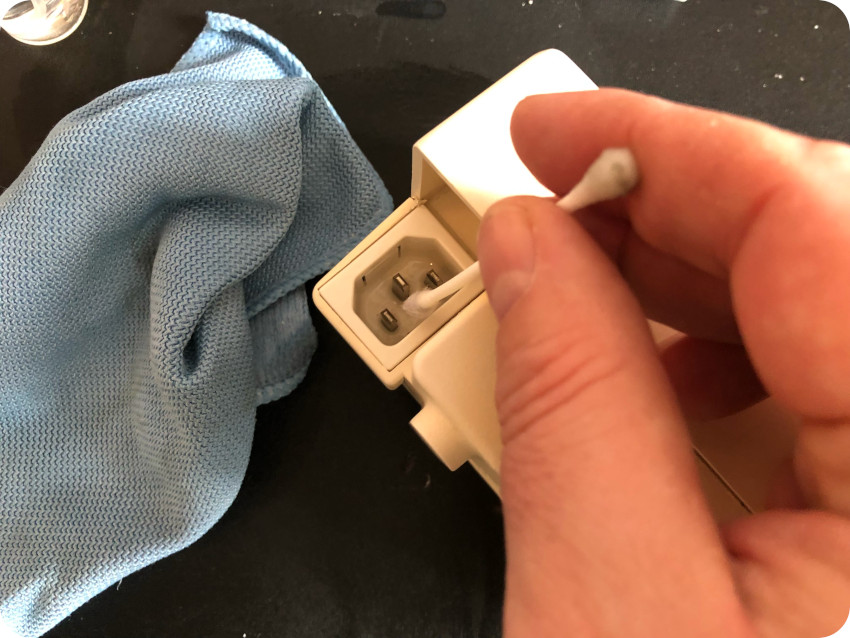
I used contact cleaner and a cotton swab to clean the 3-prong power connector:
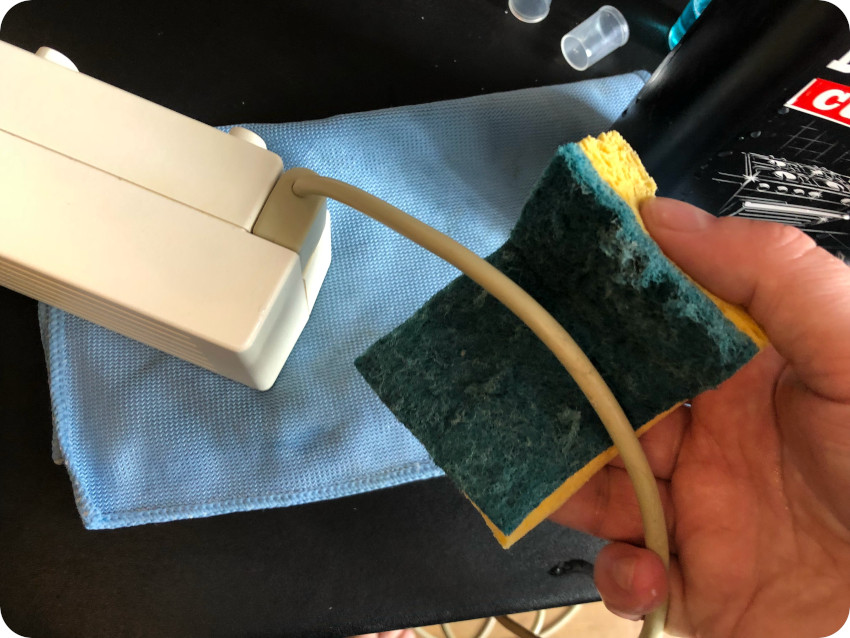
The cable of the power brick was extremely sticky, so it took me a while to clean it up with soap and the rough side of a sponge:
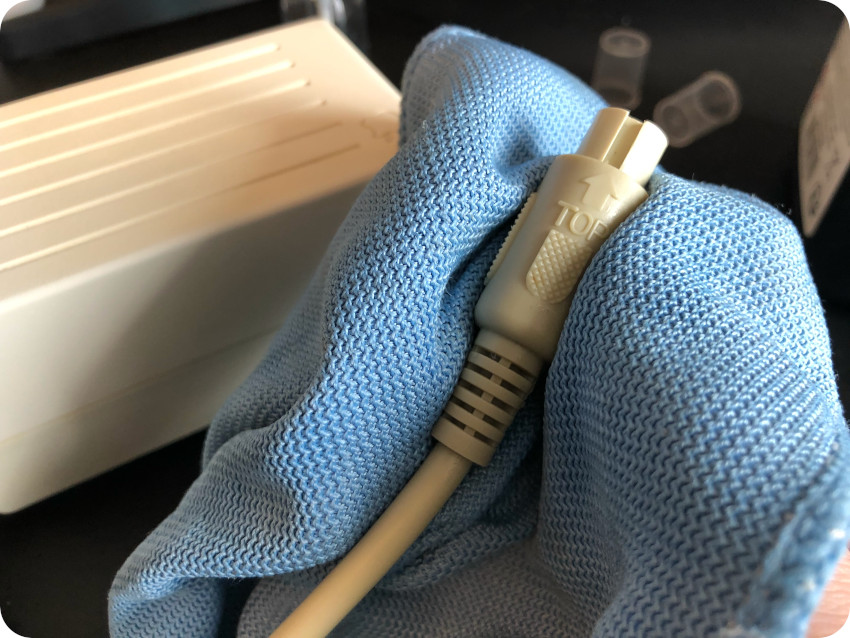
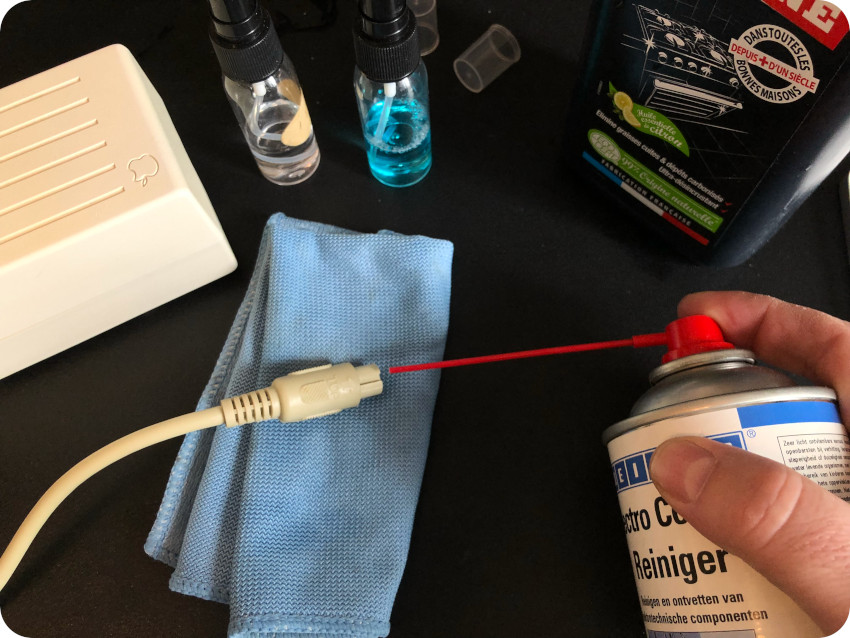
I finished cleaning the DIN connector and sprayed contact cleaner:
There we go ! I cleaned external power supply :
Sunbrighting the enclosure (part 1)
After many years, ABS (Acrylonitrile Butadiene Styrene) plastic tend to become yellow. It is a complex process triggered by the presence of bromine, a fire retardant. The yellowing of my Apple IIc happened mostly on the sides (slightly yellowed) and back panel (very yellowed). Moreover, there is a yellow stain on the left side of the top case.
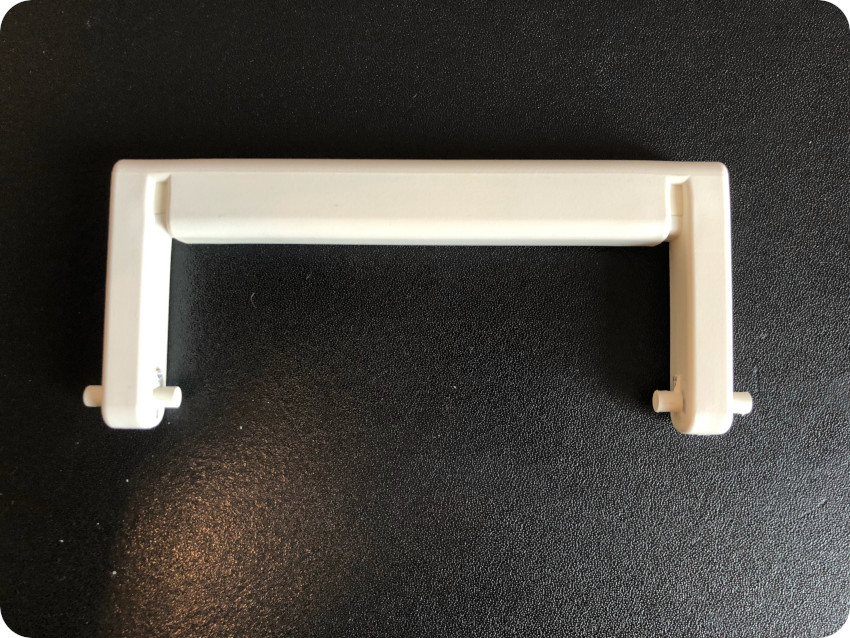
The enclosure of this Apple IIc is not as badly yellowed as the monitor, that turned almost … orange. The feeling of “yellowness” depends a bit of the ambient light, but it become evident when compared to the handle of the IIc. It uses another kind of plastics and has not yellowed at all. I will use it as a “control sample” to check if I could fully recovered the original color:
Before doing anything, I cleaned up the case, and removed scuff marks with a magic eraser:

Since my first attempt at retrobrighting (using peroxide cream) almost turned into a disaster, I took the sunbrighting path: exposing the case to direct sunlight for many hours.
It is a easy process, only requiring being very patient.
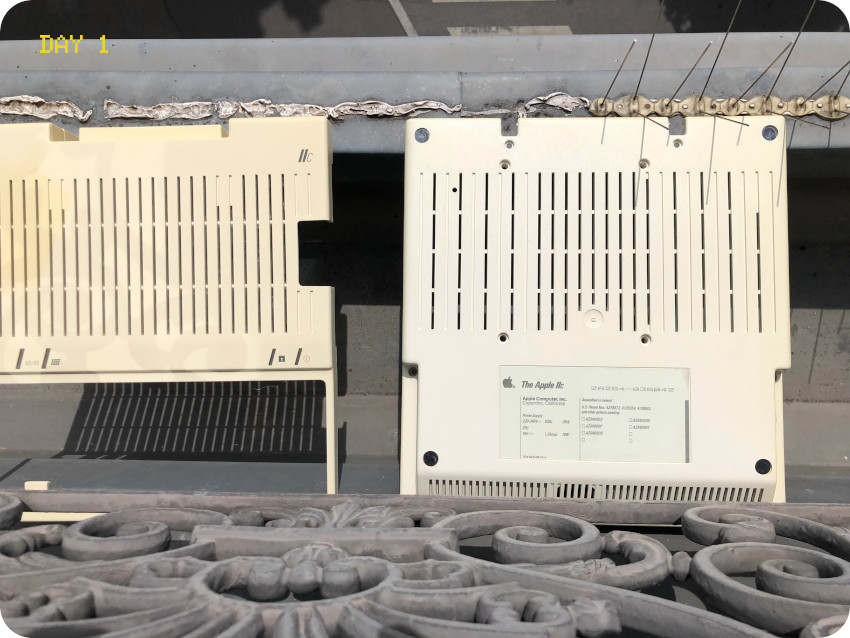
Nevertheless, the first effects appeared very fast: by the end of the first day, the stain on the left of the top case had already gone !
I let both parts of case under the moderate sun of May, 5-6 hours a day, for 2 weeks, rotating the parts a quarter turn 4 times a day so that all sides get proper sunlight.
Video outputs and video modes
The Apple IIc provides two video output connectors:
- All Apple II machines featured an RCA jack providing a rough NTSC, PAL, or SECAM composite video output (on non-NTSC machines before the Apple IIe this output is black-and-white only)
- In addition to the composite video output jack, the IIc has a DB-15 output connector. This was a special-purpose video connector for adapters to digital RGB monitors or RF modulators.
The Apple IIc has two text display modes
- TEXT: 40-column
- TEXT80: 80-column
The graphic modes of the Apple II series were peculiar even by the standards of the late 1970s and early 1980s. For colors, the trick used was to combine pixels in quadrature with the colorburst signal to be interpreted as color by a composite video display.
The Apple II graphic modes consist of a 16 color low resolution mode and a high resolution mode. The Apple IIe added double versions of each of these, most prominently “double high resolution” with twice the horizontal resolution. The most common video modes are the following one:
- GR: in the Low-Resolution graphic mode, the screen displayed graphics with a resolution of 40×40 (with 4 lines of text at the bottom) or 40×48 pixels (with no text at the bottom). This mode is often called “GR” because of the Applesoft BASIC command used to access this graphic mode).
- HGR: the High-resolution GRaphic mode offered a higher resolution of 280×192 pixels, allowing for more detailed graphics. It is named after the HGR Applesoft BASIC command to invoke this graphic mode. The user could “switch in” four lines of text in the HGR mode, just like in GR (resulting in a 280×160 picture).
- DHGR: the Double High-resolution GRaphic (DHGR) mode can achieve 560×192 resolution (16 colors), doubling the horizontal resolution of the HGR mode. The composition of the Double Hi-Res screen is complicated, nevertheless, is was used in business applications like GEOS or Dazzle Draw.
Note: there are other modes, like the Double Low-Resolution and other weird mixed modes.
Le Chat Mauve (RGB SCART adapter)
The first Apple II computers sold in Europe were NTSC models modified to generate PAL sync signals, but without color on the composite output. Then came the PAL models with a color modulator, which was incompatible with French SECAM televisions (resulting in black and white display).
The Apple IIc also only provided a black and white composite signal in its PAL version. The French company “Le Chat Mauve” (“The Purple Cat”) quickly offered cards with RGB output to overcome these limitations. This choice proved to be successful since in 1981, French law made RGB SCART (Peritel) mandatory for all new televisions, making these cards indispensable in France.
Le Chat Mauve produced three cards and a video adapter:
- RVB Graph: compatible with the Apple II and Apple II+, this card supports all standard Apple II modes .It adds enhanced color management in HGR mode.
- Eve: the Eve card is the most ambitious product of the company. It supports the following standard video modes: TEXT, GR, HGR, TEXT80, DHGR.
- Féline: the Féline card abandoned all the modes specific to the RVB Graph and Eve cards but introduced the mixed mode DHGR COL140.
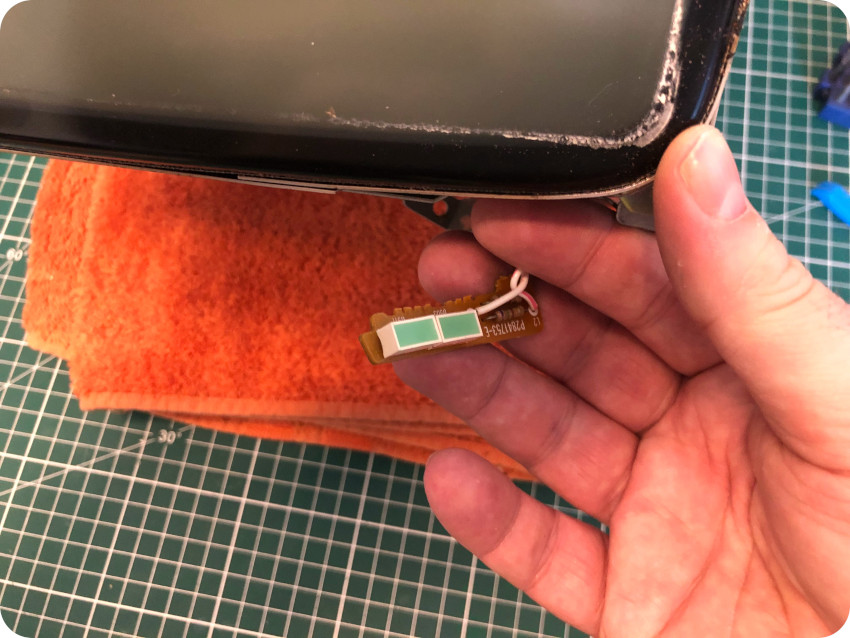
- Apple IIc adapter: Since the Apple IIc does not generate a color PAL signal in composite, Le Chat Mauve managed to incorporate all the logic of the Féline card into this adapter (with the help of Apple).
Note: information on “Le Chat Mauve” in the previous paragraphs are based on https://www.fenarinarsa.com/?p=1370
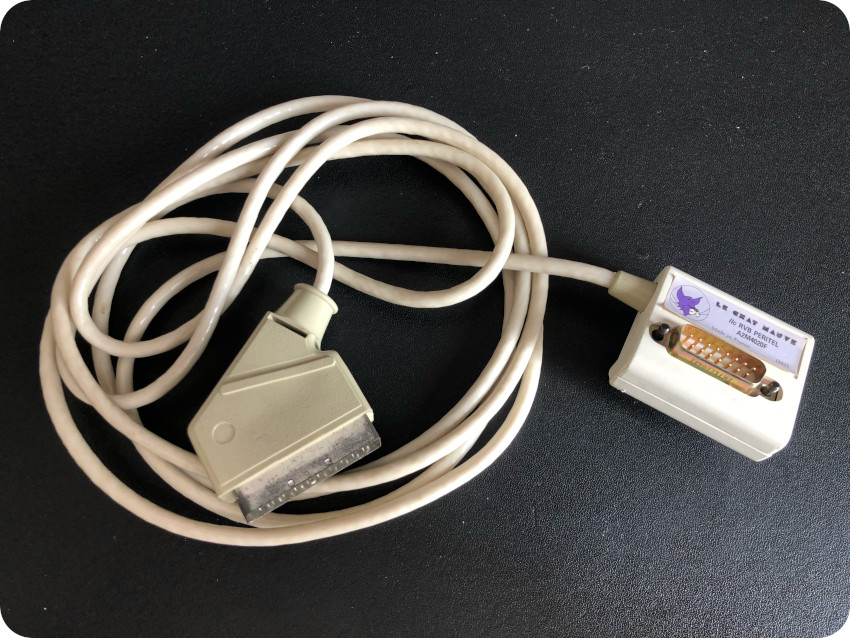
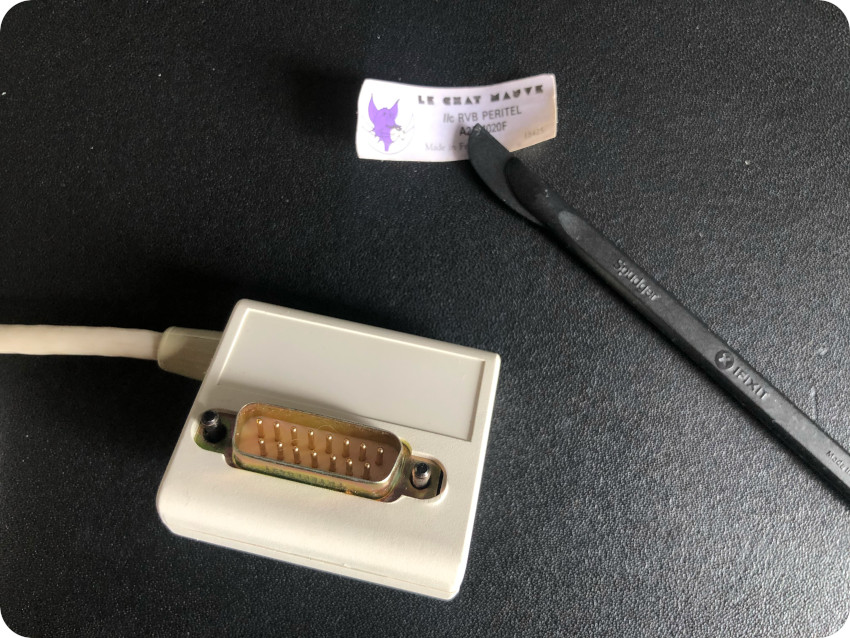
Here is a picture of Le Chat Mauve Apple IIc adapter:
It seems that is was actually supported by Apple France at the time, but I will have to make sure of that. It is referenced as A2M4020F (which sounds like an Apple reference number) and it has an engraved Apple logo on the back, so it is quite possible…
The adapter has two connectors:
- A male SCART (Péritel) connector, to be plugged into female Péritel connector of a TV set
- A male DB-15 adapter, which embeds the “Féline” card logic and plugs into the female DB-15 connector of the Apple IIc
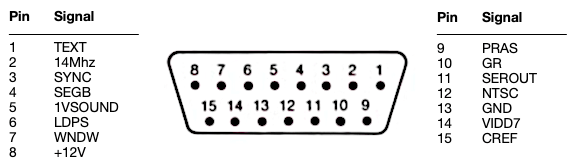
Here is the pinout of the Apple IIc DB-15 video connector [from “Apple IIc Reference Manual, Volume I”]:
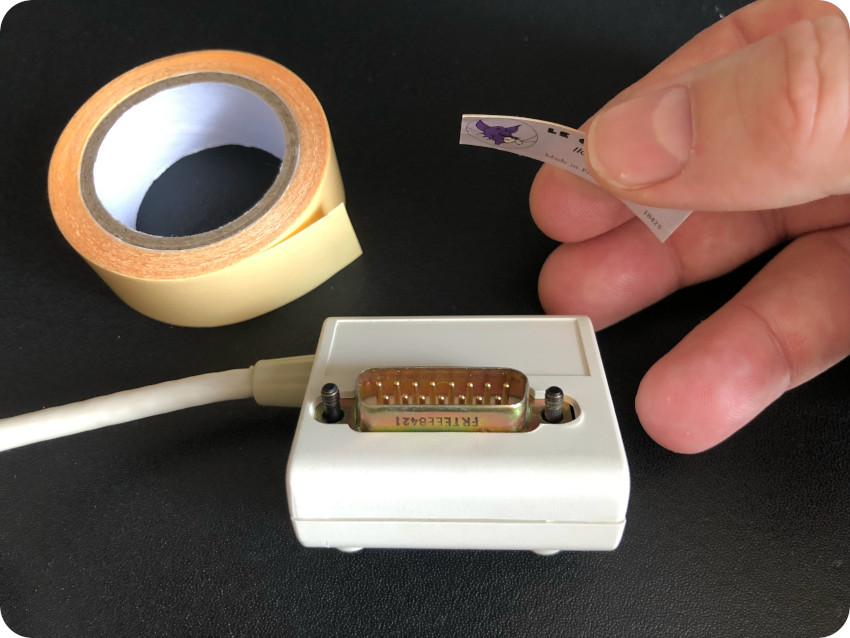
The connector box is sealed, with no obvious way to open it without damaging the case.
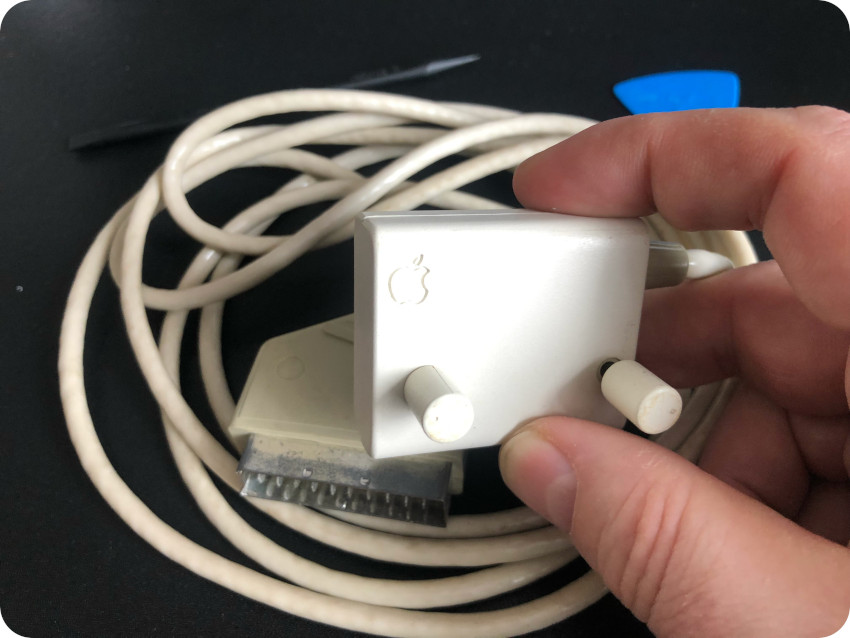
Thus, I only cleaned the adapter (soap, IPA, contact cleaner) and then consolidated and glued back the “Chat Mauve” sticker with double-sided adhesive:
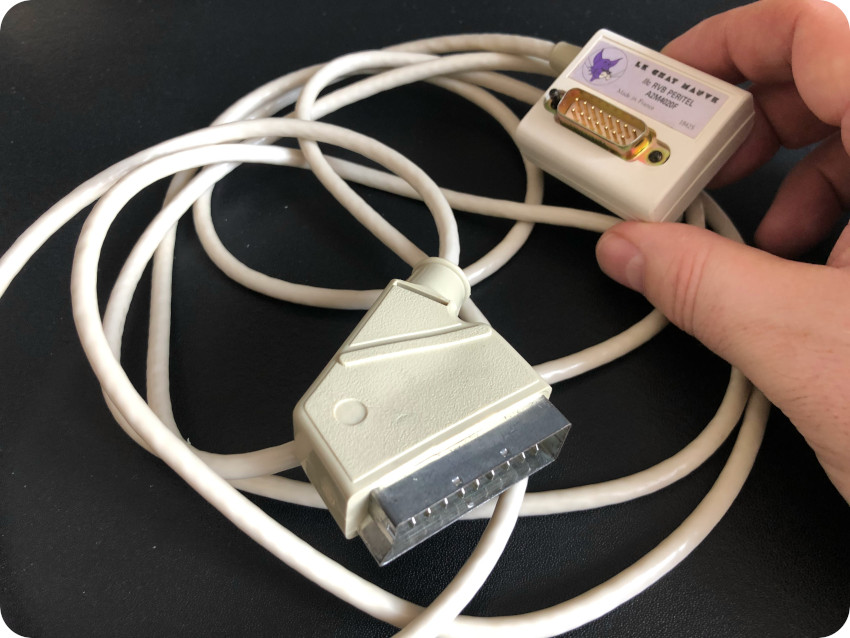
Here is a picture of the “Le Chat Mauve” adapter once cleaned:
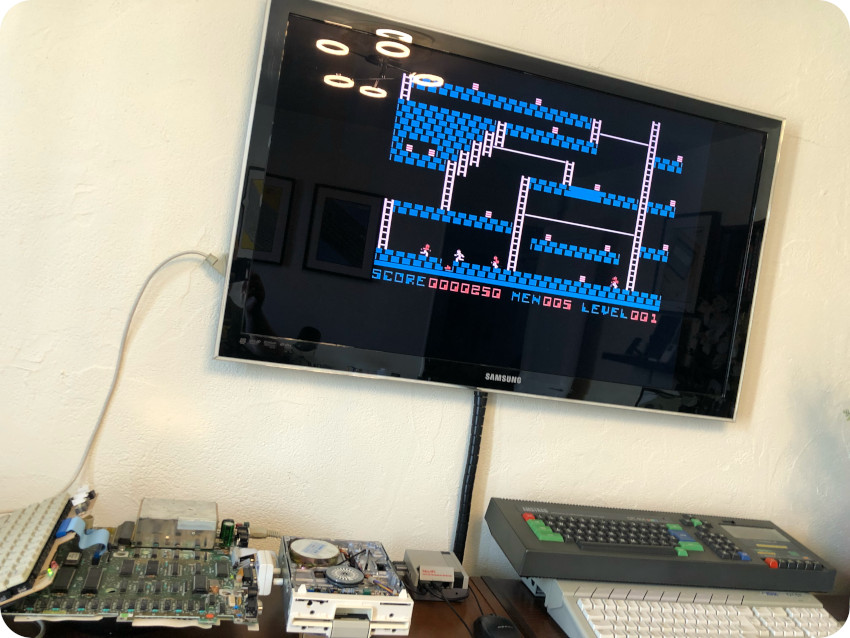
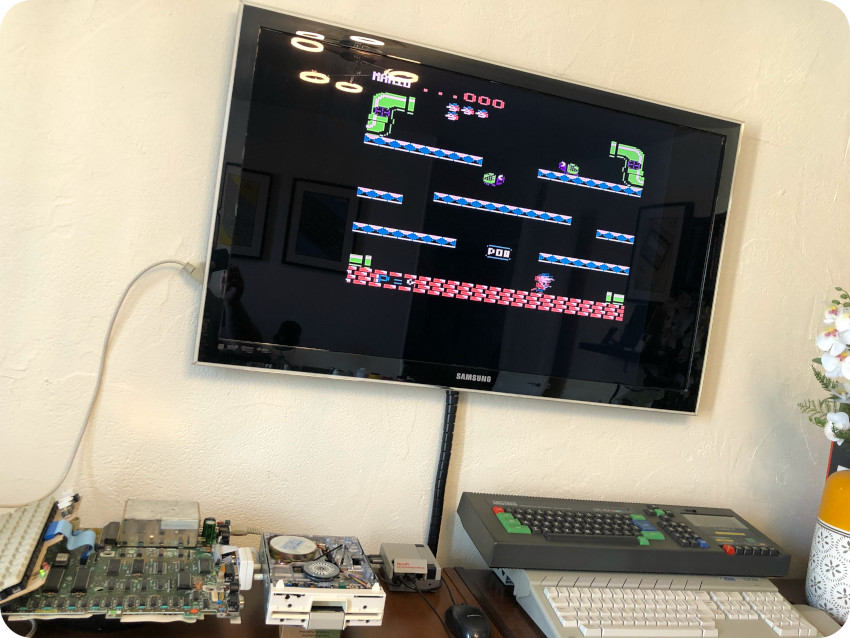
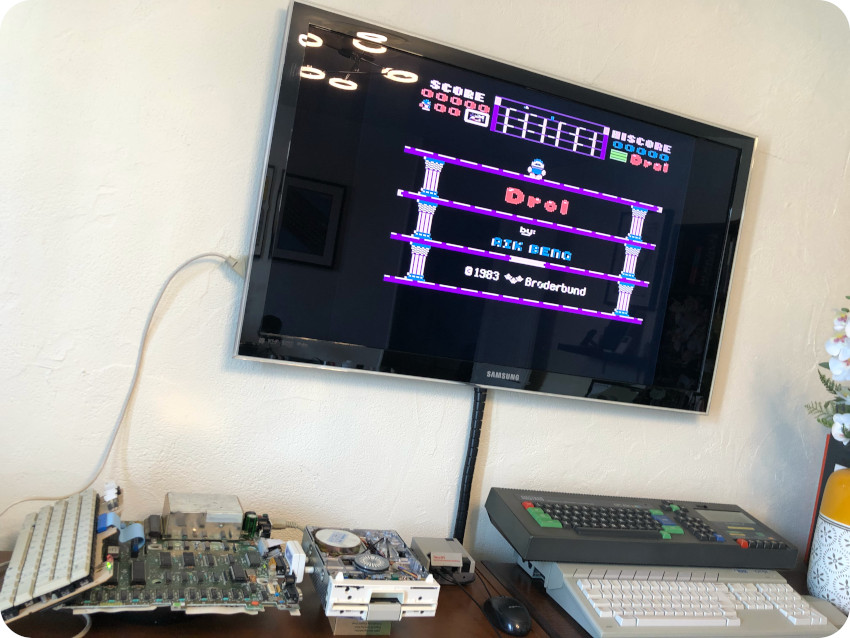
While the case was still sunbrighting, I started another round of tests, this time hooking the “Le Chat Mauve” adapter to my trusty 42″ Samsung TV:
- Booting (40-column, with no disk): the adapter is working fine !

- Lode Runner is must better looking than on my mini-LCD screen that had trouble interpreting the Apple IIc weird composite signal:
- Here is a picture of Mario Bros.:
- Here is another one, for Drol
- And a last one for Zaxxon (not having an Apple IIc joystick, I crashed on the wall soon after)

I must say the image quality is pretty good. Better than what I could get from my Atari ST, Amstrad CPC, Oric Atmos, Alice 90 or my ZX Spectrum on the same TV using the same SCART input. It is not perfect though: the image is shifted up (this can be handled via TV options).
I am impressed by the quality this 40 years old “Le Chat Mauve” adapter !
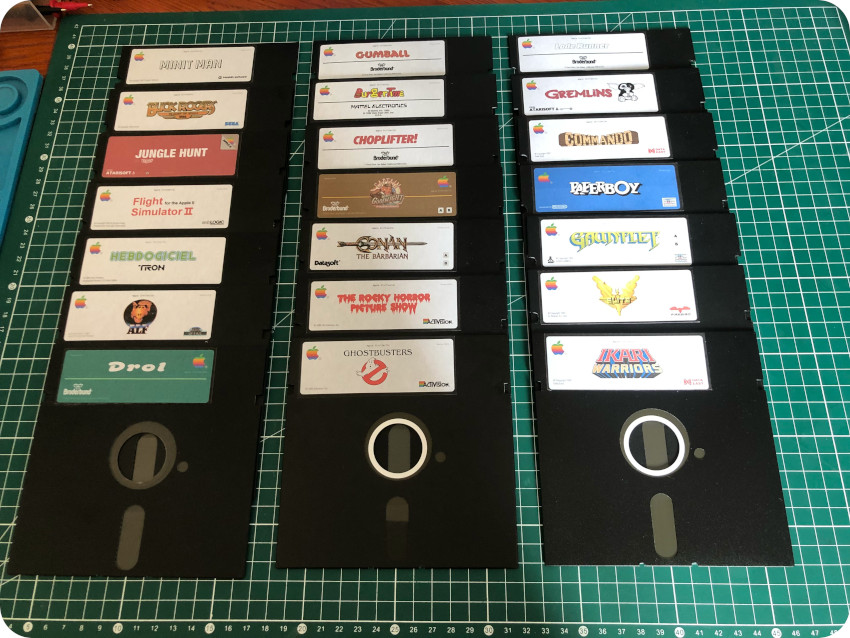
Software
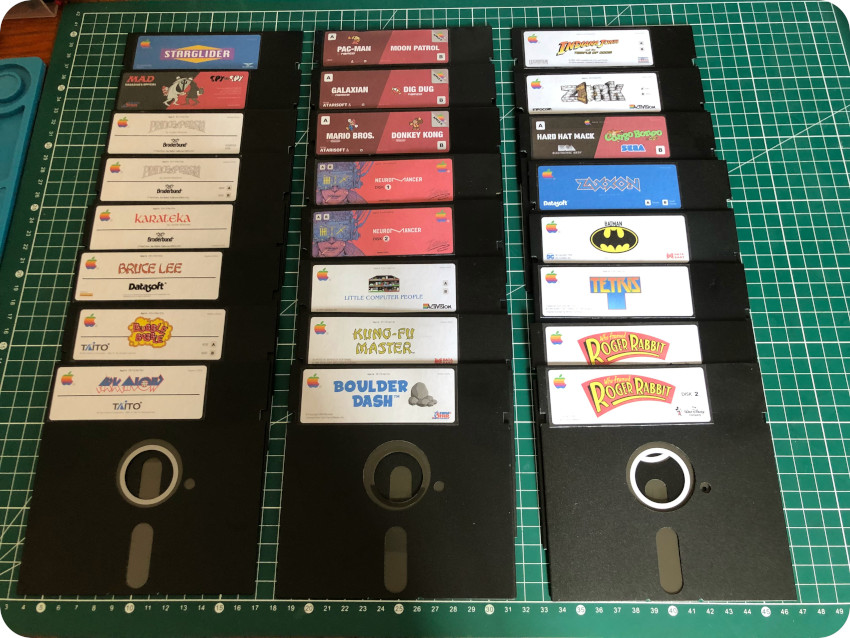
I took the time to test each ones of the diskettes bundled with the lot. Amongst 102 disks, 17 of them turned out to be bad or questionable enough to be trashed (the 17 bad ones were all Control Data disks)
They fall into these categories:
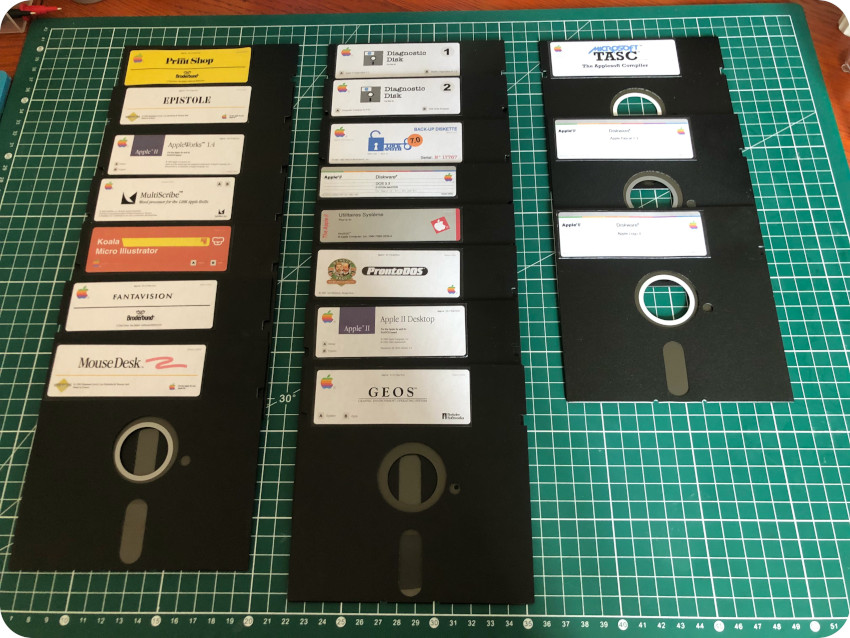
- Apple Original Software: “A la découverte d’Apple Logo”, “Une introduction”, “L’Apple au travail”, “Une introduction au BASIC”, “Utilitaires Systèmes”, “Diskware DOS 3.3 System Master”, “Diskware ProDos User’s Disk”, “Diskware Applesoft Sampler (DOS based)”, “Diskware Applesoft Sampler (ProDOS based)” and MousePaint
- Utility: Locksmith, Upgrade to ProDOS 1.1.1, Disk Muncher, Nibble away, Crazy Copy, …
- Programming languages: LISA assembler, TASC compiler, Procode
- Productivity: Fantavision, Epistole, Papyrus, ADDE Décisionnel Graphique, Visitrend / Visiplot, Apple Writer, Apple Pie, Multiscribe, The Print Shop, AppleWorks, Easy Puss, Gribouille, Magicalc, Koala Micro Illustrator, The Graphic Magician, Pixit, MouseDesk, …
- Games: Mario Bros., Zaxxon, Minit Man, Lode Runner, Conan, Boulder Dash, Jungle Hunt, Kings Tuts Revenge, Hard Hat Mat, Congo Bongo, Choplifter, Captain Goodnight, Drol, Super Bunny, Floppy, Sorcellerie, La Cité Perdue,…
- Educational: Point Bac disks (“Maths”, “Physique”, “Français”), Music Construction Set
There were a lot of duplicates, and some came in different versions. Before anything, I made sure that each and everyone of them were already preserved on:
- https://ftp.apple.asimov.net
- or http://www.brutaldeluxe.fr/products/france/ (french software)
- or http://www.apple-iigs.info/logicielsfrliste.php?lettre=A (french software)
- or https://archive.org/
I decided to format the duplicates as well as the ones I did not really care for (the educational ones, a few of the productivity and utility ones, as well as a few not so great games). This left me with about 40 empty disks to add new software.
Indeed, I wanted to add a few software to the collection:
- Games like Karateka, Prince of Persia, Burger Time, Bruce Lee, Arkanoid, Donkey Kong, Pac-Man, Zork, …
- Systems / productivity tools like GEOS, Multiplan, …
- Diagnostics tools for disks, RAM, CPU, …
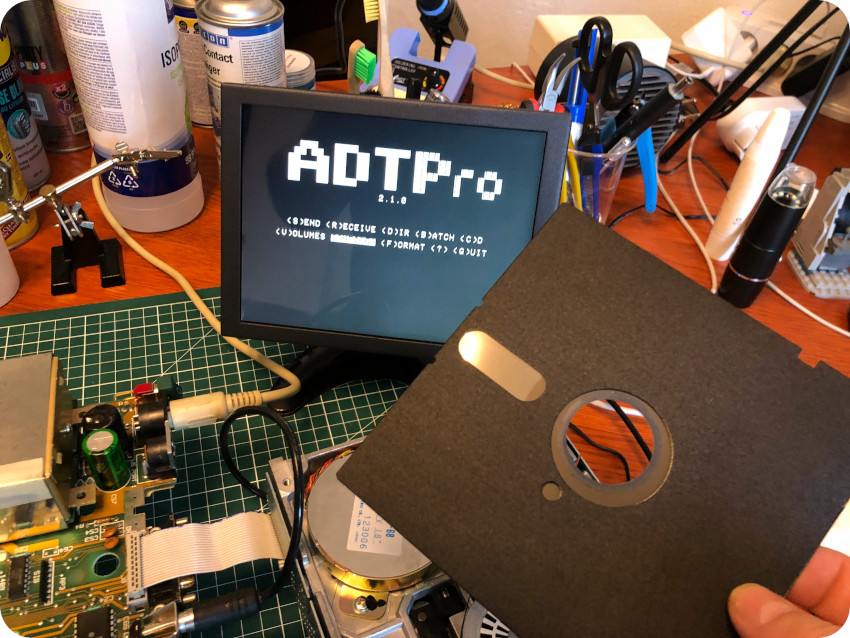
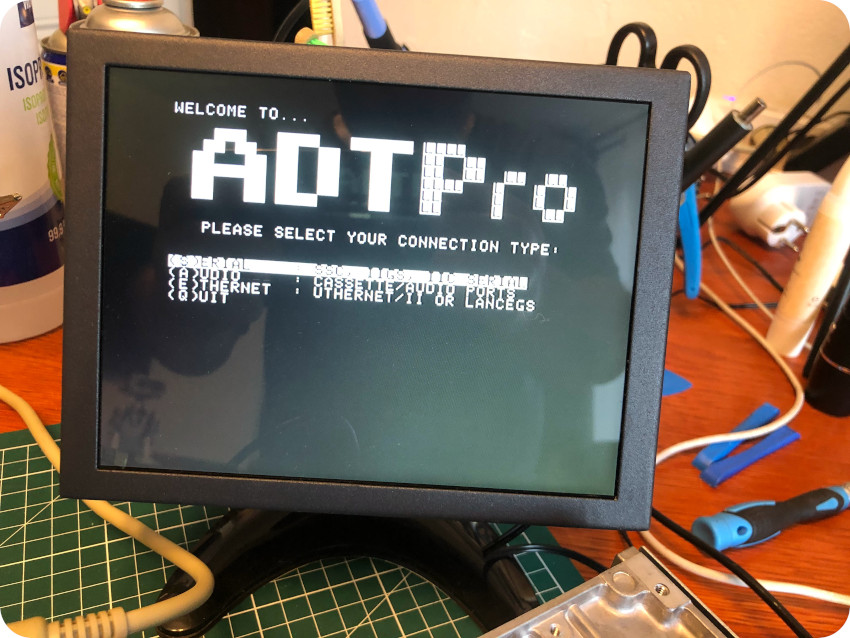
Creating a null modem cable and using ADTPro
Apple Disk Transfer ProDOS (ADTPro) is a fantastic software that can be used to transfer physical disks and disk images between Apple II computers and a modern host (running mac OS, GNU/Linux or MS Windows).
ADTPro enables the transfer of files using an Ethernet connection, audio transfer or a serial connector.
One of the many use cases for ADTPro is to transfer disk images to an Apple II in order to create new disks computer. It can also work the other way around, creating images from old disks. It is particularly useful for users who want to preserve and explore the software and data from the Apple II era.
It can also bootstrap an Apple II, i.e, start up the computer and load software without relying on physical disk, only using a simple cable connecting the Apple II to the host ,and the ADTPro software running on the host.
Since my Apple IIc doesn’t have an Ethernet connector nor audio in, I went the serial connector way (which, I guess, must also be the most common way to use ADTPro).
One can buy an DIN-5 to DE-9 null modem cable online (here, or on Etsy for example). Shipping to France takes from several weeks to one month, depending on sources.
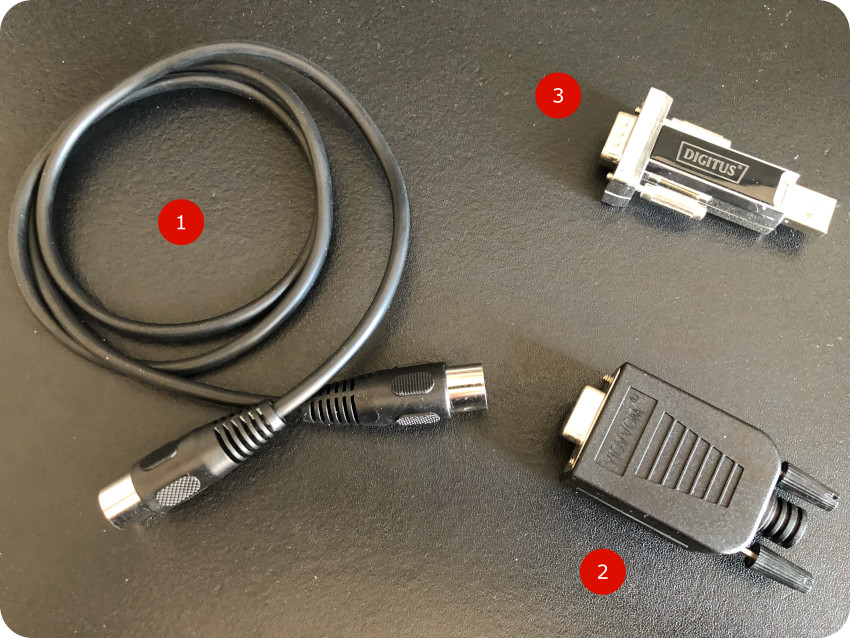
So, I decided to build the cable myself, and bought the following components:
- A 1 meter male-male DIN-5 cable, actually made for MIDI instruments
- A RS232 female D-Sub (DE-9) connector
- A male RS232 to USB 1.1 connector (PL2303RA-based)
Note: It turned out it wasn’t the best choice (for me), since the current version of the PL2303 driver does not seem to work with mac OS Ventura. My Wife’s laptop is running MS Windows 10, so I had to borrow it to make things work…
Building the cable was actually easy. I followed the official procedure: https://adtpro.com/connectionsserial.html#DIN5, completed by this very nice post: https://modelrail.otenko.com/apple/apple-iic-floppy-via-serial
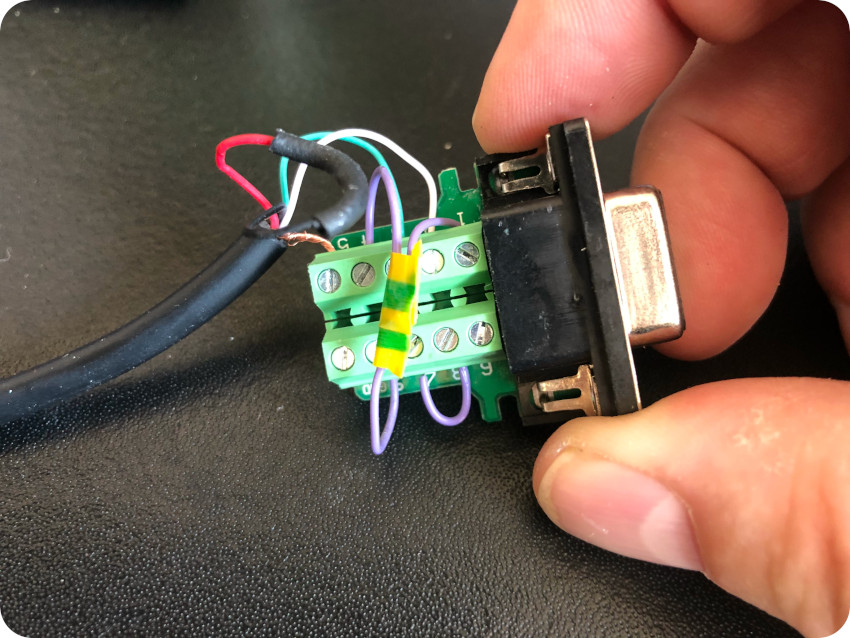
I started by cutting the DIN-5 male-male cable in half, and identified the pins / wires with a multi-meter in continuity mode:
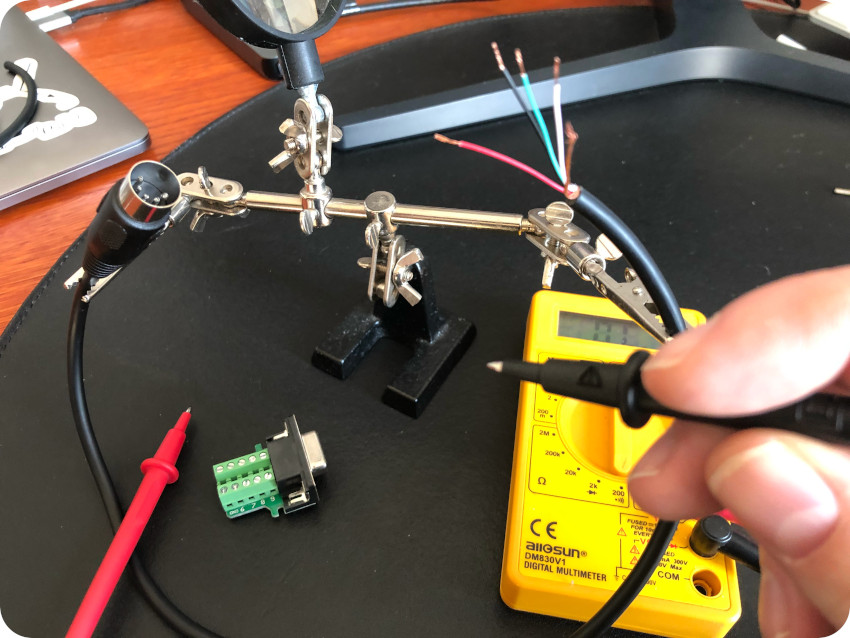
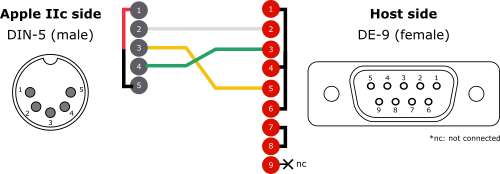
Let’s take a look at the required wiring:
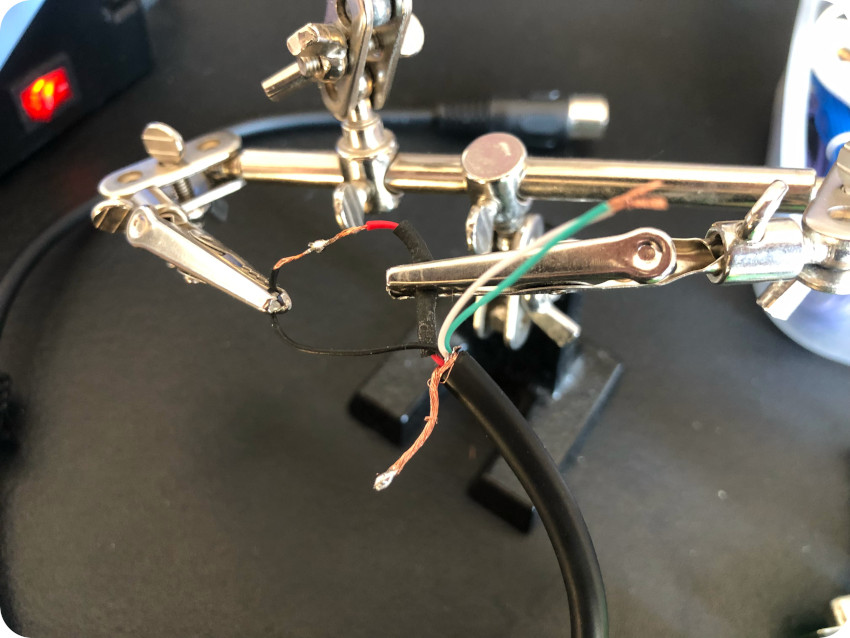
I started soldering wires 1 and 5 (and added a heat shrink tube for protection):
Once done,
- I connected wire 4 (DIN-5) to 3 (DE-9)
- I connected wire 2 (DIN-5) to 2 (DE-9)
- I connected wire 3 (DIN-5) to 5 (DE-9)
- I connected pin 7 and pin 8 (DE-9)
- I connected 3 wires into 1, 4 and 6 (DE-9), soldered them all together and wrapped electrical tape around
Here is a picture of the result:
Then I tucked in and secured everything inside the RS232 connector box:
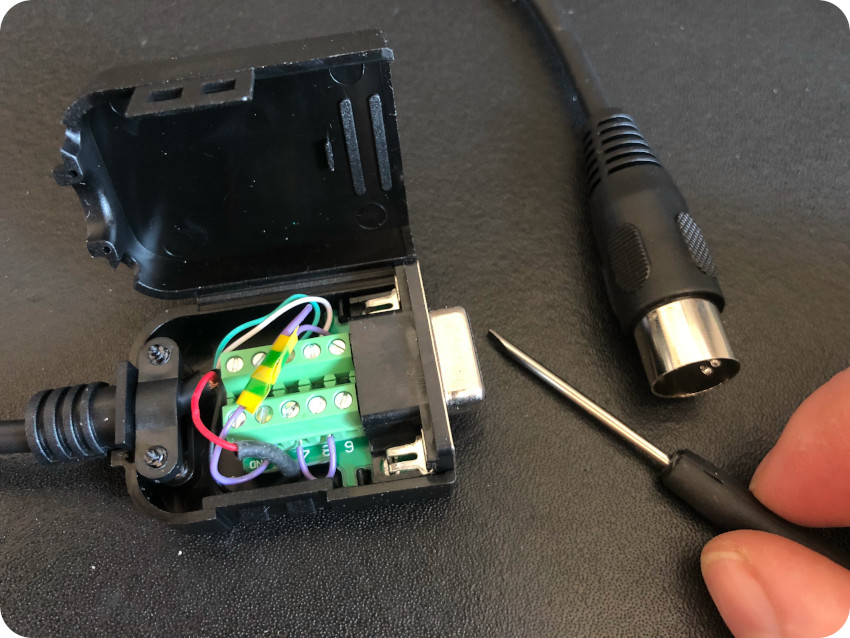
Here is the final result:
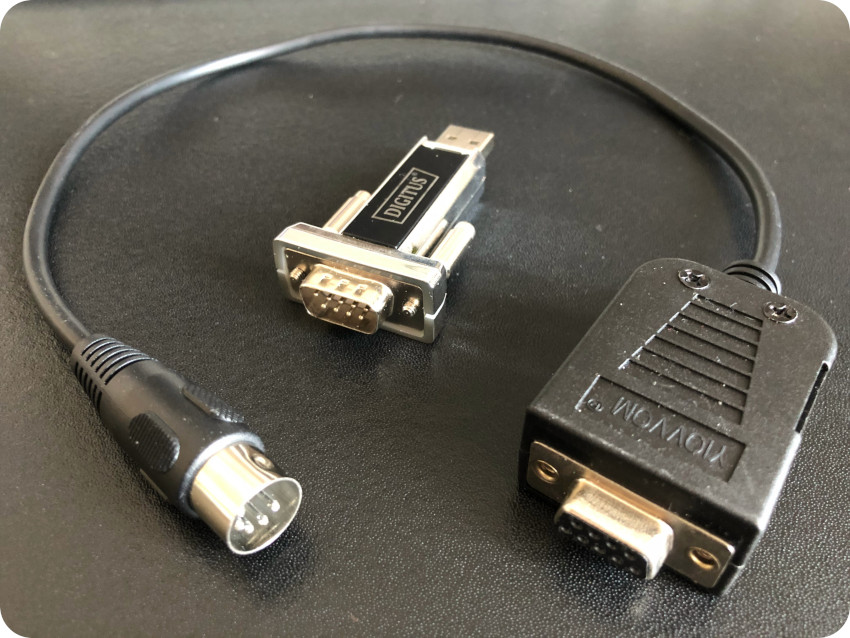
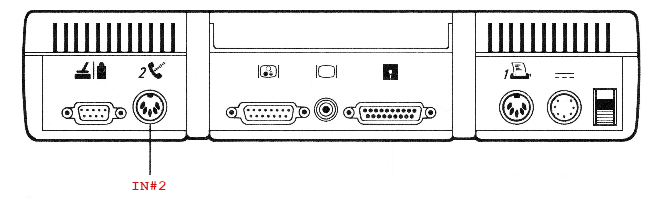
The DIN-5 part of the null modem cable plugs into the second serial port of the Apple IIc:
I connected the female RS232 connector of the cable to the RS232-to-USB connector, and plugged it into one of the USB ports of my Wife’s laptop:
Now, let’s take a look at the software part. It is Java-based, so it should run an anything, from GNU/Linux to mac OS or MS Windows, provided it runs Java and has proper drivers for the RS232-to-USB adapter.
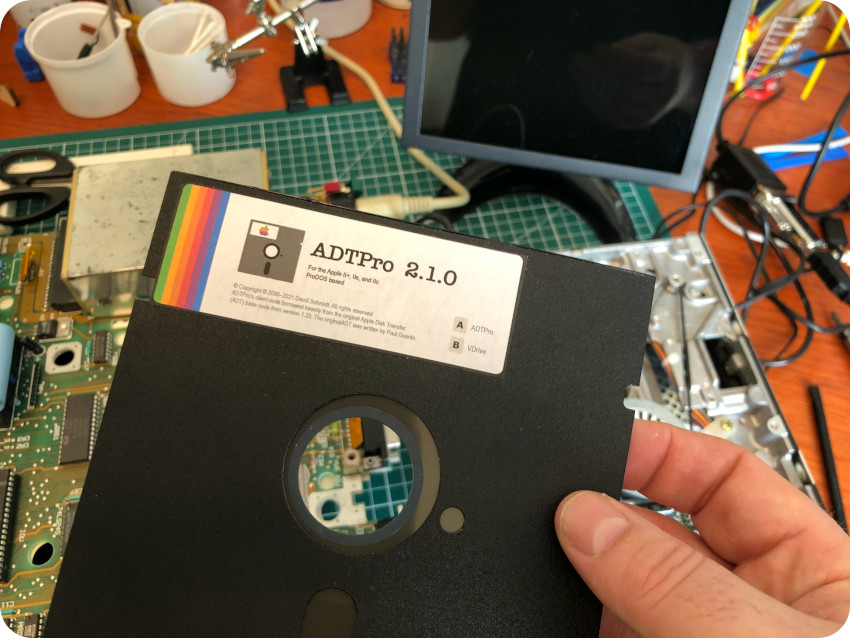
I downloaded ADTPro version 2.1.0 from here: https://github.com/ADTPro/adtpro/releases
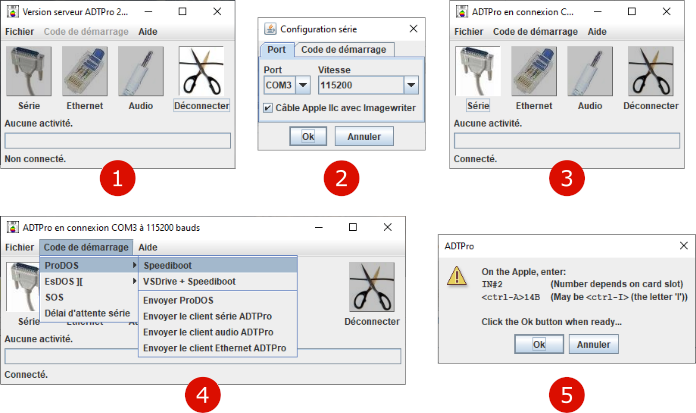
Here is the procedure:
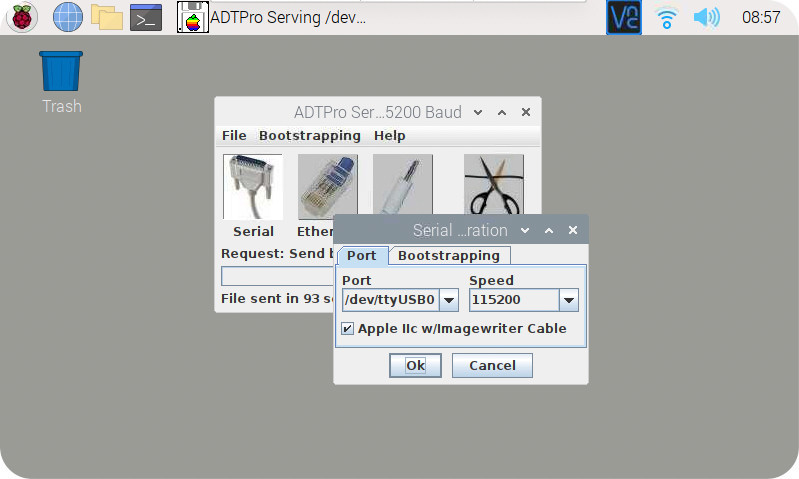
- Power on the Apple IIc without any floppy disk inside the drive, then hit Ctrl-Reset to get the prompt. Do not load any OS on the Apple IIc. On the host, launch ADTPro (depending on the system, using the .bat file, the .sh file or the .command file)
- Go to “File / Serial Configuration”. Here, the cable is plugged into COM3. Set the speed to 115200
- Push the “Serial” button
- Go into “Bootstrapping“. From there, select “PRODOS / Speediboot“
- On the Apple IIc, type the following commands:
- IN#2 (this will select the second serial port and listen to it). Note: if you have a French keyboard, you would have to type IN£2 instead !
- <ctrl-A>14B (this will select the proper speed)
On the host, click on “Ok”.
This will start the bootstraping sequence:
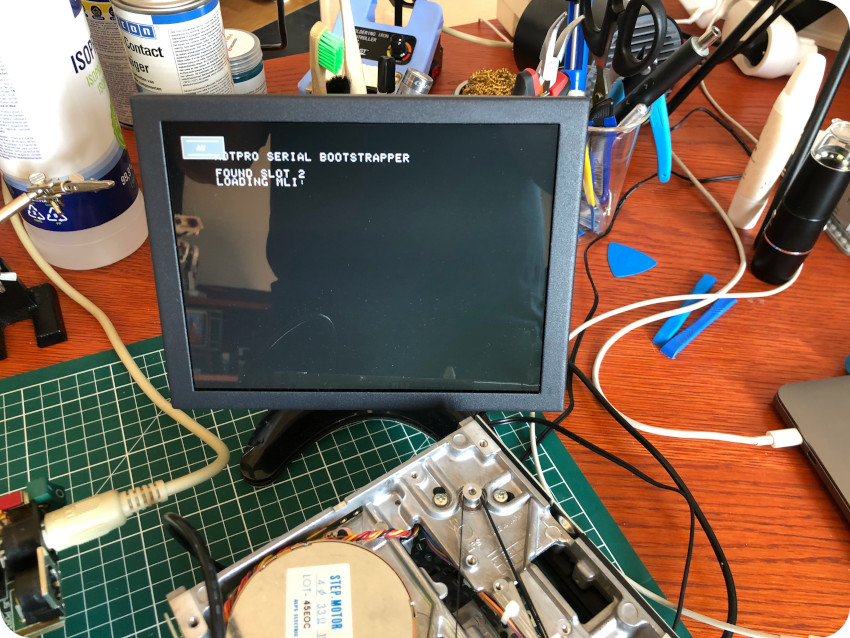
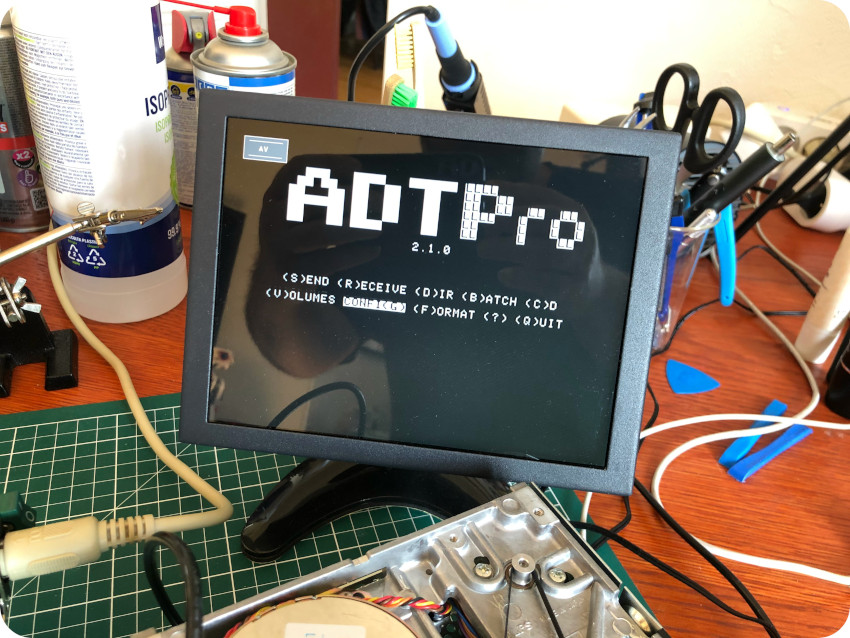
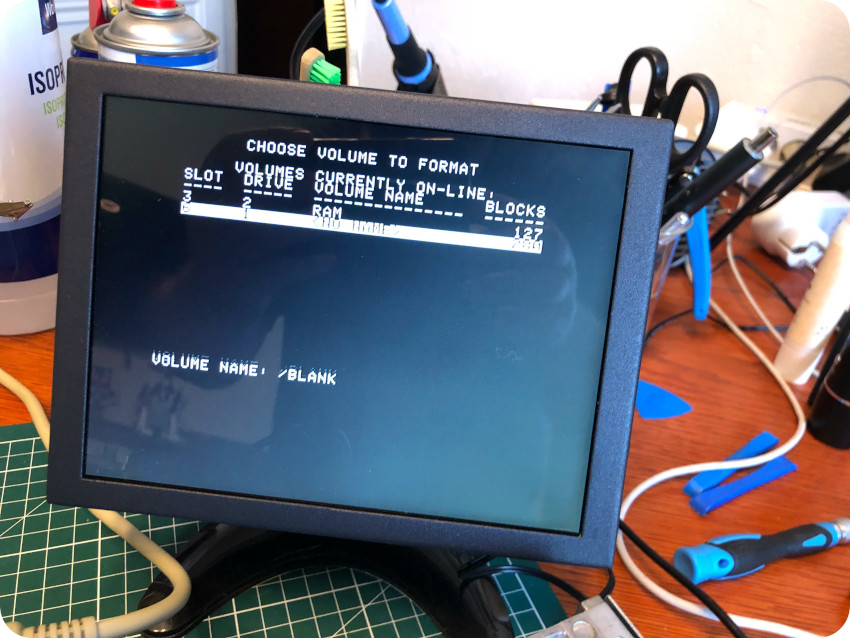
Once the ADTPro client is loaded on the Apple IIc, you can use the menu
- to (F)ormat a disk
- to (R)eceive a disk image (and write it down to a formatted disk) from the host
- to (S)end an image of a disk to the host for preservation purposes,
- etc.
I inserted a floppy disk and formatted it with ADTPro:
Then went back to the menu, selected (R)ecieve, then “ADTPro-2.1.0.dsk“:
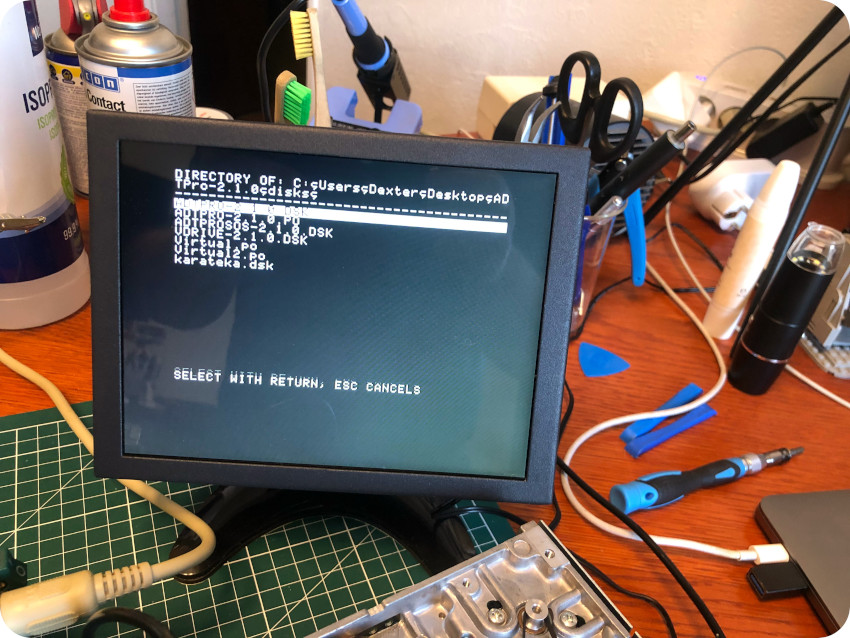
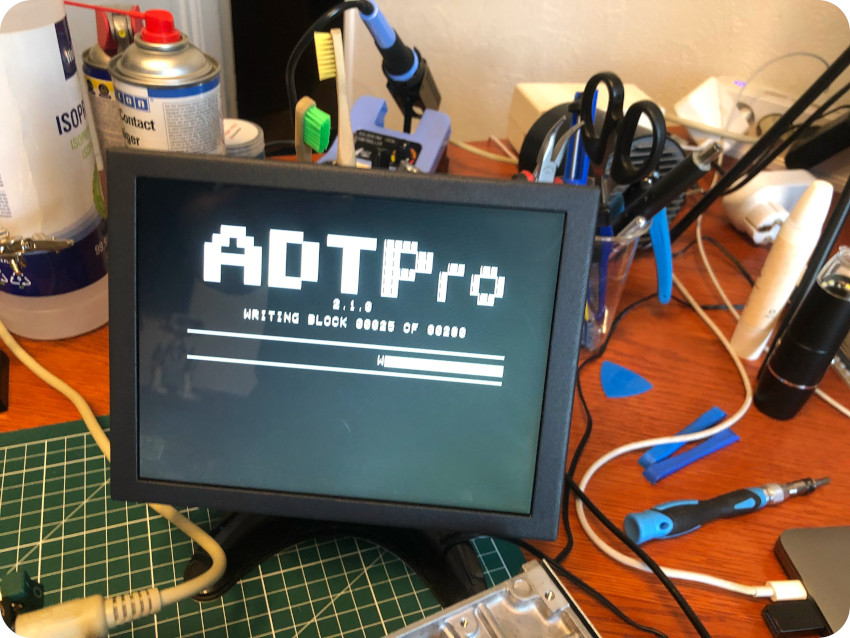
There you go ! I now have a floppy with the ADTPro client on it.
No need to bootstrap anymore. For now on, I’ll just have to boot from the ADTPro diskette. No need to type in IN#2 <ctrl-A>14B commands anymore to load the ADTPro client over the cable:
Thanks to ADTPro, I could create new sets of diskettes:
- dropping .dsk images into the ADTPro “disks” host folder
- receiving them on the Apple IIc from the host overt the null modem cable
- writing them down on freshly formatted floppy disks.
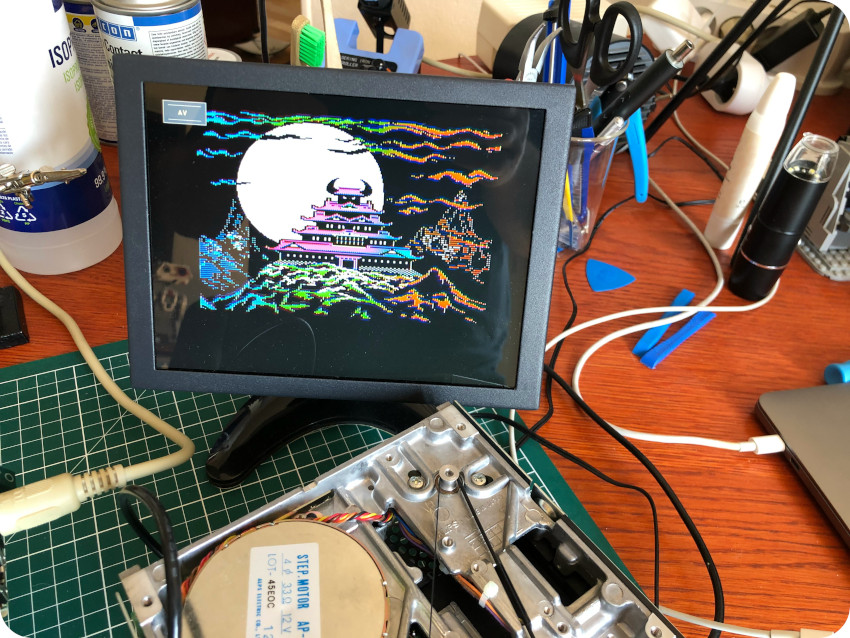
As an example, here is a screenshot of “Karateka“, loaded from a newly created floppy disk with ADTPro (colors are funky on the mini-LCD screen because of the way it decodes the weird composite signal from the Apple IIc):
Here is a listing of the first set of floppy disks I created with ADTPro:
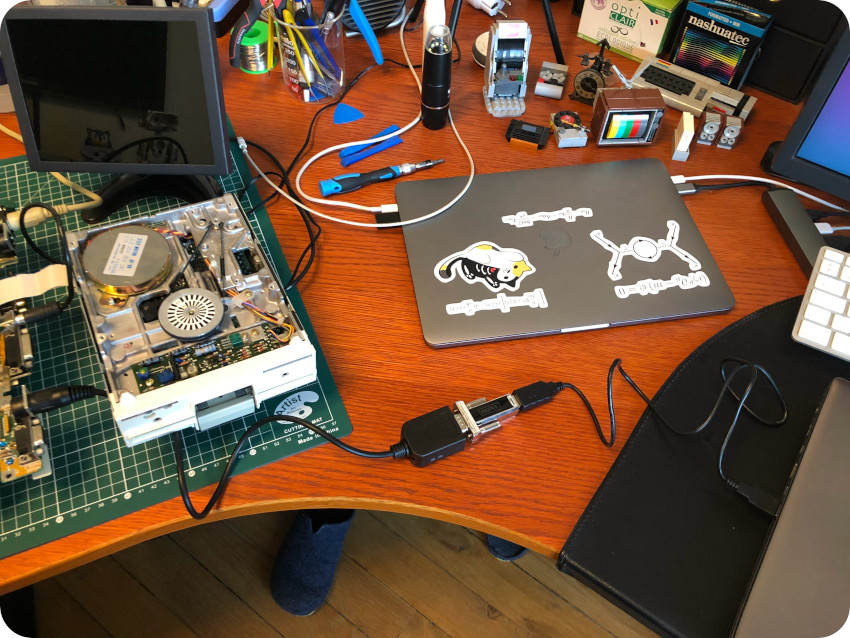
Note: in the end, I used ADTPro on a Raspberry Pi – encased into a 7″ touchscreen – I had handy:
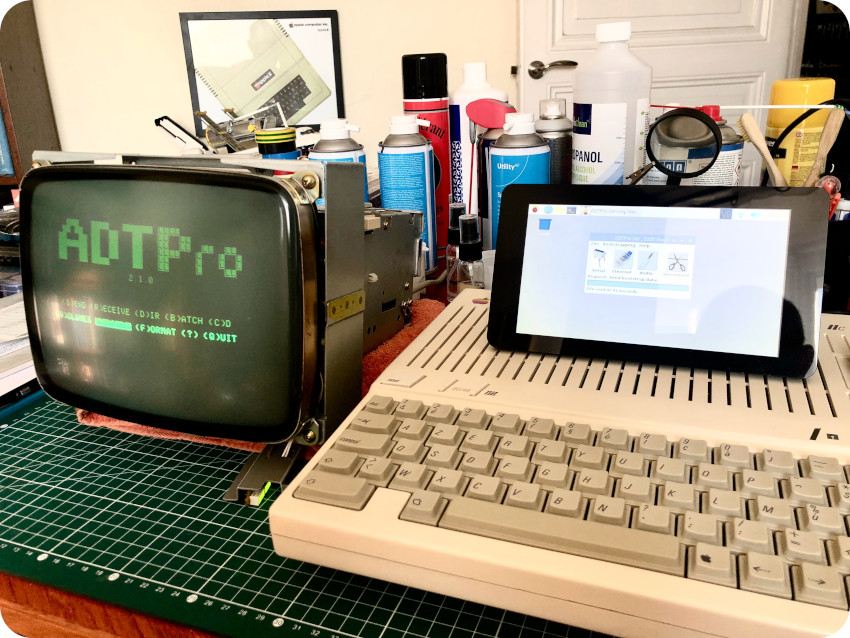
Unlike Mac OS, GNU/Linux recognized the PL2303-based RS232-USB connector right away. This setup was much more practical than having to borrow my Wife’s laptop each time I wanted to build a new disk. And it allowed me to drive the Raspberry Pi directly from my Mac via VNC:
Further testings
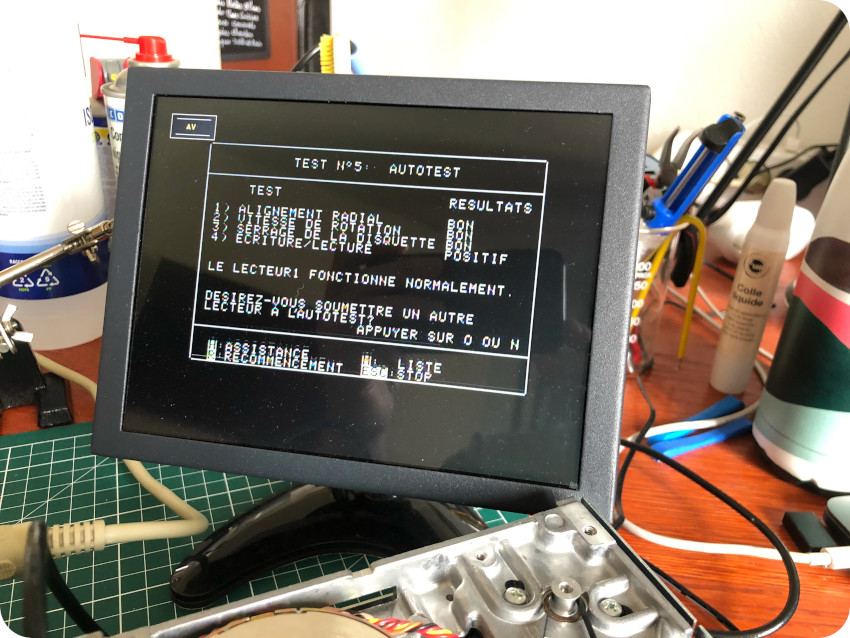
Thanks to ADTPro, I had created two diagnostic disks with a set of 3 tools to check CPU, ROM, RAM, MMU / ICU, serial ports, disk ports, sound, video, keyboard, mouse … :
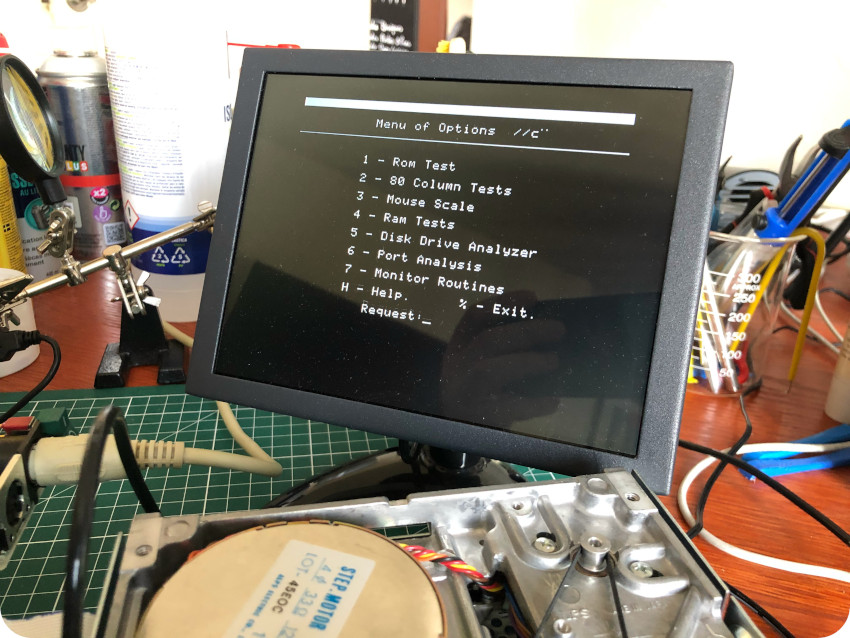
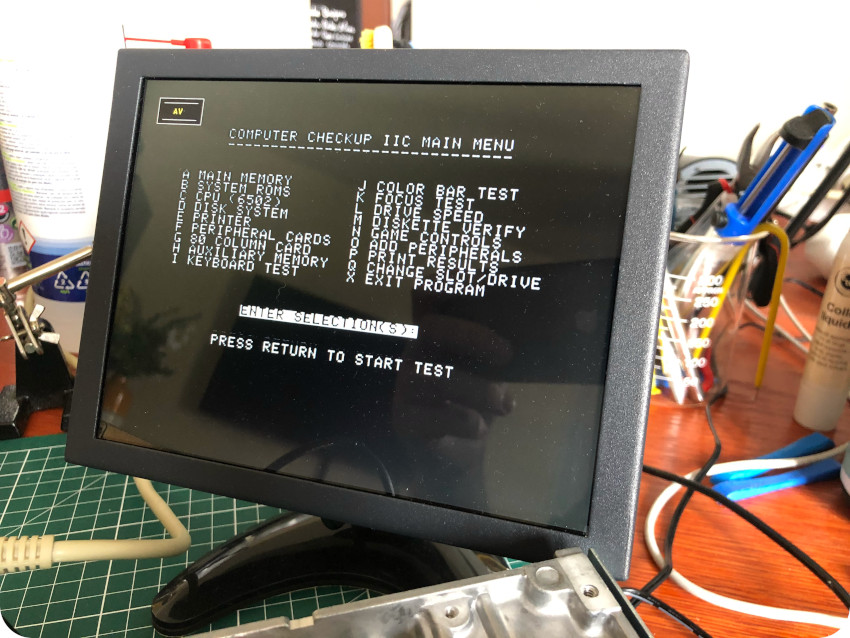
I run trough (most of) these tests … and I am very happy to report that my Apple IIc passed these tests with flying colors !
The last tool I run was a (quite nice) disk drive analyzer:
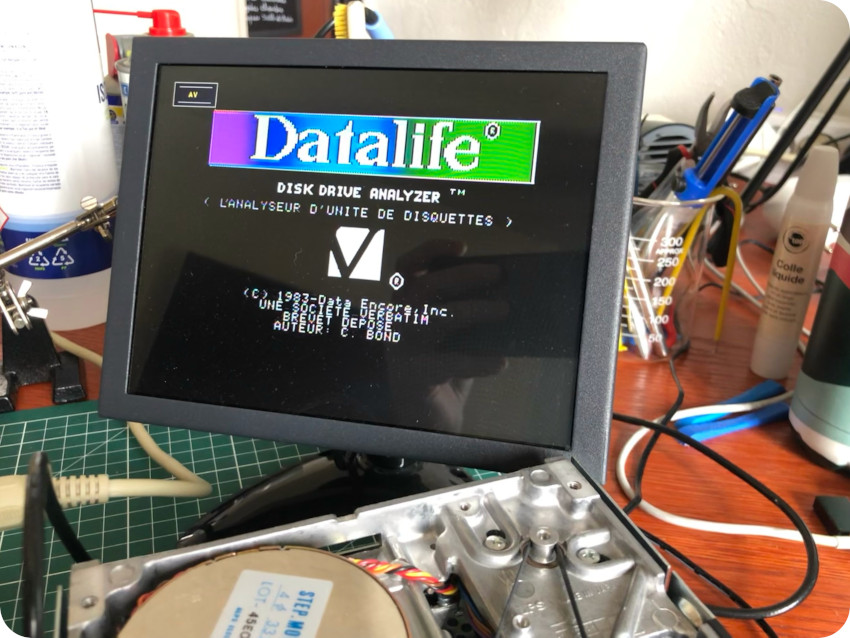
It allowed me to run various tests (radial alignment, rotation speed, head adjustment, read / write) on the internal floppy disk drive:
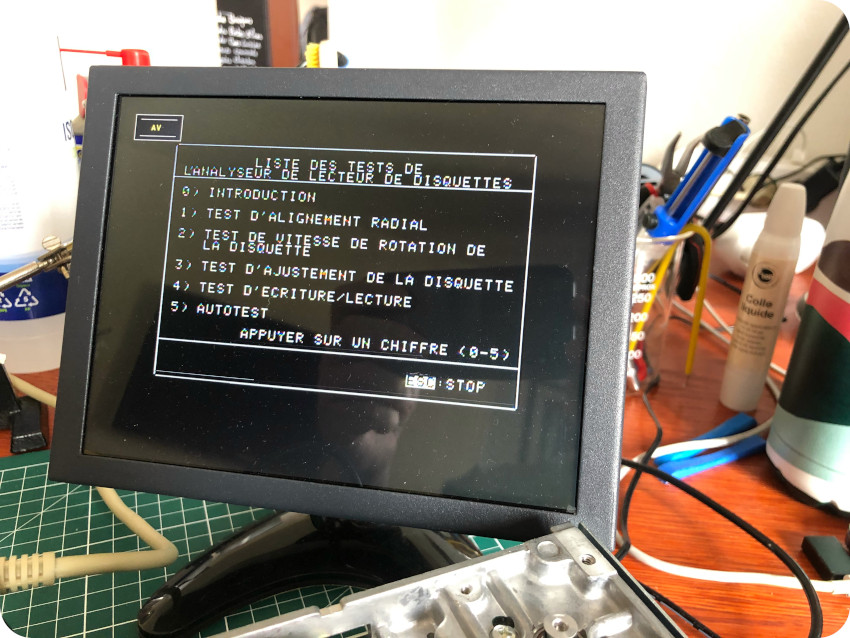
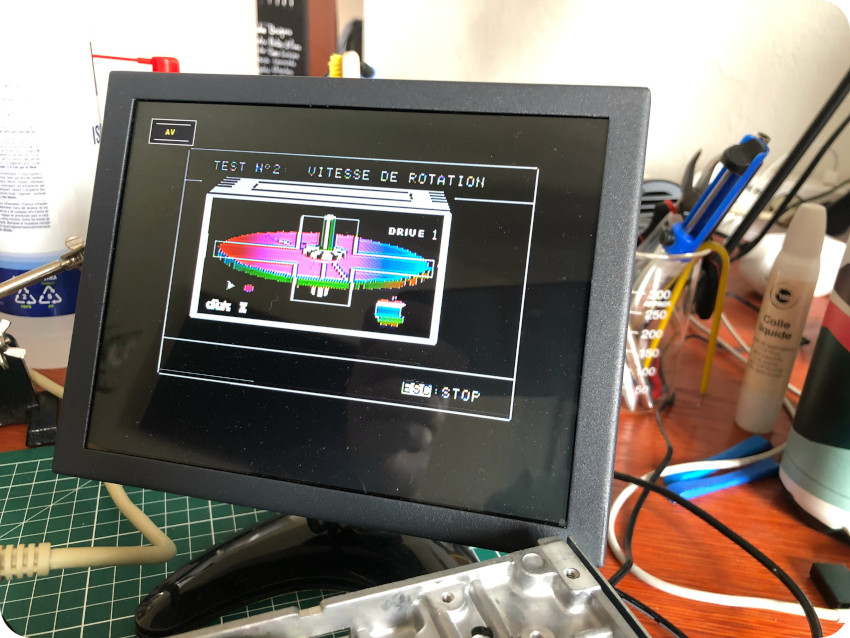
There again, I am happy to report that it passed all tests !
These diagnostic tools also provide tests designed for CRT maintenance, including:
- Pattern generation
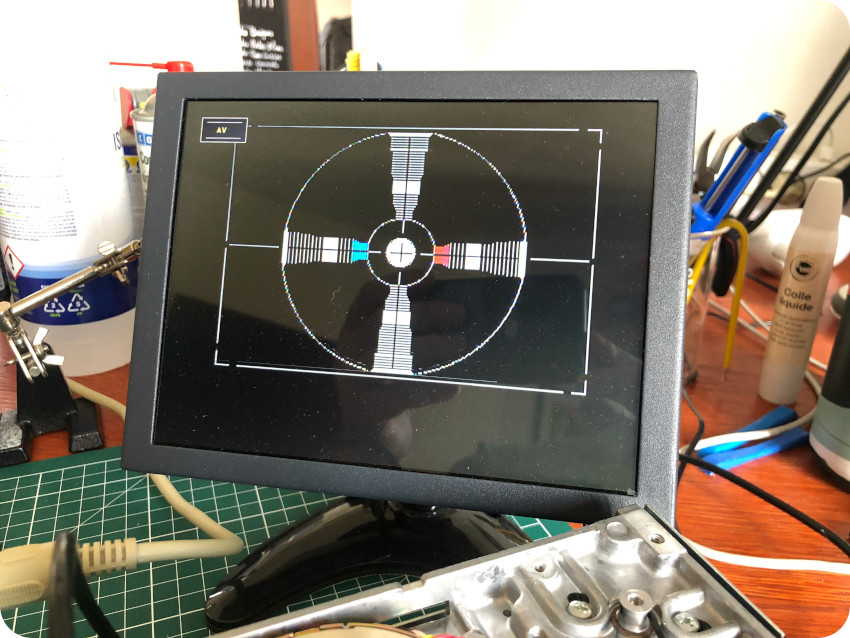
- Yoke alignment tests
- Focus tests
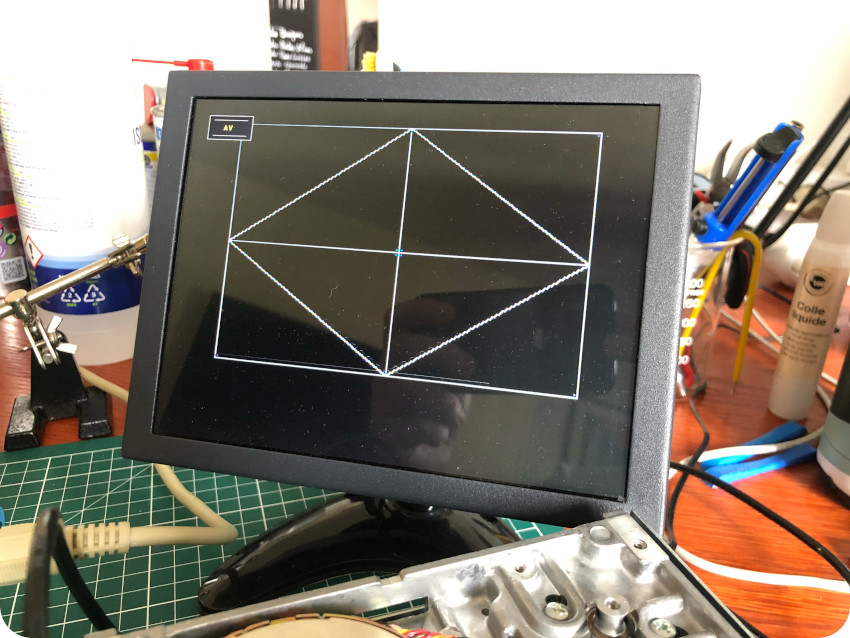
These turned out to be handy for testing and servicing the Apple IIc 9″ green monitor later on !
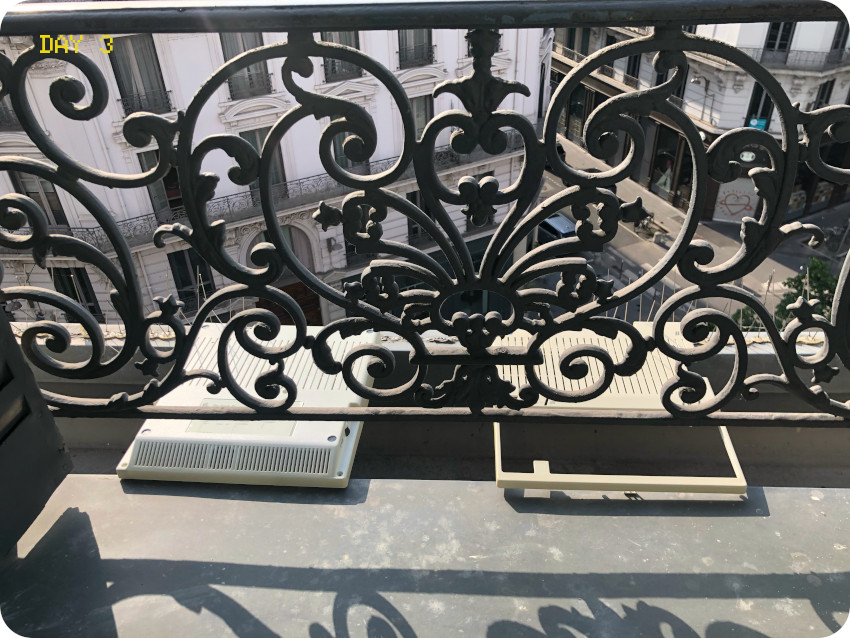
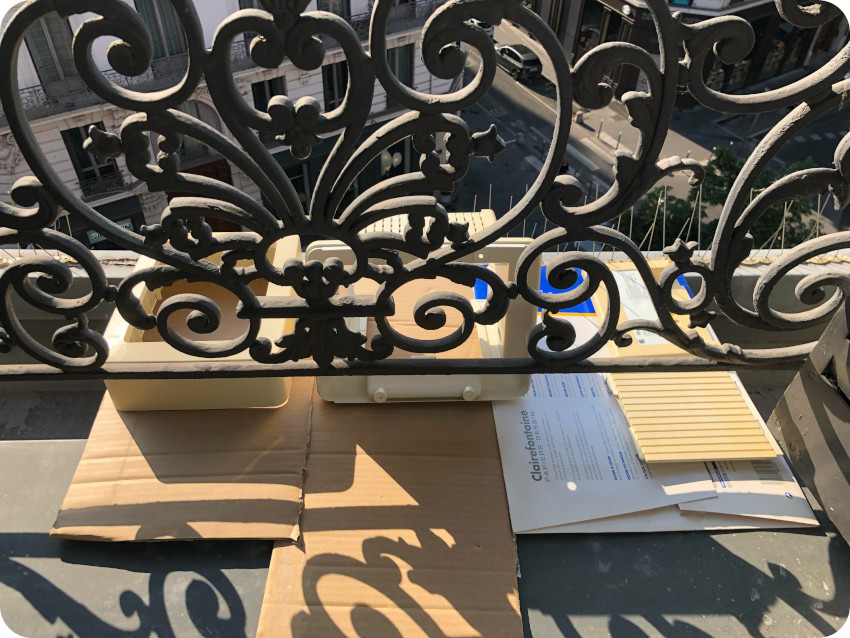
Sunbrighting the enclosure (part II)
Meanwhile, both top and bottom parts of the case had been sunbrighting at the window of my study for two weeks. It seems that most of the sunbrighting occurred during the first 10 days, with visible changes. After that, color tends to stabilize, with less and less visible “whitening” effect:
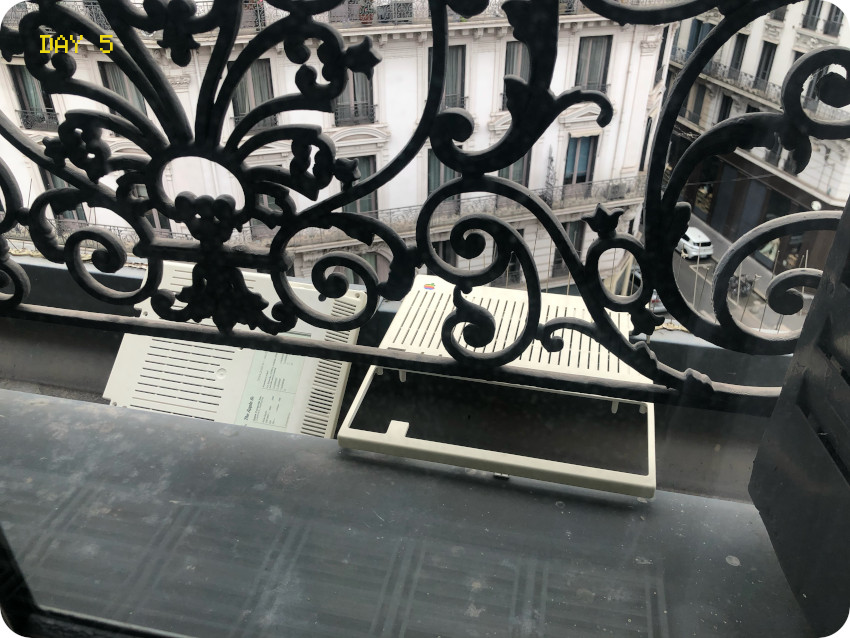
Here is a picture of the final results:
The difference is striking when compared to the monitor. Of course, the monitor was much more “yellowed”. This result is subjective, and depends on ambient light. But still, this is not a bad one, given that I did not use any chemical nor any specialized equipment (UV light, etc.).
There is room for improvements though:
The bottom part is nearly perfect. But there is still a bit of yellowing on the top part, when compared to the handle. Maybe I could have continued the process longer. I don’t think there is a perfect recipe, with clear indicators on when to stop. There is always a risk that the plastics turn brittle under too much heat, too much sun.
I needed space on the bench to work on the monitor, so I decided it was good enough, and started putting the Apple IIc back together:
I put back new rubber feet:
And there we go !
Opening the Apple IIc monitor
While the Apple IIc itself was only slightly yellowed and dirty, the Apple IIc monitor was very badly yellowed and quite filthy !

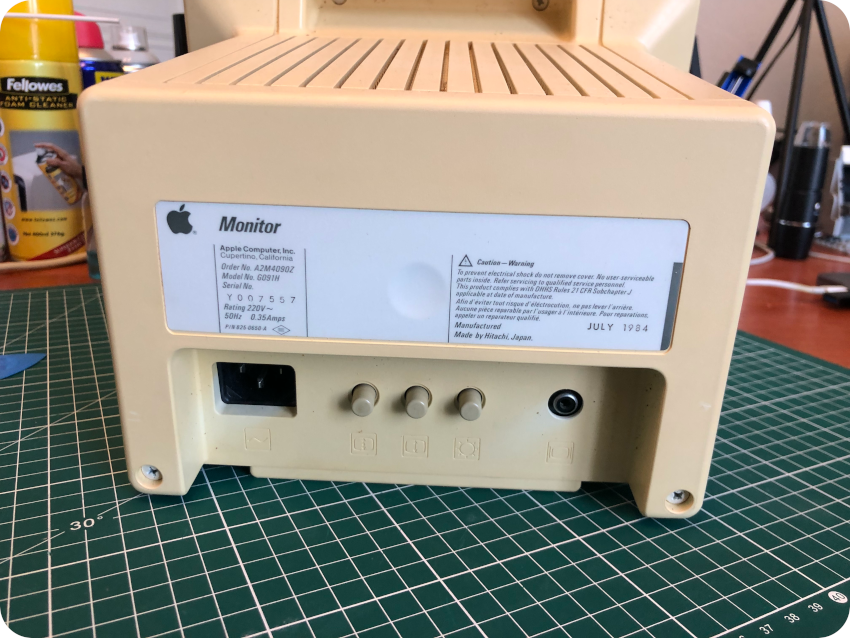
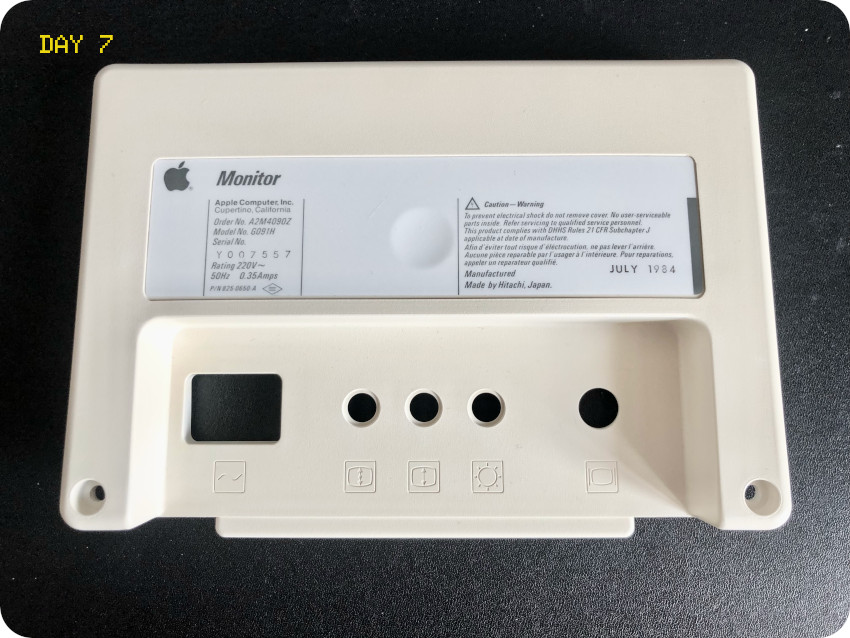
This is the European A2M4090Z – G091H model, built in July 1984:
Opening this monitor is not an easy task ! Let’s take a look at the different steps:
- Back panel: put the CRT safely on a towel, an remove the two screws to remove the back panel
- Top panel: rotate the monitor, remove the two screws located under the handle, and remove the top panel:
- Back cover: rotate the monitor to get access to the two remaining screws, then flip the monitor and remove the four screws holding the power on/off button and the contrast know, then tuck them in and slide the back cover:
- Front bezel: there are 4 screws located on each corner, plus one for the green LED. To get access to the bottom right screw, one has first to remove a small metal shield located on the right side:

Once done, remove the four corner screws. Don’t forget the LED, located inside a grey plastic cover screwed to the front bezel:
The front bezel was disgusting inside:
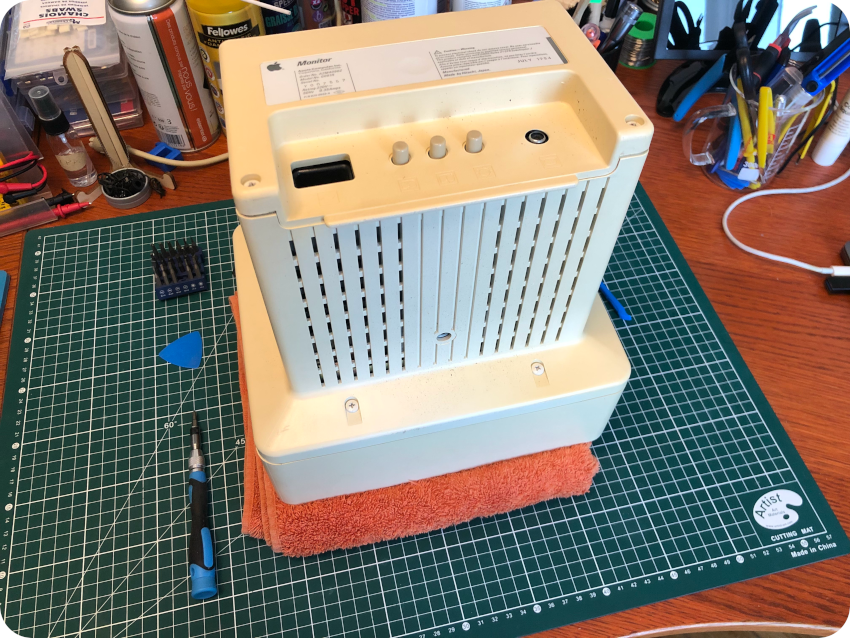
Here are pictures of the monitor once all the part of the case are removed:

Here is a picture of the green LED:
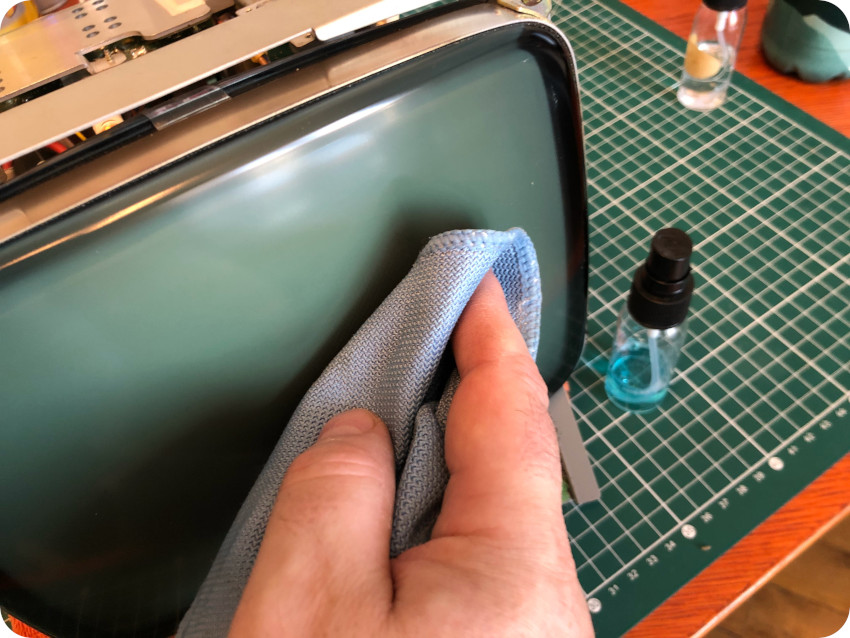
I blew compressed air, and started cleaning the screen:
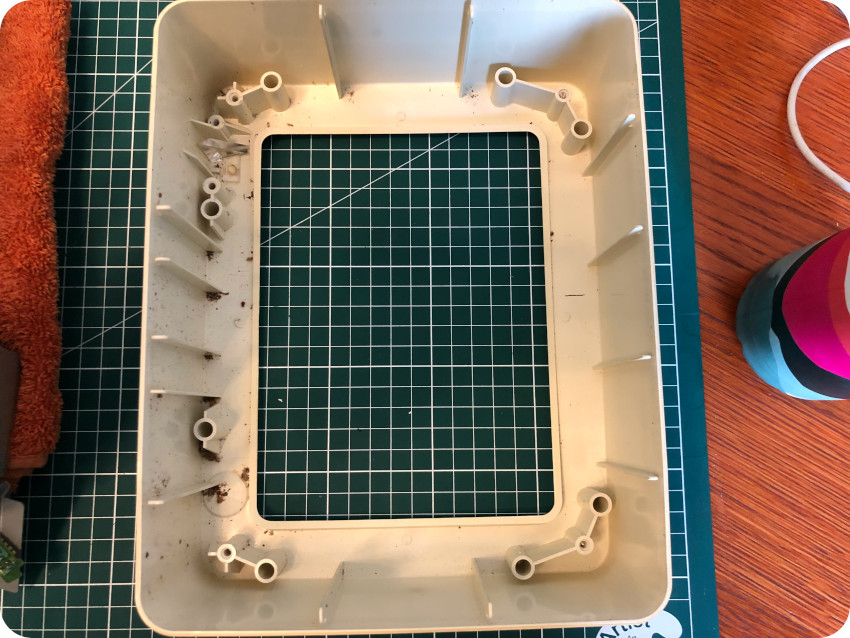
The monitor enclosure (part I)
All plastic parts of the monitor took a well deserved warm soapy bath, and an extensive scrubbing:
Once dried, I used a magic eraser to remove scuff marks, then spayed a copious amount of IPA and finalized the process with a micro-fiber cloth.
The long sunbrighting process could start:
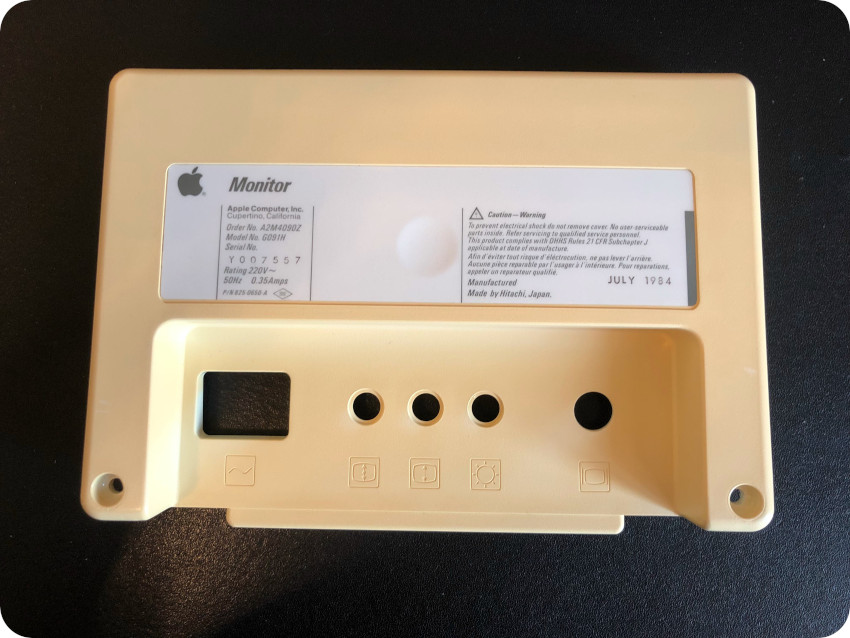
For the record, here is a picture of the back panel before starting the sunbrighting process:
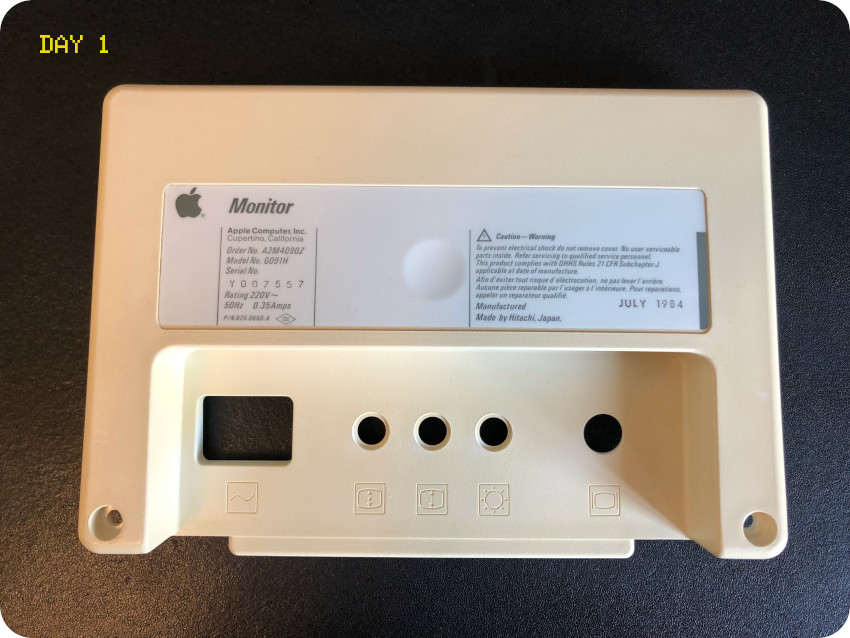
Here is the back panel after day 1. There are visible changes: it went from “almost orange” to “very yellow”:
Here is a picture on day 7:
It is getting better, but this is all very subjective and the resulting look really depends on the surrounding light.
There is still a long road to reach a color that would matching the one of the Apple IIc case, especially for the most yellowed parts. In the meantime, there were plenty of other tasks to tackle !
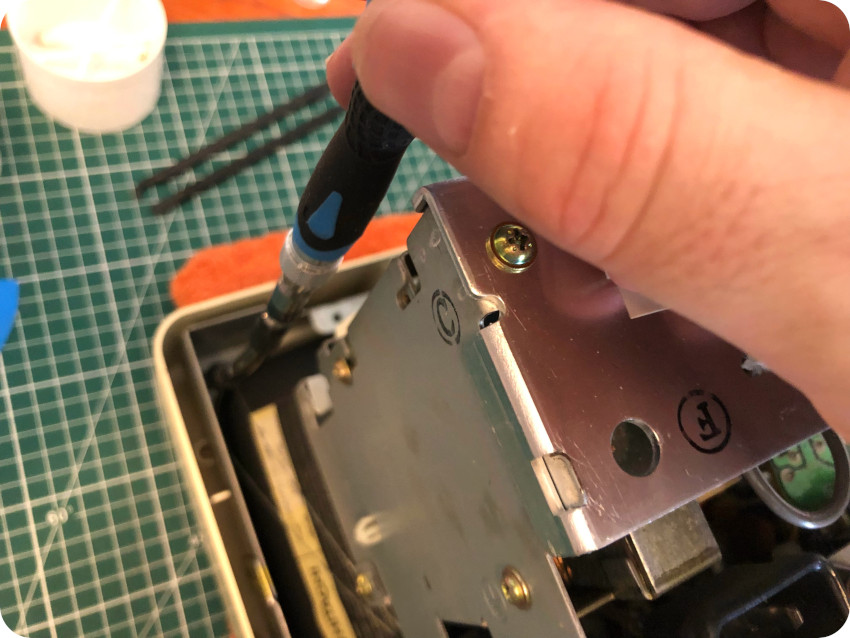
Servicing the monitor
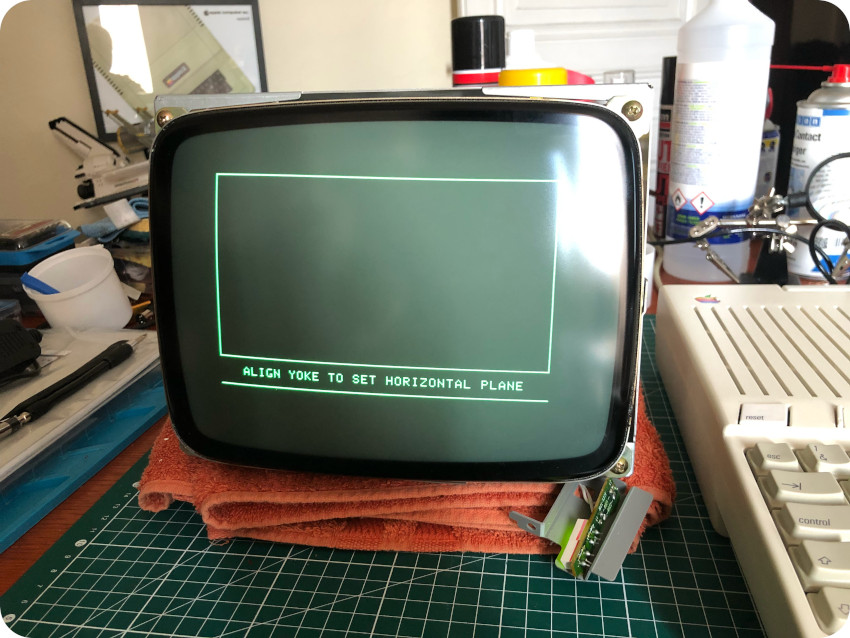
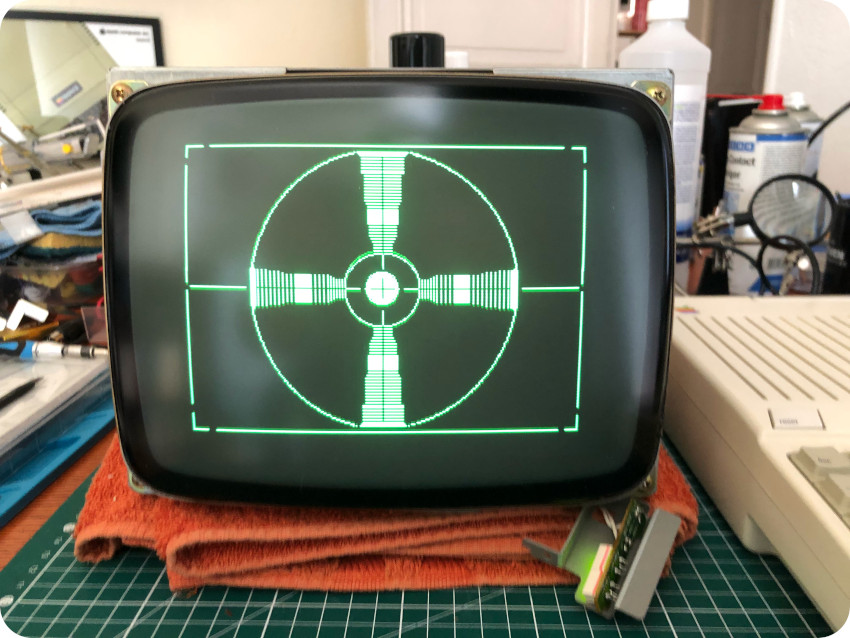
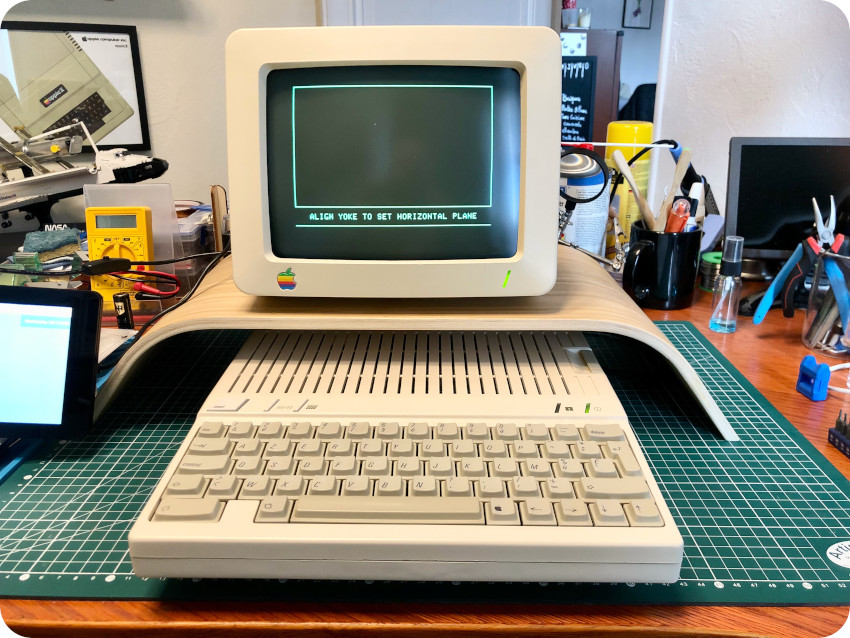
The monitor needed a tune-up. In order to do this, I used the pattern generators of my diagnostic disks;
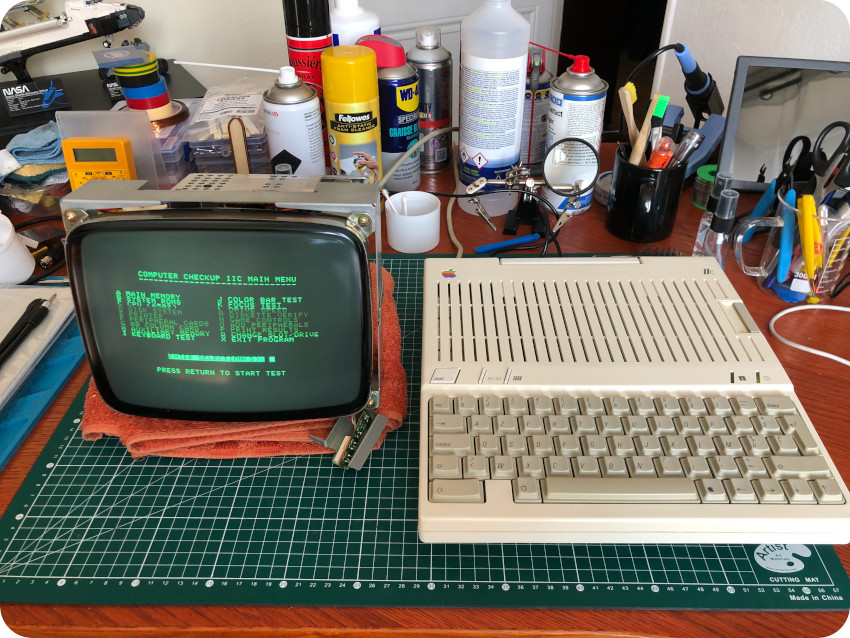
Here are the (not so great) results:
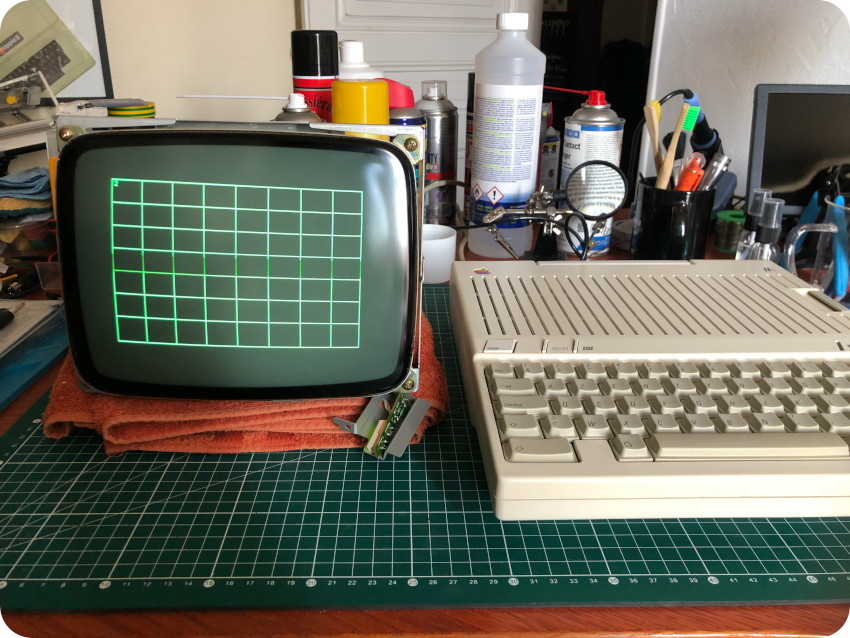

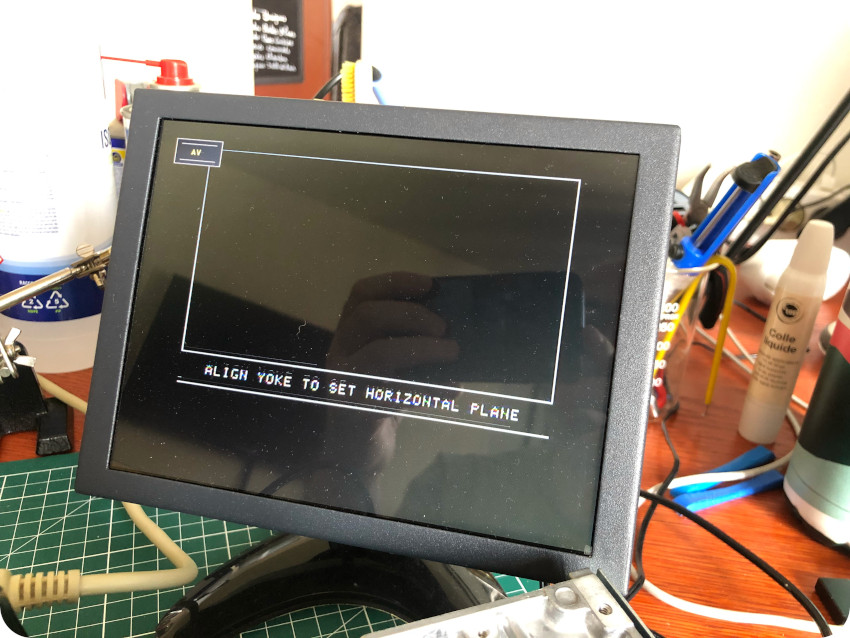
The deflection yoke clearly had to be adjusted:
Some words of caution before doing anything inside a monitor:
- A CRT is basically a huge capacitor, thus storing energy.
- Working with High Voltage is dangerous.
- Take off any jewellery or anything metallic from your hands.
- Make sure to work with only one hand. You don’t want to have two hands in when working with high voltage. If anything goes bad, the current, taking the path of least resistance, would flow from one hand to the other, passing straight to you chest, where lies your heart.
- Wearing rubber gloves and rubber soled shoes if also a good precaution.
- It is also good to have someone around, who could take actions (first aid, calling emergencies, …) in case something would go wrong.
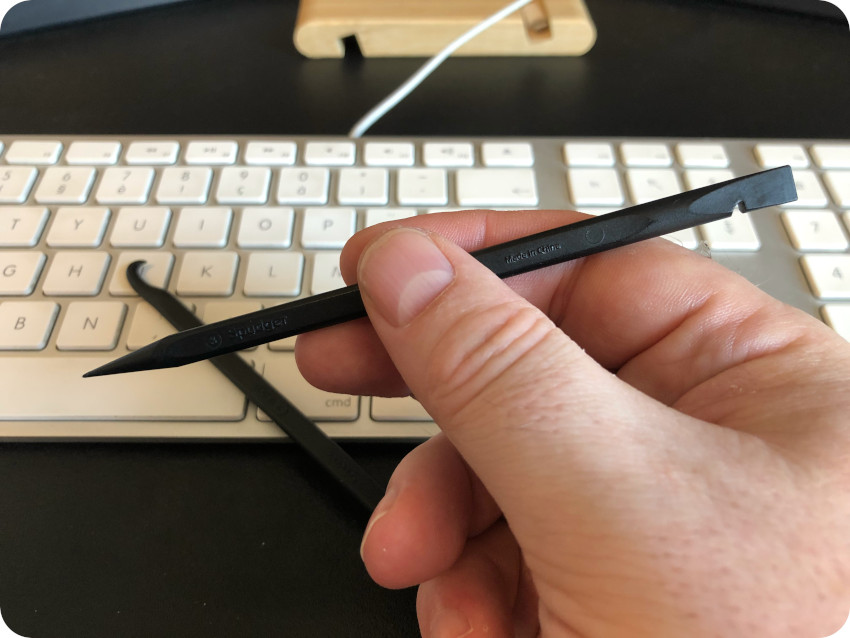
- Avoid metallic tools, use plastic ones instead:
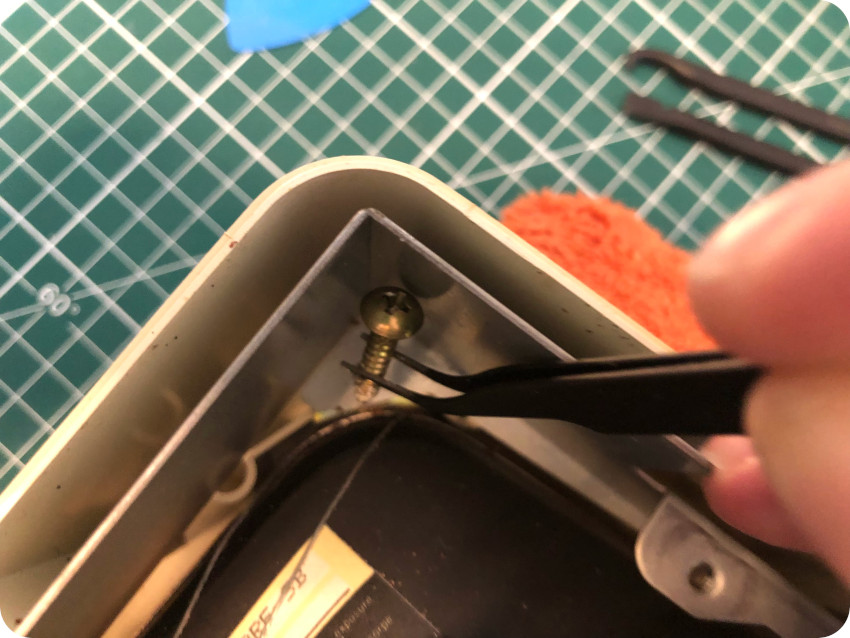
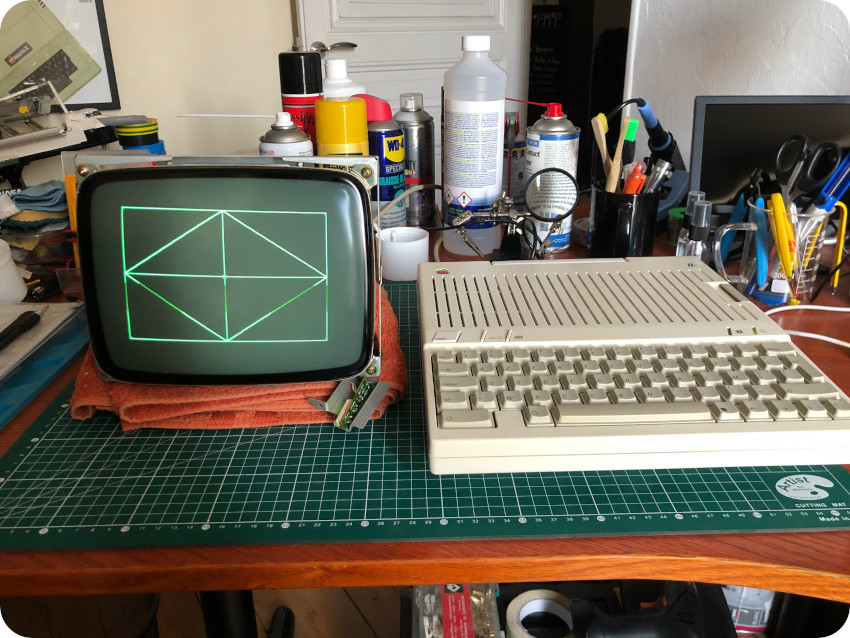
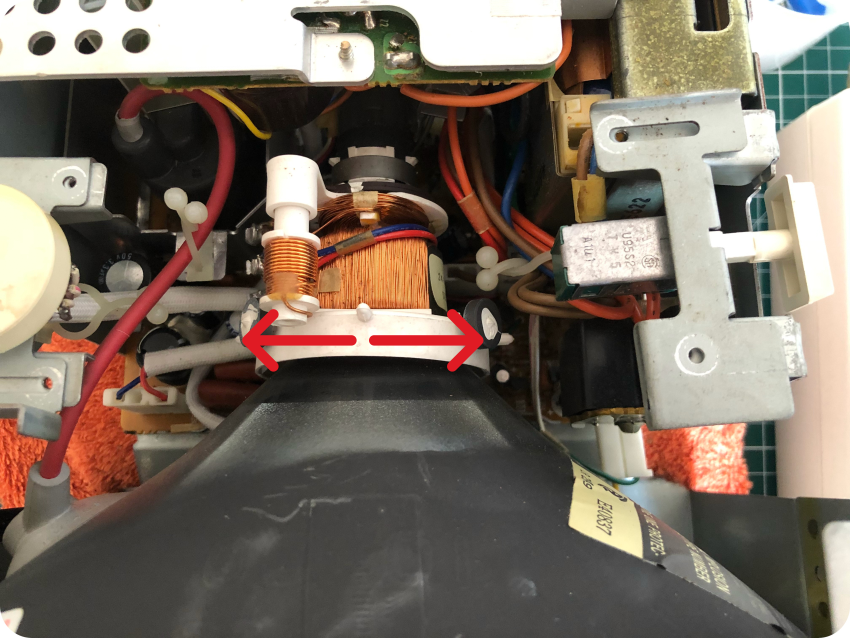
The yoke is tighten to the neck of the CRT by a ring, secured by a screw (sorry, the picture is a bit out of focus):
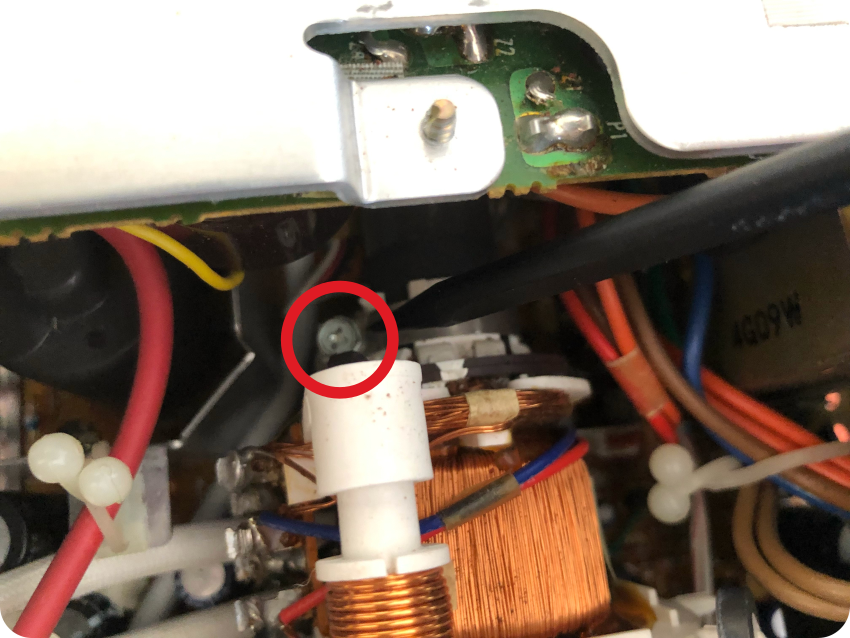
Once the screw is loosen (using a plastic tool), gently turn the yoke around the neck until it is aligned, then tighten back the screw:
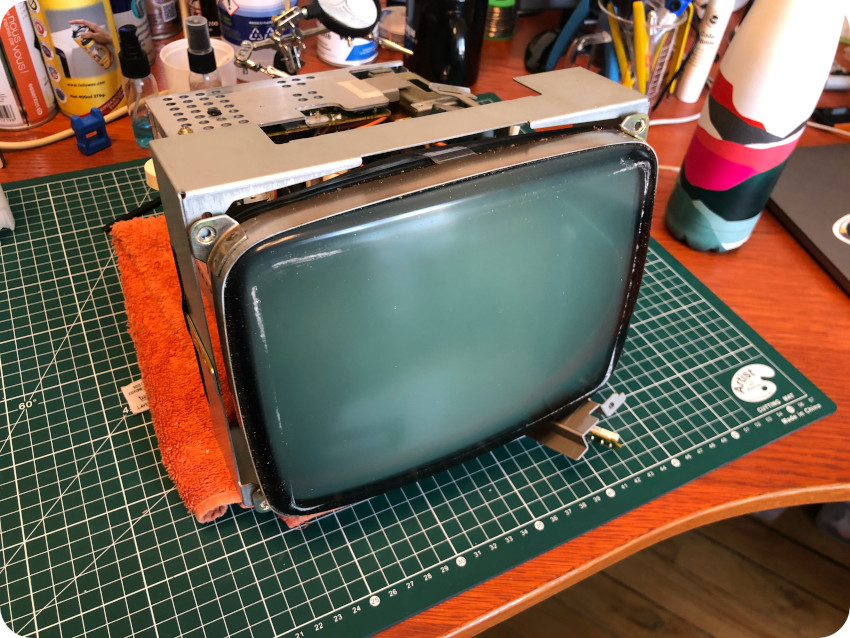
There you go ! Here are the (much better) results:
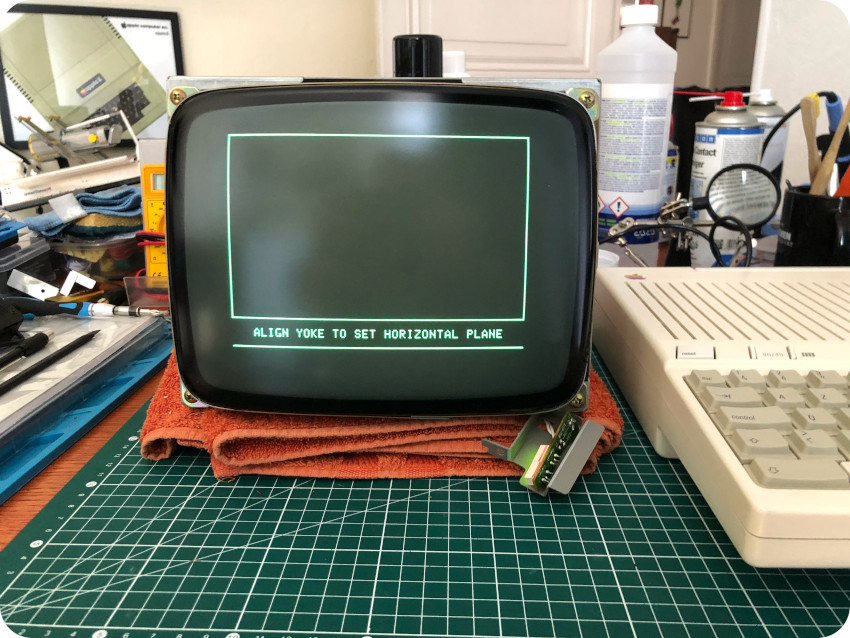
Not bad ! I am quite happy with this little fellow ! It is still sharp (sharper in real life than on the pictures I took), bright, well focused and without any noticeable burn-in marks. Nice !
It was time for a little inspection and a bit of cleaning:
The inside of the monitor is tightly packed and heavily shielded. It looked pretty good upon visual inspection: the caps looked good, the flyback looked good, no signs of corrosion, good solder joints, nothing evidently bad.
So … I did not go into the trouble of removing all the shields and completely opening up the all differents part.
I blew compressed air and vaccumed the dust. Then I cleaned the accessibles parts with IPA and used contact cleaner on the on/off switch and all the pots.
Labels and sleeves for floppy disks
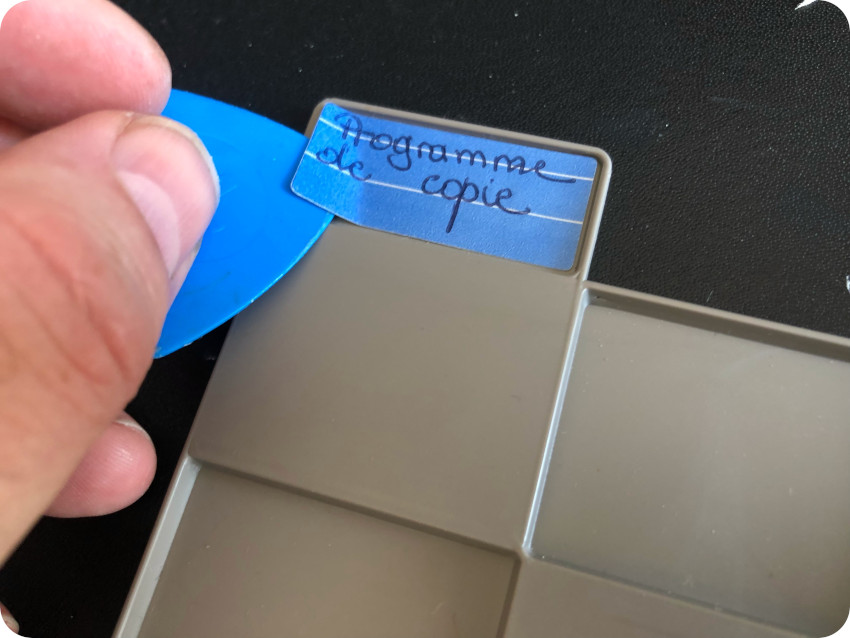
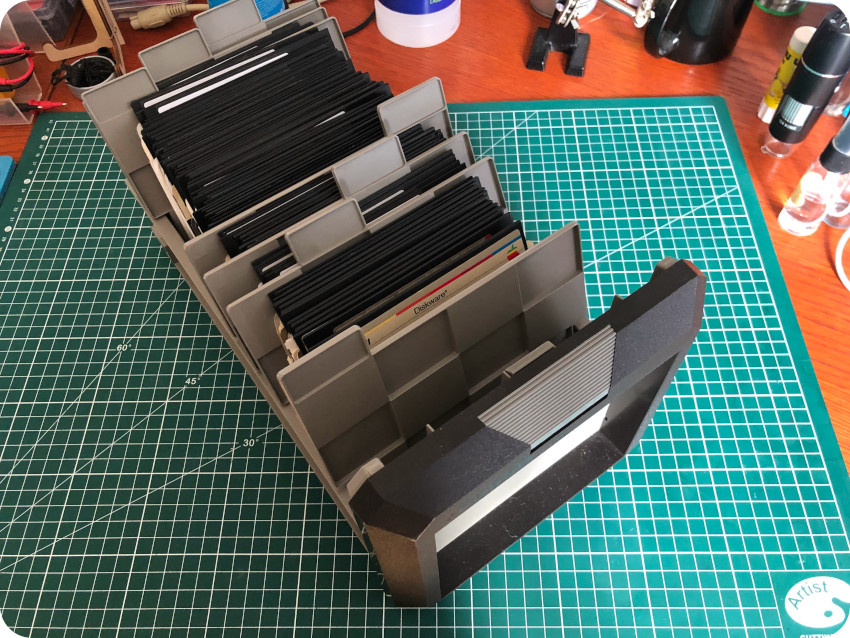
I have 3 stacks of floppy disks:
- Original Apple floppy disks: these ones won’t require a lot of work. For some, I will have to find a way to erase a few markings on the labels. Some have mismatched sleeves:
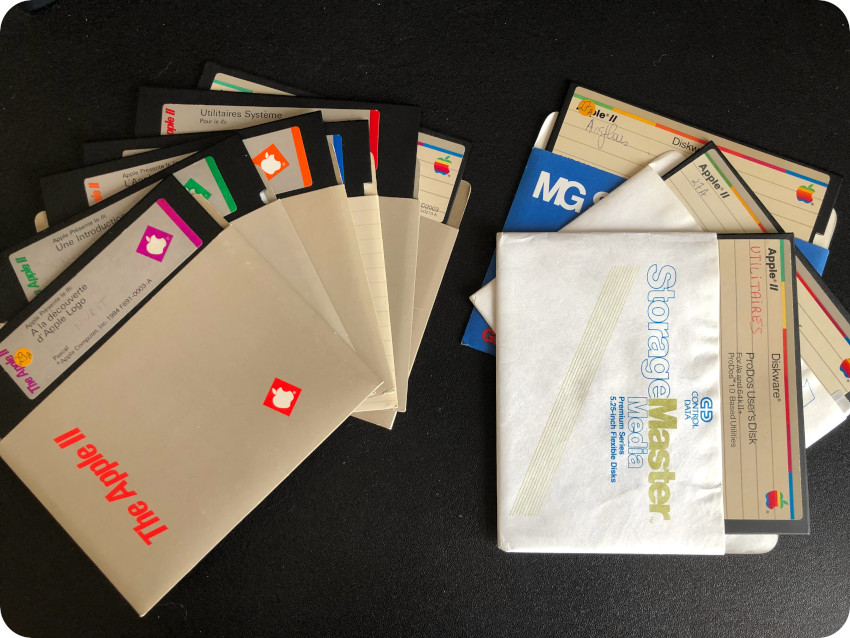
- Home-made copies: this is the bulk of the floppies that were packed with the Apple IIc. Most of the labels are either bad, half-removed, moldy, re-written or multiple. Some disks have markings on their sleeves or mismatched ones. My objective was to remove the bad labels, print new ones and create new sleeves when necessary:
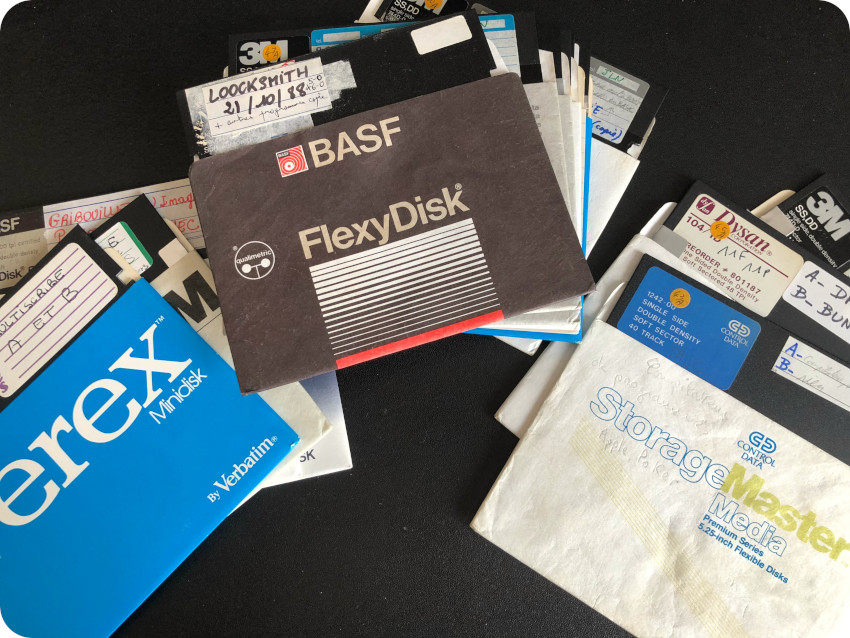
- New Old Stock floppies (Verbatim): these are in mint conditions. I will have to work a bit on the box, which is a bit out of shape:

Let’s start with the labels. As I did for Atari ST disks, I used Inkscape to create sets of new labels, in the style & spirit of the ones used for floppies back in the days:
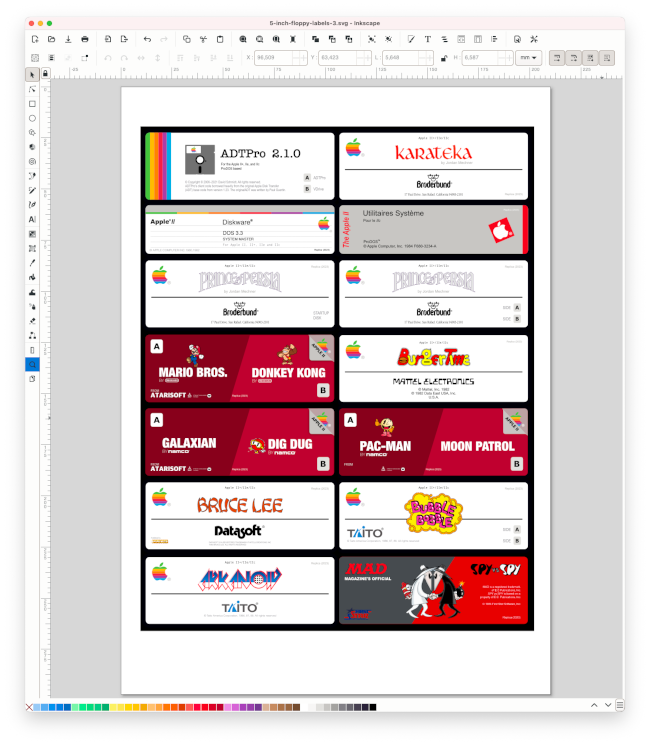
Here is the printed version of my first batch of labels:

The next step is to remove the old labels from the floppy disks. This is a very tedious process:
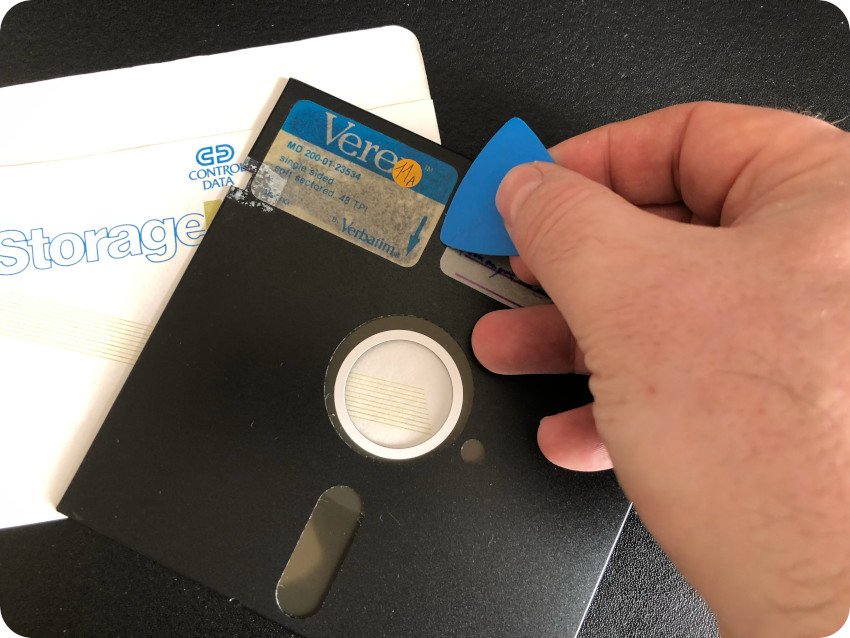
Here is the result for the first ones. It took me around about 10 minutes to get a clean result. And a lot more disks to go …
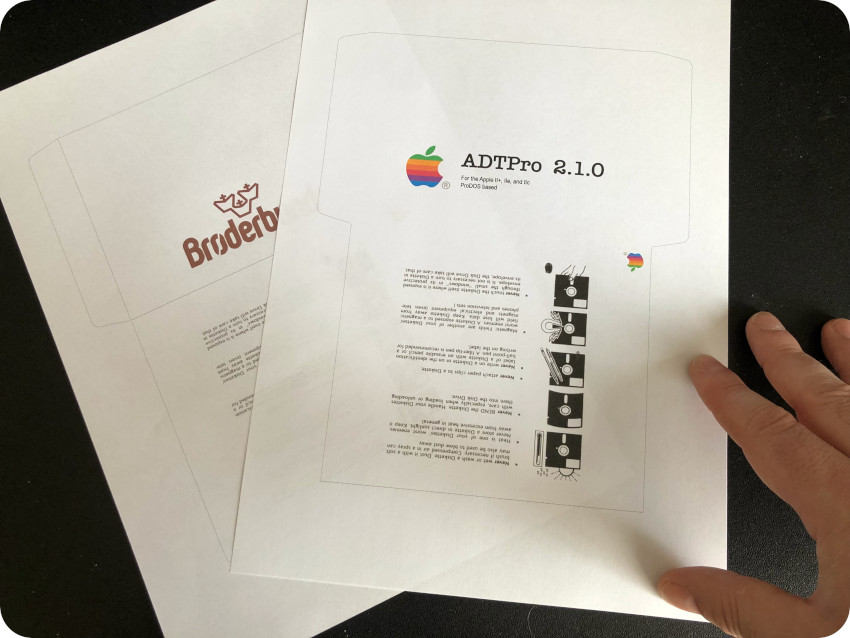
Here a picture of the newly created ADTPro 2.1.0 floppy disk and its brand new label:
Here are a few shots of the first batch of floppies:
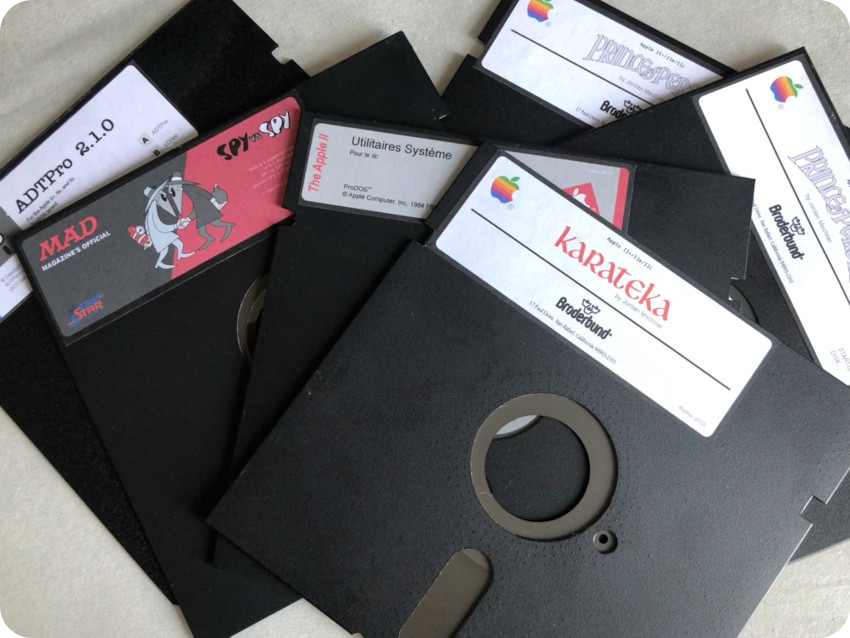
Not that bad !
Some of the sleeves were in really bad conditions. I created a model for these, with a few variations, including the goofy Beagle Bros. one:
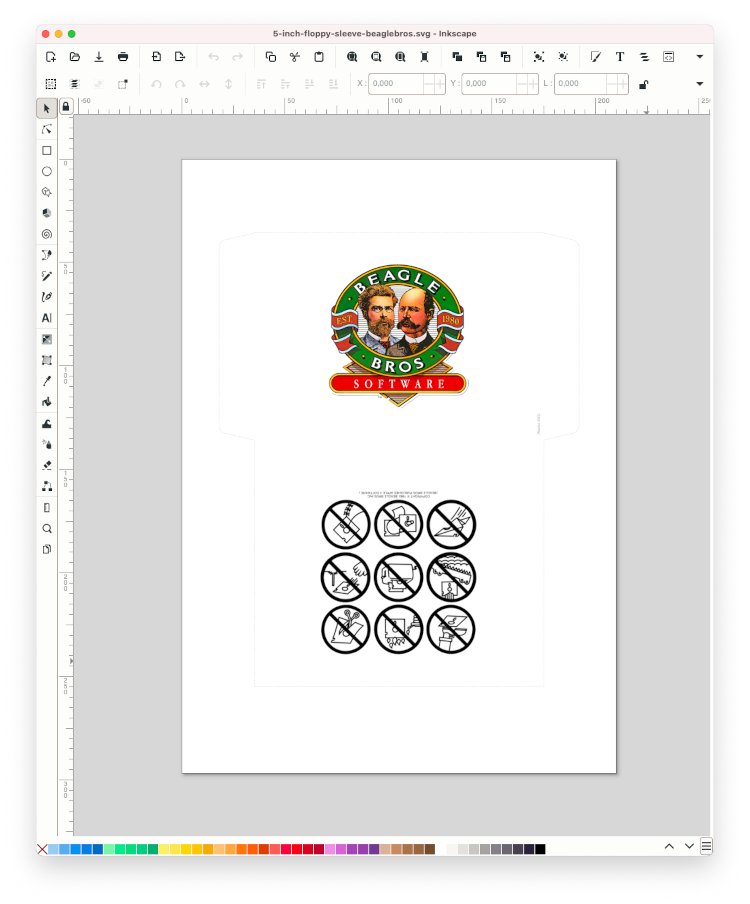
Here is the first batch of printed sleeves:
And here’s a picture of the first try, once the sleeve was cut and glued:
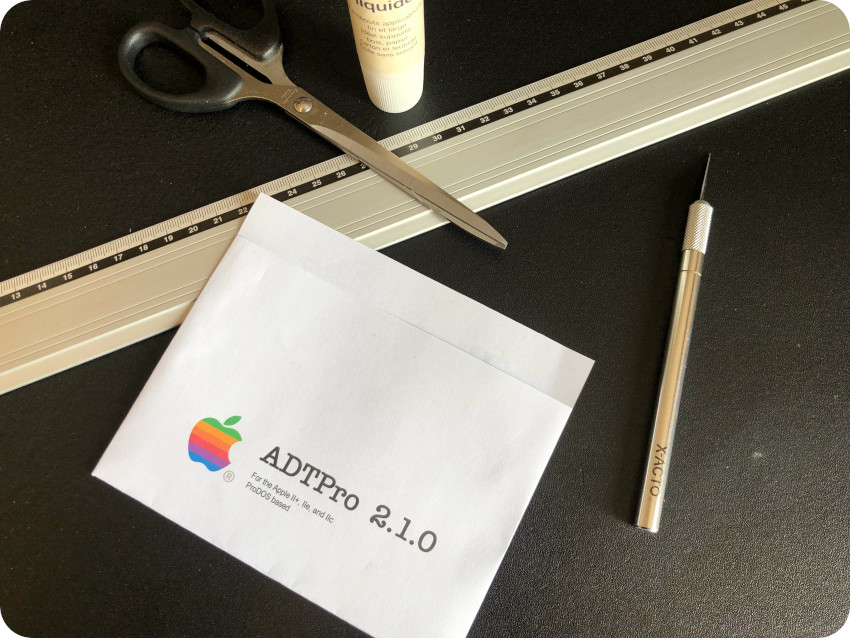
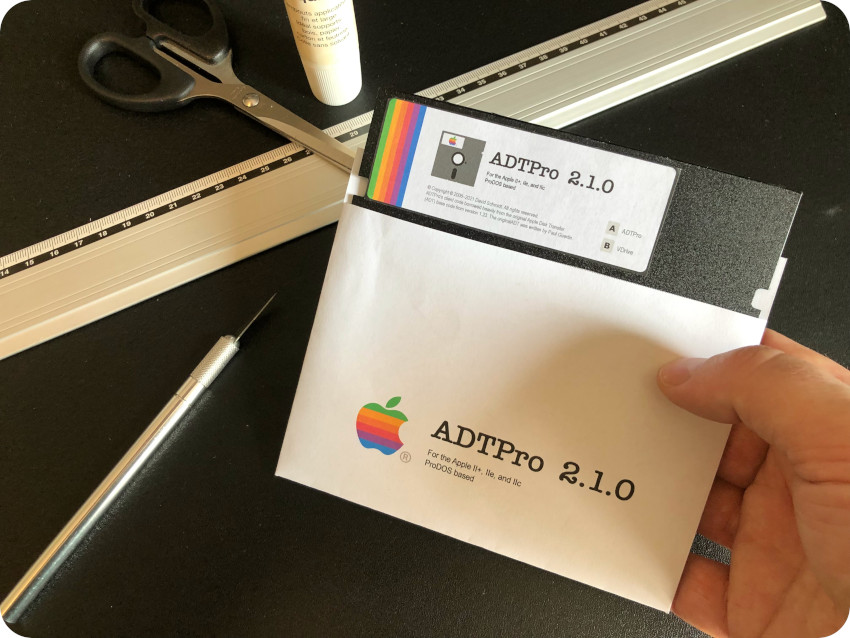
It was not quite happy with this first test, so I made a few adjustments to the Inkscape models. Here are the final results:
It is better looking this time !
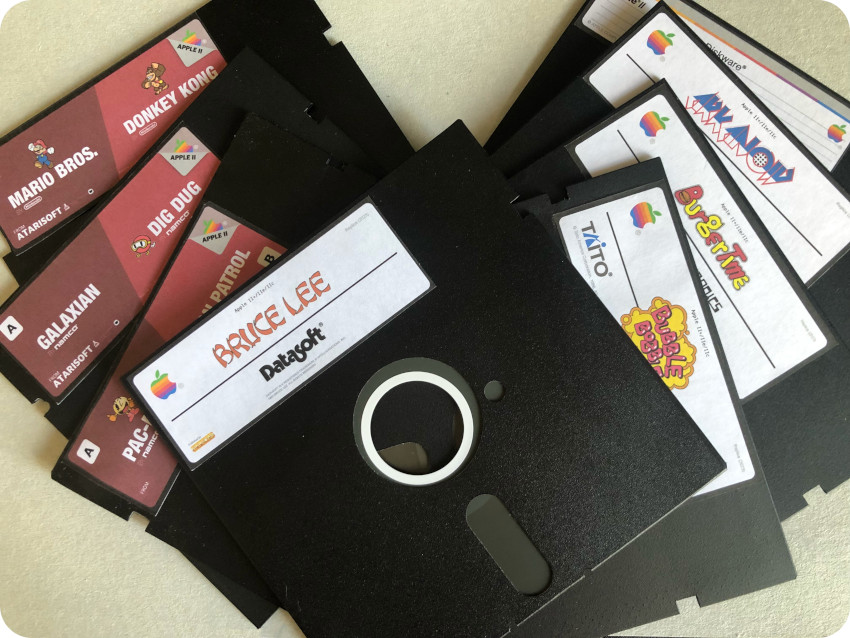
So far, here are the floppy disks I could “re-create”:
- Games:
- Tools, Apps, Systems and Programming languages:
Using a null modem to get access to the internet
Since I had build a null modem cable to use ADTPro, I wondered if I could use it to connect the Apple IIc to the Internet via a GNU/Linux gateway.
I googled around and found this nice article. The idea is the following:
- Connect the Apple IIc to a Raspberry Pi via the DIN5-to-USB RS232 serial cable (null modem)
- Use the Raspberry Pi as a gateway for internet access
- Use the Apple IIc as a “dumb” terminal
- Run Modem MGR on the Apple II to log into GNU/Linux and interact with it via CLI tools
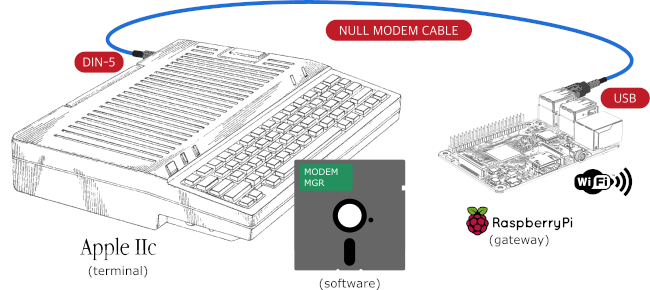
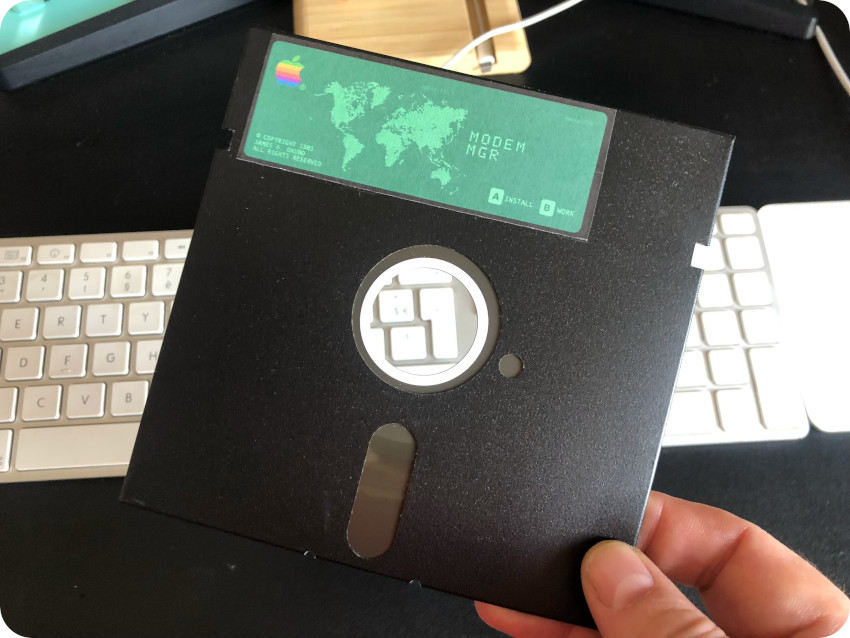
Modem MGR comes with 3 disks:
- An install disk
- A Work disk
- A Utilities disk (that I didn’t use)
Important note: for better VT Terminal compatibility, use the PRODOS version of Modem MGR, which has more options than the DOS one.
I created a floppy disk with Install on one side and Work on the other one:
The Install software allows to set basic configuration options and write them on the Work disk. I selected:
- 1) Install video driver, and chose the “Apple // 80 column” driver
- 2) Install modem driver, and chose the “Non-smart Modem” driver
- 9) Save new installation to save the configuration to the Work disk
On the GNU/Linux side, I created the following “server.sh” script:
#!/bin/bash

while true
do
/sbin/getty -L 9600 ttyUSB0 vt100
done
Here is an explanation of this script:
- getty (short for “get TTY”) is a Unix program that manages physical or virtual terminals (called TeleTYpewriters, or TTY‘s).
- When it detects a connection, it prompts for a username an runs the login program to authenticate the user
- It is set to use device ttyUSB0 (the one used by ADTPro)
- The “-L” options controls the line flag
- The Baud rate (speed) is set to 9600
- It is configured as a VT100 terminal
I created a user named fred with the following configuration:
- defaults using the tcsh shell (I found out it worked better than bash for VT emulation with Modem MGR)
- a very simple (to avoid mangled characters at the prompt) .tcshc file: set prompt="%M:%~>"
To log into the GNU/Linux gateway (if lost, at any time, the Modem MGT menu can be displayed using ESC-? ):
- Boot the Apple IIc with the Modem MGR floppy disk (“Work” side)
- On the Apple IIc side, when the Modem MGT menu appears, type ESC-M, then N to setup the proper speed (9600 bauds)
- Once done, type ESC-:, then V to setup the proper VT terminal emulation (this option is only available in the PRODOS version of Modem MGR)
- On the GNU/Linux side, start the server script (as root): sudo ./server.sh
The login process should initiate right away:
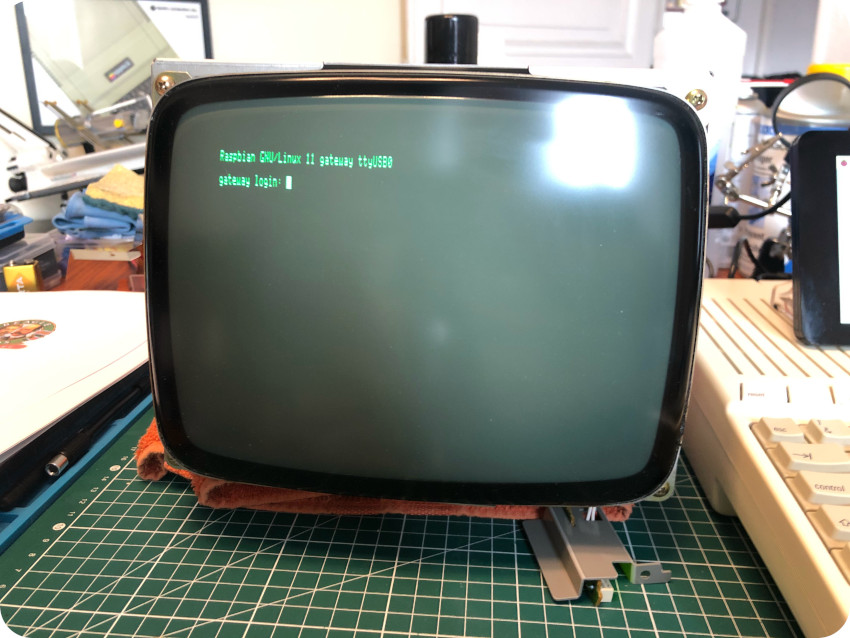
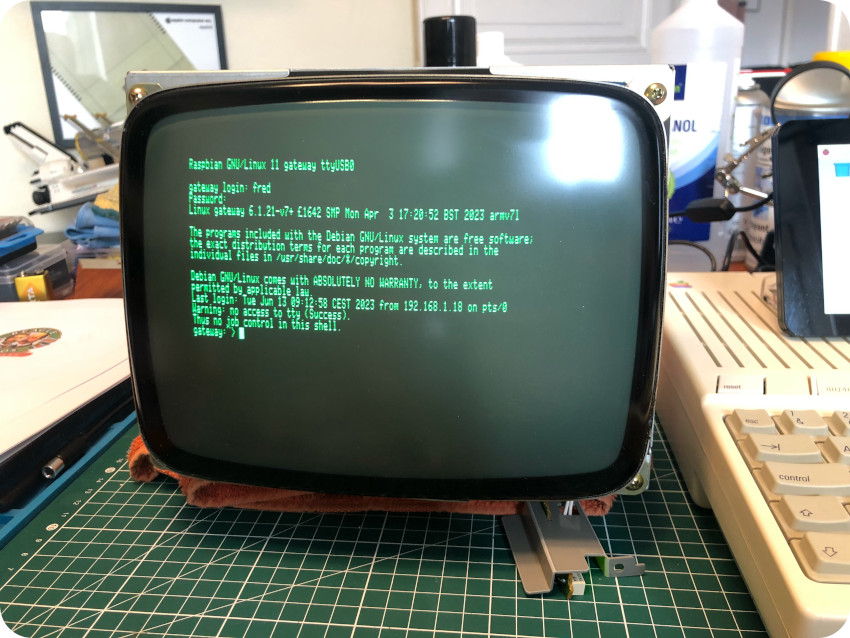
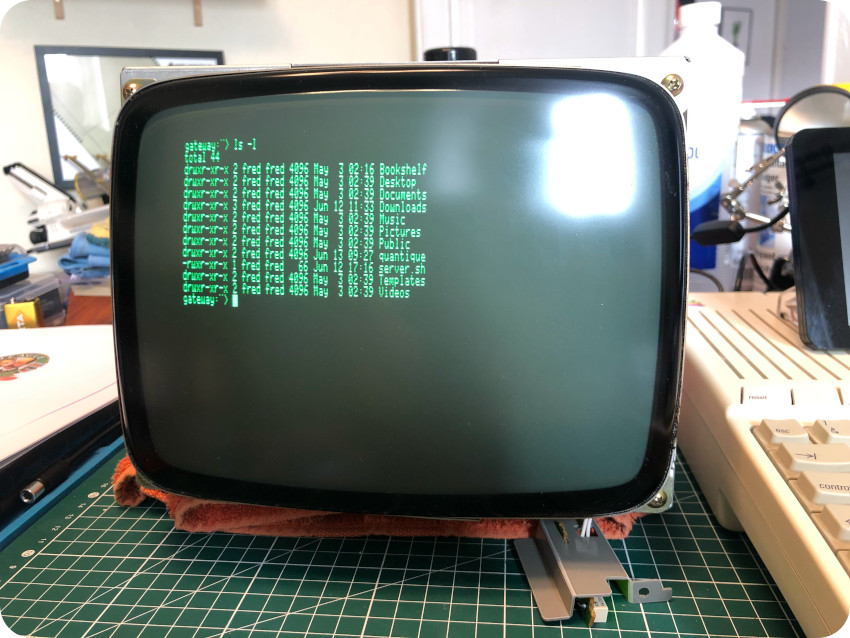
Excellent !
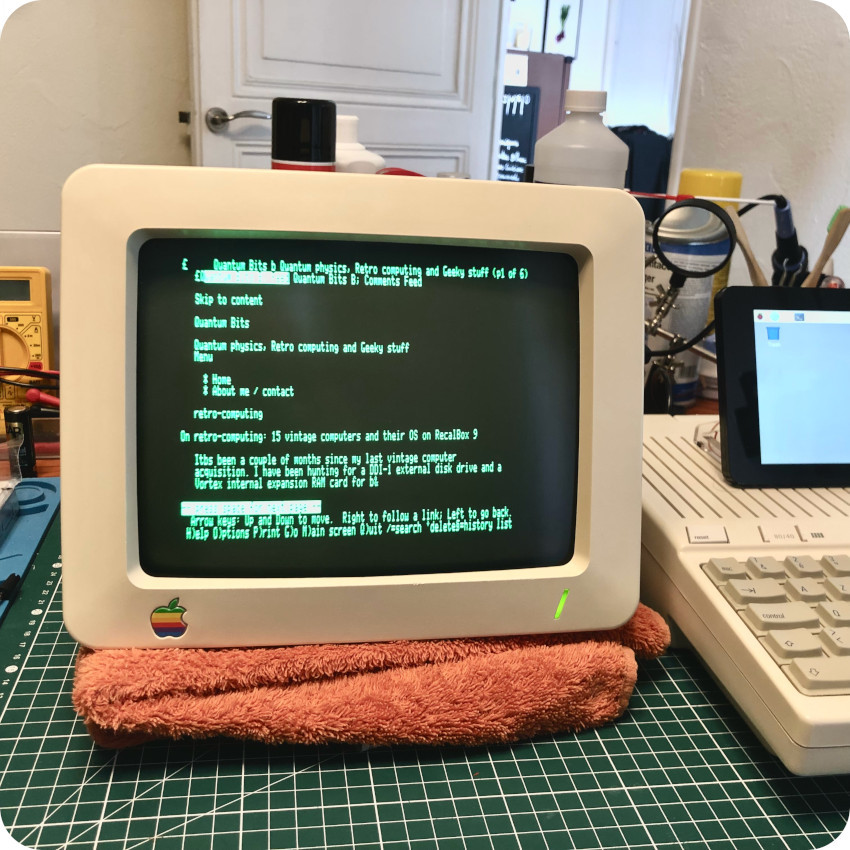
Now, let’s go to http://info.cern.ch and surf the web (on a 1984 machine) like if it were 1991:
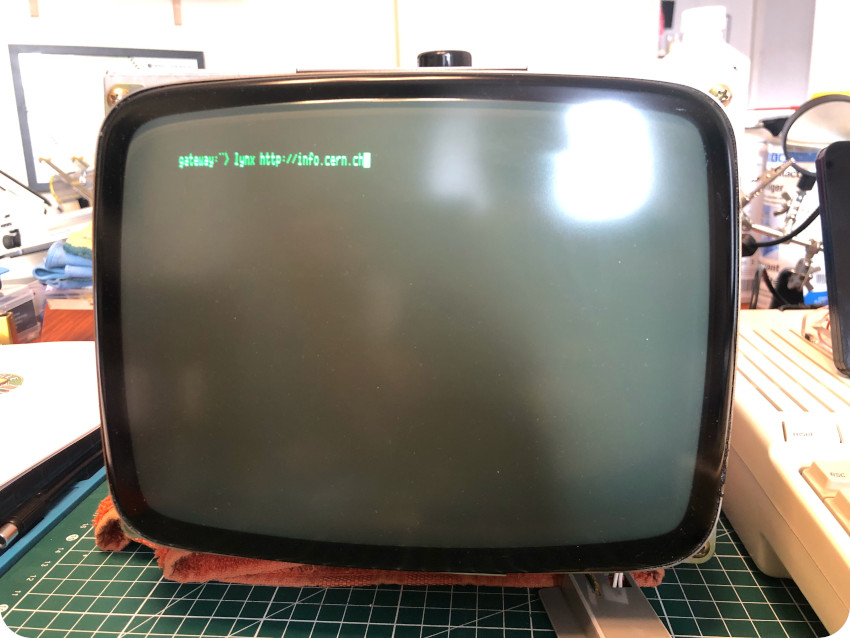
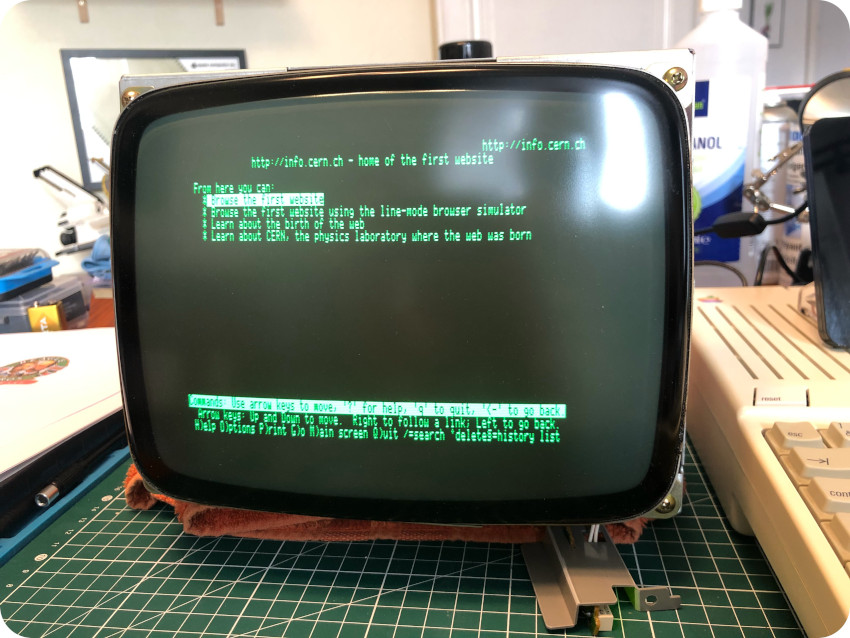
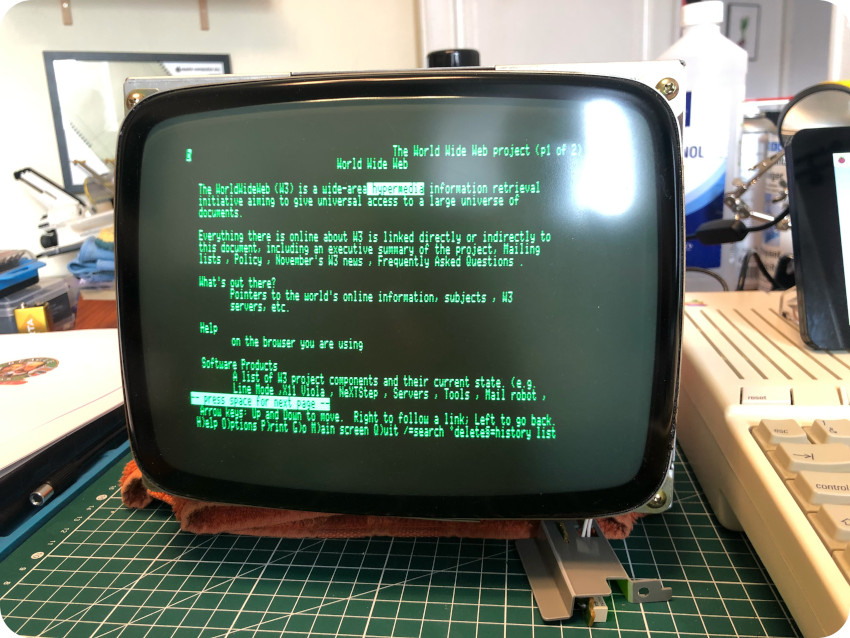
So much memories !!
Now … let’s watch Star Wars IV on the Apple IIc:
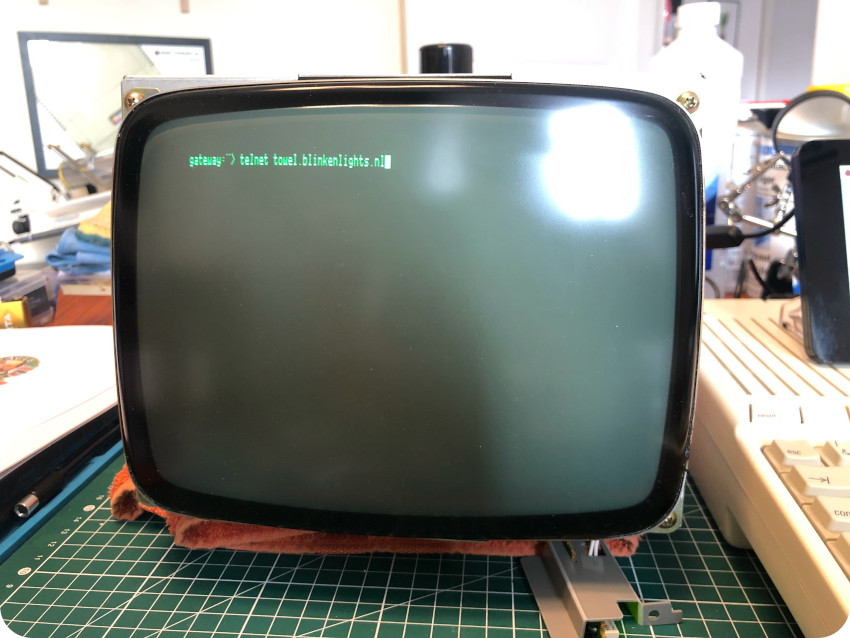
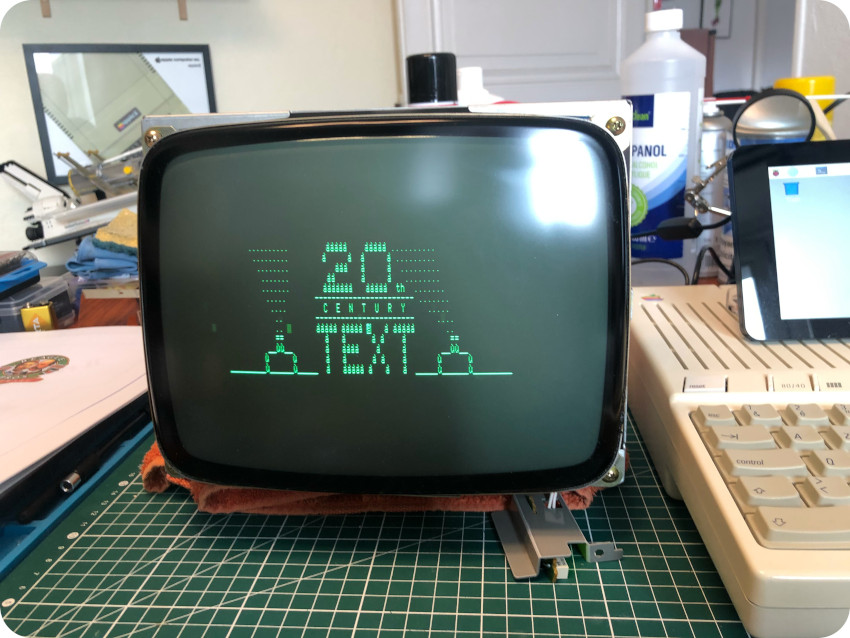
I am amazed telnet towel.blinkenlights.nl is still up and working after all these years !
Let’s jump into the present, and try ChatGPT on an Apple IIc. Because … why not ?
For this, using the Apple IIc as a terminal, I SSHed into my Mac from the gateway and used the tgpt CLI wrapper for ChatGPT. I asked “Describe the Apple IIc in two paragraphs” and got this not-that-great answer:
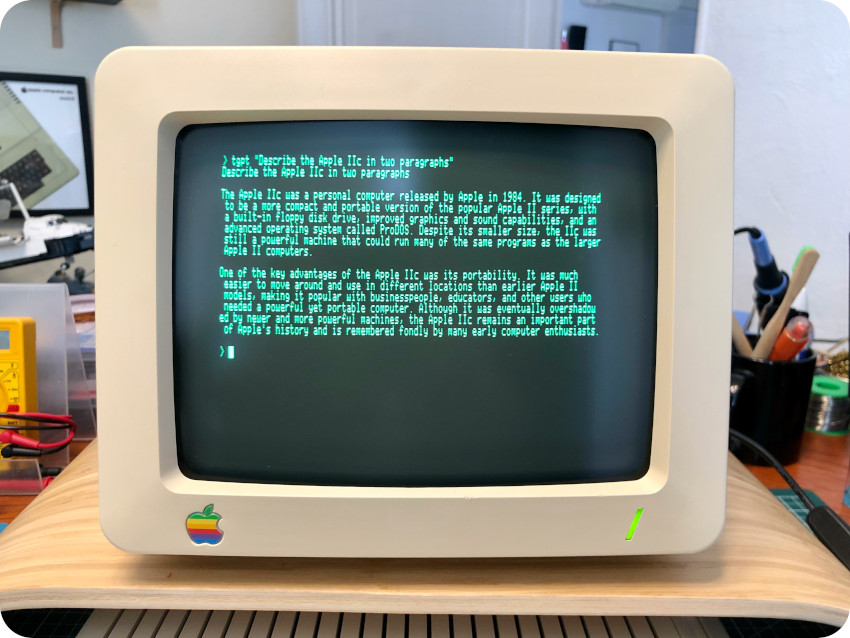
Note: I actually forgot to take a picture of the first tests of ChatGPT on the Apple IIc. This one was taken later on, after I put back the front bezel (see next paragraph).
Now, let the past meet the future. Let’s make a bit of quantum computing with an Apple IIc ! I wrote a very simple python script with IBM Qiskit to create a three-qubit Greenberger–Horne–Zeilinger state:
![]()
The script basically creates the quantum state and saves as a text file the corresponding quantum circuit:
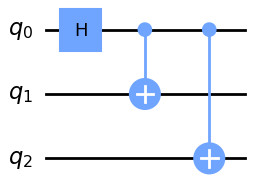
For this “retro” context, I had to include a bit of trickery in the script to output only Apple II compatible characters, but it worked:
How cool is that !
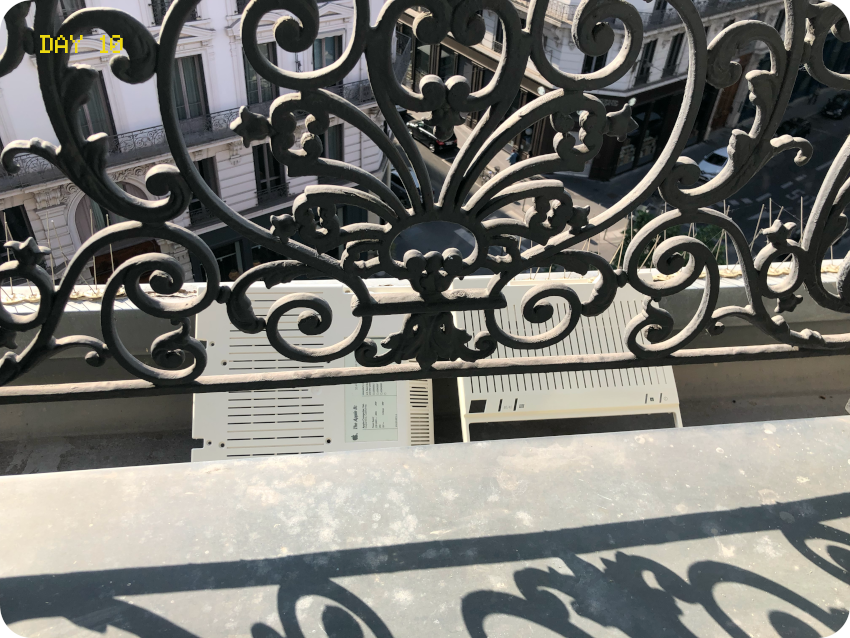
The monitor enclosure (part II)
During this time, all the plastic parts of the monitor were sunbathing:
After 10 days, the front bezel and the contrast knob were ready to go:
Of course, this was not perfect, but it (almost) matched the color of the Apple IIc !
It was time to put back the front bezel, which was not an easy task ! Indeed, the green LED has first to be screwed back in place:
The tiny PBC is held into place via a slit in this grey piece of plastic:
Screwing back this freaking piece of plastic to the front bezel is a royal pain in the arse and involves a lot of swearing !
And … there it goes !
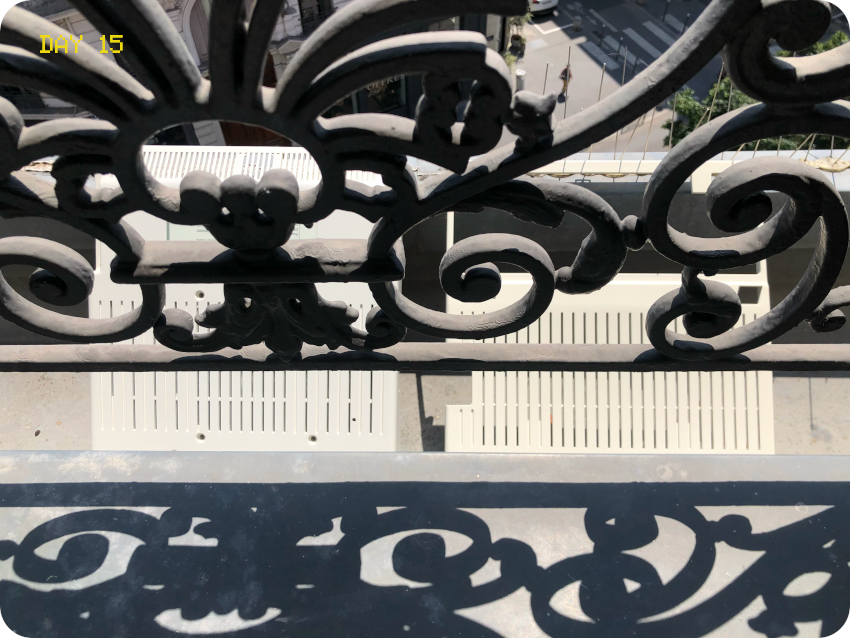
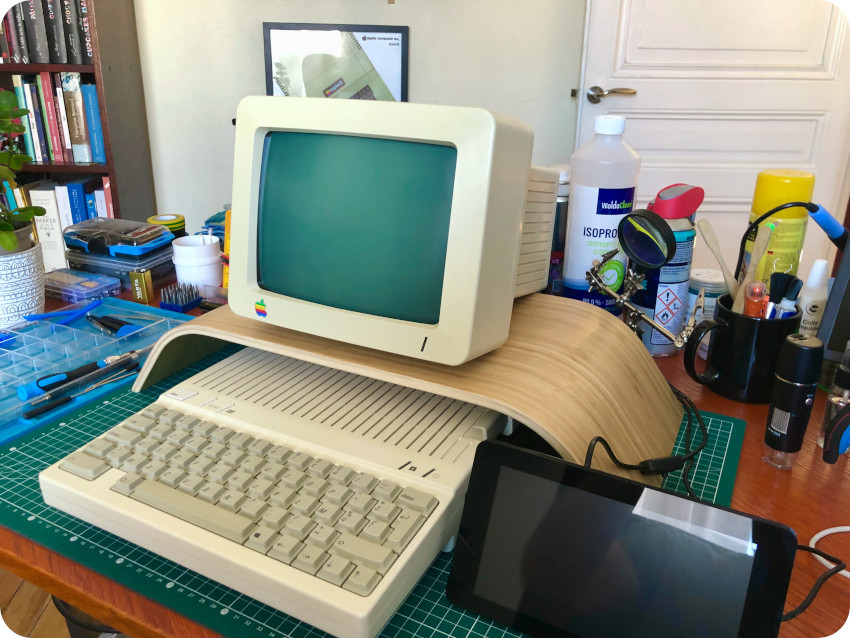
Alas, with the front bezel on, it appeared more clearly that the image was still a bit crooked (though less than it was originally), so I had to re-adjust the yoke accordingly. Here is the results, with the monitor with its front bezel sitting on an IKEA “SIGFINN” bamboo stand:
It took 5 more days for the rest of the monitor parts to reach a decent color. Here is the result :
There still a yellowish hue on the monitor, but given the almost orange color from where it started, I think it is not a bad result with no chemical.
Books and guides
Let’s take a look at the books and guides that were bundled with this Apple IIc. The first one is “Travaux Pratiques Applesoft pour Apple IIe seulement” (Applesoft Tutorial for IIe Only). It is kind of curious for an Apple IIc lot, but … well that’s the way it is !
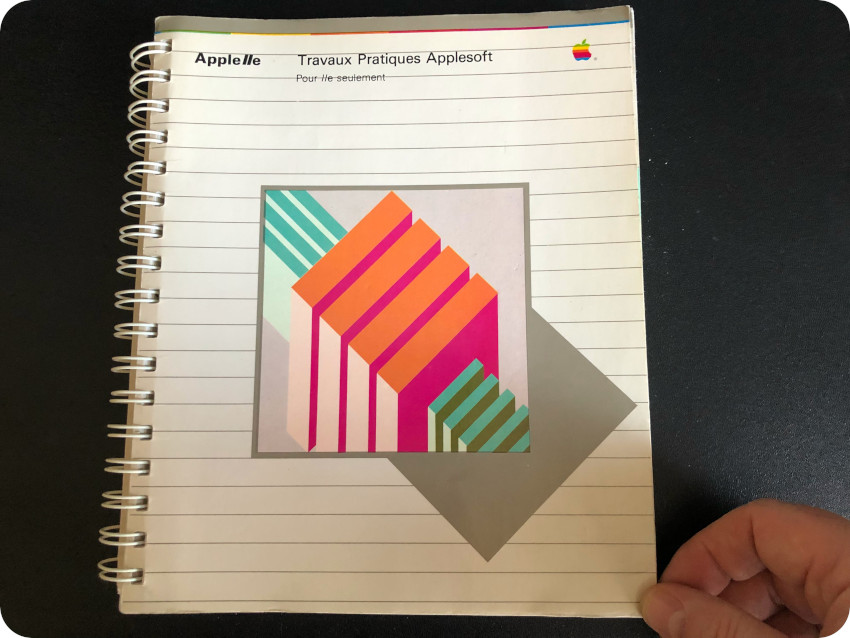
It is in decent conditions: the cover had suffered just a little bit. It had a few scuff marks that could be easily removed. But the spiral binding and the content are in excellent conditions.
Note: this book is already preserved here: https://archive.org/details/Travaux_Pratiques_Applesoft_French
The next one is: “ImageWriter II: Manuel de l’Utilisateur” (ImageWriter II Owner’s Manual):
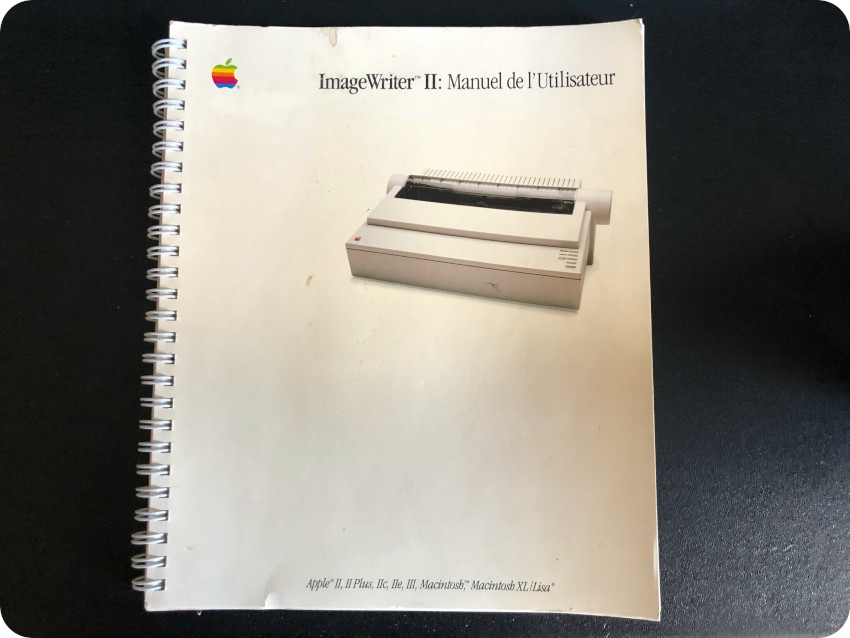
Just like the first book, it is a bit curious, because there were no printer in the lot. The cover is in okay-ish shape, but the binder and content are nearly perfect:
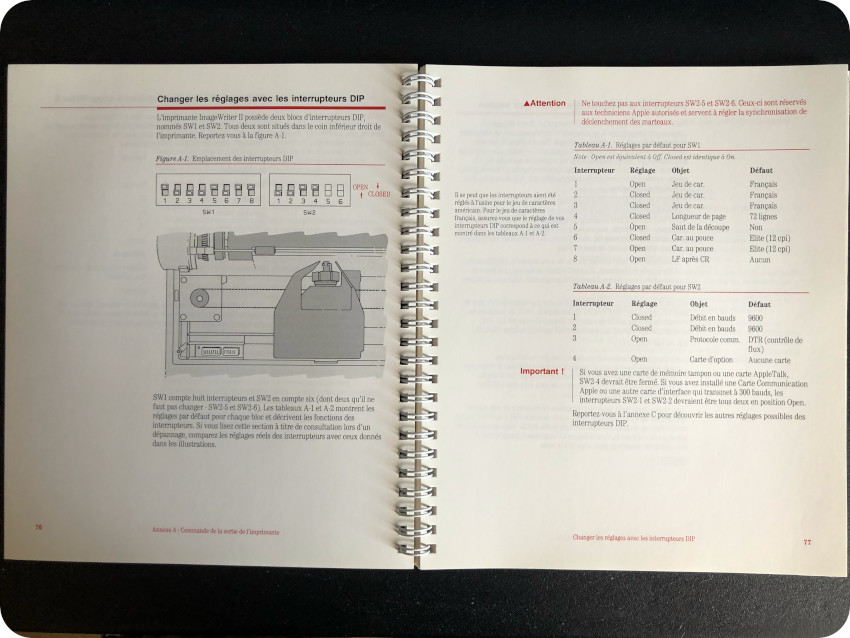
Note: surprisingly, I could only find the English version of this document preserved online, but not this French version. I will try to scan it and archive it online.
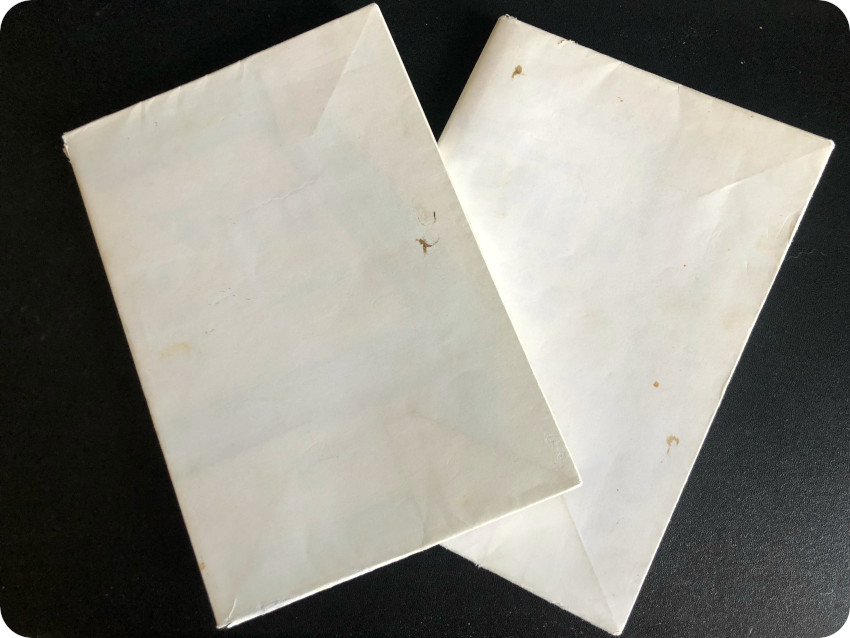
The next books were a bit of a mystery, since they were paper protected:
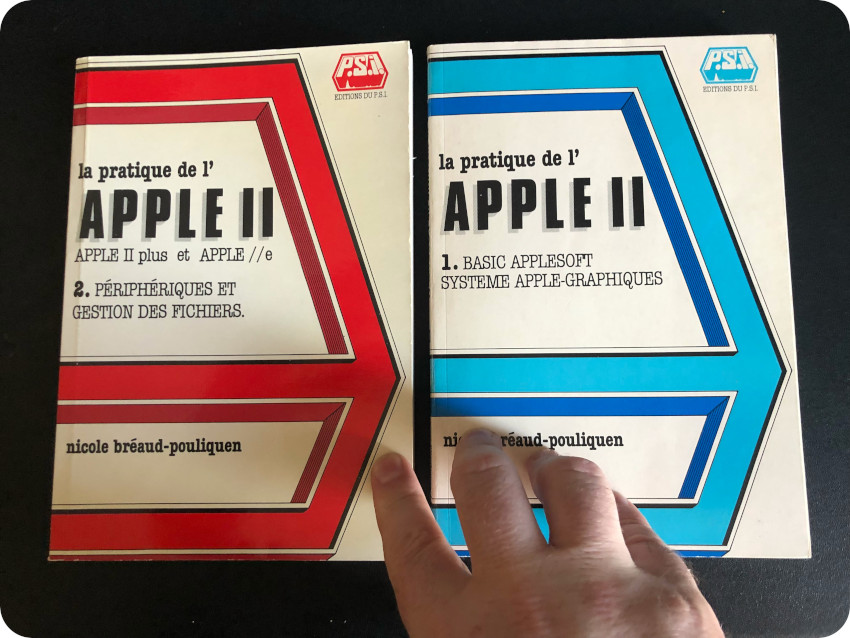
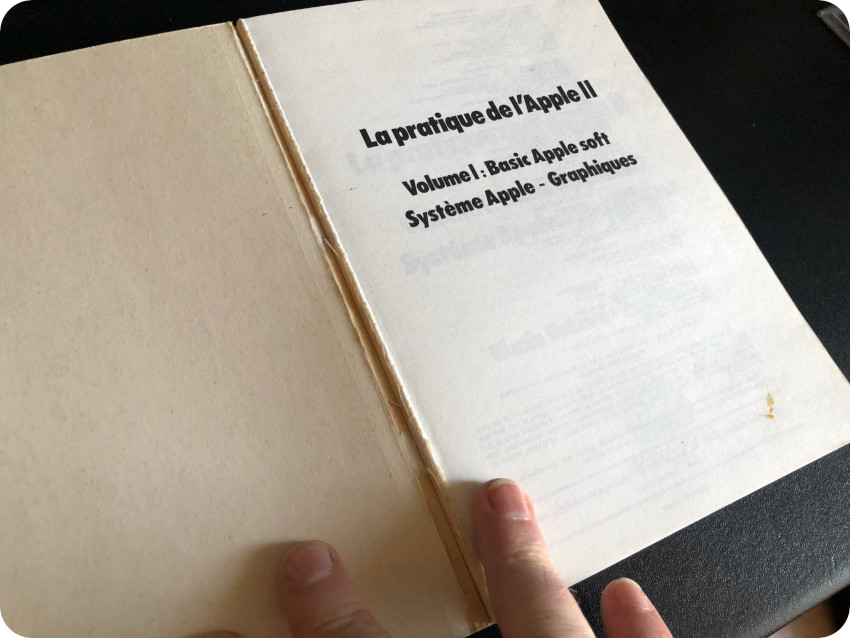
It appeared these books were first two volumes of “La pratique de l’Apple II” (Practical Apple II) series of books by Nicole Bréaud-Pouliquen:
- Volume 1 – BASIC Applesoft / Système Apple-graphiques (Applesoft BASIC / Apple Graphic System)
- Volume 2 – Périphériques et Gestion des Fichiers (Peripherals and File Management)
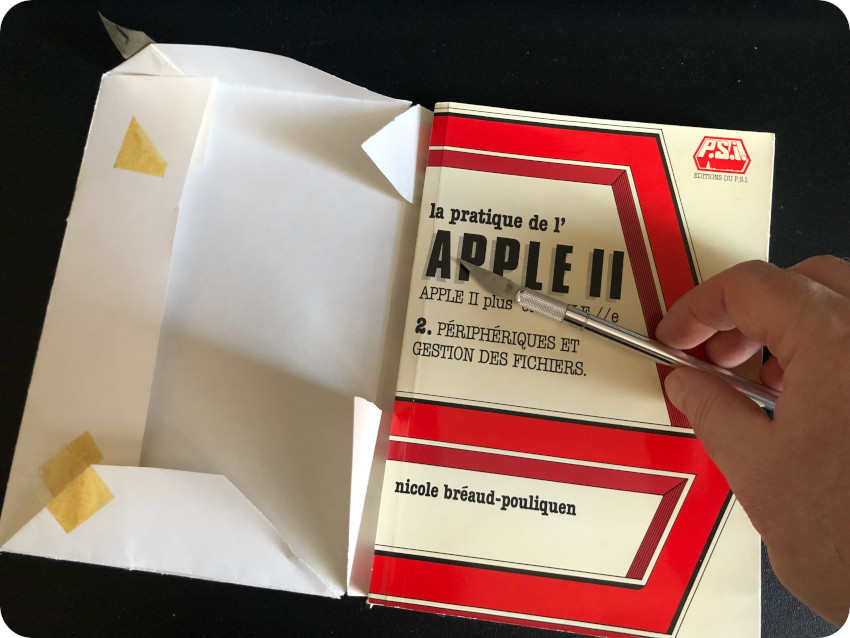
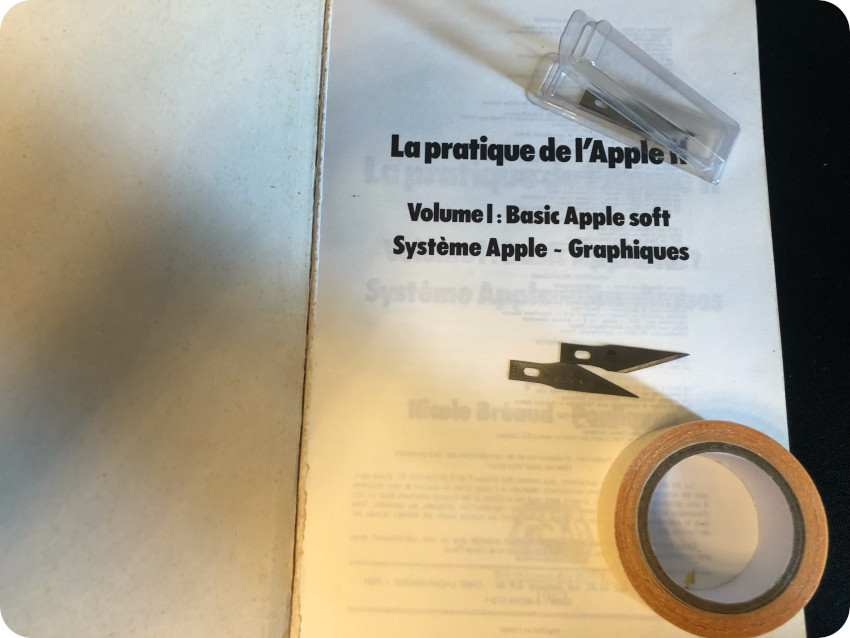
They are in pretty good shape, although I had to work a bit on the binding of the first volume which was a teared apart:
I consolidated the binding of the book with a thin layer of double sided sticky tape:
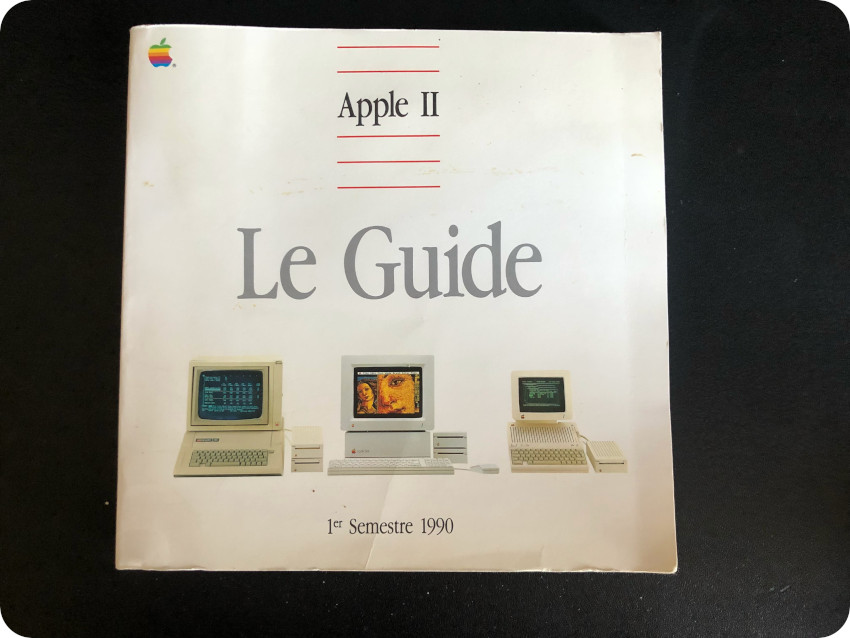
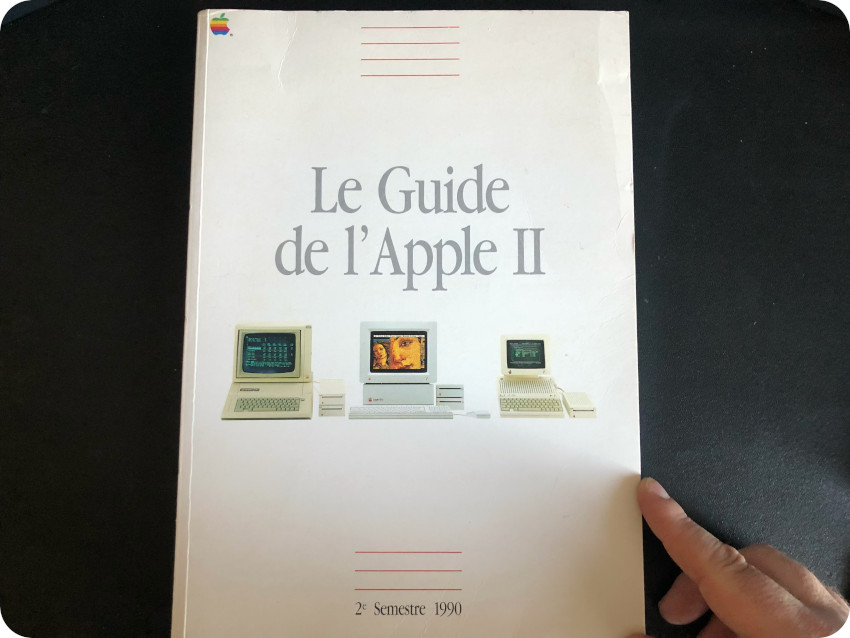
The last three ones are editions of “Le Guide Apple II” (The Apple II Guide), for the 2nd semester of 1989, 1st semester of 1990 and 2nd semester of 1990:
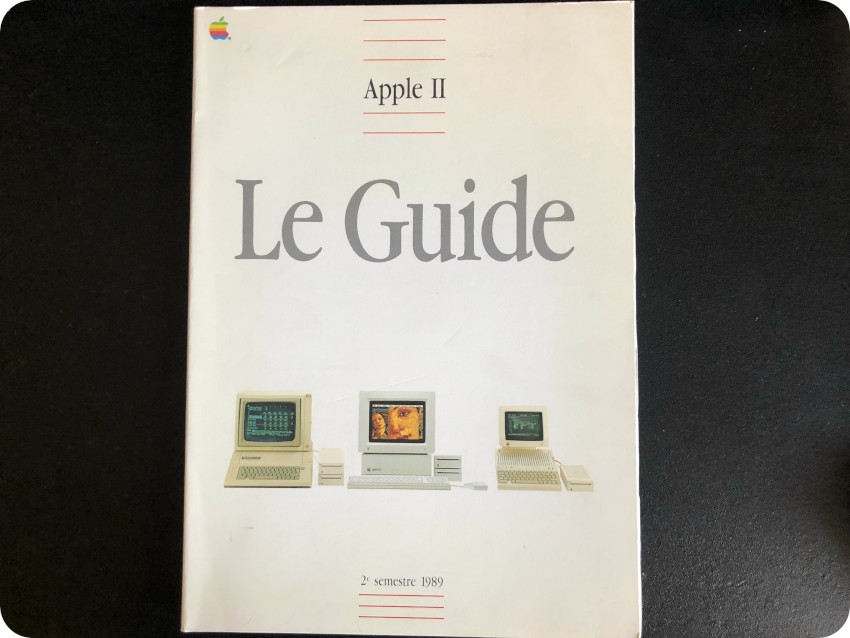
From a letter that was kept inside the first one, these guides were distributed free of charge by the French “Apple II Service Team“:
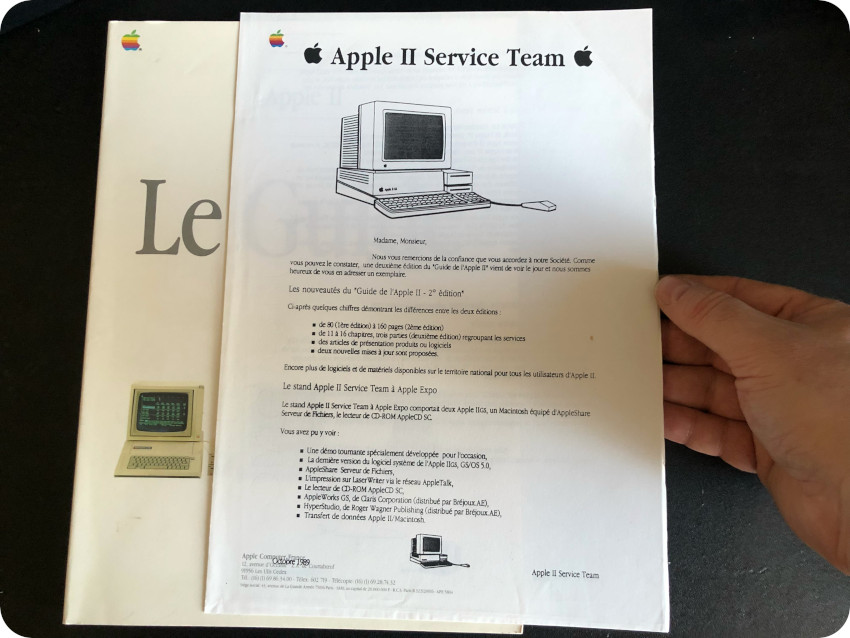
The only mentions I could find about these guides were in the “GS Infos” French magazine – editions #10 and #13, see here: http://www.apple-iigs.info/revuegsinfo.php – that was distributed on diskettes for the Apple IIGS. I read these two editions thanks to the GSplus emulator:
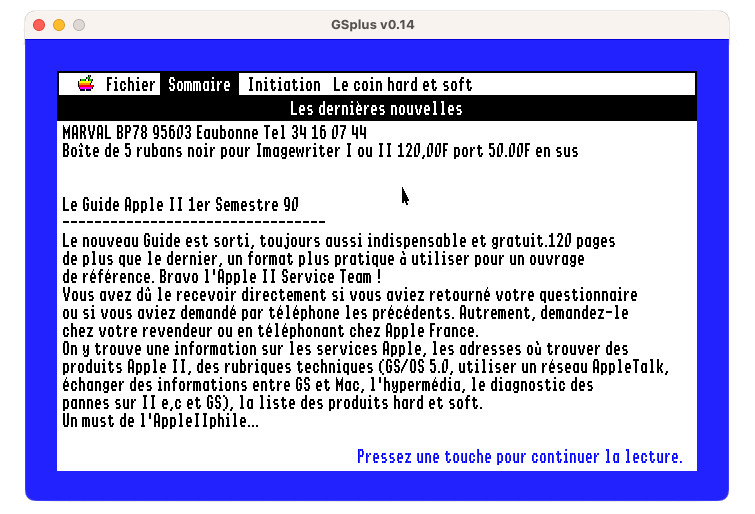
Note: it basically says that the new version of the guide (1st semester of 90) is out, kudos the Apple II Service Team, details a few of its topics and concludes saying this is a must have for all Apple II lovers]
These seems to be the French version of the “Apple II Guide“. See for example the Fall 1990 edition on archive.org:
Here are the other two ones:
These are quite thick guides, the biggest one being almost 300 pages. They cover a wide variety of topics. As an example, here is the table of contents of the 2nd semester 1990 edition:
- Apple and the Apple II: Letter from John Sculley and a timeline of the Apple II from March 1976 to April 1990
- Technical Information: fundamentals, hardware, operating systems, a focus on the Apple IIGS, hypermedia
- Communication strategies: networking, telecommunication via phones, data exchange, bootstrapping an Apple IIGS from AppleShare
- Troubleshooting: Apple IIe, Apple IIc, Apple IIGS diagnostics
- Products: Apple II computers, extensions cards, storage peripherals, printers, monitors, keyboards and joysticks, communication peripherals, Apple II updates, software for the Apple IIe/IIc, software for the Apple IIGS, products for the Apple II, news for the Apple IIGS, professional services
- Apple sales, services and support: dealers, how to get informed
- Information resources: French Apple User Group, magazines, books and technical publications, …
I could not find any preserved version of these French guides online. I will try to find a proper tool to scan them and make them available to the community. I asked on various forums if anybody had more information on these guides, but (so far), no luck.
Wrapping things up
Let’s wrap things up ! The properly store the floppy disks, I needed first to clean the box thoroughly, starting with removing the old stickers:
Then giving the storage box a well deserved bath:
And there we go, a proper storage box to preserve these disks as long as possible !
Next steps
All in all, it took me about 2 months. I actually knew very little about the Apple IIc when I started this project. It gave me the opportunity to experiment and learn so many things. As always, I am indebted to the vintage computing community !
There are still a few things I want to tackle soon:
- Experimenting with ADTPro Virtual Drives (VDRIVE),
- Finding an Apple II joystick (unfortunately, they are often insanely priced),
- Scanning the 3 “Apple II Guides”, as well as the French edition of the “ImageWriter II Owner’s Manual” and archive them online.
And then, of course, the next step will be finding another vintage computer (TI 994/A, Commodore 64, Amiga 500, Thomson MO5, …) to work on, experiment and learn.
Acknowledgments and links
Communities and dedicated web sites:
- Apple Logic: http://www.applelogic.org
- Apple2 Online: https://apple2online.com
- Software: https://mirrors.apple2.org.za/ftp.apple.asimov.net/images/
- Software & documentation (french): https://www.brutaldeluxe.fr/products/france/
- Apple Disk Transfer ProdDOS: https://adtpro.com
- System.cfg Forum (8bits topic): https://forum.system-cfg.com/viewforum.php?f=1 (French)
- Call A.P.P.L.E : https://www.callapple.org/
YouTubers:
- Adrian’s Digital Basement: https://www.youtube.com/c/adriansdigitalbasement
- Mr Lurch’s Things: https://www.youtube.com/c/MrLurchsThings
- The Retro Channel: https://www.youtube.com/@TheRetroChannel
- Rodrik Studio: https://www.youtube.com/c/RodrikStudio (French)
- GalaMoon Retrogaming: https://www.youtube.com/channel/UCHoSrYaPSHUIMXoXH3bRRbQ (French)
Manuals, Books & Schematics:
- The Apple IIc Reference Manual (volume 1): http://www.applelogic.org/files/IICREFV1.pdf
- The Apple IIc Reference Manual (volume 2): http://www.applelogic.org/files/IICREFV2.pdf
- Monitor IIc, User’s Manual: https://apple2online.com/wp-content/uploads/Apple-Monitor-IIc-Users-Manual-KB.pdf
- Setting Up Your Apple IIc; https://apple2online.com/wp-content/uploads/Setting-Up-Your-Apple-IIc-Manual.pdf
- Apple IIc Repair Info: https://apple2online.com/wp-content/uploads/Apple-Repair-IIc-1988.pdf
- Apple IIc schematics: http://www.applelogic.org/files/IICSCHEMATIC.pdf
Thank you for the comprehensive run through of the Apple IIc and your restoration. Well done!
Fascinating traversal! I’m amazed your Samsung LCD TV can handle the vintage SCART signal so well. And your mini LCD even manages to sync (somewhat) to the off-spec NTSC of the European //c for funky colors! The rare French Apple II Guide is actually the forerunner of the English editions it would seem
I have just got a IIc as a companion to my dad’s IIe Platinum and we have recovered a batch of 5.25″ floppies… I created a small set of floppy labels, but yours are a very interesting one because you also created the sleeves.. I was wondering if you could share them 🙂 cheers and congrats on your beautiful IIc project, mine is due a retrobright next brazilian summer 😛
Fred, you did not mention how to Remove or Reinstall the SPEAKER. I pried out mine with a tiny flathead screwdriver nearest the top tab, but how did you get your speaker back in without breaking any of the 3 tabs?
Sorry to be sooo long to answer !! I actually did the same, using a plastic pry tools (one of those from ifixit) very very gently. Fortunately the tabs were not brittle and none of them broke off. But It gave me a bit of cold sweat ! (btw, I love your youtube videos)
Nice and thorough writing. Which LCD-monitor do you have connected to the computer?
Oh, this is a very basic 8″ 4:3 (1024×768) PUSOKEI industrial LCD, with VGA, BNC and Composite inputs (bought on Amazon 2-3 years ago, not sure it is still available)