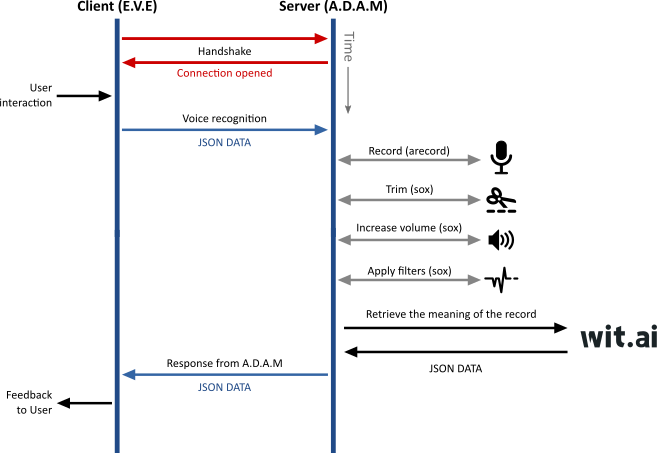
Now that enough progress has been made on E.V.E touch-enabled interface, and since we added a websocket-enabled general purpose middleware (A.D.A.M) to handle local hardware and proxy HTTP requests, we can now tackle voice recognition.
The audio sub-system
The audio sub-system is probably the weakest point of Raspberry Pi. Without extension (such an USB audio sub-system), only two audio output modes are available: HDMI and headphone jack.
The HDMI audio output is pretty good. But E.V.E’s touchscreen uses a DSI connector, and doesn’t have any speaker. The headphone jack output is thus the only way to go without adding an extra component. There are different ways to switch from HDMI output to analogue (jack). You can either launch raspi-config and select the proper option, or use this simple command:
amixer cset numid=3 1
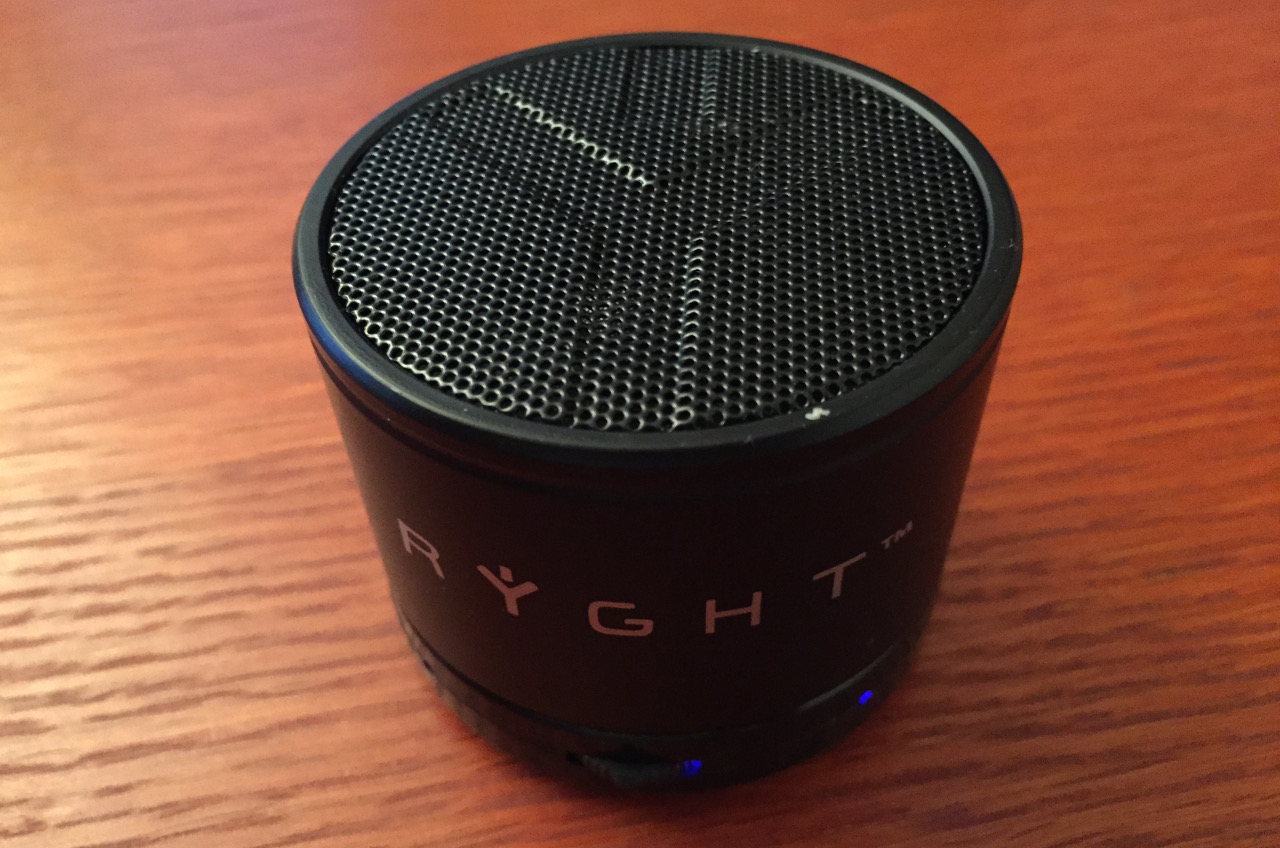
Of course, you’ll have to provide a speaker. I found a nice little black speaker for 9.90 € at a local general store. It is USB-powered, and can run on batteries two. It doesn’t draw much power, so I can hook it up on a free USB socket from the Raspberry Pi without any trouble.
The analogue audio output is not great on RPi’s. There is a very small but constant “hissss” sound coming out of the speaker. I upgraded the RPi’s firmware (rpi-upgrade). It got a little better, but it was still there. I’ll have to pump the speaker volume down a bit. I’ll investigate this later, but I’m not sure there is anything I can do about it.
The input audio is another business : RPi’s doesn’t have an audio input, so you’ll have to either use I2S via the IO pins or a USB device. I didn’t want a full USB Audio device. It might draw too much current for E.V.E (since the RPi powers the touchscreen in my configuration).
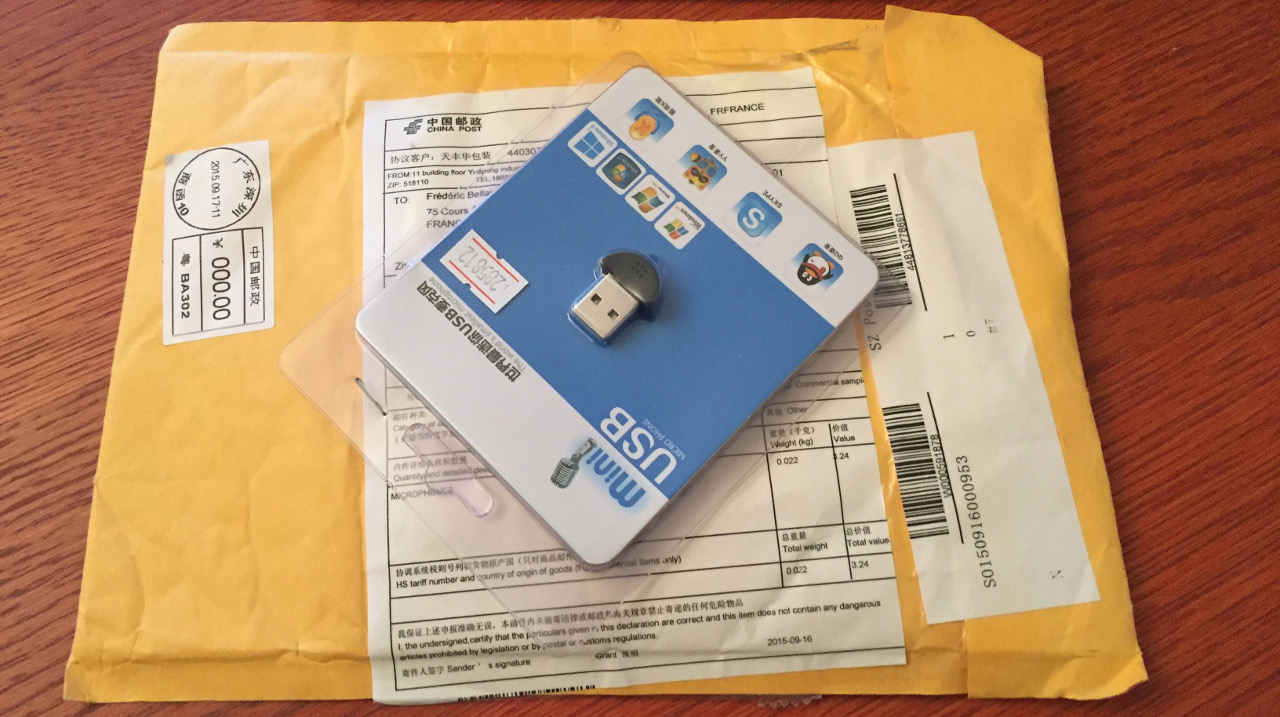
I searched for small USB microphones, and I found a couple of them on www.dx.com (a Chinese re-seller I was introduced to by a colleague. Hello J-P !).
I wasn’t that sure they would work on RPi’s, but they were dirt cheap (and shipping to France is free):
- The first one is a tiny USB microphone (supposedly the world’s smallest USB 2.0 microphone) – 2.89 €
- The second one is a little bigger, but might give better results – 5.33 €
It was so cheap, I tool the leap. It took about 3 weeks for the first one to be delivered (the second was shipped a week later, and should be delivered soon).
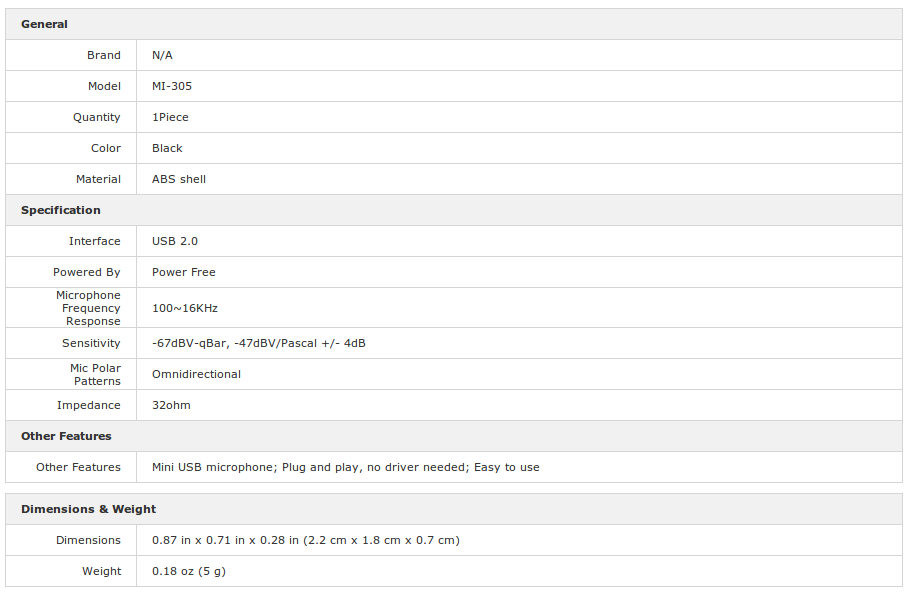
The mini UBS microphone is really a liiiiiittle fellow:
Its specifications are not exceptional, but should be enough to record voice:
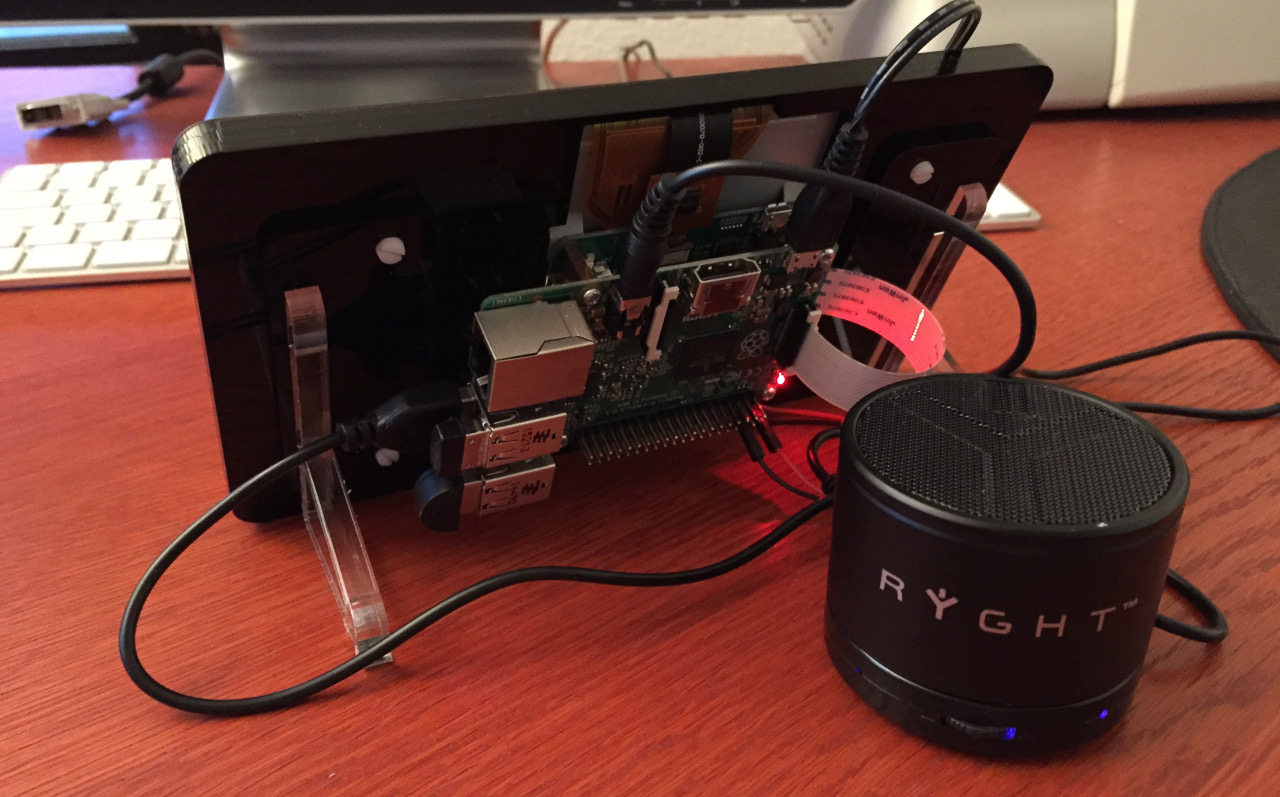
Here is a picture of the analogue speaker and the mini USB microphone connected to the back of E.V.E :
Testing the tiny USB Microphone
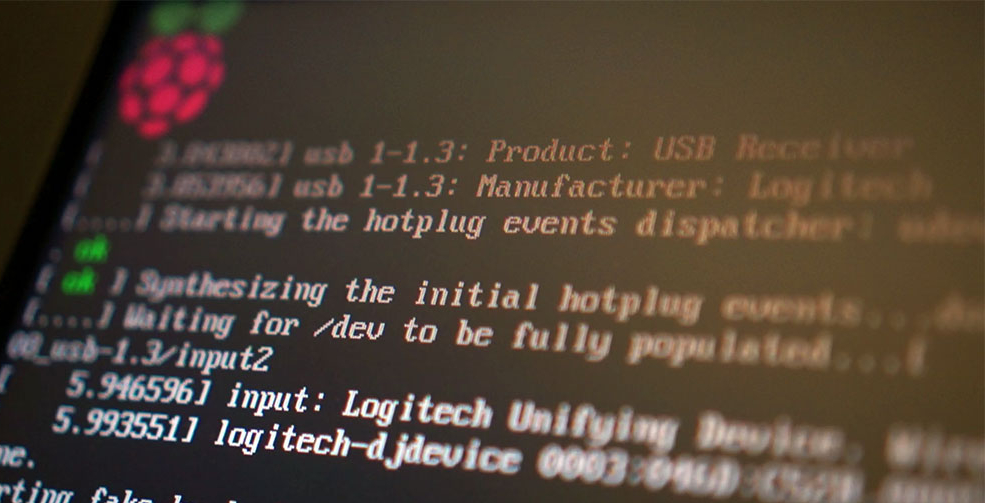
I booted up E.V.E and checked the system logs (dmesg) to see it the USB microphone would be recognized:
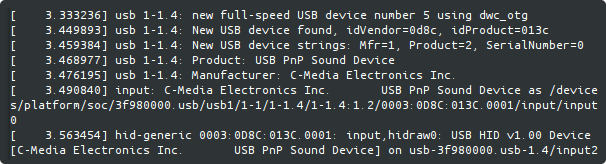
I was happily surprised to see it recognized as a C-Media USB PnP Sound Device, using a generic HID interface. Cool : HID interface means I probably won’t need any specific driver.
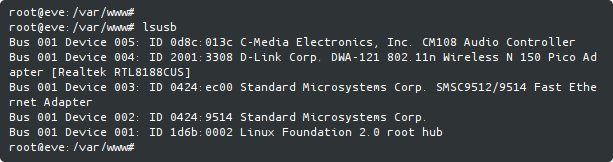
Running lsub command confirmed it was recognized :
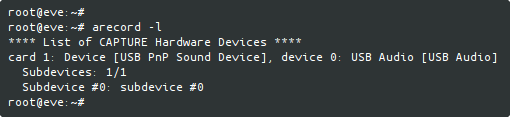
Then I used arecord to find out if it was also recognized by ALSA, and to check out its card number and sub-device id:
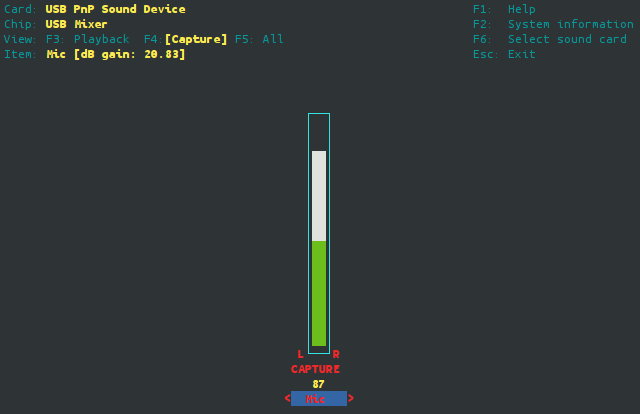
I launched alsamixer -c 1 and pumped up the microphone gain:
Voice recording with arecord
Now that I knew the USB microphone card number (#1), I tried to capture a first record. On my main workstation, I used Google’s text-to-speech service to translate “What time is it ?” into voice (female, en_US). On the RPi, I used arecord, set to high quality (48000 Hz, 16 bits, stereo) :
arecord -D plughw:1 -f dat -r 48000 record.wav
I played it back on the RPi’s speaker. I could hear something, but it was rather weak and noisy. But it worked.
Filtering with sox
I scp‘ed the record.wav file to my workstation to study it a bit. I fired up audacity:

Indeed, the audio level was very weak, but I could hear “What time is it ?”, though not clearly enough for voice recognition.
Before recognition, it clearly need filtering. Sox is the “Swiss Army knife of sound processing”, and is available on RPi’s. First, I used sox to trim the silence;
sox record.wav trimmed.wav silence 1 0.1 0.1% reverse silence 1 0.1 0.1% reverse
It gave this:

Then, I used sox once again, to boost the volume up (applying a x 4 factor on the trimmed .wav record):
sox -v 4.0 trimmed.wav boosted.wav
It gave this:

I launched audacity and did a frequency analysis:
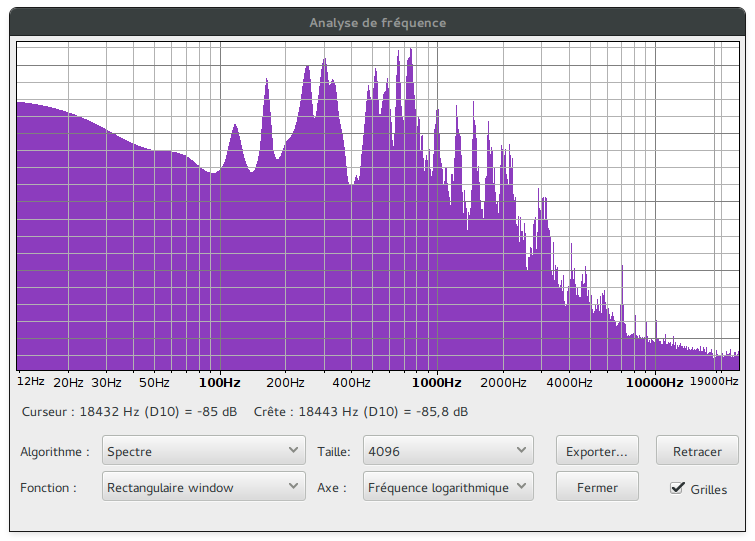
Judging by the spectrum, I applied a highpass and a lowpass filter, using sox one more time:
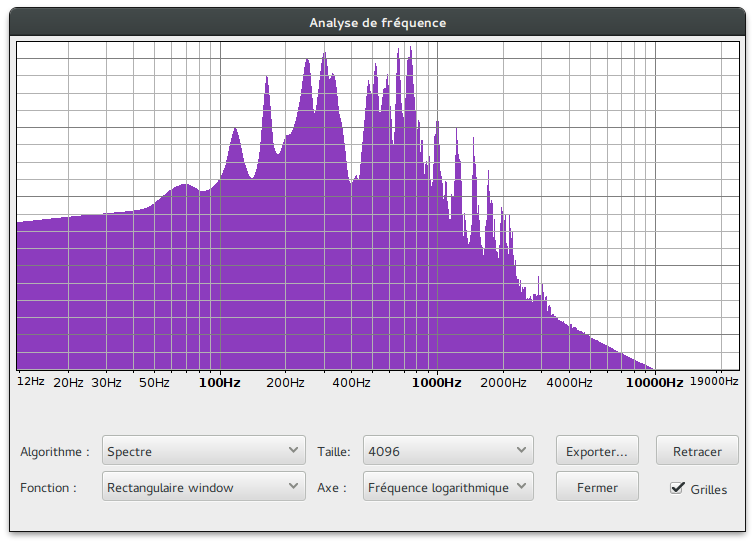
sox boosted.wav filtered.wav highpass 100 lowpass 1000
After these two filters, the frequency spectrum looked like this:
And the final filtered .wav record sounded good enough for me:

Voice recognition with wit.ai
wit.ai is a French start-up specialized in IoT and natural language. For 1.5 year, they built an open, community-based platform that makes it easy for developers to create intents and build apps that users can talk to to activate these intents:

Even though wit.ai was bought by Facebook (which I am not utterly fond of) in January 2015, the platform is very much alive and active.
I am not sure wit.ai will be my final choice for voice recognition. But it is easy to handle (though the documentation is sometimes scarce), particularly on the prototyping phase.
The first thing one has to do is to register (for free) to wit.ai and get an access token. wit.ai proposes several wrappers (C, Python, Ruby, Node.js, HTML5/JS, iOS, Android, …). I chose the HTTP API for testing purposes.
Once the speech is recorded and filtered, a simple HTTP request is enough (my access token is blurred):

And it gave me back this:
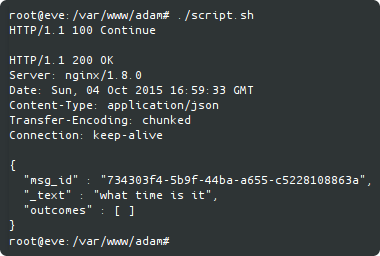
Great !
I now have a nice E.V.E / A.D.A.M / wit.ai workflow to implement: